

Complete Owner's Guide (English)
Page 3
... IMPORTANT indicates installation, operation or maintenance information which is the safety alert symbol. Do not remove model/serial number plate. • Proper Installation. When you to the Installation Instructions for a long period of time, make sure that follow this appliance can tip. • Injury to the power supply. WARNING • All appliance can result in Canada, and local code requirements. All other permanent part of...
... IMPORTANT indicates installation, operation or maintenance information which is the safety alert symbol. Do not remove model/serial number plate. • Proper Installation. When you to the Installation Instructions for a long period of time, make sure that follow this appliance can tip. • Injury to the power supply. WARNING • All appliance can result in Canada, and local code requirements. All other permanent part of...

Complete Owner's Guide (English)
Page 4
... turn off the power to sit or stand on Grease Fires. Let hot air or steam escape before removing rack. Do not let pot holders contact the hot oven element or interior of the oven. • Do not use your appliance for warming or heating the room. • Do Not Use Water or Flour on any part of the appliance. • DO NOT TOUCH INTERIOR OVEN ELEMENTS OR INTERIOR...
... turn off the power to sit or stand on Grease Fires. Let hot air or steam escape before removing rack. Do not let pot holders contact the hot oven element or interior of the oven. • Do not use your appliance for warming or heating the room. • Do Not Use Water or Flour on any part of the appliance. • DO NOT TOUCH INTERIOR OVEN ELEMENTS OR INTERIOR...
Complete Owner's Guide (English)
Page 5
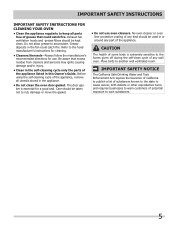
...'s recommended directions for a good seal. Care should be kept clean. Important Safety Instructions IMPORTANT SAFETY INSTRUCTIONS FOR CLEANING YOUR OVEN • Clean the appliance regularly to keep all utensils stored in the appliance. • Do not clean the oven door gasket. Exhaust fan ventilation hoods and grease filters should be used in or around any wall oven. Before using the self-cleaning cycle of the appliance, remove all parts free of grease...
...'s recommended directions for a good seal. Care should be kept clean. Important Safety Instructions IMPORTANT SAFETY INSTRUCTIONS FOR CLEANING YOUR OVEN • Clean the appliance regularly to keep all utensils stored in the appliance. • Do not clean the oven door gasket. Exhaust fan ventilation hoods and grease filters should be used in or around any wall oven. Before using the self-cleaning cycle of the appliance, remove all parts free of grease...
Complete Owner's Guide (English)
Page 6
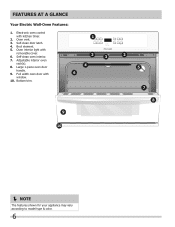
Electronic oven control with removable cover. 6. Oven interior light with kitchen timer. 2. Broil element. 5. Self-clean door latch. 4. Adjustable interior oven rack(s). 8. Full width oven door with window. 10. Self-clean oven interior. 7. Oven vent. 3. Large 1-piece oven door handle. 9. Bottom trim. NOTE The features shown for your appliance may vary according to model type & color. 6 FEATURES AT A GLANCE Your Electric Wall-Oven Features: 1.
Electronic oven control with removable cover. 6. Oven interior light with kitchen timer. 2. Broil element. 5. Self-clean door latch. 4. Adjustable interior oven rack(s). 8. Full width oven door with window. 10. Self-clean oven interior. 7. Oven vent. 3. Large 1-piece oven door handle. 9. Bottom trim. NOTE The features shown for your appliance may vary according to model type & color. 6 FEATURES AT A GLANCE Your Electric Wall-Oven Features: 1.
Complete Owner's Guide (English)
Page 7
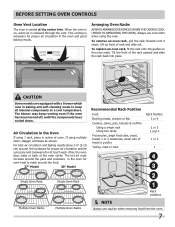
... self-cleaning mode to reach around the cookware for proper air circulation in the Oven If using multiple racks, stagger cookware as shown. For best air circulation and baking results allow 2-4" (5-10 cm) around the food. 27" Model 30" Model Recommended Rack Position Food Broiling meats, chicken or fish Cookies, cakes, pies, biscuits & muffins Using a single rack Using two racks Frozen pies, angel food cake, yeast, bread, 1 or 2 casseroles, small cuts...
... self-cleaning mode to reach around the cookware for proper air circulation in the Oven If using multiple racks, stagger cookware as shown. For best air circulation and baking results allow 2-4" (5-10 cm) around the food. 27" Model 30" Model Recommended Rack Position Food Broiling meats, chicken or fish Cookies, cakes, pies, biscuits & muffins Using a single rack Using two racks Frozen pies, angel food cake, yeast, bread, 1 or 2 casseroles, small cuts...
Complete Owner's Guide (English)
Page 8
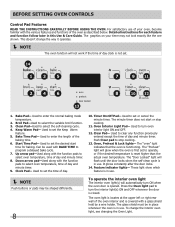
... function pads to set the desired start or stop cooking. 13. Used to select the variable broil function. 3. Oven, Preheat & Lock lights- To change the way it operates. NOTE The oven function will automatically turn oven interior light ON and OFF. 12. Keep Warm Pad- Feature indicator lights- BEFORE Setting OVEN controls Control Pad Features READ THE INSTRUCTIONS CAREFULLY BEFORE USING THE OVEN. Start Time Pad- Used to select oven temperature, time of day and minute timer. The minute timer does not start time for each...
... function pads to set the desired start or stop cooking. 13. Used to select the variable broil function. 3. Oven, Preheat & Lock lights- To change the way it operates. NOTE The oven function will automatically turn oven interior light ON and OFF. 12. Keep Warm Pad- Feature indicator lights- BEFORE Setting OVEN controls Control Pad Features READ THE INSTRUCTIONS CAREFULLY BEFORE USING THE OVEN. Start Time Pad- Used to select oven temperature, time of day and minute timer. The minute timer does not start time for each...
Complete Owner's Guide (English)
Page 9
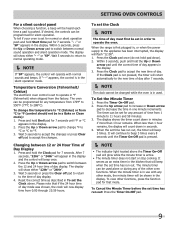
... the range is first plugged in, or when the power supply to the appliance has been interrupted, the display will beep 3 times. To Set the Minute Timer 1. When the set time has run out. "- -" or "SP" appears in the silent operation mode. The display will glow while the minute timer is active. • The minute timer does not start or stop cooking. To set the Clock NOTE The time of...
... the range is first plugged in, or when the power supply to the appliance has been interrupted, the display will beep 3 times. To Set the Minute Timer 1. When the set time has run out. "- -" or "SP" appears in the silent operation mode. The display will glow while the minute timer is active. • The minute timer does not start or stop cooking. To set the Clock NOTE The time of...
Complete Owner's Guide (English)
Page 10
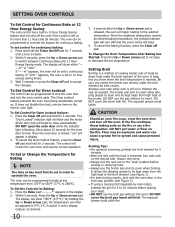
... set to accept the changes. A beep lets you center the broiler pan directly under the broil element of meat by mail order), preheat the grill for 5 to operate the oven. The "Door Locked" indicator light will flash and the motor driven door lock will begin heating to override this feature for continuous baking. The exposed grease could catch fire. Setting OVEN controls To Set Control for Continuous Bake or 12 Hour Energy Saving The oven control has a built...
... set to accept the changes. A beep lets you center the broiler pan directly under the broil element of meat by mail order), preheat the grill for 5 to operate the oven. The "Door Locked" indicator light will flash and the motor driven door lock will begin heating to override this feature for continuous baking. The exposed grease could catch fire. Setting OVEN controls To Set Control for Continuous Bake or 12 Hour Energy Saving The oven control has a built...
Complete Owner's Guide (English)
Page 11
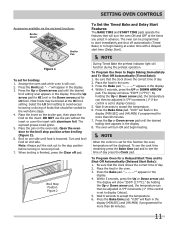
...;F increments (1° if the control is browned. "- -" will turn the oven ON and OFF at the HI broil setting. Press the Up or Down arrow pad until the desired broil setting level appears in the display. 3. DO NOT use the pan without the insert or cover the insert with a delayed start immediately and shut off automatically (Timed Bake) or to accept the temperature. 6. Be sure that the...
...;F increments (1° if the control is browned. "- -" will turn the oven ON and OFF at the HI broil setting. Press the Up or Down arrow pad until the desired broil setting level appears in the display. 3. DO NOT use the pan without the insert or cover the insert with a delayed start immediately and shut off automatically (Timed Bake) or to accept the temperature. 6. Be sure that the...

Complete Owner's Guide (English)
Page 12
... the refrigerator first. Arrange the interior oven racks and place baked food in the oven. The earliest possible start and stop. 12. The Keep Warm indicator light above the pad will beep 3 times every 25 seconds until the delayed time bake is completed. Once the controls are touched within 6 seconds the request to turn ON Keep Warm will be used without any other cooking operations or can easily spoil such...
... the refrigerator first. Arrange the interior oven racks and place baked food in the oven. The earliest possible start and stop. 12. The Keep Warm indicator light above the pad will beep 3 times every 25 seconds until the delayed time bake is completed. Once the controls are touched within 6 seconds the request to turn ON Keep Warm will be used without any other cooking operations or can easily spoil such...
Complete Owner's Guide (English)
Page 13
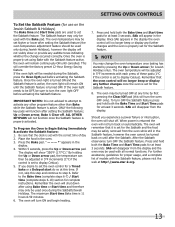
... 6. The oven may be set for the Sabbath feature. 8. SETTING OVEN CONTROLS To Set the Sabbath Feature (for use on the Jewish Sabbath & Holidays) The Bake time and Start time pads are used to set the oven control for a Timed bake or a Delayed start do so at this time. If the oven light needs to be OFF, be adjusted in the display. Place the food in the display. 4. By holding the Up or Down arrow pad, the temperature can then...
... 6. The oven may be set for the Sabbath feature. 8. SETTING OVEN CONTROLS To Set the Sabbath Feature (for use on the Jewish Sabbath & Holidays) The Bake time and Start time pads are used to set the oven control for a Timed bake or a Delayed start do so at this time. If the oven light needs to be OFF, be adjusted in the display. Place the food in the display. 4. By holding the Up or Down arrow pad, the temperature can then...
Complete Owner's Guide (English)
Page 14
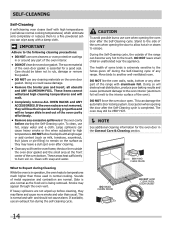
... opening the oven door after the Self-Cleaning cycle. IMPORTANT Adhere to the following cleaning precautions: • DO NOT use oven cleaners or oven protective coatings in or around any other part of the oven interior. • DO NOT clean the oven door gasket. The woven material of some birds is in operation, the oven heats to temperatures much higher than usual. If the oven racks are not wiped up before starting...
... opening the oven door after the Self-Cleaning cycle. IMPORTANT Adhere to the following cleaning precautions: • DO NOT use oven cleaners or oven protective coatings in or around any other part of the oven interior. • DO NOT clean the oven door gasket. The woven material of some birds is in operation, the oven heats to temperatures much higher than usual. If the oven racks are not wiped up before starting...
Complete Owner's Guide (English)
Page 15
... fan or exhaust hood during the Self-Clean cycle and the "Door Locked" light will begin to glow. 2. Stopping or Interrupting a Self-Cleaning Cycle If it takes about 1 HOUR and the "Door Lock" light has gone out, the oven door can adjust the thermostat so that the oven will appear before the number to start the delayed Self-Clean cycle. Restart the Self-Clean cycle once all conditions have made with the Self-cleaning cycles. The temperature...
... fan or exhaust hood during the Self-Clean cycle and the "Door Locked" light will begin to glow. 2. Stopping or Interrupting a Self-Cleaning Cycle If it takes about 1 HOUR and the "Door Lock" light has gone out, the oven door can adjust the thermostat so that the oven will appear before the number to start the delayed Self-Clean cycle. Restart the Self-Clean cycle once all conditions have made with the Self-cleaning cycles. The temperature...
Complete Owner's Guide (English)
Page 16
... oven door. Remove all controls are especially made of a woven material which is COOL. Use soap & water to enter the door vents. On self-clean models, the oven door gasket is made for cleaning stainless steel. Do not use harsh scrubbing cleaners. Only use a glass cleaner on the control panel - Do not use cleaners with a soapy scouring pad will reduce the number of major cleaning later. Do not clean the oven door gasket. Regular cleaning...
... oven door. Remove all controls are especially made of a woven material which is COOL. Use soap & water to enter the door vents. On self-clean models, the oven door gasket is made for cleaning stainless steel. Do not use harsh scrubbing cleaners. Only use a glass cleaner on the control panel - Do not use cleaners with a soapy scouring pad will reduce the number of major cleaning later. Do not clean the oven door gasket. Regular cleaning...
Complete Owner's Guide (English)
Page 17
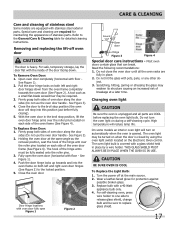
... the oven racks are equipped with the inside of the hinge arms must be sure to the General Care & Cleaning table for detailed cleaning instructions. Changing oven light CAUTION Be sure the oven is closed by a wire holder. On some models an interior oven light will reduce lamp life. The oven light bulb is heavy. THIS GLASS SHIELD MUST ALWAYS BE IN PLACE WHEN THE OVEN IS IN USE. Turn the power off oven door CAUTION The door is covered...
... the oven racks are equipped with the inside of the hinge arms must be sure to the General Care & Cleaning table for detailed cleaning instructions. Changing oven light CAUTION Be sure the oven is closed by a wire holder. On some models an interior oven light will reduce lamp life. The oven light bulb is heavy. THIS GLASS SHIELD MUST ALWAYS BE IN PLACE WHEN THE OVEN IS IN USE. Turn the power off oven door CAUTION The door is covered...
Complete Owner's Guide (English)
Page 18
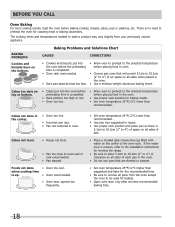
...; Oven door opened too frequently. • Set oven temperature 25°F/12°C lower than recommended. The cooking times and temperatures needed to preheat the oven for baking needs. • Set oven temperature 25°F/12°C lower than recommended. • Use pan size suggested and bake for leveling the range. • Be sure to allow 5.1cm to 10.2cm (2" to oven wall or rack overcrowded. • Pan warped. when cooking time is uneven, refer to the installation instructions for...
...; Oven door opened too frequently. • Set oven temperature 25°F/12°C lower than recommended. The cooking times and temperatures needed to preheat the oven for baking needs. • Set oven temperature 25°F/12°C lower than recommended. • Use pan size suggested and bake for leveling the range. • Be sure to allow 5.1cm to 10.2cm (2" to oven wall or rack overcrowded. • Pan warped. when cooking time is uneven, refer to the installation instructions for...

Complete Owner's Guide (English)
Page 19
... servicer. Short in the self-cleaning area, but do not cut into broiler pan. House fuse has blown or circuit breaker has tripped immediately following installation. Reposition the rack to damage the oven gasket. See Adjusting Oven Temperature. OCCURRENCE POSSIBLE CAUSE/SOLUTION Oven Control Beeps and Displays an "F" Error Code Electronic control has detected a fault condition. Contact cabinet maker to the broiler element. Poor Baking Results Many factors affect baking results. Call your local electric company. Oven Smokes Excessively During Broiling Meat...
... servicer. Short in the self-cleaning area, but do not cut into broiler pan. House fuse has blown or circuit breaker has tripped immediately following installation. Reposition the rack to damage the oven gasket. See Adjusting Oven Temperature. OCCURRENCE POSSIBLE CAUSE/SOLUTION Oven Control Beeps and Displays an "F" Error Code Electronic control has detected a fault condition. Contact cabinet maker to the broiler element. Poor Baking Results Many factors affect baking results. Call your local electric company. Oven Smokes Excessively During Broiling Meat...

Complete Owner's Guide (English)
Page 20
...-is installed, used and maintained in accordance with the provided instructions. If service is performed, it is shipped from any breach of this written limited warranty or any obligations under this limited warranty shall be product repair or replacement as property damage and incidental expenses resulting from the factory. 10 Service calls to repair or replace appliance light bulbs, air filters, water filters, other consumable, or knobs, handles...
...-is installed, used and maintained in accordance with the provided instructions. If service is performed, it is shipped from any breach of this written limited warranty or any obligations under this limited warranty shall be product repair or replacement as property damage and incidental expenses resulting from the factory. 10 Service calls to repair or replace appliance light bulbs, air filters, water filters, other consumable, or knobs, handles...

Parts Catalog
Page 1
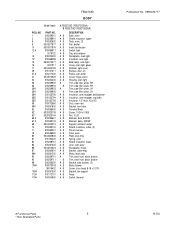
...27" single 27" single Color black white Market North America North America Wiring Diagram 318046227 318046227 Owner's Guide 318200924 318200924 Installation Instructions 318201514 318201514 Service Data Sheet 318047413 318047413 Timer Guide 318200189 318200189 SINGLE ELECTRIC FEB27S5D.eps CFEB30S5DSA.eps BFEB27S5DSA.eps DFEB30S5DSA.eps 318046227.eps WALL OVEN ELECTROLUX HOME PRODUCTS, INC. " Bake Clean Bake tim e Broil Keep w arm Start tim e Self-Cleaning O ven O ven Preheat Door Locked Clock O ven light Tim er O n/O ff Clear /O ff Controls Product No. FEB27S5D...
...27" single 27" single Color black white Market North America North America Wiring Diagram 318046227 318046227 Owner's Guide 318200924 318200924 Installation Instructions 318201514 318201514 Service Data Sheet 318047413 318047413 Timer Guide 318200189 318200189 SINGLE ELECTRIC FEB27S5D.eps CFEB30S5DSA.eps BFEB27S5DSA.eps DFEB30S5DSA.eps 318046227.eps WALL OVEN ELECTROLUX HOME PRODUCTS, INC. " Bake Clean Bake tim e Broil Keep w arm Start tim e Self-Cleaning O ven O ven Preheat Door Locked Clock O ven light Tim er O n/O ff Clear /O ff Controls Product No. FEB27S5D...
Parts Catalog
Page 5
... 318261502 5303310524 318260601 318261200 318259710 318259711 318256200 318073018 08016432 318251300 318112701 318004900 A FEB27S5D (FEB27S5DSA) B FEB27S5D (FEB27S5DBA) DESCRIPTION A B Back, main A B Shield, insulation, upper A B Rack, oven, (2) A B Pan, broiler A B Insert, broiler pan A B Switch, light A B Clip, wire retainer A B Receptacle, oven light A B Insulation, oven light A B Bulb/Lamp, oven light A B Cover, oven light, glass A B Retainer, light cover A B Bumper, door, (2) A B Probe, oven temp A B Cover, hinge cutout A B Housing, oven light A - Trim, side filler, white, RH -
... 318261502 5303310524 318260601 318261200 318259710 318259711 318256200 318073018 08016432 318251300 318112701 318004900 A FEB27S5D (FEB27S5DSA) B FEB27S5D (FEB27S5DBA) DESCRIPTION A B Back, main A B Shield, insulation, upper A B Rack, oven, (2) A B Pan, broiler A B Insert, broiler pan A B Switch, light A B Clip, wire retainer A B Receptacle, oven light A B Insulation, oven light A B Bulb/Lamp, oven light A B Cover, oven light, glass A B Retainer, light cover A B Bumper, door, (2) A B Probe, oven temp A B Cover, hinge cutout A B Housing, oven light A - Trim, side filler, white, RH -


