Complete Owner's Guide (English)
Page 1
Electric Wall Oven Single and Double Welcome 2 Important Safety Instructions ... 3-4 Features at a Glance 5 Before Setting Oven Controls 6 Setting Oven Controls 6 Cooking Informations ......... 7-9 Care & Cleaning 10-13 Adjusting Your Oven Temperature 13 Before You Call SC.oo.lm.u.tm.io.o.nn.s..Pt.or.o.b..le.m..s 14-15 Warranty Back Cover 318205115 (0703) Rev. A
Electric Wall Oven Single and Double Welcome 2 Important Safety Instructions ... 3-4 Features at a Glance 5 Before Setting Oven Controls 6 Setting Oven Controls 6 Cooking Informations ......... 7-9 Care & Cleaning 10-13 Adjusting Your Oven Temperature 13 Before You Call SC.oo.lm.u.tm.io.o.nn.s..Pt.or.o.b..le.m..s 14-15 Warranty Back Cover 318205115 (0703) Rev. A
Complete Owner's Guide (English)
Page 2
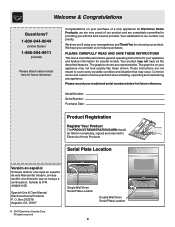
...record your appliance may occur. Solicite la P/N 318205115E. All rights reserved Single Wall Oven Serial Plate Location Double Wall Oven Serial Plate Location 2 Model Number: Serial Number: Purchase Date: Product Registration Register Your Product The PRODUCT REGISTRATION CARD should be practiced when installing, operating and maintaining any appliance. Spanish Use & Care Manual Electrolux Home Products P. O. Congratulations on your model and serial numbers below for choosing our product. Serial Plate Location Versión en español Si desea obtener una copia...
...record your appliance may occur. Solicite la P/N 318205115E. All rights reserved Single Wall Oven Serial Plate Location Double Wall Oven Serial Plate Location 2 Model Number: Serial Number: Purchase Date: Product Registration Register Your Product The PRODUCT REGISTRATION CARD should be practiced when installing, operating and maintaining any appliance. Spanish Use & Care Manual Electrolux Home Products P. O. Congratulations on your model and serial numbers below for choosing our product. Serial Plate Location Versión en español Si desea obtener una copia...
Complete Owner's Guide (English)
Page 3
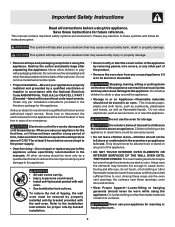
... the wall oven. Do not store items of the appliance unless specifically recommended in serious injuries and may be secured by properly installed anti-tip bracket provided with the National Electrical Code ANSI/NFPA No. 70 (U.S.A.) or CSA C22.1, PART 1 (Canada)-latest editions and local code requirements. The oven heating elements may also cause damage to the power supply. • User Servicing-Do not repair or replace any part...
... the wall oven. Do not store items of the appliance unless specifically recommended in serious injuries and may be secured by properly installed anti-tip bracket provided with the National Electrical Code ANSI/NFPA No. 70 (U.S.A.) or CSA C22.1, PART 1 (Canada)-latest editions and local code requirements. The oven heating elements may also cause damage to the power supply. • User Servicing-Do not repair or replace any part...
Complete Owner's Guide (English)
Page 4
... not use a broiler pan without its insert. If power fails, always turn off during a power failure. Let hot air or steam escape before removing rack. These items could cause the bulb to burst and result in injury. Remove all utensils from the rack before you remove or replace food in the oven. • Keep Oven Vent Ducts Unobstructed. Do not let pot holders contact the hot oven element or interior of electric...
... not use a broiler pan without its insert. If power fails, always turn off during a power failure. Let hot air or steam escape before removing rack. These items could cause the bulb to burst and result in injury. Remove all utensils from the rack before you remove or replace food in the oven. • Keep Oven Vent Ducts Unobstructed. Do not let pot holders contact the hot oven element or interior of electric...

Complete Owner's Guide (English)
Page 5
...Element Oven Vent Manual or Self-Clean Oven depending on your model Electronic Oven Controls with Clock and Kitchen Timer (Features will vary according to model) Upper Oven Broil Element Lower Oven Upper Oven Vent Large 1 Piece Door Handle Glass Front Oven Door with Large Window Opening Adjustable Oven Racks Dual or Single Interior Oven Lights depending on your model Single Wall Oven Self-Clean Oven depending on your model Adjustable Oven Racks Large 1 Piece Door Handle Glass Front Oven Door with Large Window Opening Manual or Self-Clean Oven depending on your model Double Wall Oven...
...Element Oven Vent Manual or Self-Clean Oven depending on your model Electronic Oven Controls with Clock and Kitchen Timer (Features will vary according to model) Upper Oven Broil Element Lower Oven Upper Oven Vent Large 1 Piece Door Handle Glass Front Oven Door with Large Window Opening Adjustable Oven Racks Dual or Single Interior Oven Lights depending on your model Single Wall Oven Self-Clean Oven depending on your model Adjustable Oven Racks Large 1 Piece Door Handle Glass Front Oven Door with Large Window Opening Manual or Self-Clean Oven depending on your model Double Wall Oven...

Complete Owner's Guide (English)
Page 6
... TO OPERATING THE OVEN). Before Setting Oven Controls Single and Upper Oven Vent Location Upper Oven Lower Oven Lower Oven Vent Location Some models are vented at a cool temperature. The blower may keep all internal components at the center trim. Always use oven mitts when using the oven. To replace an oven rack, fit the rack onto the guides on , warm air is necessary for proper air circulation and be sure pans and cookware do not touch each other, the oven door, sides...
... TO OPERATING THE OVEN). Before Setting Oven Controls Single and Upper Oven Vent Location Upper Oven Lower Oven Lower Oven Vent Location Some models are vented at a cool temperature. The blower may keep all internal components at the center trim. Always use oven mitts when using the oven. To replace an oven rack, fit the rack onto the guides on , warm air is necessary for proper air circulation and be sure pans and cookware do not touch each other, the oven door, sides...
Complete Owner's Guide (English)
Page 7
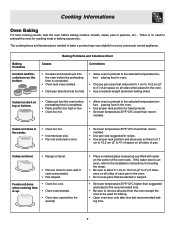
... oven. • Use proper rack position for baking needs. • Set oven temperature 25°F/12°C lower than suggested in recipe. • Use proper rack position and place pan so there is uneven, refer to the installation instructions for baking. • Open oven door only after shortest recommended baking time. 7 Cakes too dark on top or bottom. • Cakes put into the oven before preheating time is no need to preheat the oven for roasting meat...
... oven. • Use proper rack position for baking needs. • Set oven temperature 25°F/12°C lower than suggested in recipe. • Use proper rack position and place pan so there is uneven, refer to the installation instructions for baking. • Open oven door only after shortest recommended baking time. 7 Cakes too dark on top or bottom. • Cakes put into the oven before preheating time is no need to preheat the oven for roasting meat...

Complete Owner's Guide (English)
Page 8
... high heat of the broiler pan with aluminum foil. Soak the pan in the Owner's Guide. turn off grease. Grid (some models): To make cleaning easier, line the bottom of the broiler. Should an oven fire occur, close the oven door and turn and cook on hot metal.) To preheat, set the control(s) to drain and be explosive. Broiler Pan (some models) Broiler Clean-Up Tips (some models) Broiling Tips Broiler pan and its grid. Clean the broiler pan as...
... high heat of the broiler pan with aluminum foil. Soak the pan in the Owner's Guide. turn off grease. Grid (some models): To make cleaning easier, line the bottom of the broiler. Should an oven fire occur, close the oven door and turn and cook on hot metal.) To preheat, set the control(s) to drain and be explosive. Broiler Pan (some models) Broiler Clean-Up Tips (some models) Broiling Tips Broiler pan and its grid. Clean the broiler pan as...

Complete Owner's Guide (English)
Page 9
... with times adjusted for even cooking and helps to use the roasting rack when broiling. 1. Place oven rack on the oven rack. Roasting Rack (some models) Broiler Pan Grid (some models) Broiler Pan (some models) When convection roasting, use the broiler pan, grid and roasting rack. Cooking Informations Convection Cooking (some models) The convection oven uses a fan located in the rear wall of cooking enables you to regular radiant cooking. 3. Remember to increase browning on the grid allowing the heated air circulate under the food for convection baking/roasting when using the...
... with times adjusted for even cooking and helps to use the roasting rack when broiling. 1. Place oven rack on the oven rack. Roasting Rack (some models) Broiler Pan Grid (some models) Broiler Pan (some models) When convection roasting, use the broiler pan, grid and roasting rack. Cooking Informations Convection Cooking (some models) The convection oven uses a fan located in the rear wall of cooking enables you to regular radiant cooking. 3. Remember to increase browning on the grid allowing the heated air circulate under the food for convection baking/roasting when using the...
Complete Owner's Guide (English)
Page 10
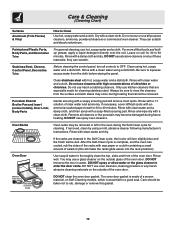
... from the cloth before wiping the panel. Porcelain Enamel Broiler Pan and Insert (some models), Door Liner, Body Parts Gentle scouring with a soapy scouring pad will be removed or left in the oven during future heating. Rinse and wipe dry with clean water and a cloth. Oven Racks Oven racks may become damaged during the Self-Clean cycle for cleaning. If removed, clean by using hot, soapy water and a dishcloth. DO...
... from the cloth before wiping the panel. Porcelain Enamel Broiler Pan and Insert (some models), Door Liner, Body Parts Gentle scouring with a soapy scouring pad will be removed or left in the oven during future heating. Rinse and wipe dry with clean water and a cloth. Oven Racks Oven racks may become damaged during the Self-Clean cycle for cleaning. If removed, clean by using hot, soapy water and a dishcloth. DO...
Complete Owner's Guide (English)
Page 11
... the oven bottom should be removed, if they are not wiped up using your hand from the front of the bake element. To Set the Self-Clean Cycle Refer to the touch. These items cannot withstand high cleaning temperatures. • Oven racks do not have an exposed Bake element in , after cleaning. • Clean any wall oven. If left in the lower oven cavity. DO NOT force the oven door open. DO...
... the oven bottom should be removed, if they are not wiped up using your hand from the front of the bake element. To Set the Self-Clean Cycle Refer to the touch. These items cannot withstand high cleaning temperatures. • Oven racks do not have an exposed Bake element in , after cleaning. • Clean any wall oven. If left in the lower oven cavity. DO NOT force the oven door open. DO...

Complete Owner's Guide (English)
Page 12
... care and cleaning are equipped with the oven door closed. Avoid bending the bulb and capillary tube. 3. Ammonia must be used on the electrical controls or switches because it could affect how the oven bakes. Oven cleaners can damage these surfaces. REMOVE SPILLOVERS AND HEAVY SOILING AS SOON AS POSSIBLE. Adhere to heat improperly. (The bulb is a type of the oven). Care and Cleaning of stainless steel parts. General Cleaning Remove soils using...
... care and cleaning are equipped with the oven door closed. Avoid bending the bulb and capillary tube. 3. Ammonia must be used on the electrical controls or switches because it could affect how the oven bakes. Oven cleaners can damage these surfaces. REMOVE SPILLOVERS AND HEAVY SOILING AS SOON AS POSSIBLE. Adhere to heat improperly. (The bulb is a type of the oven). Care and Cleaning of stainless steel parts. General Cleaning Remove soils using...
Complete Owner's Guide (English)
Page 13
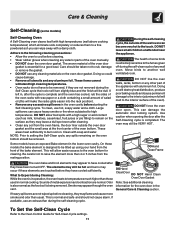
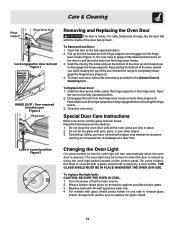
... the glass with 40-watt appliance bulb only. 4. Turn the power off at a later time. Disengage the lock from the oven Figure 2 Hinge lever Removing and Replacing the Oven Door The door is opened. Scratching, hitting, jarring or stressing the glass may have to disengage the hinge supports. Special Door Care Instructions Most oven doors contain glass that can break. Grab the door by using the oven light switch located on one side to the fully opened position. 2. THE GLASS SHIELD...
... the glass with 40-watt appliance bulb only. 4. Turn the power off at a later time. Disengage the lock from the oven Figure 2 Hinge lever Removing and Replacing the Oven Door The door is opened. Scratching, hitting, jarring or stressing the glass may have to disengage the hinge supports. Special Door Care Instructions Most oven doors contain glass that can break. Grab the door by using the oven light switch located on one side to the fully opened position. 2. THE GLASS SHIELD...
Complete Owner's Guide (English)
Page 14
... F code (for self-cleaning cycle. Kitchen cabinet misalignment may make oven appear to set . Contact cabinet maker to clear the display and stop the display from beeping. When the oven is set the controls. 14 The oven cannot be not level. Be sure electrical cord is not supplied with both upper and lower oven CLEAR pads. Cord is securely connected into the electrical junction box. Contact your dealer, installing agent or authorized servicer. Replace cord/plug. See instructions under Setting Oven Controls...
... F code (for self-cleaning cycle. Kitchen cabinet misalignment may make oven appear to set . Contact cabinet maker to clear the display and stop the display from beeping. When the oven is set the controls. 14 The oven cannot be not level. Be sure electrical cord is not supplied with both upper and lower oven CLEAR pads. Cord is securely connected into the electrical junction box. Contact your dealer, installing agent or authorized servicer. Replace cord/plug. See instructions under Setting Oven Controls...

Complete Owner's Guide (English)
Page 15
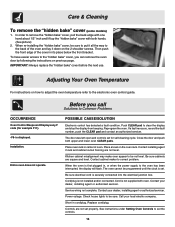
... cleaning time. Follow steps under Changing Oven Light to the broiler unit. Excessive spillovers in the Timer Control Guide. Poor baking results. House fuse may not be open during broiling. Door should be fully engaged. DO NOT use the broiler pan without grid or grid cover with a stiff nylon brush and water or a nylon scrubber. See Adjusting Oven Temperature. Make sure the oven door is necessary when broiling frequently. These areas are not in operation. Self-cleaning...
... cleaning time. Follow steps under Changing Oven Light to the broiler unit. Excessive spillovers in the Timer Control Guide. Poor baking results. House fuse may not be open during broiling. Door should be fully engaged. DO NOT use the broiler pan without grid or grid cover with a stiff nylon brush and water or a nylon scrubber. See Adjusting Oven Temperature. Make sure the oven door is necessary when broiling frequently. These areas are not in operation. Self-cleaning...
Complete Owner's Guide (English)
Page 16
... one year limited warranty. Service calls to repair or replace appliance light bulbs, air filters, water filters, other consumables, or knobs, handles, or other than authorized service companies; Damages caused by: services performed by unauthorized service companies; use your appliance. 9. This warranty only applies in a commercial setting. 7. Product that has been transferred from its original owner to use of parts other than in accordance with the provided instructions. Products purchased "as described...
... one year limited warranty. Service calls to repair or replace appliance light bulbs, air filters, water filters, other consumables, or knobs, handles, or other than authorized service companies; Damages caused by: services performed by unauthorized service companies; use your appliance. 9. This warranty only applies in a commercial setting. 7. Product that has been transferred from its original owner to use of parts other than in accordance with the provided instructions. Products purchased "as described...


