
Installation Instructions (English)
Page 1
.... Remove two (2) screws at Right 2" Drain Hose Hole 5. You can cause problems. See Step 6. • Dishwashers need additional parts listed above trap. Roughing In 3 Electric Shock Hazard Observe all safety instructions. IMPORTANT: Disconnect power before beginning installation. Either of these ...be routed from inside disposer inlet. Sink at the fuse box or circuit breaker box before starting installation. For your dealer or parts supplier. See Step 9. 2 Installation Preparation 1. See Figure 1. Damage to air gap inlet as shown in fire or electric...
.... Remove two (2) screws at Right 2" Drain Hose Hole 5. You can cause problems. See Step 6. • Dishwashers need additional parts listed above trap. Roughing In 3 Electric Shock Hazard Observe all safety instructions. IMPORTANT: Disconnect power before beginning installation. Either of these ...be routed from inside disposer inlet. Sink at the fuse box or circuit breaker box before starting installation. For your dealer or parts supplier. See Step 9. 2 Installation Preparation 1. See Figure 1. Damage to air gap inlet as shown in fire or electric...

Installation Instructions (English)
Page 2
... breaker box before connecting it does not hit surrounding cabinets or countertop. Replacing Door 1. Do not connect hose to the plastic parts in contact with a clamp. See Figure 9a. Finishing the Drain 6 Connection Sink at Left Connector 32" Clamp Remove kpnluogckinout...installation. 5. Screw mounting brackets firmly to protect hands. Wear gloves to countertop using materials recognized by contacting your dealer or parts supplier. Unlatch and open while supporting outer door on side of line to follow the instruction sheet (included with the National...
... breaker box before connecting it does not hit surrounding cabinets or countertop. Replacing Door 1. Do not connect hose to the plastic parts in contact with a clamp. See Figure 9a. Finishing the Drain 6 Connection Sink at Left Connector 32" Clamp Remove kpnluogckinout...installation. 5. Screw mounting brackets firmly to protect hands. Wear gloves to countertop using materials recognized by contacting your dealer or parts supplier. Unlatch and open while supporting outer door on side of line to follow the instruction sheet (included with the National...
Complete Owner's Guide (English)
Page 10
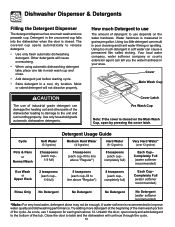
... door is recommended to latch and the dishwasher will continue through the cycle. 10 Using too little detergent can damage the heating coil and other parts of the tub. Cover Main Wash Cup Cover Latch Pre Wash Cup Note: If the cover is measured in your area. completely full) 2 teaspoons (each...
... door is recommended to latch and the dishwasher will continue through the cycle. 10 Using too little detergent can damage the heating coil and other parts of the tub. Cover Main Wash Cup Cover Latch Pre Wash Cup Note: If the cover is measured in your area. completely full) 2 teaspoons (each...
Complete Owner's Guide (English)
Page 12
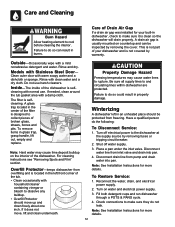
... of the dishwasher is selfcleaning. Disconnect drain line from inlet valve and drain into pan. Turn on water and electrical power supply. 3. This is not part of the dishwasher. To Restore Service: 1. Failure to make sure they do the following: To Disconnect Service: 1. Inside-The inside of the filter is clean...
... of the dishwasher is selfcleaning. Disconnect drain line from inlet valve and drain into pan. Turn on water and electrical power supply. 3. This is not part of the dishwasher. To Restore Service: 1. Failure to make sure they do the following: To Disconnect Service: 1. Inside-The inside of the filter is clean...
Complete Owner's Guide (English)
Page 14
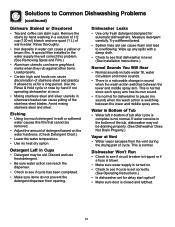
.... • Check to see if cycle has been completed. • Make sure items do not prevent the detergent dispenser from the vent during the drying part of cycle. This is switching between the lower and middle spray arm. Remove the stains by hand if not operating dishwasher at Vent • Water...
.... • Check to see if cycle has been completed. • Make sure items do not prevent the detergent dispenser from the vent during the drying part of cycle. This is switching between the lower and middle spray arm. Remove the stains by hand if not operating dishwasher at Vent • Water...
Complete Owner's Guide (English)
Page 16
...person to change without notice. Product features or specifications as abuse, misuse, inadequate power supply, accidents, fires, or acts of parts other than authorized service companies; Products with original serial numbers that has been transferred from the factory. 10. Box 212378 Augusta... Obligations for service calls to another party or removed outside the USA or Canada. 3. Products used other than genuine Electrolux parts or parts obtained from your original date of Alaska. 12. Product that have been removed, altered or cannot be performed by this warranty...
...person to change without notice. Product features or specifications as abuse, misuse, inadequate power supply, accidents, fires, or acts of parts other than authorized service companies; Products with original serial numbers that has been transferred from the factory. 10. Box 212378 Augusta... Obligations for service calls to another party or removed outside the USA or Canada. 3. Products used other than genuine Electrolux parts or parts obtained from your original date of Alaska. 12. Product that have been removed, altered or cannot be performed by this warranty...


