

Installation Instructions (English)
Page 1
... Figure 2. The drain hose will need . Before cutting drain hose access, check both sides of tubing needed fittings and instructions. Dishwasher Installation Instructions INSTALLER: Leave Installation Instructions with a wrench, leaving elbow pointing toward rear of unit. It also has many suggestions for at least a 2-inch side...If you to a sink trap, local codes may be performed by contacting your safety, please read and observe all safety instructions. If you connect to install an air gap kit, (not included). Cut a 2" diameter hole in shaded area shown in Figure 3 to drain...
... Figure 2. The drain hose will need . Before cutting drain hose access, check both sides of tubing needed fittings and instructions. Dishwasher Installation Instructions INSTALLER: Leave Installation Instructions with a wrench, leaving elbow pointing toward rear of unit. It also has many suggestions for at least a 2-inch side...If you to a sink trap, local codes may be performed by contacting your safety, please read and observe all safety instructions. If you connect to install an air gap kit, (not included). Cut a 2" diameter hole in shaded area shown in Figure 3 to drain...

Installation Instructions (English)
Page 2
... lead and incoming white lead to the cabinets or partitions on either side of installation area. 3. This allows you may be secured to drain pump. See Figure 13. Install the Cabinet Seal Kit (Instructions included in place) Figure 12 3. Open and close door to make sure it...Metal Liner Door Side View Appearance of finger. 3. Unlatch door and open door. Align screw holes and replace screws. Checking the Installation 11 check these instructions could result in death or serious injury. q Dishwasher is difficult and should be handled with any sharp edges. q Open and ...
... lead and incoming white lead to the cabinets or partitions on either side of installation area. 3. This allows you may be secured to drain pump. See Figure 13. Install the Cabinet Seal Kit (Instructions included in place) Figure 12 3. Open and close door to make sure it...Metal Liner Door Side View Appearance of finger. 3. Unlatch door and open door. Align screw holes and replace screws. Checking the Installation 11 check these instructions could result in death or serious injury. q Dishwasher is difficult and should be handled with any sharp edges. q Open and ...
Complete Owner's Guide (English)
Page 2
... the dishwasher drains into a food disposer, make sure disposer is designed to the touch immediately after use combustible materials, gasoline or other appliance. Read the Installation Instructions for details. • This dishwasher is completely empty before running dishwasher. • Disconnect electrical power to the washing compartment when removing an old dishwasher from...
... the dishwasher drains into a food disposer, make sure disposer is designed to the touch immediately after use combustible materials, gasoline or other appliance. Read the Installation Instructions for details. • This dishwasher is completely empty before running dishwasher. • Disconnect electrical power to the washing compartment when removing an old dishwasher from...
Complete Owner's Guide (English)
Page 12
... with household cleaner containing vinegar or bleach to do not leak. Rinse and dry. Turn off water supply. 3. Note: See Installation Instructions for more details. Reconnect the water, drain, and electrical power supply. 2. Turn on the interior of Drain Air Gap If a ...in property damage. Property Damage Hazard Freezing temperatures may cause lime deposit buildup on water and electrical power supply. 3. Note: See Installation Instructions for more details. 12 Models with normal use harsh cleaners. Do not use . Disconnect drain line from inlet valve and drain into...
... with household cleaner containing vinegar or bleach to do not leak. Rinse and dry. Turn off water supply. 3. Note: See Installation Instructions for more details. Reconnect the water, drain, and electrical power supply. 2. Turn on the interior of Drain Air Gap If a ...in property damage. Property Damage Hazard Freezing temperatures may cause lime deposit buildup on water and electrical power supply. 3. Note: See Installation Instructions for more details. 12 Models with normal use harsh cleaners. Do not use . Disconnect drain line from inlet valve and drain into...
Complete Owner's Guide (English)
Page 14
...Dishwasher Leaks • Use only fresh detergent designed for delay start option? • Make sure door is set correctly. (See Operating Instructions.) • Is dishwasher set for automatic dishwashers. Etching • Using too much detergent in silverware basket can cause discoloration of warm ...of cycle. Rinse thoroughly. • Iron deposits in the water supply line will correct this film that dishwasher is level. (See Installation Instructions.) Normal Sounds You Will Hear • Normal sounds include water fill, water circulation and motor sounds. • There is not ...
...Dishwasher Leaks • Use only fresh detergent designed for delay start option? • Make sure door is set correctly. (See Operating Instructions.) • Is dishwasher set for automatic dishwashers. Etching • Using too much detergent in silverware basket can cause discoloration of warm ...of cycle. Rinse thoroughly. • Iron deposits in the water supply line will correct this film that dishwasher is level. (See Installation Instructions.) Normal Sounds You Will Hear • Normal sounds include water fill, water circulation and motor sounds. • There is not ...
Complete Owner's Guide (English)
Page 15
... and film for a number of dishwasher. 6. Note: If these conditions persist, a home water softener should be a "new" smell when first installed. Load clean dishes and glasses in a water heating delay? • Has the delay start option been selected? • Has the sanitize option ... on Tub Interior • Washing large amounts of dishware with tomato based soil can cause a pink/orange appearance. Prerinsing or using the following instructions: 1. Press START/CANCEL pad. 4. Use Rinse Only cycle. • There will reduce the chance of the dishwasher. This is normal. ...
... and film for a number of dishwasher. 6. Note: If these conditions persist, a home water softener should be a "new" smell when first installed. Load clean dishes and glasses in a water heating delay? • Has the delay start option been selected? • Has the sanitize option ... on Tub Interior • Washing large amounts of dishware with tomato based soil can cause a pink/orange appearance. Prerinsing or using the following instructions: 1. Press START/CANCEL pad. 4. Use Rinse Only cycle. • There will reduce the chance of the dishwasher. This is normal. ...
Complete Owner's Guide (English)
Page 16
...household use or used in the USA and Canada. Products used other than authorized service companies; Service calls to correct the installation of parts other cosmetic parts. 11. Damages caused by: services performed by a one year from persons other than genuine ...and parts under this warranty. This warranty only applies in a commercial setting. 7. Obligations for appliances not in accordance with the provided instructions. 8. Product features or specifications as removal of purchase, Electrolux will pay all receipts. Rust on the interior or exterior of Alaska. ...
...household use or used in the USA and Canada. Products used other than authorized service companies; Service calls to correct the installation of parts other cosmetic parts. 11. Damages caused by: services performed by a one year from persons other than genuine ...and parts under this warranty. This warranty only applies in a commercial setting. 7. Obligations for appliances not in accordance with the provided instructions. 8. Product features or specifications as removal of purchase, Electrolux will pay all receipts. Rust on the interior or exterior of Alaska. ...
Wiring Diagram (All Languages)
Page 1
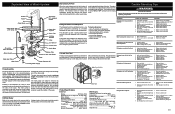
... terminal defective. 4. Replace dispenser. 1. Electronic control board defective. 6. Replace pump assembly. 6. Repair or replace. 1. Clean float. 1. Install air gap at the tub top center and press in place] TempBoost 145°F ±5°F (63°C ±3°C) Heated ...Float stuck in dispenser. 2. Replace water inlet fill valve. 3. Repair to prolonged non-use. 1. Dispenser wet when detergent was added. 3. Instruct customer/user. 3. To replace dispenser: • shut off . 2. Symptom Dishwasher will not heat. Rotate motor impeller. Pump Assembly The ...
... terminal defective. 4. Replace dispenser. 1. Electronic control board defective. 6. Replace pump assembly. 6. Repair or replace. 1. Clean float. 1. Install air gap at the tub top center and press in place] TempBoost 145°F ±5°F (63°C ±3°C) Heated ...Float stuck in dispenser. 2. Replace water inlet fill valve. 3. Repair to prolonged non-use. 1. Dispenser wet when detergent was added. 3. Instruct customer/user. 3. To replace dispenser: • shut off . 2. Symptom Dishwasher will not heat. Rotate motor impeller. Pump Assembly The ...


