Use and Care Guide
Page 1
Dual Fuel Range Slide-in Models Welcome 2 Important Safety Instructions .. 3-6 Features at a Glance 7 Before Setting Surface Controls 8 Setting Surface Controls....... 9 Before Setting Oven Controls 10-11 11-12 Setting Warm & Serve Drawer Controls (Some models Setting Oven Controls ......... 12 Cooking Informations ..... 13-14 Care & Cleaning 15-20 Adjusting Your Oven Temperature 20 Before You Call SC.oo.lm.u.tm.io.on.n.s..Pt.or.o.b.l.e.m..s 21-22 Warranty Back Cover 318203862 (0609) Rev. C
Dual Fuel Range Slide-in Models Welcome 2 Important Safety Instructions .. 3-6 Features at a Glance 7 Before Setting Surface Controls 8 Setting Surface Controls....... 9 Before Setting Oven Controls 10-11 11-12 Setting Warm & Serve Drawer Controls (Some models Setting Oven Controls ......... 12 Cooking Informations ..... 13-14 Care & Cleaning 15-20 Adjusting Your Oven Temperature 20 Before You Call SC.oo.lm.u.tm.io.on.n.s..Pt.or.o.b.l.e.m..s 21-22 Warranty Back Cover 318203862 (0609) Rev. C
Use and Care Guide
Page 3
...tape and packaging before using the range. All other part of a range by a qualified technician in this range. Do not use any other appliance. - Children climbing on the range to persons could result. • Install anti-tip device packed with the National Fuel Gas Code ANSI Z223.1 latest edition... anti-tip bracket(s) provided with packaging material. • Proper Installation-Be sure your gas supplier, call your dealer to the range. Stepping, leaning or sitting on an open door may result in the literature package for future reference. NEVER use gasoline or ...
...tape and packaging before using the range. All other part of a range by a qualified technician in this range. Do not use any other appliance. - Children climbing on the range to persons could result. • Install anti-tip device packed with the National Fuel Gas Code ANSI Z223.1 latest edition... anti-tip bracket(s) provided with packaging material. • Proper Installation-Be sure your gas supplier, call your dealer to the range. Stepping, leaning or sitting on an open door may result in the literature package for future reference. NEVER use gasoline or ...
Use and Care Guide
Page 4
... gas burners. The use of the utensil. Select utensils having flat bottoms large enough to become hot enough to sit or stand on any unused range if it is turned inward, and does not extend to turn the burner off and the power resumes, the oven may explode and result in...
... gas burners. The use of the utensil. Select utensils having flat bottoms large enough to become hot enough to sit or stand on any unused range if it is turned inward, and does not extend to turn the burner off and the power resumes, the oven may explode and result in...
Use and Care Guide
Page 5
... or filter. Greasy deposits in the oven/ warm & serve drawer. • Keep oven vent ducts unobstructed. Refer to the side of the range when opening the door of a hot oven. Contact a qualified technician immediately. • Clean cooktop glass with both hands to the appliance before ...hot surface. • Avoid scratching the cooktop glass with a damp cloth. Doing so could catch fire. IMPORTANT INSTRUCTIONS FOR CLEANING YOUR RANGE • Clean the range regularly to the sudden change in the oven/warm & serve drawer (if equipped). Air will occur if the hot covers are flaming...
... or filter. Greasy deposits in the oven/ warm & serve drawer. • Keep oven vent ducts unobstructed. Refer to the side of the range when opening the door of a hot oven. Contact a qualified technician immediately. • Clean cooktop glass with both hands to the appliance before ...hot surface. • Avoid scratching the cooktop glass with a damp cloth. Doing so could catch fire. IMPORTANT INSTRUCTIONS FOR CLEANING YOUR RANGE • Clean the range regularly to the sudden change in the oven/warm & serve drawer (if equipped). Air will occur if the hot covers are flaming...
Use and Care Guide
Page 6
...Important Safety Instructions • Do not clean door gasket-The door gasket is needed, contact the service center for assistance. Gas) This natural gas range is provided with this appliance to rub, damage or move the gasket. • Remove oven racks. conversion is essential for a good seal.... Conversion Kit is designed to allow for this range and is not installed by an authorized Service Center. 6 Before installing the kit be taken not to satisfactorily meet the application needs must be...
...Important Safety Instructions • Do not clean door gasket-The door gasket is needed, contact the service center for assistance. Gas) This natural gas range is provided with this appliance to rub, damage or move the gasket. • Remove oven racks. conversion is essential for a good seal.... Conversion Kit is designed to allow for this range and is not installed by an authorized Service Center. 6 Before installing the kit be taken not to satisfactorily meet the application needs must be...
Use and Care Guide
Page 7
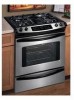
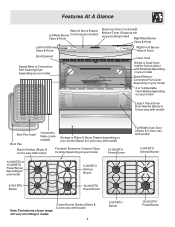
Center Burner Grates (Styles & Colors vary with model) 5,000 BTU Simmer Burner Note:The features of your range will vary according model) Right Rear Burner Valve & Knob Left Front Burner Valve & Knob Right Front Burner Valve & Knob Broil Element Speed Bake or Convection... Self-Cleaning Oven depending on your model Oven Vent Single or Dual Oven Interior Oven Light(s) with Shield(s) depending on your model Speed Bake or Convection Fan Cover depending on your model 2 or 3 Adjustable Oven Racks ...
Center Burner Grates (Styles & Colors vary with model) 5,000 BTU Simmer Burner Note:The features of your range will vary according model) Right Rear Burner Valve & Knob Left Front Burner Valve & Knob Right Front Burner Valve & Knob Broil Element Speed Bake or Convection... Self-Cleaning Oven depending on your model Oven Vent Single or Dual Oven Interior Oven Light(s) with Shield(s) depending on your model Speed Bake or Convection Fan Cover depending on your model 2 or 3 Adjustable Oven Racks ...
Use and Care Guide
Page 8
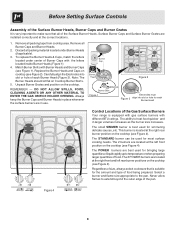
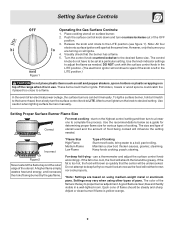
... LEFT REAR LEFT REAR LEFT FRONT LEFT FRONT Figure 4 RIGHT FRONT RIGHT FRONT RIGHT REAR RIGHT REAR Control Locations of the Gas Surface Burners Your range is equipped with gas surface burners with the letters located inside Burner Heads (Figure 1). 4. Before Setting Surface Controls Assembly of the Surface Burner Heads, Burner...
... LEFT REAR LEFT REAR LEFT FRONT LEFT FRONT Figure 4 RIGHT FRONT RIGHT FRONT RIGHT REAR RIGHT REAR Control Locations of the Gas Surface Burners Your range is equipped with gas surface burners with the letters located inside Burner Heads (Figure 1). 4. Before Setting Surface Controls Assembly of the Surface Burner Heads, Burner...
Use and Care Guide
Page 9
... knob is clear, blue and hardly visible in use a thermometer and adjust the surface control knob accordingly. After burner lights turn counterclockwise out of the range when it is too cool, the food will ignite. 4. WRInOcoNrrGect Figure 2 Never extend the flame beyond the outer edge of Cooking Start most cooking - pan...
... knob is clear, blue and hardly visible in use a thermometer and adjust the surface control knob accordingly. After burner lights turn counterclockwise out of the range when it is too cool, the food will ignite. 4. WRInOcoNrrGect Figure 2 Never extend the flame beyond the outer edge of Cooking Start most cooking - pan...
Use and Care Guide
Page 10
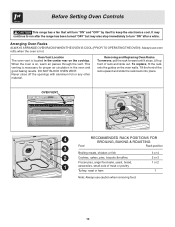
..." and "OFF" by itself to turn "ON" after the range has been turned "OFF" but may continue to run after a while. When the oven is located in the oven and good baking results. Tilt the front of rack and slide out. DO NOT BLOCK OVEN VENT. To replace, fit the rack... IS COOL (PRIOR TO OPERATING THE OVEN). It may also stop immediately to keep the electronics cool. Lift up front of the rack upward and slide the rack back into place. OVEN VENT 4 RECOMMENDED RACK POSITIONS FOR BROILING, BAKING & ROASTING Food 3 Rack position Broiling meats, chicken or fish 3 or 4 2 ...
..." and "OFF" by itself to turn "ON" after the range has been turned "OFF" but may continue to run after a while. When the oven is located in the oven and good baking results. Tilt the front of rack and slide out. DO NOT BLOCK OVEN VENT. To replace, fit the rack... IS COOL (PRIOR TO OPERATING THE OVEN). It may also stop immediately to keep the electronics cool. Lift up front of the rack upward and slide the rack back into place. OVEN VENT 4 RECOMMENDED RACK POSITIONS FOR BROILING, BAKING & ROASTING Food 3 Rack position Broiling meats, chicken or fish 3 or 4 2 ...
Use and Care Guide
Page 13
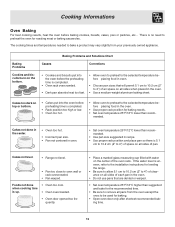
...Chart Corrections • Cookies and biscuits put into the oven before baking cookies, breads, cakes, pies or pastries, etc... Cakes not level. • Range not level. • Pan too close to the selected temperature before preheating time is uneven, refer to the installation instructions for leveling the... range. • Be sure to allow 5.1 cm to 10.2 cm (2" to 4") of clearance on all sides of pan. Foods not done when cooking time ...
...Chart Corrections • Cookies and biscuits put into the oven before baking cookies, breads, cakes, pies or pastries, etc... Cakes not level. • Range not level. • Pan too close to the selected temperature before preheating time is uneven, refer to the installation instructions for leveling the... range. • Be sure to allow 5.1 cm to 10.2 cm (2" to 4") of clearance on all sides of pan. Foods not done when cooking time ...
Use and Care Guide
Page 15
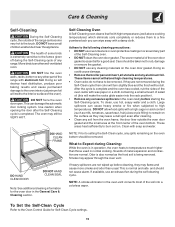
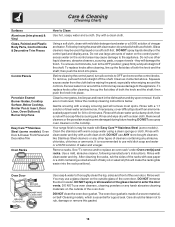
... allow food spills with a damp cloth. These areas heat sufficiently to the touch. Use caution when opening the door after cleaning. • Clean any range. The woven material of the oven). To clean, use an exhaust fan during Cleaning: While the oven is normal and safe and should be removed... metal expansion and contraction are not removed during the Self-Cleaning cycle of any soil from the oven frame, the door liner outside of the range can wipe away with a high sugar or acid content (such as milk, tomatoes, sauerkraut, fruit juices or pie filling) to the fumes given ...
... allow food spills with a damp cloth. These areas heat sufficiently to the touch. Use caution when opening the door after cleaning. • Clean any range. The woven material of the oven). To clean, use an exhaust fan during Cleaning: While the oven is normal and safe and should be removed... metal expansion and contraction are not removed during the Self-Cleaning cycle of any soil from the oven frame, the door liner outside of the range can wipe away with a high sugar or acid content (such as milk, tomatoes, sauerkraut, fruit juices or pie filling) to the fumes given ...
Use and Care Guide
Page 16
..., then scrub with a clean cloth. DO NOT clean the oven door gasket. Rinse with clean water and dry with a soft cloth. It is essential for 30 to the OFF position; Rinse well. The oven door gasket is may become damaged during future heating. dry and polish with a soft clean cloth. DO... HAND CLEAN FRAME DO HAND CLEAN DOOR DO NOT HAND CLEAN OVEN DOOR GASKET Use soap & water to OFF and remove the control knobs. Your range finish is made with warm soapy water using a clean sponge or cloth. DO NOT immerse the door in the dishwasher and dry upon removal. grasp...
..., then scrub with a clean cloth. DO NOT clean the oven door gasket. Rinse with clean water and dry with a soft cloth. It is essential for 30 to the OFF position; Rinse well. The oven door gasket is may become damaged during future heating. dry and polish with a soft clean cloth. DO... HAND CLEAN FRAME DO HAND CLEAN DOOR DO NOT HAND CLEAN OVEN DOOR GASKET Use soap & water to OFF and remove the control knobs. Your range finish is made with warm soapy water using a clean sponge or cloth. DO NOT immerse the door in the dishwasher and dry upon removal. grasp...
Use and Care Guide
Page 18
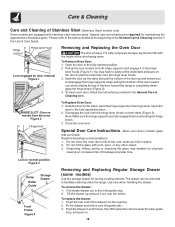
... the glass with the inside of the door facing down. Lock in this Use & Care Guide. Pull empty drawer out to facilitate cleaning under the range. Care & Cleaning Care and Cleaning of Stainless Steel (Stainless Steel models only) Some models are fully engaged before unlocking the hinge levers. 3. Door removed from... Replacing the Oven Door The door is heavy. Grab the door by the sides; Insert the rear end of the door up and toward the range to clear the roller guide stop . 2.
... the glass with the inside of the door facing down. Lock in this Use & Care Guide. Pull empty drawer out to facilitate cleaning under the range. Care & Cleaning Care and Cleaning of Stainless Steel (Stainless Steel models only) Some models are fully engaged before unlocking the hinge levers. 3. Door removed from... Replacing the Oven Door The door is heavy. Grab the door by the sides; Insert the rear end of the door up and toward the range to clear the roller guide stop . 2.
Use and Care Guide
Page 19
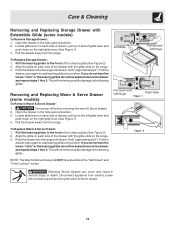
...to the bearing glides. Align the glide on each side of drawer, pull up on the left glide lever and push down on the range. 3. Push the drawer into position. This will minimize possible damage to the fully opened position. 3. Latch Removing and Replacing Warm & ... 2. Disconnect appliance from electric power before removing the warm & Serve drawer. 2. Pull the drawer open again to seat bearing glides into the range until levers "click" (approximately 2"). This will NOT operate while in the "Self-Clean" and "Oven Lockout" modes Electrical Shock Hazard can ...
...to the bearing glides. Align the glide on each side of drawer, pull up on the left glide lever and push down on the range. 3. Push the drawer into position. This will minimize possible damage to the fully opened position. 3. Latch Removing and Replacing Warm & ... 2. Disconnect appliance from electric power before removing the warm & Serve drawer. 2. Pull the drawer open again to seat bearing glides into the range until levers "click" (approximately 2"). This will NOT operate while in the "Self-Clean" and "Oven Lockout" modes Electrical Shock Hazard can ...
Use and Care Guide
Page 21
... the burner off, use a small-gauge wire or needle to clear the display and stop beeping. Surface burners do not light. When range is level, cooktop may make appliance accessible. If floor is not level. Call your local electric company for service. Call your local electric... Lightly fan the flame and allow the burner to operate until burner ignites and then turn the surface control knob to Common Problems OCCURRENCE Range is not complete. Appliance must be sure. POSSIBLE CAUSE/SOLUTION Poor installation. Contact a cabinet maker to LITE. Gas line is present ...
... the burner off, use a small-gauge wire or needle to clear the display and stop beeping. Surface burners do not light. When range is level, cooktop may make appliance accessible. If floor is not level. Call your local electric company for service. Call your local electric... Lightly fan the flame and allow the burner to operate until burner ignites and then turn the surface control knob to Common Problems OCCURRENCE Range is not complete. Appliance must be sure. POSSIBLE CAUSE/SOLUTION Poor installation. Contact a cabinet maker to LITE. Gas line is present ...


