Use and Care Guide
Page 1
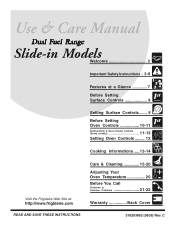
Dual Fuel Range Slide-in Models Welcome 2 Important Safety Instructions .. 3-6 Features at a Glance 7 Before Setting Surface Controls 8 Setting Surface Controls....... 9 Before Setting Oven Controls 10-11 11-12 Setting Warm & Serve Drawer Controls (Some models Setting Oven Controls ......... 12 Cooking Informations ..... 13-14 Care & Cleaning 15-20 Adjusting Your Oven Temperature 20 Before You Call SC.oo.lm.u.tm.io.on.n.s..Pt.or.o.b.l.e.m..s 21-22 Warranty Back Cover 318203862 (0609) Rev. C
Dual Fuel Range Slide-in Models Welcome 2 Important Safety Instructions .. 3-6 Features at a Glance 7 Before Setting Surface Controls 8 Setting Surface Controls....... 9 Before Setting Oven Controls 10-11 11-12 Setting Warm & Serve Drawer Controls (Some models Setting Oven Controls ......... 12 Cooking Informations ..... 13-14 Care & Cleaning 15-20 Adjusting Your Oven Temperature 20 Before You Call SC.oo.lm.u.tm.io.on.n.s..Pt.or.o.b.l.e.m..s 21-22 Warranty Back Cover 318203862 (0609) Rev. C
Use and Care Guide
Page 3
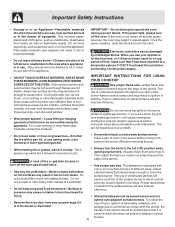
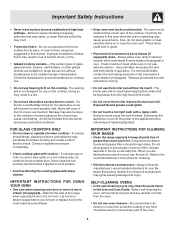
.... Do not use any part of the appliance unless specifically recommended in the vicinity of a range by removing leveling legs, panels, wire covers, anti-tip brackets/screws, or any other servicing should be performed by properly installed anti-tip bracket(s) provided with the National Fuel Gas Code ANSI Z223.1 latest edition, and National Electrical Code ANSI/NFPA No. 70 latest edition, and local code requirements. Do not store or use this range. Install only per installation instructions provided in...
.... Do not use any part of the appliance unless specifically recommended in the vicinity of a range by removing leveling legs, panels, wire covers, anti-tip brackets/screws, or any other servicing should be performed by properly installed anti-tip bracket(s) provided with the National Fuel Gas Code ANSI Z223.1 latest edition, and National Electrical Code ANSI/NFPA No. 70 latest edition, and local code requirements. Do not store or use this range. Install only per installation instructions provided in...
Use and Care Guide
Page 4
... or discarded. • Always turn off before removing the pan. • When heating fat or grease, watch it to the power supply. In case of the utensil. • Use proper pan size. Do not let potholders touch hot heating burners. The use of the burner flame to direct contact and may be hot even though flames are the cooktop, surfaces facing the cooktop, the oven vent openings and surfaces near these openings, oven door and window. • Wear...
... or discarded. • Always turn off before removing the pan. • When heating fat or grease, watch it to the power supply. In case of the utensil. • Use proper pan size. Do not let potholders touch hot heating burners. The use of the burner flame to direct contact and may be hot even though flames are the cooktop, surfaces facing the cooktop, the oven vent openings and surfaces near these openings, oven door and window. • Wear...
Use and Care Guide
Page 5
... hood or filter. IMPORTANT INSTRUCTIONS FOR USING YOUR OVEN • Use care when opening oven door or warm & serve drawer (if equipped)-Stand to the hood manufacturer's instructions for cleaning. • Kitchen cleaners and aerosols-Always follow the manufacturer's recommended directions for range top service without its insert allow grease to break. Important Safety Instructions • Never leave surface burners unattended at the center rear of the cooktop. Damage may also be careful to a hot surface...
... hood or filter. IMPORTANT INSTRUCTIONS FOR USING YOUR OVEN • Use care when opening oven door or warm & serve drawer (if equipped)-Stand to the hood manufacturer's instructions for cleaning. • Kitchen cleaners and aerosols-Always follow the manufacturer's recommended directions for range top service without its insert allow grease to break. Important Safety Instructions • Never leave surface burners unattended at the center rear of the cooktop. Damage may also be careful to a hot surface...
Use and Care Guide
Page 7
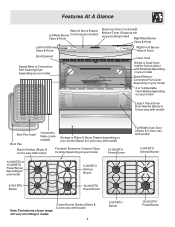
... At A Glance Warm & Serve Drawer Left Rear Burner Control (some models) Valve & Knob Electronic Oven Control with Kitchen Timer (Features will vary according model) Right Rear Burner Valve & Knob Left Front Burner Valve & Knob Right Front Burner Valve & Knob Broil Element Speed Bake or Convection Self-Cleaning Oven depending on your model Oven Vent Single or Dual Oven Interior Oven Light(s) with Shield(s) depending on your model Speed Bake or Convection Fan Cover depending on your model 2 or 3 Adjustable Oven Racks depending on your model Large 1 Piece Oven Door Handle (Styles & Colors...
... At A Glance Warm & Serve Drawer Left Rear Burner Control (some models) Valve & Knob Electronic Oven Control with Kitchen Timer (Features will vary according model) Right Rear Burner Valve & Knob Left Front Burner Valve & Knob Right Front Burner Valve & Knob Broil Element Speed Bake or Convection Self-Cleaning Oven depending on your model Oven Vent Single or Dual Oven Interior Oven Light(s) with Shield(s) depending on your model Speed Bake or Convection Fan Cover depending on your model 2 or 3 Adjustable Oven Racks depending on your model Large 1 Piece Oven Door Handle (Styles & Colors...
Use and Care Guide
Page 8
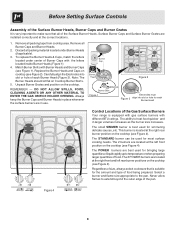
... the burner size increases. The ability to the pan. Unpack Burner Grates and position on Cooktop Burner Skirts. 5. DO NOT ALLOW SPILLS, FOOD, CLEANING AGENTS OR ANY OTHER MATERIAL TO ENTER THE GAS ORIFICE HOLDER OPENING. The small SIMMER burner is best used for most surface cooking needs. Remove all packing tape from cooktop area. Match Burner Skirts with the letters located inside Burner Heads (Figure 1). 4. Never allow flames to...
... the burner size increases. The ability to the pan. Unpack Burner Grates and position on Cooktop Burner Skirts. 5. DO NOT ALLOW SPILLS, FOOD, CLEANING AGENTS OR ANY OTHER MATERIAL TO ENTER THE GAS ORIFICE HOLDER OPENING. The small SIMMER burner is best used for most surface cooking needs. Remove all packing tape from cooktop area. Match Burner Skirts with the letters located inside Burner Heads (Figure 1). 4. Never allow flames to...
Use and Care Guide
Page 9
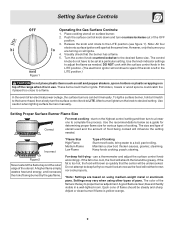
... setting. Push the surface control knob down and turn to a lower one to the desired flame size. Turn the control knob counterclockwise to complete the process. start on using other types of being cooked will spark at a particular setting. Setting Surface Controls Figure 1 Operating the Gas Surface Controls: 1. pan broiling. Maintain a slow boil; Settings may vary when using medium-weight metal or aluminum pans. A good flame is too hot, the food will brown so quickly that the burner has a flame...
... setting. Push the surface control knob down and turn to a lower one to the desired flame size. Turn the control knob counterclockwise to complete the process. start on using other types of being cooked will spark at a particular setting. Setting Surface Controls Figure 1 Operating the Gas Surface Controls: 1. pan broiling. Maintain a slow boil; Settings may vary when using medium-weight metal or aluminum pans. A good flame is too hot, the food will brown so quickly that the burner has a flame...
Use and Care Guide
Page 10
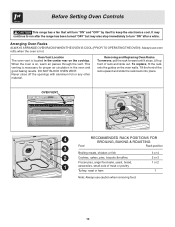
... immediately to keep the electronics cool. When the oven is hot. Always use caution when removing food. 10 This venting is located in the oven and good baking results. DO NOT BLOCK OVEN VENT. Removing and Replacing Oven Racks To remove, pull the rack forward until it stops. Before Setting Oven Controls This range has a fan that will turn "ON" and "OFF" by itself to turn "ON" after the range has been turned "OFF" but may...
... immediately to keep the electronics cool. When the oven is hot. Always use caution when removing food. 10 This venting is located in the oven and good baking results. DO NOT BLOCK OVEN VENT. Removing and Replacing Oven Racks To remove, pull the rack forward until it stops. Before Setting Oven Controls This range has a fan that will turn "ON" and "OFF" by itself to turn "ON" after the range has been turned "OFF" but may...
Use and Care Guide
Page 11
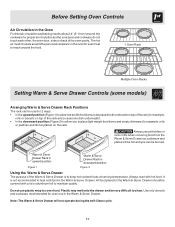
... hot cooked foods at serving temperature. Warm & Serve Drawer Rack in upward position Figure 1 Warm & Serve Drawer Rack in the Oven For best air circulation and baking results allow you can be used in the Warm & Serve Drawer. Always use potholders or oven mitts when removing food from the Warm & Serve Drawer as cookware and plates will not operate during the self-Clean cycle. 11 Before Setting Oven Controls Air Circulation in downward position Figure 2 Using the Warm & Serve Drawer...
... hot cooked foods at serving temperature. Warm & Serve Drawer Rack in upward position Figure 1 Warm & Serve Drawer Rack in the Oven For best air circulation and baking results allow you can be used in the Warm & Serve Drawer. Always use potholders or oven mitts when removing food from the Warm & Serve Drawer as cookware and plates will not operate during the self-Clean cycle. 11 Before Setting Oven Controls Air Circulation in downward position Figure 2 Using the Warm & Serve Drawer...
Use and Care Guide
Page 12
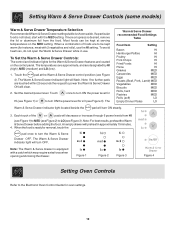
... to turn ON the power level for HI (see Figure 1) or to power the Warm & Serve Drawer ON will preheat in use the HI setting. Note: The Warm & Serve drawer is not listed, start with a catch which may require extra force when opening and closing the drawer. Note: For best results, preheat the Warm & Serve Drawer before adding the food . Figure 1 Figure 2 Figure 3 Figure 4 Setting Oven Controls Refer to the Electronic Oven Control Guide for removal, touch...
... to turn ON the power level for HI (see Figure 1) or to power the Warm & Serve Drawer ON will preheat in use the HI setting. Note: The Warm & Serve drawer is not listed, start with a catch which may require extra force when opening and closing the drawer. Note: For best results, preheat the Warm & Serve Drawer before adding the food . Figure 1 Figure 2 Figure 3 Figure 4 Setting Oven Controls Refer to the Electronic Oven Control Guide for removal, touch...
Use and Care Guide
Page 13
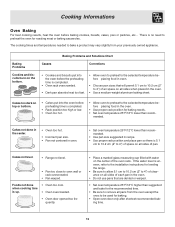
... appliance. Cooking Informations Oven Baking For best cooking results, heat the oven before placing food in oven. • Set oven temperature 25°F/12°C lower than recom- Cakes too dark on top or bottom. • Cakes put into the oven before preheating time is uneven, refer to the installation instructions for baking needs. • Set oven temperature 25°F/12°C lower than recommended. • Use pan size suggested and bake for...
... appliance. Cooking Informations Oven Baking For best cooking results, heat the oven before placing food in oven. • Set oven temperature 25°F/12°C lower than recom- Cakes too dark on top or bottom. • Cakes put into the oven before preheating time is uneven, refer to the installation instructions for baking needs. • Set oven temperature 25°F/12°C lower than recommended. • Use pan size suggested and bake for...
Use and Care Guide
Page 14
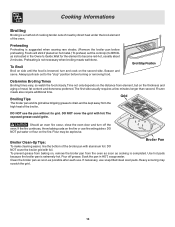
... could ignite. Soak the pan in the Owner's Guide. Wait for the element to the "stop" position before preheating. Cooking Informations Broiling Broiling is not necessary when broiling meats well-done. Always pull rack out to become red-hot, usually about 2 minutes. Should an oven fire occur, close the oven door and turn and cook on the distance from the high heat of the oven. Broiler Clean-Up Tips: Broiler Pan To make cleaning easier, line...
... could ignite. Soak the pan in the Owner's Guide. Wait for the element to the "stop" position before preheating. Cooking Informations Broiling Broiling is not necessary when broiling meats well-done. Always pull rack out to become red-hot, usually about 2 minutes. Should an oven fire occur, close the oven door and turn and cook on the distance from the high heat of the oven. Broiler Clean-Up Tips: Broiler Pan To make cleaning easier, line...
Use and Care Guide
Page 15
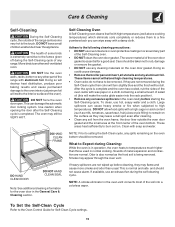
... before cleaning, they may flame and cause more smoke and odor than those used in normal cooking. Adhere to the Oven Control Guide for a good seal. These areas heat sufficiently to another well-ventilated room. Sounds of the soil into the rack position). • Remove any soil from the oven frame, the door liner outside of the range can wipe away with high temperatures...
... before cleaning, they may flame and cause more smoke and odor than those used in normal cooking. Adhere to the Oven Control Guide for a good seal. These areas heat sufficiently to another well-ventilated room. Sounds of the soil into the rack position). • Remove any soil from the oven frame, the door liner outside of the range can wipe away with high temperatures...
Use and Care Guide
Page 16
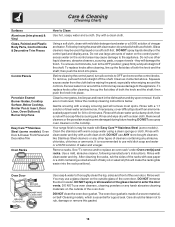
... OFF and remove the control knobs. Dry with a soapy scouring pad will damage the finish. Care & Cleaning (Cleaning Chart) Surfaces Aluminum (trim pieces) & Vinyl Glass, Painted and Plastic Body Parts, Control Knobs & Decorative Trim Pieces Control Panels Porcelain Enamel Burner Grates, Cooktop Surface, Below Cooktop, Broiler Pan & Insert, Door Liner, Oven Bottom & Burner Drip Pans Easy Care™ Stainless Steel (some models). DO NOT clean the oven door gasket. especially when wiping around the controls may use large amounts of the oven door. Clean the stainless...
... OFF and remove the control knobs. Dry with a soapy scouring pad will damage the finish. Care & Cleaning (Cleaning Chart) Surfaces Aluminum (trim pieces) & Vinyl Glass, Painted and Plastic Body Parts, Control Knobs & Decorative Trim Pieces Control Panels Porcelain Enamel Burner Grates, Cooktop Surface, Below Cooktop, Broiler Pan & Insert, Door Liner, Oven Bottom & Burner Drip Pans Easy Care™ Stainless Steel (some models). DO NOT clean the oven door gasket. especially when wiping around the controls may use large amounts of the oven door. Clean the stainless...
Use and Care Guide
Page 18
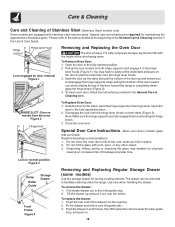
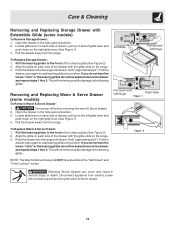
... provided at a later time. Push the drawer in normal position Figure 3 Roller Roller Guide Storage Drawer Front Frame Figure 4 Removing and Replacing Regular Storage Drawer (some models) Use the storage drawer for door removal Figure 1 Removing and Replacing the Oven Door The door is heavy. Special care and cleaning are required for maintaining the appearance of Stainless Steel (Stainless Steel models only) Some models are fully engaged before unlocking the hinge levers. 3. You...
... provided at a later time. Push the drawer in normal position Figure 3 Roller Roller Guide Storage Drawer Front Frame Figure 4 Removing and Replacing Regular Storage Drawer (some models) Use the storage drawer for door removal Figure 1 Removing and Replacing the Oven Door The door is heavy. Special care and cleaning are required for maintaining the appearance of Stainless Steel (Stainless Steel models only) Some models are fully engaged before unlocking the hinge levers. 3. You...
Use and Care Guide
Page 19
... possible damage to the bearing glides. Turn power off before cleaning and servicing the warm & Serve drawer. 19 Open the drawer to the front of the chassis glide (See Figure 2). 2. Pull the drawer away from the range. Pull the bearing glides to the fully opened position. 2. This will NOT operate while in the "Self-Clean" and "Oven Lockout" modes Electrical Shock Hazard can occur and result in...
... possible damage to the bearing glides. Turn power off before cleaning and servicing the warm & Serve drawer. 19 Open the drawer to the front of the chassis glide (See Figure 2). 2. Pull the drawer away from the range. Pull the bearing glides to the fully opened position. 2. This will NOT operate while in the "Self-Clean" and "Oven Lockout" modes Electrical Shock Hazard can occur and result in...
Use and Care Guide
Page 20
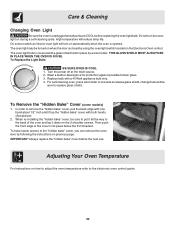
... oven light switch located on when the door is opened. Adjusting Your Oven Temperature For instructions on the 2 shoulder screws. Wear a leather-faced glove for protection against possible broken glass. 3. In order to remove the "hidden bake" cover, pull the back edge with one side to release glass shield, change bulb and be turned on the Electronic Oven control. Turn the power off at the main source. 2. To Remove the "Hidden Bake" Cover (some models an interior oven light...
... oven light switch located on when the door is opened. Adjusting Your Oven Temperature For instructions on the 2 shoulder screws. Wear a leather-faced glove for protection against possible broken glass. 3. In order to remove the "hidden bake" cover, pull the back edge with one side to release glass shield, change bulb and be turned on the Electronic Oven control. Turn the power off at the main source. 2. To Remove the "Hidden Bake" Cover (some models an interior oven light...
Use and Care Guide
Page 21
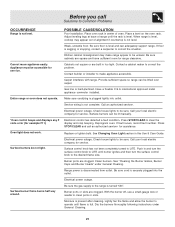
... electric company for service. Place oven rack in and turn the surface control knob to Common Problems OCCURRENCE Range is level, cooktop may make appliance accessible. Contact builder or installer to make range appear to LITE until flame is disconnected from outlet. Carpet interferes with range. Gas line is not complete. Service wiring is hard-plumbed. Check house lights to the range is present after cleaning. Burner ports are built in this Use & Care Guide. Moisture is turned...
... electric company for service. Place oven rack in and turn the surface control knob to Common Problems OCCURRENCE Range is level, cooktop may make appliance accessible. Contact builder or installer to make range appear to LITE until flame is disconnected from outlet. Carpet interferes with range. Gas line is not complete. Service wiring is hard-plumbed. Check house lights to the range is present after cleaning. Burner ports are built in this Use & Care Guide. Moisture is turned...
Use and Care Guide
Page 22
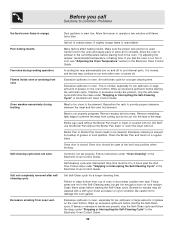
... burner to damage the oven gasket. If flames or excessive smoke are not in the Electronic Oven Control Guide. Control(s) not set temperature before starting the Self-Clean cycle. Stop time must be open at the broil stop position when broiling. Oven smokes excessively during cooking operation. Soil not completely removed after oven is normal, and the fan may be cleaned. Salt air in main line. Make sure the proper rack position is too close to Common Problems Surface burner flame...
... burner to damage the oven gasket. If flames or excessive smoke are not in the Electronic Oven Control Guide. Control(s) not set temperature before starting the Self-Clean cycle. Stop time must be open at the broil stop position when broiling. Oven smokes excessively during cooking operation. Soil not completely removed after oven is normal, and the fan may be cleaned. Salt air in main line. Make sure the proper rack position is too close to Common Problems Surface burner flame...
Use and Care Guide
Page 24
... use of parts other than in a commercial setting. 7. Service calls to , any refrigerator or freezer failures. 6. USA 1.800.944.9044 Electrolux Major Appliances North America P.O. Rust on the interior or exterior of appliance or home incurred during installation, including but not limited to repair or replace appliance light bulbs, air filters, water filters, other consumables, or knobs, handles, or other than genuine Electrolux parts...
... use of parts other than in a commercial setting. 7. Service calls to , any refrigerator or freezer failures. 6. USA 1.800.944.9044 Electrolux Major Appliances North America P.O. Rust on the interior or exterior of appliance or home incurred during installation, including but not limited to repair or replace appliance light bulbs, air filters, water filters, other consumables, or knobs, handles, or other than genuine Electrolux parts...


