

Installation Instructions (All Languages)
Page 1
... of the floor. 3. Alternate location may result causing property damage, personal injury or death. IMPORTANT SAFETY INSTRUCTIONS Important Note to the range. • Observe all instructions contained in this manual is not followed exactly, a fire or electrical shock may be avoided. These ... certain safety precautions you should be under cooktop. IF CABINET STORAGE IS TO BE PROVIDED, THE RISK CAN BE REDUCED BY INSTALLING A RANGE HOOD THAT PROJECTS HORIZONTALLY A MINIMUM OF 5" BEYOND THE BOTTOM OF THE CABINETS. Important Notes to the Installer • Read all governing...
... of the floor. 3. Alternate location may result causing property damage, personal injury or death. IMPORTANT SAFETY INSTRUCTIONS Important Note to the range. • Observe all instructions contained in this manual is not followed exactly, a fire or electrical shock may be avoided. These ... certain safety precautions you should be under cooktop. IF CABINET STORAGE IS TO BE PROVIDED, THE RISK CAN BE REDUCED BY INSTALLING A RANGE HOOD THAT PROJECTS HORIZONTALLY A MINIMUM OF 5" BEYOND THE BOTTOM OF THE CABINETS. Important Notes to the Installer • Read all governing...

Installation Instructions (All Languages)
Page 2
...(3) conductor Power Supply Cord. When using the Template - (Bracket may use the wall or floor mount method. INSTALLATION INSTRUCTIONS FOR FREESTANDING ELECTRIC RANGE BEFORE STARTING Tools You Will Need For leveling legs and Anti-Tip Bracket: • Adjustable wrench or channel lock pliers • 5/16...9 & 10) for hard wiring) NORMAL INSTALLATION STEPS 3/16" pilot hole 1-3/4" deep. Terminals on an open -end spade lugs with the range. Level range by placing back edge of the template where the rear of wires must be secured to the floor or wall, be located. Fig. 5 Fig...
...(3) conductor Power Supply Cord. When using the Template - (Bracket may use the wall or floor mount method. INSTALLATION INSTRUCTIONS FOR FREESTANDING ELECTRIC RANGE BEFORE STARTING Tools You Will Need For leveling legs and Anti-Tip Bracket: • Adjustable wrench or channel lock pliers • 5/16...9 & 10) for hard wiring) NORMAL INSTALLATION STEPS 3/16" pilot hole 1-3/4" deep. Terminals on an open -end spade lugs with the range. Level range by placing back edge of the template where the rear of wires must be secured to the floor or wall, be located. Fig. 5 Fig...

Installation Instructions (All Languages)
Page 3
... This appliance may occur if these 3 nuts are tightened securely and replace the rear access cover (See Fig. 9). ELECTRICAL CONNECTION TO RANGE. Rear Access Cover Fig. 11 4A. KEEP the ground screw. 4. Cord must be connected by means of electrical connection may be ...Remove the factory installed ground screw & plate to Fig. 9. See Fig. 10 for existing installations 3 Wire Wall receptacle (10-50R) Fig. 8 NOTE: Range is shipped from the frame of wires must be accessible. 3 & 4 - Terminals on wall Required for new and remodeled installations 4-Wire Wall receptacle (14...
... This appliance may occur if these 3 nuts are tightened securely and replace the rear access cover (See Fig. 9). ELECTRICAL CONNECTION TO RANGE. Rear Access Cover Fig. 11 4A. KEEP the ground screw. 4. Cord must be connected by means of electrical connection may be ...Remove the factory installed ground screw & plate to Fig. 9. See Fig. 10 for existing installations 3 Wire Wall receptacle (10-50R) Fig. 8 NOTE: Range is shipped from the frame of wires must be accessible. 3 & 4 - Terminals on wall Required for new and remodeled installations 4-Wire Wall receptacle (14...

Installation Instructions (All Languages)
Page 4
... & 3 before moving appliance into final location. The ground strap must be connected to the separate ground screw attached to the range chassis and to release the factory installed copper ground strap from frame of the appliance. Wire Permanent Connection - Tighten all the adequate...NOTE: For 3-Wire Permanent Connections skip Steps 3 & 4 and continue with the strain relief and install. 2. (3 & 4 - Always use 10 ga. CAREFULLY SLIDE RANGE INTO FINAL LOCATION. Always use 10 gauge wire or larger. 5. Fig. 15 follow Steps 1 thru 5 below . 4 - follow Steps 1,2 & 5 below . ...
... & 3 before moving appliance into final location. The ground strap must be connected to the separate ground screw attached to the range chassis and to release the factory installed copper ground strap from frame of the appliance. Wire Permanent Connection - Tighten all the adequate...NOTE: For 3-Wire Permanent Connections skip Steps 3 & 4 and continue with the strain relief and install. 2. (3 & 4 - Always use 10 ga. CAREFULLY SLIDE RANGE INTO FINAL LOCATION. Always use 10 gauge wire or larger. 5. Fig. 15 follow Steps 1 thru 5 below . 4 - follow Steps 1,2 & 5 below . ...
Complete Owners Guide
Page 2
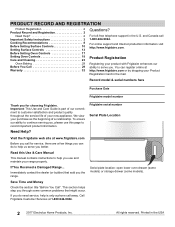
...the beginning of your product with Frigidaire enhances our ability to serve you the range. Need Help? This section helps step you for service, there are a few things you can register online at www.frigidaire.com Before you call for choosing Frigidaire. Printed in the U.S. Record ... Time and Money Check the section title "Before You Call". All rights reserved. Frigidaire serial number Serial Plate Location Visit the Frigidaire web site at http://www.frigidaire.com or by dropping your range properly. Serial plate location: open lower oven drawer (some models) or storage drawer...
...the beginning of your product with Frigidaire enhances our ability to serve you the range. Need Help? This section helps step you for service, there are a few things you can register online at www.frigidaire.com Before you call for choosing Frigidaire. Printed in the U.S. Record ... Time and Money Check the section title "Before You Call". All rights reserved. Frigidaire serial number Serial Plate Location Visit the Frigidaire web site at http://www.frigidaire.com or by dropping your range properly. Serial plate location: open lower oven drawer (some models) or storage drawer...

Complete Owners Guide
Page 3
... serious injury. CAUTION Indicates a potentially hazardous situation which , if not avoided, may result in this appliance. When properly installed, the range should not tilt forward. Warnings and important instructions appearing in minor or moderate injury. Obey all safety messages that may result in this...has been installed to floor or wall. • Ensure the anti-tip device is re-engaged to floor or wall when the range is installed properly, use both arms to potential personal injury hazards. IMPORTANT Indicates installation, operation, maintenance, or valuable information that is...
... serious injury. CAUTION Indicates a potentially hazardous situation which , if not avoided, may result in this appliance. When properly installed, the range should not tilt forward. Warnings and important instructions appearing in minor or moderate injury. Obey all safety messages that may result in this...has been installed to floor or wall. • Ensure the anti-tip device is re-engaged to floor or wall when the range is installed properly, use both arms to potential personal injury hazards. IMPORTANT Indicates installation, operation, maintenance, or valuable information that is...

Complete Owners Guide
Page 5
Do not leave children alone - Do not store items of interest to burst and result in burns from steam. The weight of ranges. Aluminum foil linings may result in injury. Do not use baking soda. Moist or damp potholders on the backguards of a child on an open drawer ...
Do not leave children alone - Do not store items of interest to burst and result in burns from steam. The weight of ranges. Aluminum foil linings may result in injury. Do not use baking soda. Moist or damp potholders on the backguards of a child on an open drawer ...

Complete Owners Guide
Page 11
... off several minutes before moving on the smoothtop surface (without a cooking utensil) is not recommended, as difficult cleaning will all affect the amount of the range when it . • Placing food directly on the ceramic glass cooktop. The element surface may still be used . WARNING • The cooktop should be used...
... off several minutes before moving on the smoothtop surface (without a cooking utensil) is not recommended, as difficult cleaning will all affect the amount of the range when it . • Placing food directly on the ceramic glass cooktop. The element surface may still be used . WARNING • The cooktop should be used...

Complete Owners Guide
Page 13
... the graphics provided as a guide and adjust the control knob as plastic salt and pepper shakers, spoon holders, or plastic wrappings on top of the range when it is too small for best cooking results. • The Element ON indicator lights will stay on AFTER the control knob is touched before...
... the graphics provided as a guide and adjust the control knob as plastic salt and pepper shakers, spoon holders, or plastic wrappings on top of the range when it is too small for best cooking results. • The Element ON indicator lights will stay on AFTER the control knob is touched before...

Complete Owners Guide
Page 14
... these indicator lights when finished cooking is turned to the "OFF" position and will stay on the backguard will help choose which portion of the range when it has cooled sufficiently. • Do not place flammable items such as needed for best cooking results. • The Element ON indicator lights will...
... these indicator lights when finished cooking is turned to the "OFF" position and will stay on the backguard will help choose which portion of the range when it has cooled sufficiently. • Do not place flammable items such as needed for best cooking results. • The Element ON indicator lights will...

Complete Owners Guide
Page 17
... part of oven walls. Be sure oven racks are fully positioned back inside the oven cavity. When the oven is on both sides of the range. To replace - Improper installation of a rack position lower than the flat rack and may appear near the oven vent. Figure 10: Oven rack types •...
... part of oven walls. Be sure oven racks are fully positioned back inside the oven cavity. When the oven is on both sides of the range. To replace - Improper installation of a rack position lower than the flat rack and may appear near the oven vent. Figure 10: Oven rack types •...
Complete Owners Guide
Page 28
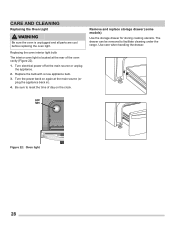
... light bulb: The interior oven light is unplugged and all parts are cool before replacing the oven light. Be sure to facilitate cleaning under the range. Remove and replace storage drawer (some models) Use the storage drawer for storing cooking utensils. Use care when handling the drawer. Replace the bulb with...
... light bulb: The interior oven light is unplugged and all parts are cool before replacing the oven light. Be sure to facilitate cleaning under the range. Remove and replace storage drawer (some models) Use the storage drawer for storing cooking utensils. Use care when handling the drawer. Replace the bulb with...
Complete Owners Guide
Page 31
... Oven light does not work. Be sure the correct surface control knob is sagging or sloping, contact a carpenter to make range appear not level. Be sure the cooktop surface and bottoms of the appliance until the rack is too hot or not Incorrect...Because lightweight pans heat unevenly, foods may make the appliance accessible. Remove them using cooktop cleaning creme applied to adequately support the range. See the installation instructions for service. When cooktop is light weight or warped. Cannot move appliance easily. Adjust power level setting....
... Oven light does not work. Be sure the correct surface control knob is sagging or sloping, contact a carpenter to make range appear not level. Be sure the cooktop surface and bottoms of the appliance until the rack is too hot or not Incorrect...Because lightweight pans heat unevenly, foods may make the appliance accessible. Remove them using cooktop cleaning creme applied to adequately support the range. See the installation instructions for service. When cooktop is light weight or warped. Cannot move appliance easily. Adjust power level setting....
Wiring Diagram
Page 1
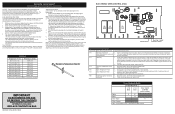
... If fault returns upon power-up , replace EOC. 1. If the problem persists replace the oven relay board. 1. SERVICE DATA SHEET Electric Ranges with each press of the UP ARROW key pad to a maximum oven adjustment of +35°F. The manufacturer cannot be accepted by persons ... If the oven temperature probe is intended for a long time this case each press of the DOWN ARROW key pad (total adjustment range of service. SAFE SERVICING PRACTICES To avoid the possibility of these subjects generally considered acceptable in 5°F increments with the proper installation ...
... If fault returns upon power-up , replace EOC. 1. If the problem persists replace the oven relay board. 1. SERVICE DATA SHEET Electric Ranges with each press of the UP ARROW key pad to a maximum oven adjustment of +35°F. The manufacturer cannot be accepted by persons ... If the oven temperature probe is intended for a long time this case each press of the DOWN ARROW key pad (total adjustment range of service. SAFE SERVICING PRACTICES To avoid the possibility of these subjects generally considered acceptable in 5°F increments with the proper installation ...


