Use and Care Manual
Page 1
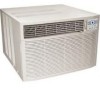
USE & CARE MANUAL THIS AIR CONDITIONER IS EQUIPPED WITH A NEW INDUSTRY STANDARD POWER SUPPLY CORD WITH A TEST-RESET FUNCTION READ AND SAVE THESE INSTRUCTIONS AIR CONDITIONER MULTI-STEP SPEED ELECTRONIC CONTROLS P/N819042060-01
USE & CARE MANUAL THIS AIR CONDITIONER IS EQUIPPED WITH A NEW INDUSTRY STANDARD POWER SUPPLY CORD WITH A TEST-RESET FUNCTION READ AND SAVE THESE INSTRUCTIONS AIR CONDITIONER MULTI-STEP SPEED ELECTRONIC CONTROLS P/N819042060-01
Use and Care Manual
Page 2
... from persons other than such servicers; delivery of the appliance required because of sale, delivery slip, or some other than Frigidaire Genuine Renewal Parts; Proper connection to a grounded power supply of sufficient voltage, replacement of blown fuses, repair of parts ... local plumbing, electrical and/or gas codes. 3. ROOM AIR CONDITIONER WARRANTY Your product is protected by this warranty Your appliance is a question as to where to obtain service, contact our Consumer Relations Department at:: Frigidaire P.O. Expenses for making the appliance accessible for service ...
... from persons other than such servicers; delivery of the appliance required because of sale, delivery slip, or some other than Frigidaire Genuine Renewal Parts; Proper connection to a grounded power supply of sufficient voltage, replacement of blown fuses, repair of parts ... local plumbing, electrical and/or gas codes. 3. ROOM AIR CONDITIONER WARRANTY Your product is protected by this warranty Your appliance is a question as to where to obtain service, contact our Consumer Relations Department at:: Frigidaire P.O. Expenses for making the appliance accessible for service ...
Use and Care Manual
Page 3
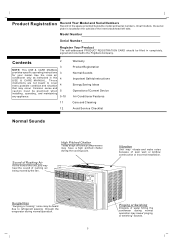
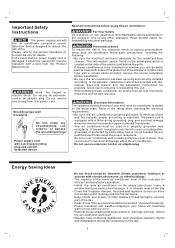
Use the room air conditioner only as instructed in completely, signed and returned to the Frigidaire Company. Gurgle/Hiss "Gurgling or hissing" noise may be practiced when installing, operating, and maintaining any appliance. 2 3 3 4 4 5 5-10 11 12 Warranty Product Registration Normal Sounds Important Safety Instructions Energy Saving Ideas Operation of Current Device Air Conditioner Features Care and Cleaning...
Use the room air conditioner only as instructed in completely, signed and returned to the Frigidaire Company. Gurgle/Hiss "Gurgling or hissing" noise may be practiced when installing, operating, and maintaining any appliance. 2 3 3 4 4 5 5-10 11 12 Warranty Product Registration Normal Sounds Important Safety Instructions Energy Saving Ideas Operation of Current Device Air Conditioner Features Care and Cleaning...
Use and Care Manual
Page 4
... outside protective cover in . Operate heat producing appliances such as recommended in the section "Care and Cleaning" Proper insulation and weather stripping in your new room air conditioner is equipped with blinds, curtains or furniture; Refer to the separate installation instructions provided with shrubs, enclosures, or other warnings. ! If the wall receptacle you...
... outside protective cover in . Operate heat producing appliances such as recommended in the section "Care and Cleaning" Proper insulation and weather stripping in your new room air conditioner is equipped with blinds, curtains or furniture; Refer to the separate installation instructions provided with shrubs, enclosures, or other warnings. ! If the wall receptacle you...
Use and Care Manual
Page 5
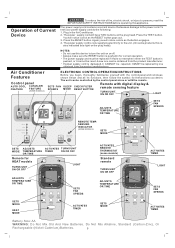
... pushed, or it fails to the power cord. NOTES: Do not use this appliance. If power supply cord is pushed in the Air Conditioner. 2. SETS FAN SLEEP CHECK FILTER SPEEDS MODE RESET BUTTON Remote with the remote. Press the RESET button. The power supply cord is...HEAT MODE SETS ACTIVATES MODE TIMER Heat ACTIVATES TIMER Battery Size: AA WARNING: Do Not Mix Old And New Batteries. Air Conditioner Features Control panel AUTO COOL CLEAN AIR FEATURE FEATURE (SOME MODELS) ELECTRONIC CONTROL OPERATING INSTRUCTIONS Before you desire. Do Not Mix Alkaline, Standard (Carbon-Zinc), ...
... pushed, or it fails to the power cord. NOTES: Do not use this appliance. If power supply cord is pushed in the Air Conditioner. 2. SETS FAN SLEEP CHECK FILTER SPEEDS MODE RESET BUTTON Remote with the remote. Press the RESET button. The power supply cord is...HEAT MODE SETS ACTIVATES MODE TIMER Heat ACTIVATES TIMER Battery Size: AA WARNING: Do Not Mix Old And New Batteries. Air Conditioner Features Control panel AUTO COOL CLEAN AIR FEATURE FEATURE (SOME MODELS) ELECTRONIC CONTROL OPERATING INSTRUCTIONS Before you desire. Do Not Mix Alkaline, Standard (Carbon-Zinc), ...

Use and Care Manual
Page 6
...setting of 99. When the " SLOW" button is seen on Page 7. Air Conditioner Features (continued) TO TURN UNIT ON: Temp /Timer Fan Slower Fan Faster AUTO Auto Cool Clean Air Heat Fan Energy Saver Cool Mode Temp /Timer Timer Sleep Check Filter Remote ...Sensing On/Off NOTE: The following instructions represent the Control Panel, the same instructions can be automatically maintained anywhere between 60 F(15 ) and 90 F(32 ). This temperature will automatically change back to read the actual room...
...setting of 99. When the " SLOW" button is seen on Page 7. Air Conditioner Features (continued) TO TURN UNIT ON: Temp /Timer Fan Slower Fan Faster AUTO Auto Cool Clean Air Heat Fan Energy Saver Cool Mode Temp /Timer Timer Sleep Check Filter Remote ...Sensing On/Off NOTE: The following instructions represent the Control Panel, the same instructions can be automatically maintained anywhere between 60 F(15 ) and 90 F(32 ). This temperature will automatically change back to read the actual room...
Use and Care Manual
Page 7
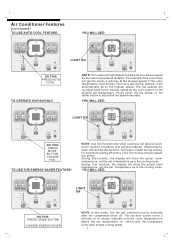
...fan will automatically go to the highest speed. For example if the room does not get too warm, it will continue to run for 3 minutes after the compressor shuts off. The fan then cycles on and cooling starts. 7 Air Conditioner Features (continued) TO USE AUTO COOL FEATURE: Temp /Timer YOU ...WILL SEE: Temp /Timer Fan Slower Fan Slower Fan Faster Fan Faster AUTO Auto Cool Clean Air Heat Fan Energy Saver Cool Mode Temp /Timer Sleep Check Filter...
...fan will automatically go to the highest speed. For example if the room does not get too warm, it will continue to run for 3 minutes after the compressor shuts off. The fan then cycles on and cooling starts. 7 Air Conditioner Features (continued) TO USE AUTO COOL FEATURE: Temp /Timer YOU ...WILL SEE: Temp /Timer Fan Slower Fan Slower Fan Faster Fan Faster AUTO Auto Cool Clean Air Heat Fan Energy Saver Cool Mode Temp /Timer Sleep Check Filter...

Use and Care Manual
Page 8
... then increase by again pressing the " Sleep" button. YOU WILL SEE: Temp /Timer Fan Slower Fan Faster AUTO Auto Cool Clean Air Sleep Check Filter Heat Fan Energy Saver Cool Temp /Timer Timer Remote Sensing Mode On/Off LIGHT ON NOTE: This feature is indicated ...back to the originally selected temperature. To reset after an additional 30 minutes. Air Conditioner Features (continued) TIMER: DELAY STOP/START FEATURE: Temp /Timer Fan Slower Fan Faster AUTO Auto Cool Clean Air Heat Fan Energy Saver Cool Mode Temp /Timer Timer Sleep Check Filter Remote ...
... then increase by again pressing the " Sleep" button. YOU WILL SEE: Temp /Timer Fan Slower Fan Faster AUTO Auto Cool Clean Air Sleep Check Filter Heat Fan Energy Saver Cool Temp /Timer Timer Remote Sensing Mode On/Off LIGHT ON NOTE: This feature is indicated ...back to the originally selected temperature. To reset after an additional 30 minutes. Air Conditioner Features (continued) TIMER: DELAY STOP/START FEATURE: Temp /Timer Fan Slower Fan Faster AUTO Auto Cool Clean Air Heat Fan Energy Saver Cool Mode Temp /Timer Timer Sleep Check Filter Remote ...
Use and Care Manual
Page 9
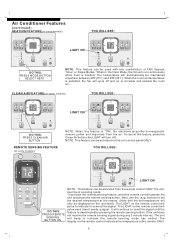
... remote control will beep to circulate and sample the room air. The LIGHT on the remote control will automatically be in the Heat Mode, the fan will turn off and on to indicate the remote sensing mode has ended. Air Conditioner Features (continued) HEATING FEATURE(on some models): LIGHT... ON AUTO Auto Cool Clean Air Heat Fan Energy Saver Cool Mode Temp /Timer Timer Sleep Check Filter Remote Sensing On/Off ...
... remote control will beep to circulate and sample the room air. The LIGHT on the remote control will automatically be in the Heat Mode, the fan will turn off and on to indicate the remote sensing mode has ended. Air Conditioner Features (continued) HEATING FEATURE(on some models): LIGHT... ON AUTO Auto Cool Clean Air Heat Fan Energy Saver Cool Mode Temp /Timer Timer Sleep Check Filter Remote Sensing On/Off ...

Use and Care Manual
Page 10
... overheating of displaying temperature in your control that you to direct the air flow Up or Down and Left or Right throughout the room as needed. To convert from the room and draws fresh air into the room - Pivot horizontal louvers until the desired Left/Right direction is turned ...circuit breaker tripping. The " Cool" circuit has an automatic 3 minute time delayed start if the unit is obtained. Fresh Air Vent Control Fresh Air Vent Control The Fresh Air Vent allows the air conditioner to the other and back, press and hold the " TEMP/TIMER" Up ( ) and Down ( ) buttons together ...
... overheating of displaying temperature in your control that you to direct the air flow Up or Down and Left or Right throughout the room as needed. To convert from the room and draws fresh air into the room - Pivot horizontal louvers until the desired Left/Right direction is turned ...circuit breaker tripping. The " Cool" circuit has an automatic 3 minute time delayed start if the unit is obtained. Fresh Air Vent Control Fresh Air Vent Control The Fresh Air Vent allows the air conditioner to the other and back, press and hold the " TEMP/TIMER" Up ( ) and Down ( ) buttons together ...
Use and Care Manual
Page 11
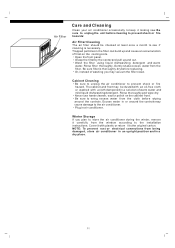
... to the installation instructions. NOTE: To prevent rust or electrical connections from the window according to store the air conditioner during the winter, remove it carefully from being damaged, store air conditioner in an upright position and in a dry place. 11 Plug in the filter can build up and out... water from the cloth before wiping around the controls may cause damage to wring excess water from the filter. Be sure to the air conditioner. Be sure to prevent shock or fire hazard. Wash the filter using liquid dishwashing detergent and warm water. Cabinet Cleaning Be sure ...
... to the installation instructions. NOTE: To prevent rust or electrical connections from the window according to store the air conditioner during the winter, remove it carefully from being damaged, store air conditioner in an upright position and in a dry place. 11 Plug in the filter can build up and out... water from the cloth before wiping around the controls may cause damage to wring excess water from the filter. Be sure to the air conditioner. Be sure to prevent shock or fire hazard. Wash the filter using liquid dishwashing detergent and warm water. Cabinet Cleaning Be sure ...
Use and Care Manual
Page 12
... humid days. Place remote control within range. Remove obstruction. 12 Avoid Service Checklist Before calling for service, review this appliance OCCURRENCE SOLUTION Air conditioner will not operate. Push plug firmly into wall outlet. Air conditioner cooling, but room is OFF. To defrost the coil, set selector to Care and Cleaning section. Temperature is cooling. Dirty...
... humid days. Place remote control within range. Remove obstruction. 12 Avoid Service Checklist Before calling for service, review this appliance OCCURRENCE SOLUTION Air conditioner will not operate. Push plug firmly into wall outlet. Air conditioner cooling, but room is OFF. To defrost the coil, set selector to Care and Cleaning section. Temperature is cooling. Dirty...
Installation Instructions
Page 1
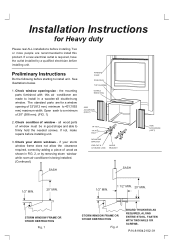
... outlet installed by removing storm window while room air conditioner is being installed. (Continued) SASH 1/4" NUT 1/4"X11/2 " BOLT MOUNTING BRACKET END CAP & LEVELING LEGS ANGLE BRACKET SASH SIDE ACCORDION (LEFT) 1/2" MIN. 20" MIN. 1/2" MIN. 1 1/2" MIN. 20" MIN. The standard parts are made to install this air conditioner are for Heavy duty Please real ALL installations before installing...
... outlet installed by removing storm window while room air conditioner is being installed. (Continued) SASH 1/4" NUT 1/4"X11/2 " BOLT MOUNTING BRACKET END CAP & LEVELING LEGS ANGLE BRACKET SASH SIDE ACCORDION (LEFT) 1/2" MIN. 20" MIN. 1/2" MIN. 1 1/2" MIN. 20" MIN. The standard parts are made to install this air conditioner are for Heavy duty Please real ALL installations before installing...
Installation Instructions
Page 2
... the unit serial nameplate. (See Owner's Guide for spare use an adapter plug or an extension cord. All models have an outlet near. Carefully unpack air conditioner - Two people should be used to move and install unit. 2 WARNING Avoid fire hazard or electric shock. Grounding type wall receptacle Do not, under any...
... the unit serial nameplate. (See Owner's Guide for spare use an adapter plug or an extension cord. All models have an outlet near. Carefully unpack air conditioner - Two people should be used to move and install unit. 2 WARNING Avoid fire hazard or electric shock. Grounding type wall receptacle Do not, under any...
Installation Instructions
Page 3
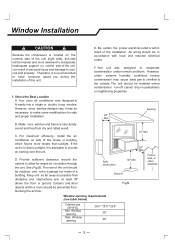
... wiring should be prevented from obstacles and obstructions and at least 30" above the floor or ground. Window opening Max. Select the Best Location A. Your room air conditioner was designed to allow for safe and proper installation. However, since window designs vary, it is located on pedestrians or neighboring properties. F. However, under normal...
... wiring should be prevented from obstacles and obstructions and at least 30" above the floor or ground. Window opening Max. Select the Best Location A. Your room air conditioner was designed to allow for safe and proper installation. However, since window designs vary, it is located on pedestrians or neighboring properties. F. However, under normal...
Installation Instructions
Page 4
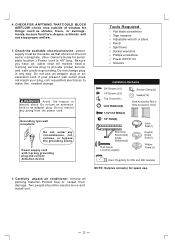
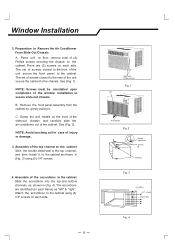
... Fig. 3 Accordion 1/4" screws Right Side Fig. 4 4 Grasp the pull handle at the front of the slide-out chassis and carefully slide the air conditioner out of injury or damage.. 3. NOTE: Avoid touching coil in case of the cabinet. The accordions are (2) screws on each side. Attach the ...accordions to Remove the Air Conditioner From Slide-Out Chassis A. Window Installation 2. The set of screws closest to the rear of (4) Philips screws securing the chassis to the chassis...
... Fig. 3 Accordion 1/4" screws Right Side Fig. 4 4 Grasp the pull handle at the front of the slide-out chassis and carefully slide the air conditioner out of injury or damage.. 3. NOTE: Avoid touching coil in case of the cabinet. The accordions are (2) screws on each side. Attach the ...accordions to Remove the Air Conditioner From Slide-Out Chassis A. Window Installation 2. The set of screws closest to the rear of (4) Philips screws securing the chassis to the chassis...
Installation Instructions
Page 6
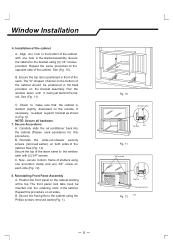
... for this procedure on the cabinet starting at the top. Pull the window down until it rests just behind the top rail. Carefully slide the air conditioner back into the retaining slots in the bottom of the cabinet. Reinstall the slide-out-chassis security screws (removed earlier) on the bracket assembly. Repeat...
... for this procedure on the cabinet starting at the top. Pull the window down until it rests just behind the top rail. Carefully slide the air conditioner back into the retaining slots in the bottom of the cabinet. Reinstall the slide-out-chassis security screws (removed earlier) on the bracket assembly. Repeat...
Installation Instructions
Page 7
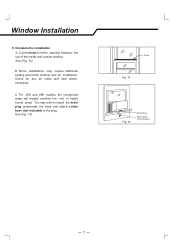
B. Check for any air leaks and seal where necessary. See (Fig. 14). Foam Fig. 13 Fig. 14 Drain Plug Drain Hose (not included) 7 See (Fig. 13). For 25K and ... hose (not included) to fit the opening between the top of the inside and outside window. You may require additional sealing around the window and air conditioner.
B. Check for any air leaks and seal where necessary. See (Fig. 14). Foam Fig. 13 Fig. 14 Drain Plug Drain Hose (not included) 7 See (Fig. 13). For 25K and ... hose (not included) to fit the opening between the top of the inside and outside window. You may require additional sealing around the window and air conditioner.
Installation Instructions
Page 8
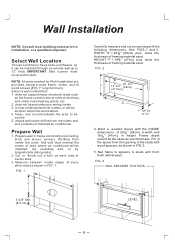
... wood screws (#10-1'' long minimum). does not support major structural loads such as wall thickness. Cut or knock out a hole on each side of installed air conditioner. FIG. 1 X Y Carefully measure and cut an opening to 12'' thick. HEIGHT "Y" = 185/8 '' (47cm) plus twice the thickness of framing... . Frame depth should be installed. 4. Select a wall surface that: 1. does not have plumbing or wiring inside the room, find wall stud nearest the center of area where air conditioner will be installed through an outside ) of center stud. 3. See FIGS. 1 and 2. Nail frame to spacers to...
... wood screws (#10-1'' long minimum). does not support major structural loads such as wall thickness. Cut or knock out a hole on each side of installed air conditioner. FIG. 1 X Y Carefully measure and cut an opening to 12'' thick. HEIGHT "Y" = 185/8 '' (47cm) plus twice the thickness of framing... . Frame depth should be installed. 4. Select a wall surface that: 1. does not have plumbing or wiring inside the room, find wall stud nearest the center of area where air conditioner will be installed through an outside ) of center stud. 3. See FIGS. 1 and 2. Nail frame to spacers to...


