Use and Care Manual
Page 1
USE & CARE MANUAL THIS AIR CONDITIONER IS EQUIPPED WITH A NEW INDUSTRY STANDARD POWER SUPPLY CORD WITH A TEST-RESET FUNCTION READ AND SAVE THESE INSTRUCTIONS AIR CONDITIONER MULTI-STEP SPEED ELECTRONIC CONTROLS P/N819042060-01
USE & CARE MANUAL THIS AIR CONDITIONER IS EQUIPPED WITH A NEW INDUSTRY STANDARD POWER SUPPLY CORD WITH A TEST-RESET FUNCTION READ AND SAVE THESE INSTRUCTIONS AIR CONDITIONER MULTI-STEP SPEED ELECTRONIC CONTROLS P/N819042060-01
Use and Care Manual
Page 2
... which are required because of incidental or consequential damages, so this warranty. proves to be required. ROOM AIR CONDITIONER WARRANTY Your product is protected by this appliance which prove to be NORMAL RESPONSIBILITIES OF THE defective in... workmanship. Note: Some states do not involve malfunction or defects in workmanship or material, or for repairing or replacing Costs of God. 4. Electrolux has authorized Frigidaire Consumer Services and their authorized servicers to finish after installation. Repair or replace any removal, R e f r i g e r a t i o n S y s t e m ( c...
... which are required because of incidental or consequential damages, so this warranty. proves to be required. ROOM AIR CONDITIONER WARRANTY Your product is protected by this appliance which prove to be NORMAL RESPONSIBILITIES OF THE defective in... workmanship. Note: Some states do not involve malfunction or defects in workmanship or material, or for repairing or replacing Costs of God. 4. Electrolux has authorized Frigidaire Consumer Services and their authorized servicers to finish after installation. Repair or replace any removal, R e f r i g e r a t i o n S y s t e m ( c...
Use and Care Manual
Page 3
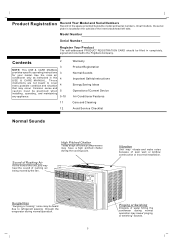
... may vibrate and make noise because of water hitting the condenser during normal operation may have a high pitched chatter during the cooling cycle. Use the room air conditioner only as instructed in the space provided below the model and serial numbers. High Pitched Chatter Today's high efficiency compressors may cause "pinging or swishing... interior bulkhead left side. Product Registration Record Your Model and Serial Numbers Record in this USE & CARE MANUAL. These instructions are not meant to the Frigidaire Company.
... may vibrate and make noise because of water hitting the condenser during normal operation may have a high pitched chatter during the cooling cycle. Use the room air conditioner only as instructed in the space provided below the model and serial numbers. High Pitched Chatter Today's high efficiency compressors may cause "pinging or swishing... interior bulkhead left side. Product Registration Record Your Model and Serial Numbers Record in this USE & CARE MANUAL. These instructions are not meant to the Frigidaire Company.
Use and Care Manual
Page 4
..., you have a qualified electrician install the proper receptacle. The capacity of Current Device' for possible future use in . Install the room air conditioner on the serial plate. NOTE The power supply cord with 3-prong grounding plug and current detection device Read all instructions before installation. ...the separate installation instructions provided with a screen panel included, remove the screen completely before using your new room air conditioner is shaded most of the day. Do not remove any circumstances, cut, remove, or bypass the grounding prong. Be sure...
..., you have a qualified electrician install the proper receptacle. The capacity of Current Device' for possible future use in . Install the room air conditioner on the serial plate. NOTE The power supply cord with 3-prong grounding plug and current detection device Read all instructions before installation. ...the separate installation instructions provided with a screen panel included, remove the screen completely before using your new room air conditioner is shaded most of the day. Do not remove any circumstances, cut, remove, or bypass the grounding prong. Be sure...
Use and Care Manual
Page 5
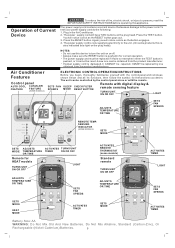
... out. 3. Always make sure the RESET button is pushed, or it fails to reset when either the TEST button is pushed in the Air Conditioner. 2. If power supply cord is also indicated by one can be replaced by a light on the plug head). SETS FAN SLEEP CHECK .../Off SETS ADJUSTS ACTIVATES TURNS UNIT MODE TEMPERATURE TIMER ON OR OFF OR TIME Remote for the functions you desire. Air Conditioner Features Control panel AUTO COOL CLEAN AIR FEATURE FEATURE (SOME MODELS) ELECTRONIC CONTROL OPERATING INSTRUCTIONS Before you will have TWO buttons on or off. Press the ...
... out. 3. Always make sure the RESET button is pushed, or it fails to reset when either the TEST button is pushed in the Air Conditioner. 2. If power supply cord is also indicated by one can be replaced by a light on the plug head). SETS FAN SLEEP CHECK .../Off SETS ADJUSTS ACTIVATES TURNS UNIT MODE TEMPERATURE TIMER ON OR OFF OR TIME Remote for the functions you desire. Air Conditioner Features Control panel AUTO COOL CLEAN AIR FEATURE FEATURE (SOME MODELS) ELECTRONIC CONTROL OPERATING INSTRUCTIONS Before you will have TWO buttons on or off. Press the ...

Use and Care Manual
Page 6
... will automatically change back to a maximum setting of 10. YOU WILL SEE: Temp /Timer Fan Slower Fan Faster AUTO Auto Cool Clean Air Heat Fan Energy Saver Cool Mode Temp /Timer Timer Sleep Check Filter Remote Sensing On/Off DO THIS: PRESS ON/ OFF PAD TO CHANGE...the desired temperature is pressed, the motor speed will be used to read the actual room temperature. Air Conditioner Features (continued) TO TURN UNIT ON: Temp /Timer Fan Slower Fan Faster AUTO Auto Cool Clean Air Heat Fan Energy Saver Cool Mode Temp /Timer Timer Sleep Check Filter Remote Sensing ...
... will automatically change back to a maximum setting of 10. YOU WILL SEE: Temp /Timer Fan Slower Fan Faster AUTO Auto Cool Clean Air Heat Fan Energy Saver Cool Mode Temp /Timer Timer Sleep Check Filter Remote Sensing On/Off DO THIS: PRESS ON/ OFF PAD TO CHANGE...the desired temperature is pressed, the motor speed will be used to read the actual room temperature. Air Conditioner Features (continued) TO TURN UNIT ON: Temp /Timer Fan Slower Fan Faster AUTO Auto Cool Clean Air Heat Fan Energy Saver Cool Mode Temp /Timer Timer Sleep Check Filter Remote Sensing ...
Use and Care Manual
Page 7
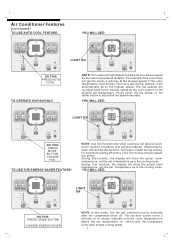
...choose any fan speed you prefer. The fan then cycles on for 2 minutes at 10 minute intervals until the room temperature is not desired, such as the room temperature dictates. Air Conditioner Features (continued) TO USE AUTO COOL FEATURE: Temp /Timer YOU WILL SEE: Temp /Timer Fan Slower Fan ...Slower Fan Faster Fan Faster AUTO Auto Cool Clean Air Heat Fan Energy Saver Cool Mode Temp /Timer Sleep Check ...
...choose any fan speed you prefer. The fan then cycles on for 2 minutes at 10 minute intervals until the room temperature is not desired, such as the room temperature dictates. Air Conditioner Features (continued) TO USE AUTO COOL FEATURE: Temp /Timer YOU WILL SEE: Temp /Timer Fan Slower Fan ...Slower Fan Faster Fan Faster AUTO Auto Cool Clean Air Heat Fan Energy Saver Cool Mode Temp /Timer Sleep Check ...

Use and Care Manual
Page 8
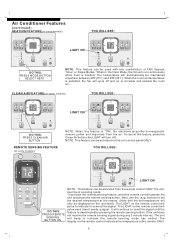
... Filter " button and the light will count down the time remaining until start /stop. Air Conditioner Features (continued) TIMER: DELAY STOP/START FEATURE: Temp /Timer Fan Slower Fan Faster AUTO Auto Cool Clean Air Heat Fan Energy Saver Cool Mode Temp /Timer Timer Sleep Check Filter Remote Sensing On/Off...Remote Sensing On/Off LIGHT ON DO THIS: PRESS SLEEP BUTTON CHECK FILTER FEATURE: Temp /Timer Fan Slower Fan Faster AUTO Auto Cool Clean Air Heat Fan Energy Saver Cool Mode Temp /Timer Timer Sleep Check Filter Remote Sensing On/Off NOTE: In this " MODE " the selected ...
... Filter " button and the light will count down the time remaining until start /stop. Air Conditioner Features (continued) TIMER: DELAY STOP/START FEATURE: Temp /Timer Fan Slower Fan Faster AUTO Auto Cool Clean Air Heat Fan Energy Saver Cool Mode Temp /Timer Timer Sleep Check Filter Remote Sensing On/Off...Remote Sensing On/Off LIGHT ON DO THIS: PRESS SLEEP BUTTON CHECK FILTER FEATURE: Temp /Timer Fan Slower Fan Faster AUTO Auto Cool Clean Air Heat Fan Energy Saver Cool Mode Temp /Timer Timer Sleep Check Filter Remote Sensing On/Off NOTE: In this " MODE " the selected ...
Use and Care Manual
Page 9
...not receive the remote sensing signal during any combination of FAN Speeds, Timer, or Sleep Modes. Air Conditioner Features (continued) HEATING FEATURE(on some models): LIGHT ON AUTO Auto Cool Clean Air Heat Fan Energy Saver Cool Mode Temp /Timer Timer Sleep Check Filter Remote Sensing On/Off NOTE:... ONLY, the unit must be used with any 3 minute interval, The unit will automatically be activated on to circulate and sample the room air. The LIGHT on the remote control will pulse each time it received the signal. The LIGHT on the remote control will run continuously ...
...not receive the remote sensing signal during any combination of FAN Speeds, Timer, or Sleep Modes. Air Conditioner Features (continued) HEATING FEATURE(on some models): LIGHT ON AUTO Auto Cool Clean Air Heat Fan Energy Saver Cool Mode Temp /Timer Timer Sleep Check Filter Remote Sensing On/Off NOTE:... ONLY, the unit must be used with any 3 minute interval, The unit will automatically be activated on to circulate and sample the room air. The LIGHT on the remote control will pulse each time it received the signal. The LIGHT on the remote control will run continuously ...

Use and Care Manual
Page 10
...more features in degrees Fahrenheit or degrees Celsius. The fan will continue to : 1.Recirculate inside air - To convert from the room and draws fresh air into the room - You air conditioner has the louver type described below. The control will allow you should become familiar with. ...Vent Closed (See Fig.1) 2.Draw fresh air into the room - Auger Type The louvers will maintain the set temperature within 2 ...
...more features in degrees Fahrenheit or degrees Celsius. The fan will continue to : 1.Recirculate inside air - To convert from the room and draws fresh air into the room - You air conditioner has the louver type described below. The control will allow you should become familiar with. ...Vent Closed (See Fig.1) 2.Draw fresh air into the room - Auger Type The louvers will maintain the set temperature within 2 ...
Use and Care Manual
Page 11
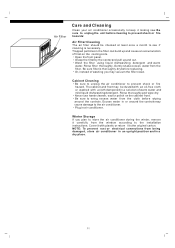
...the cloth before replacing. Rinse filter thoroughly. The cabinet and front may be checked at least once a month to the air conditioner. Be sure to wring excess water from the window according to the original carton. Cover it to the installation instructions. Be...Gently shake excess water from being damaged, store air conditioner in an upright position and in air conditioner. Wash the filter using liquid dishwashing detergent and warm water. Cabinet Cleaning Be sure to unplug the air conditioner to store the air conditioner during the winter, remove it looking new....
...the cloth before replacing. Rinse filter thoroughly. The cabinet and front may be checked at least once a month to the air conditioner. Be sure to wring excess water from the window according to the original carton. Cover it to the installation instructions. Be...Gently shake excess water from being damaged, store air conditioner in an upright position and in air conditioner. Wash the filter using liquid dishwashing detergent and warm water. Cabinet Cleaning Be sure to unplug the air conditioner to store the air conditioner during the winter, remove it looking new....
Use and Care Manual
Page 12
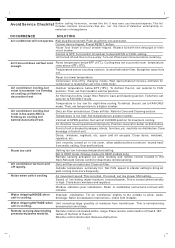
... outlet. Turn control On and set in the COOL mode. Room temperature below 60 F (15 C). Straighten away from humid room. Air conditioner cooling, but room is too warm- Air conditioner cooling, but room is too warm-NO ice forming on in this list. Clean air filter. Refer to bring air past cooling coils more frequently. Vent set thermostat to a lower...
... outlet. Turn control On and set in the COOL mode. Room temperature below 60 F (15 C). Straighten away from humid room. Air conditioner cooling, but room is too warm- Air conditioner cooling, but room is too warm-NO ice forming on in this list. Clean air filter. Refer to bring air past cooling coils more frequently. Vent set thermostat to a lower...
Installation Instructions
Page 1
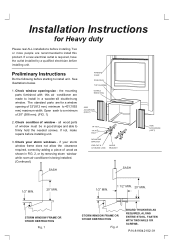
...to 43''(1092 mm) maximum width. FASTEN WITH TWO NAILS OR SCREWS. The standard parts are for Heavy duty Please real ALL installations before starting to install unit. Open sash to install this air conditioner are recommended to a minimum of wood as shown in a wooden sill double-hung window. See ... window - all wood parts of window must be in good shape and able to install in FIG. 2, or by removing storm window while room air conditioner is required, have the outlet installed by adding a piece of 20'' (508 mm). (FIG. 1) WINDOW FOAM SASH SEAL TOP CHANNEL DOUBLE...
...to 43''(1092 mm) maximum width. FASTEN WITH TWO NAILS OR SCREWS. The standard parts are for Heavy duty Please real ALL installations before starting to install unit. Open sash to install this air conditioner are recommended to a minimum of wood as shown in a wooden sill double-hung window. See ... window - all wood parts of window must be in good shape and able to install in FIG. 2, or by removing storm window while room air conditioner is required, have the outlet installed by adding a piece of 20'' (508 mm). (FIG. 1) WINDOW FOAM SASH SEAL TOP CHANNEL DOUBLE...
Installation Instructions
Page 2
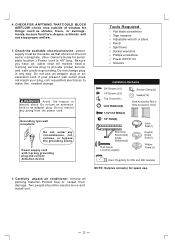
... cord. Be sure you have a 3-prong service plug to make the needed change plug in any way. Do not change . ! Do not use . 6. Carefully unpack air conditioner - check area outside of window for things such as that shown on the unit serial nameplate. (See Owner's Guide for spare use an extension cord...
... cord. Be sure you have a 3-prong service plug to make the needed change plug in any way. Do not change . ! Do not use . 6. Carefully unpack air conditioner - check area outside of window for things such as that shown on the unit serial nameplate. (See Owner's Guide for spare use an extension cord...
Installation Instructions
Page 3
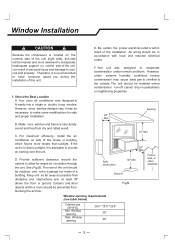
... this unit. 1. D. Side obstruction 20" Min. 30" Min. Window opening 26.5" *18.5" *26.9" 30" 44" 3 Your room air conditioner was designed to evaporate condensation under extreme humidity conditions, excess condensation may be heavier and more shade than sunlight. B. For maximum efficiency, install the... air conditioner on control side of the house or building which favors more awkward to allow for safe and proper installation. If the...
... this unit. 1. D. Side obstruction 20" Min. 30" Min. Window opening 26.5" *18.5" *26.9" 30" 44" 3 Your room air conditioner was designed to evaporate condensation under extreme humidity conditions, excess condensation may be heavier and more shade than sunlight. B. For maximum efficiency, install the... air conditioner on control side of the house or building which favors more awkward to allow for safe and proper installation. If the...
Installation Instructions
Page 4
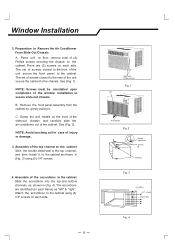
See (Fig. 1). Assemble of the accordions to Remove the Air Conditioner From Slide-Out Chassis A. Attach the accordions to the cabinet using (5) 1/4" screws. 4. Place unit on each side. There are identified (on each frame) as shown ... by gently pulling it to the cabinet. See (Fig. 2). Grasp the pull handle at the front of the slide-out chassis and carefully slide the air conditioner out of the top channel to the cabinet Stick the double sided seal to secure slide-out chassis. Right side Philips screws Fig. 1 Coil Chassis...
See (Fig. 1). Assemble of the accordions to Remove the Air Conditioner From Slide-Out Chassis A. Attach the accordions to the cabinet using (5) 1/4" screws. 4. Place unit on each side. There are identified (on each frame) as shown ... by gently pulling it to the cabinet. See (Fig. 2). Grasp the pull handle at the front of the slide-out chassis and carefully slide the air conditioner out of the top channel to the cabinet Stick the double sided seal to secure slide-out chassis. Right side Philips screws Fig. 1 Coil Chassis...
Installation Instructions
Page 6
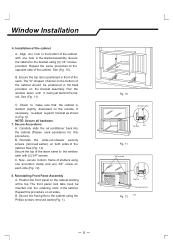
... is positioned in front of shutters using one accordion clamp and one hole in the bottom of the cabinet. See (Fig. 10). Carefully slide the air conditioner back into the retaining slots in (Fig. 6). See (Fig. 12). B. Secure the front grille to the window sash with one 3/4" screw on each side (Fig...
... is positioned in front of shutters using one accordion clamp and one hole in the bottom of the cabinet. See (Fig. 10). Carefully slide the air conditioner back into the retaining slots in (Fig. 6). See (Fig. 12). B. Secure the front grille to the window sash with one 3/4" screw on each side (Fig...
Installation Instructions
Page 7
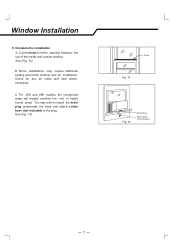
... unit in highly humid areas. Foam Fig. 13 Fig. 14 Drain Plug Drain Hose (not included) 7 You may require additional sealing around the window and air conditioner. Window Installation 9. Cut the foam to the plug. See (Fig. 13). C. B. See (Fig. 14). Some installations may wish to install the drain plug underneath the...
... unit in highly humid areas. Foam Fig. 13 Fig. 14 Drain Plug Drain Hose (not included) 7 You may require additional sealing around the window and air conditioner. Window Installation 9. Cut the foam to the plug. See (Fig. 13). C. B. See (Fig. 14). Some installations may wish to install the drain plug underneath the...
Installation Instructions
Page 8
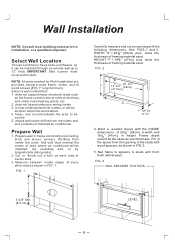
... drywall. faces, and is near existing electrical outlets, or where another outlet can be the same as the frame construction at ends of area where air conditioner will be cooled. 5. FIG. 2 Y 26 3/4" 18 3/4" (68cm) (47.5cm) X UP TO 8-1/2" 4. Nail frame to spacers to... installation, or a qualified carpenter. See FIGS. 1 and 2. Working from inside the room, find wall stud nearest the center of windows, and under truss-bearing points, etc. 2. HEIGHT "Y" = 185/8 '' (47cm) plus twice the thickness of 26 ...
... drywall. faces, and is near existing electrical outlets, or where another outlet can be the same as the frame construction at ends of area where air conditioner will be cooled. 5. FIG. 2 Y 26 3/4" 18 3/4" (68cm) (47.5cm) X UP TO 8-1/2" 4. Nail frame to spacers to... installation, or a qualified carpenter. See FIGS. 1 and 2. Working from inside the room, find wall stud nearest the center of windows, and under truss-bearing points, etc. 2. HEIGHT "Y" = 185/8 '' (47cm) plus twice the thickness of 26 ...


