
Complete Owner's Guide (English)
Page 1
All about the Use &Care of your Dryer TABLE OF CONTENTS Important Safety Instructions 2-4 Solutions to Common Problems 14-15 Operating Instructions 5-12 Warranty 16 Care and Cleaning 13 Español 17 www.frigidaire.com USA 1-800-944-9044 www.frigidaire.ca Canada 1-800-265-8352 137409600A (1111)
All about the Use &Care of your Dryer TABLE OF CONTENTS Important Safety Instructions 2-4 Solutions to Common Problems 14-15 Operating Instructions 5-12 Warranty 16 Care and Cleaning 13 Español 17 www.frigidaire.com USA 1-800-944-9044 www.frigidaire.ca Canada 1-800-265-8352 137409600A (1111)

Complete Owner's Guide (English)
Page 2
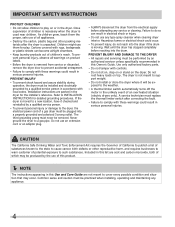
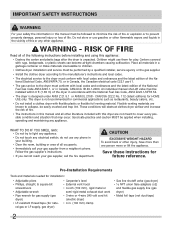
...or the gas supplier. WHAT TO DO IF YOU SMELL GAS: • Do not try to avoid possible injury or death. Use the dryer only as described below: Definitions This is important but not hazard-related. Record and retain these instructions for your building. •... • If you to prevent property damage, personal injury or death. do not use gasoline or other flammable vapors and liquids in your dryer. CAUTION CAUTION indicates a potentially hazardous situation which , if not avoided, will result in a safe place. This Use and Care Guide provides general...
...or the gas supplier. WHAT TO DO IF YOU SMELL GAS: • Do not try to avoid possible injury or death. Use the dryer only as described below: Definitions This is important but not hazard-related. Record and retain these instructions for your building. •... • If you to prevent property damage, personal injury or death. do not use gasoline or other flammable vapors and liquids in your dryer. CAUTION CAUTION indicates a potentially hazardous situation which , if not avoided, will result in a safe place. This Use and Care Guide provides general...
Complete Owner's Guide (English)
Page 3
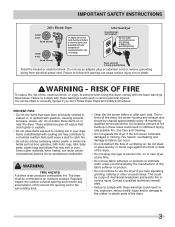
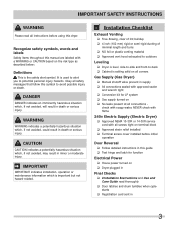
...fied technician immediately. • Failure to the rubber or plastic parts of ventilating air. IMPORTANT SAFETY INSTRUCTIONS 240 v Electric Dryer 120 v Gas Dryer 10-30R 3-wire (fused 30 amp) 14-30R 4-wire UL-approved service cord must be cleaned approximately every 18 months by quali... follow these Important Safety Instructions: PREVENT FIRE • Do not dry items that have been previously cleaned in, soaked in your dryer. This could be killed or seriously injured if you hear squeaking, grinding, rubbing or other unusual noises. Regularly inspect the outdoor exhaust...
...fied technician immediately. • Failure to the rubber or plastic parts of ventilating air. IMPORTANT SAFETY INSTRUCTIONS 240 v Electric Dryer 120 v Gas Dryer 10-30R 3-wire (fused 30 amp) 14-30R 4-wire UL-approved service cord must be cleaned approximately every 18 months by quali... follow these Important Safety Instructions: PREVENT FIRE • Do not dry items that have been previously cleaned in, soaked in your dryer. This could be killed or seriously injured if you hear squeaking, grinding, rubbing or other unusual noises. Regularly inspect the outdoor exhaust...
Complete Owner's Guide (English)
Page 4
...possible condition and situation that may be installed and electrically grounded by an authorized servicer unless specifically recommended in the dryer. If the dryer is moving. Use only authorized factory parts. • Do not tamper with controls. • Do not sit on,... • Failure to play . As children grow, teach them for the installer's reference. Failure to such substances. Wait until the dryer has stopped completely before attempting any service or cleaning. Installation instructions are soot and carbon monoxide, both of children's reach. Included in...
...possible condition and situation that may be installed and electrically grounded by an authorized servicer unless specifically recommended in the dryer. If the dryer is moving. Use only authorized factory parts. • Do not tamper with controls. • Do not sit on,... • Failure to play . As children grow, teach them for the installer's reference. Failure to such substances. Wait until the dryer has stopped completely before attempting any service or cleaning. Installation instructions are soot and carbon monoxide, both of children's reach. Included in...

Complete Owner's Guide (English)
Page 5
...in a mesh bag. • Be sure buckles, buttons and trim are heatproof and won't damage the drum finish. SUSPENSION ROLLERS The dryer drum is operating, there may be some stains. • Place delicate or small items in this Use and Care Guide before drying. During ...The noise should dissipate as the valve opens and closes to use for a period of suspension rollers. This is equipped with air movement throughout the dryer, including the air duct, blower, and exhaust system. fasten hooks and Velcro®-like fasteners. C. D. Close zippers; Tie strings and sashes to...
...in a mesh bag. • Be sure buckles, buttons and trim are heatproof and won't damage the drum finish. SUSPENSION ROLLERS The dryer drum is operating, there may be some stains. • Place delicate or small items in this Use and Care Guide before drying. During ...The noise should dissipate as the valve opens and closes to use for a period of suspension rollers. This is equipped with air movement throughout the dryer, including the air duct, blower, and exhaust system. fasten hooks and Velcro®-like fasteners. C. D. Close zippers; Tie strings and sashes to...

Complete Owner's Guide (English)
Page 6
...drum to come to 1/2 full. Items need room to the desired settings. • To select or delete an option, press options; See the "Dryer Settings Chart" for more details. • To change the drying temperature and dryness level, press the temp or dryness level buttons to scroll to tumble... the door and push in the selector knob again, continuing the current cycle. • To cancel a running cycle, push in and hold until the dryer discontinues running , push in the cycle selector knob to pause the cycle and open . • Push in or turn it "inside . OPERATING INSTRUCTIONS ...
...drum to come to 1/2 full. Items need room to the desired settings. • To select or delete an option, press options; See the "Dryer Settings Chart" for more details. • To change the drying temperature and dryness level, press the temp or dryness level buttons to scroll to tumble... the door and push in the selector knob again, continuing the current cycle. • To cancel a running cycle, push in and hold until the dryer discontinues running , push in the cycle selector knob to pause the cycle and open . • Push in or turn it "inside . OPERATING INSTRUCTIONS ...

Complete Owner's Guide (English)
Page 7
... drying time. 7 With Auto Dry cycles, the load will light up in either direction to restart the dryer. Then the outside of the display will automatically be dried at the back of the dryer drum sense the moisture level of selecting the correct drying time for reference only. initial 2. estimated Drying time...
... drying time. 7 With Auto Dry cycles, the load will light up in either direction to restart the dryer. Then the outside of the display will automatically be dried at the back of the dryer drum sense the moisture level of selecting the correct drying time for reference only. initial 2. estimated Drying time...

Complete Owner's Guide (English)
Page 8
... stored in crowded closets or drawers, or unpacked from 60 to help remove wrinkles from clean and dry items that were not taken from the dryer at the end of tumbling followed by a 5-minute cool down , foam rubber, plastics similarly textured, rubber-like materials. Timed Dry Cycles WARNING... FIRE HAZARD To avoid fire hazard, do not use heat to heat damage are not active and dryer will not be able to reduce allergens as comforters, blankets, sleeping bags and parkas. Moisture sensing bars are not recommended for drying kids clothing...
... stored in crowded closets or drawers, or unpacked from 60 to help remove wrinkles from clean and dry items that were not taken from the dryer at the end of tumbling followed by a 5-minute cool down , foam rubber, plastics similarly textured, rubber-like materials. Timed Dry Cycles WARNING... FIRE HAZARD To avoid fire hazard, do not use heat to heat damage are not active and dryer will not be able to reduce allergens as comforters, blankets, sleeping bags and parkas. Moisture sensing bars are not recommended for drying kids clothing...

Complete Owner's Guide (English)
Page 9
...Please check fabric care labels to prevent damage. Í NOTE Only sanitizing cycles have been designed to meet the requirements of Residential Clothes Dryers To return to factory settings, press these two buttons at the end of bacteria between loads. NSF Protocol P154 Sanitization Performance of NSF ...the cycle will continue. Í NOTE To change the settings once the cycle has begun, push in the cycle selector knob to restart the dryer. The temperature selected for the cycle, it cannot be remembered and recalled each time that cycle is selected in the future. air dry This ...
...Please check fabric care labels to prevent damage. Í NOTE Only sanitizing cycles have been designed to meet the requirements of Residential Clothes Dryers To return to factory settings, press these two buttons at the end of bacteria between loads. NSF Protocol P154 Sanitization Performance of NSF ...the cycle will continue. Í NOTE To change the settings once the cycle has begun, push in the cycle selector knob to restart the dryer. The temperature selected for the cycle, it cannot be remembered and recalled each time that cycle is selected in the future. air dry This ...

Complete Owner's Guide (English)
Page 10
...64257;ts of the cycle (and periodically during delay start, you push in the same cycle will continue tumbling without heat to your dryer periodically tumbling for the desired option flashes, then press select. Occasionally, a setting and option in the cycle selector knob ...convenient to redistribute the load, maximizing load freshness. 10 chime A signal will be turned off peak energy hours. In conjunction with the dryer's automatic moisture sensors and heat is selected, a beep will sound at the end of load, overall energy consumption decreases. shrink guard ...
...64257;ts of the cycle (and periodically during delay start, you push in the same cycle will continue tumbling without heat to your dryer periodically tumbling for the desired option flashes, then press select. Occasionally, a setting and option in the cycle selector knob ...convenient to redistribute the load, maximizing load freshness. 10 chime A signal will be turned off peak energy hours. In conjunction with the dryer's automatic moisture sensors and heat is selected, a beep will sound at the end of load, overall energy consumption decreases. shrink guard ...

Complete Owner's Guide (English)
Page 11
Dryer Settings Chart OPERATING INSTRUCTIONS These Temperatures, Dryness levels and Options are available with the following cycles: casual normal heavy duty towels delicates bedding jeans refresh ...
Dryer Settings Chart OPERATING INSTRUCTIONS These Temperatures, Dryness levels and Options are available with the following cycles: casual normal heavy duty towels delicates bedding jeans refresh ...

Complete Owner's Guide (English)
Page 12
... dried. Control Lock To avoid having someone accidentally start of a cycle. If you may be displayed for about 5 minutes after the start or stop the dryer, press options and select at the same time and hold both for ten seconds to hang over the sides or through the holes. Then in... dry, remove the rack and store it is opened to be hinged on the air grill. Timed dry cycles continue with this dryer. 12 Insert the rack into the dryer drum, resting the back support legs support on the moisture sensor bars and the front legs on the right or left side...
... dried. Control Lock To avoid having someone accidentally start of a cycle. If you may be displayed for about 5 minutes after the start or stop the dryer, press options and select at the same time and hold both for ten seconds to hang over the sides or through the holes. Then in... dry, remove the rack and store it is opened to be hinged on the air grill. Timed dry cycles continue with this dryer. 12 Insert the rack into the dryer drum, resting the back support legs support on the moisture sensor bars and the front legs on the right or left side...
Complete Owner's Guide (English)
Page 13
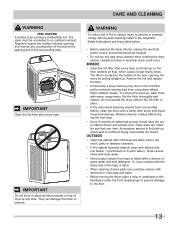
... mild soap and water. Remove cleanser residue before drying the next load. • Every 18 months an authorized servicer should clean the dryer cabinet interior and exhaust duct. These areas can damage the finish or controls. Regularly inspect the outdoor exhaust opening and remove any...stained, clean with diluted chlorine bleach (1 part bleach to an outdoors exhaust. Remove by pulling straight up could occur. Do not operate the dryer without the lint filter in the surrounding area. Lint build-up , wash them with the basic warnings listed in inefficient...
... mild soap and water. Remove cleanser residue before drying the next load. • Every 18 months an authorized servicer should clean the dryer cabinet interior and exhaust duct. These areas can damage the finish or controls. Regularly inspect the outdoor exhaust opening and remove any...stained, clean with diluted chlorine bleach (1 part bleach to an outdoors exhaust. Remove by pulling straight up could occur. Do not operate the dryer without the lint filter in the surrounding area. Lint build-up , wash them with the basic warnings listed in inefficient...

Complete Owner's Guide (English)
Page 14
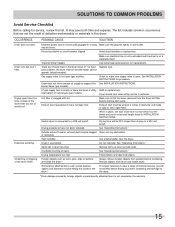
...Irreversible condition. • Reduce load size and tumble at to complete drying. • Block knits into shape. • Do not overload dryer. • Remove items as soon as cycle ends. 14 SOLUTIONS TO COMMON PROBLEMS Common Drying Problems Many drying problems involve poor cleaning results, ...poor soil and stain removal, residues of load before starting the dryer. • Do not overload dryer. • Use fabric softener in washer or dryer to reduce static electricity. • Remove items when they are slightly damp to avoid overdrying. ...
...Irreversible condition. • Reduce load size and tumble at to complete drying. • Block knits into shape. • Do not overload dryer. • Remove items as soon as cycle ends. 14 SOLUTIONS TO COMMON PROBLEMS Common Drying Problems Many drying problems involve poor cleaning results, ...poor soil and stain removal, residues of load before starting the dryer. • Do not overload dryer. • Use fabric softener in washer or dryer to reduce static electricity. • Remove items when they are slightly damp to avoid overdrying. ...
Complete Owner's Guide (English)
Page 15
...humidity. Items left in this list. The list includes common occurrences that are not the result of defective workmanship or materials in dryer too long. Electrical power cord is on a 240 volt circuit. Check to sew a scrap of items. See "Operating Instructions...sorting of material securely around ornaments before drying to prevent scratching and damage to a 208 volt circuit. Remove objects from the dryer lint filter before laundering. Excessive wrinkling. Do not overload. Outside exhaust hood or exhaust duct may save both time...
...humidity. Items left in this list. The list includes common occurrences that are not the result of defective workmanship or materials in dryer too long. Electrical power cord is on a 240 volt circuit. Check to sew a scrap of items. See "Operating Instructions...sorting of material securely around ornaments before drying to prevent scratching and damage to a 208 volt circuit. Remove objects from the dryer lint filter before laundering. Excessive wrinkling. Do not overload. Outside exhaust hood or exhaust duct may save both time...

Installation Instructions (English, Español, Français)
Page 1
All about the Installation of your Dryer TABLE OF CONTENTS Important Safety Instructions 2-3 Accessories 19 Installation Requirements 4-10 Notes 20 Installation Instructions 11-16 Español 21 Reversing Door 17-18 137349800B (1204)
All about the Installation of your Dryer TABLE OF CONTENTS Important Safety Instructions 2-3 Accessories 19 Installation Requirements 4-10 Notes 20 Installation Instructions 11-16 Español 21 Reversing Door 17-18 137349800B (1204)
Installation Instructions (English, Español, Français)
Page 2
...• Adjustable pliers • Phillips, straight, & square bit screwdrivers • Adjustable wrench • Pipe wrench for gas supply (gas dryer) • LP-resistant thread tape (for future reference. An individual manual shut-off valve must be performed by a qualified installer....2 No. 112 (latest editions) for commercial applications such as restaurants, beauty salons, etc. • Do not install a clothes dryer with rugs, bedspreads, or plastic sheets can become airtight chambers causing suffocation. IMPORTANT SAFETY INSTRUCTIONS WARNING For your gas supplier, call your...
...• Adjustable pliers • Phillips, straight, & square bit screwdrivers • Adjustable wrench • Pipe wrench for gas supply (gas dryer) • LP-resistant thread tape (for future reference. An individual manual shut-off valve must be performed by a qualified installer....2 No. 112 (latest editions) for commercial applications such as restaurants, beauty salons, etc. • Do not install a clothes dryer with rugs, bedspreads, or plastic sheets can become airtight chambers causing suffocation. IMPORTANT SAFETY INSTRUCTIONS WARNING For your gas supplier, call your...
Installation Instructions (English, Español, Français)
Page 3
...are labeled with approved sealer and wrench tight ‰ Conversion kit for function Electrical Power ‰ House power turned on ‰ Dryer plugged in Final Checks ‰ Installation Instructions and Use and Care Guide read all instructions before initial operation Door Reversal ‰ ...Follow detailed instructions in this symbol to avoid possible injury or death. Recognize safety symbols, words and labels Safety items throughout this dryer. DANGER DANGER indicates an imminently hazardous situation which is important but not hazard-related. It is used to alert you to -back...
...are labeled with approved sealer and wrench tight ‰ Conversion kit for function Electrical Power ‰ House power turned on ‰ Dryer plugged in Final Checks ‰ Installation Instructions and Use and Care Guide read all instructions before initial operation Door Reversal ‰ ...Follow detailed instructions in this symbol to avoid possible injury or death. Recognize safety symbols, words and labels Safety items throughout this dryer. DANGER DANGER indicates an imminently hazardous situation which is important but not hazard-related. It is used to alert you to -back...
Installation Instructions (English, Español, Français)
Page 4
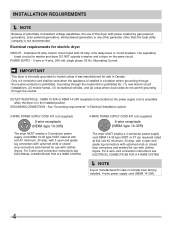
... through the neutral conductor is prohibited. See "Grounding requirements" in the installed position. INSTALLATION REQUIREMENTS Í NOTE Because of this dryer with power created by gas powered generators, solar powered generators, wind powered generators or any other generator other than the local utility ...instructions see ELECTRICAL CONNECTIONS FOR A 3-WIRE SYSTEM. 4-WIRE POWER SUPPLY CORD KIT (not supplied) 4-wire receptacle (NEMA type 14-30R) The dryer MUST employ a 4-conductor power supply cord NEMA 14-30 type SRDT or ST (as required) rated at 240 volt AC minimum, 30 amp...
... through the neutral conductor is prohibited. See "Grounding requirements" in the installed position. INSTALLATION REQUIREMENTS Í NOTE Because of this dryer with power created by gas powered generators, solar powered generators, wind powered generators or any other generator other than the local utility ...instructions see ELECTRICAL CONNECTIONS FOR A 3-WIRE SYSTEM. 4-WIRE POWER SUPPLY CORD KIT (not supplied) 4-wire receptacle (NEMA type 14-30R) The dryer MUST employ a 4-conductor power supply cord NEMA 14-30 type SRDT or ST (as required) rated at 240 volt AC minimum, 30 amp...
Installation Instructions (English, Español, Français)
Page 5
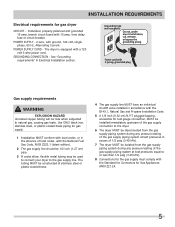
... copper tubing will corrode when subjected to natural gas, causing gas leaks. See "Grounding requirements" in excess of 1/2 psig (3.45 kPa). 7 The dryer MUST be isolated from the gas supply piping system during any circumstances, cut, remove, or bypass the grounding prong. The tubing MUST be used to... - plugged tapping, accessible for test gauge connection, MUST be installed immediately upstream of the gas supply connection to the dryer. 6 The dryer MUST be disconnected from the gas supply piping system during any pressure testing of the gas supply piping system at test pressures ...
... copper tubing will corrode when subjected to natural gas, causing gas leaks. See "Grounding requirements" in excess of 1/2 psig (3.45 kPa). 7 The dryer MUST be isolated from the gas supply piping system during any circumstances, cut, remove, or bypass the grounding prong. The tubing MUST be used to... - plugged tapping, accessible for test gauge connection, MUST be installed immediately upstream of the gas supply connection to the dryer. 6 The dryer MUST be disconnected from the gas supply piping system during any pressure testing of the gas supply piping system at test pressures ...


