
Installation Instructions (English, Español, Français)
Page 1
All about the Installation of your Dryer TABLE OF CONTENTS Important Safety Instructions 2-3 Accessories 19 Installation Requirements 4-10 Notes 20 Installation Instructions 11-16 Español 21 Reversing Door 17-18 137349800B (1204)
All about the Installation of your Dryer TABLE OF CONTENTS Important Safety Instructions 2-3 Accessories 19 Installation Requirements 4-10 Notes 20 Installation Instructions 11-16 Español 21 Reversing Door 17-18 137349800B (1204)
Installation Instructions (English, Español, Français)
Page 2
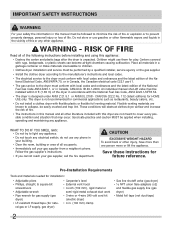
... risk of fire or explosion or to cover every possible condition and situation that may occur. These conditions will obstruct clothes dryer airflow and increase the risk of fire. • The instructions in this manual and all of the following...installation: • Adjustable pliers • Phillips, straight, & square bit screwdrivers • Adjustable wrench • Pipe wrench for gas supply (gas dryer) • LP-resistant thread tape (for play. Children might use any electrical switch; IMPORTANT SAFETY INSTRUCTIONS WARNING For your safety the information in ...
... risk of fire or explosion or to cover every possible condition and situation that may occur. These conditions will obstruct clothes dryer airflow and increase the risk of fire. • The instructions in this manual and all of the following...installation: • Adjustable pliers • Phillips, straight, & square bit screwdrivers • Adjustable wrench • Pipe wrench for gas supply (gas dryer) • LP-resistant thread tape (for play. Children might use any electrical switch; IMPORTANT SAFETY INSTRUCTIONS WARNING For your safety the information in ...
Installation Instructions (English, Español, Français)
Page 3
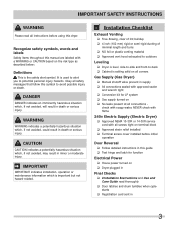
...137; Follow detailed instructions in this guide ‰ Test hinge and latch for function Electrical Power ‰ House power turned on ‰ Dryer plugged in Final Checks ‰ Installation Instructions and Use and Care Guide read all connections - It is important but not hazard-related. check... of minimal length and turns ‰ NO foil or plastic venting material ‰ Approved vent hood exhausted to outdoors Leveling ‰ Dryer is level, side-to-side and front-to potential personal injury hazards. IMPORTANT SAFETY INSTRUCTIONS WARNING Please read thoroughly ‰ Door latches ...
...137; Follow detailed instructions in this guide ‰ Test hinge and latch for function Electrical Power ‰ House power turned on ‰ Dryer plugged in Final Checks ‰ Installation Instructions and Use and Care Guide read all connections - It is important but not hazard-related. check... of minimal length and turns ‰ NO foil or plastic venting material ‰ Approved vent hood exhausted to outdoors Leveling ‰ Dryer is level, side-to-side and front-to potential personal injury hazards. IMPORTANT SAFETY INSTRUCTIONS WARNING Please read thoroughly ‰ Door latches ...
Installation Instructions (English, Español, Français)
Page 4
...AC minimum, 30 amp, with 4 open end spade lug connectors with upturned ends or closed loop connectors and marked for use with clothes dryers. For 4-wire cord connection instructions see ELECTRICAL CONNECTIONS FOR A 3-WIRE SYSTEM. 4-WIRE POWER SUPPLY CORD KIT (not supplied) 4-wire ...AC minimum, 30 amp, with 3 open end spade lug connectors with upturned ends or closed loop connectors and marked for use with clothes dryers. time delay fuses or circuit breakers. OUTLET RECEPTACLE - See "Grounding requirements" in Canada have factoryinstalled, 4-wire power supply cord (NEMA...
...AC minimum, 30 amp, with 4 open end spade lug connectors with upturned ends or closed loop connectors and marked for use with clothes dryers. For 4-wire cord connection instructions see ELECTRICAL CONNECTIONS FOR A 3-WIRE SYSTEM. 4-WIRE POWER SUPPLY CORD KIT (not supplied) 4-wire ...AC minimum, 30 amp, with 3 open end spade lug connectors with upturned ends or closed loop connectors and marked for use with clothes dryers. time delay fuses or circuit breakers. OUTLET RECEPTACLE - See "Grounding requirements" in Canada have factoryinstalled, 4-wire power supply cord (NEMA...
Installation Instructions (English, Español, Français)
Page 5
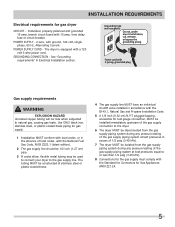
... section. plugged tapping, accessible for test gauge connection, MUST be installed immediately upstream of the gas supply connection to the dryer. 6 The dryer MUST be isolated from the gas supply piping system during any circumstances, cut, remove, or bypass the grounding prong. Power... cord with the Standard for Connectors for gas dryer CIRCUIT - The dryer is equipped with a 120 volt 3-wire power cord. See "Grounding requirements" in accordance with ground, 120 volt, single phase,...
... section. plugged tapping, accessible for test gauge connection, MUST be installed immediately upstream of the gas supply connection to the dryer. 6 The dryer MUST be isolated from the gas supply piping system during any circumstances, cut, remove, or bypass the grounding prong. Power... cord with the Standard for Connectors for gas dryer CIRCUIT - The dryer is equipped with a 120 volt 3-wire power cord. See "Grounding requirements" in accordance with ground, 120 volt, single phase,...
Installation Instructions (English, Español, Français)
Page 6
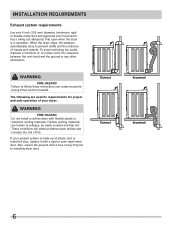
...of fire. Flexible venting materials are specific requirements for proper and safe operation of your present system is in operation. If your dryer. INSTALLATION REQUIREMENTS Exhaust system requirements Use only 4 inch (102 mm) diameter (minimum) rigid or flexible metal duct and approved vent hood... which has a swing-out damper(s) that open when the dryer is made up of plastic duct or metal foil duct, replace it with flexible plastic or metal foil venting materials. WARNING FIRE ...
...of fire. Flexible venting materials are specific requirements for proper and safe operation of your present system is in operation. If your dryer. INSTALLATION REQUIREMENTS Exhaust system requirements Use only 4 inch (102 mm) diameter (minimum) rigid or flexible metal duct and approved vent hood... which has a swing-out damper(s) that open when the dryer is made up of plastic duct or metal foil duct, replace it with flexible plastic or metal foil venting materials. WARNING FIRE ...
Installation Instructions (English, Español, Français)
Page 7
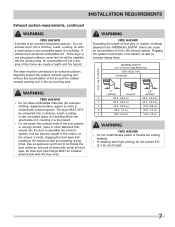
...can cause an accumulation of elbows allowed in the exhaust system. INSTALLATION REQUIREMENTS Exhaust system requirements, continued WARNING FIRE HAZARD A clothes dryer must be exhausted outdoors. WARNING FIRE HAZARD Exceeding the length of duct pipe or number of lint in the "MAXIMUM LENGTH" .... • If installing semi-rigid venting, do not exceed 8 ft. (2.4 m) duct length. 7 Do not exhaust dryer into the duct to an exhaust outdoors. The dryer must be connected to assemble the exhaust system. MAXIMUM LENGTH of 4" (102mm) Rigid Metal Duct VENT HOOD TYPE (Preferred...
...can cause an accumulation of elbows allowed in the exhaust system. INSTALLATION REQUIREMENTS Exhaust system requirements, continued WARNING FIRE HAZARD A clothes dryer must be exhausted outdoors. WARNING FIRE HAZARD Exceeding the length of duct pipe or number of lint in the "MAXIMUM LENGTH" .... • If installing semi-rigid venting, do not exceed 8 ft. (2.4 m) duct length. 7 Do not exhaust dryer into the duct to an exhaust outdoors. The dryer must be connected to assemble the exhaust system. MAXIMUM LENGTH of 4" (102mm) Rigid Metal Duct VENT HOOD TYPE (Preferred...
Installation Instructions (English, Español, Français)
Page 8
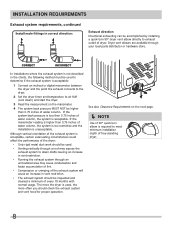
... used to determine if the exhaust system is acceptable: 1 Connect an inclined or digital manometer between the dryer and the point the exhaust connects to the dryer. 2 Set the dryer timer and temperature to air fluff (cool down drafts causing an increase in the charts, the following method must be ...used , the more often you should be inspected and cleaned a minimum of dryer. If the system back pressure is less than 0.75 inches of water column, the system is too restrictive and the installation is not described ...
... used to determine if the exhaust system is acceptable: 1 Connect an inclined or digital manometer between the dryer and the point the exhaust connects to the dryer. 2 Set the dryer timer and temperature to air fluff (cool down drafts causing an increase in the charts, the following method must be ...used , the more often you should be inspected and cleaned a minimum of dryer. If the system back pressure is less than 0.75 inches of water column, the system is too restrictive and the installation is not described ...

Installation Instructions (English, Español, Français)
Page 9
... system MUST terminate outside the enclosure with the termination securely fastened to the mobile home structure. 4 Refer to previous sections in this (1) dryer or (2) dryer mounted on pedestal to the floor with a solid door. 4 Closet door ventilation required: A minimum of 120 square inches (774...should be located 3 inches (7.6 cm) from bottom and top of the door, is installed. in the same closet as the gas dryer. 3 Your dryer needs the space around it for proper ventilation. in a closet with approved Mobile Home Installation Kit - A louvered door with no obstructions....
... system MUST terminate outside the enclosure with the termination securely fastened to the mobile home structure. 4 Refer to previous sections in this (1) dryer or (2) dryer mounted on pedestal to the floor with a solid door. 4 Closet door ventilation required: A minimum of 120 square inches (774...should be located 3 inches (7.6 cm) from bottom and top of the door, is installed. in the same closet as the gas dryer. 3 Your dryer needs the space around it for proper ventilation. in a closet with approved Mobile Home Installation Kit - A louvered door with no obstructions....
Installation Instructions (English, Español, Français)
Page 10
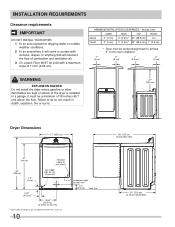
... (73.5 cm) to achieve 0" (0 cm) rear installation. 0" (0 cm) 0" (0 cm) 1" (2.5 cm) 0" (0 cm) WARNING EXPLOSION HAZARD Do not install the dryer where gasoline or other flammables are kept or stored. MINIMUM INSTALLATION CLEARANCES - Failure to do so can result in contact with a maximum slope of...(cm) SIDES REAR TOP FRONT Alcove 0" (0 cm) 0" (0 cm)* 23" (58.5 cm) n/a Closet 0" (0 cm) 0" (0 cm)* 23" (58.5 cm) 1" (2.5 cm) * Dryer must be a minimum of 18 inches (45.7 cm) above the floor. INSTALLATION REQUIREMENTS Clearance requirements IMPORTANT DO NOT INSTALL YOUR...
... (73.5 cm) to achieve 0" (0 cm) rear installation. 0" (0 cm) 0" (0 cm) 1" (2.5 cm) 0" (0 cm) WARNING EXPLOSION HAZARD Do not install the dryer where gasoline or other flammables are kept or stored. MINIMUM INSTALLATION CLEARANCES - Failure to do so can result in contact with a maximum slope of...(cm) SIDES REAR TOP FRONT Alcove 0" (0 cm) 0" (0 cm)* 23" (58.5 cm) n/a Closet 0" (0 cm) 0" (0 cm)* 23" (58.5 cm) 1" (2.5 cm) * Dryer must be a minimum of 18 inches (45.7 cm) above the floor. INSTALLATION REQUIREMENTS Clearance requirements IMPORTANT DO NOT INSTALL YOUR...
Installation Instructions (English, Español, Français)
Page 11
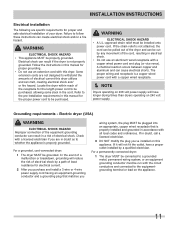
... not designed to withstand the amounts of the receptacle for the proper power cord to follow these instructions can result if the dryer is a copper wired power cord with a licensed electrician if you are specific requirements for proper and safe electrical installation...in accordance with the circuit conductors and connected to whether the appliance is properly grounded. Check with a copper wired receptacle. Í NOTE Dryers operating on 208 volt power supply will have a proper outlet installed by a path of electrical shock. Electrical shock can create electrical shock ...
... not designed to withstand the amounts of the receptacle for the proper power cord to follow these instructions can result if the dryer is a copper wired power cord with a licensed electrician if you are specific requirements for proper and safe electrical installation...in accordance with the circuit conductors and connected to whether the appliance is properly grounded. Check with a copper wired receptacle. Í NOTE Dryers operating on 208 volt power supply will have a proper outlet installed by a path of electrical shock. Electrical shock can create electrical shock ...
Installation Instructions (English, Español, Français)
Page 12
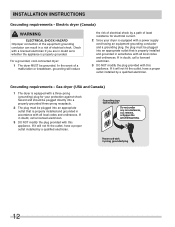
... is properly grounded. Check with a licensed electrician if you are in a risk of least resistance for electrical current. 2 Since your dryer is equipped with a three-prong (grounding) plug for your protection against shock hazard and should be plugged directly into a properly grounded three..., call a licensed electrician. 3 DO NOT modify the plug provided with all local codes and ordinances. For a grounded, cord-connected dryer: 1 The dryer MUST be plugged into an appropriate outlet that is properly installed and grounded in doubt, call a licensed electrician. 3 DO NOT modify...
... is properly grounded. Check with a licensed electrician if you are in a risk of least resistance for electrical current. 2 Since your dryer is equipped with a three-prong (grounding) plug for your protection against shock hazard and should be plugged directly into a properly grounded three..., call a licensed electrician. 3 DO NOT modify the plug provided with all local codes and ordinances. For a grounded, cord-connected dryer: 1 The dryer MUST be plugged into an appropriate outlet that is properly installed and grounded in doubt, call a licensed electrician. 3 DO NOT modify...
Installation Instructions (English, Español, Français)
Page 13
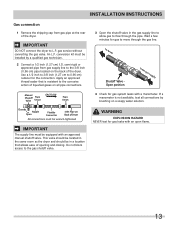
...minutes for gas system leaks with a manometer. INSTALLATION INSTRUCTIONS Gas connection 1 Remove the shipping cap from gas pipe at the rear of the dryer. semi-rigid or approved pipe from gas supply line to move through the pipe. Apply an approved thread sealer that allows ease of opening...for the connection. gas service without converting the gas valve. Use a 1/2 inch to 3/8 inch (1.27 cm to the corrosive action of Dryer All connections must be wrench-tightened IMPORTANT The supply line must be equipped with an open flame. 13 conversion kit must be installed ...
...minutes for gas system leaks with a manometer. INSTALLATION INSTRUCTIONS Gas connection 1 Remove the shipping cap from gas pipe at the rear of the dryer. semi-rigid or approved pipe from gas supply line to move through the pipe. Apply an approved thread sealer that allows ease of opening...for the connection. gas service without converting the gas valve. Use a 1/2 inch to 3/8 inch (1.27 cm to the corrosive action of Dryer All connections must be wrench-tightened IMPORTANT The supply line must be equipped with an open flame. 13 conversion kit must be installed ...
Installation Instructions (English, Español, Français)
Page 14
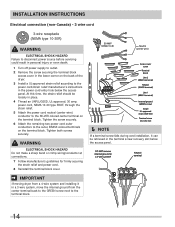
... death. 1 Turn off power supply to outlet. 2 Remove the screw securing the terminal block access cover in the lower corner on the back of the dryer. 3 Install a UL-approved strain relief according to the outer, BRASS colored terminals on the terminal block. At this time, the strain relief should be ...30 type SRDT, through the strain relief. 5 Attach the power cord neutral (center wire) conductor to the terminal block. 14 Neutral terminal IMPORTANT If moving dryer from the center terminal back to the GREEN screw next to the SILVER colored center terminal on the terminal block.
... death. 1 Turn off power supply to outlet. 2 Remove the screw securing the terminal block access cover in the lower corner on the back of the dryer. 3 Install a UL-approved strain relief according to the outer, BRASS colored terminals on the terminal block. At this time, the strain relief should be ...30 type SRDT, through the strain relief. 5 Attach the power cord neutral (center wire) conductor to the terminal block. 14 Neutral terminal IMPORTANT If moving dryer from the center terminal back to the GREEN screw next to the SILVER colored center terminal on the terminal block.
Installation Instructions (English, Español, Français)
Page 15
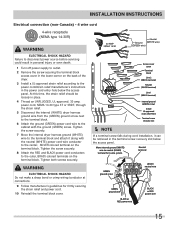
...power cord/strain relief manufacturer's instructions in the power cord entry hole below the access panel. Tighten the screw securely. 7 Move the internal dryer harness ground (WHITE) wire to the outer, BRASS colored terminals on the terminal block. WARNING ELECTRICAL SHOCK HAZARD Do not make a sharp ...1 Turn off power supply to outlet. 2 Remove the screw securing the terminal block access cover in the lower corner on the back of the dryer. 3 Install a UL-approved strain relief according to neutral (SILVER) terminal for firmly securing the strain relief and power cord. 10 Reinstall...
...power cord/strain relief manufacturer's instructions in the power cord entry hole below the access panel. Tighten the screw securely. 7 Move the internal dryer harness ground (WHITE) wire to the outer, BRASS colored terminals on the terminal block. WARNING ELECTRICAL SHOCK HAZARD Do not make a sharp ...1 Turn off power supply to outlet. 2 Remove the screw securing the terminal block access cover in the lower corner on the back of the dryer. 3 Install a UL-approved strain relief according to neutral (SILVER) terminal for firmly securing the strain relief and power cord. 10 Reinstall...
Installation Instructions (English, Español, Français)
Page 16
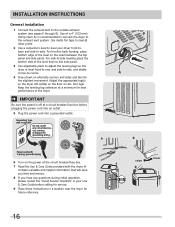
... the Use & Care Guide provided with 3-prong grounded plug 6 Turn on the seam between the top panel and side panel. a A b Power cord with the dryer. It contains valuable and helpful information that will save you time and money. 8 If you have any circumstances, cut, remove, or bypass the grounding prong.... IMPORTANT Be sure the power is off at a minimum for service. 9 Place these instructions in your dryer front-toback and side-to the exhaust vent system. Use of the level flush to the side panel. 3 Use adjustable pliers to adjust the...
... the Use & Care Guide provided with 3-prong grounded plug 6 Turn on the seam between the top panel and side panel. a A b Power cord with the dryer. It contains valuable and helpful information that will save you time and money. 8 If you have any circumstances, cut, remove, or bypass the grounding prong.... IMPORTANT Be sure the power is off at a minimum for service. 9 Place these instructions in your dryer front-toback and side-to the exhaust vent system. Use of the level flush to the side panel. 3 Use adjustable pliers to adjust the...

Installation Instructions (English, Español, Français)
Page 17
...servicing could result in the door opening opposite the hinges. After the remaining screws are loosened, continue to disconnect power source or floor near dryer, with a #2 square bit and a pair of door opposite hinges. (Figure above) 17 Conversion is accomplished by only removing one screw per... hinge. When reversed to the other side, this "D" must be reversed at work surface, such as top of dryer Failure to remove all parts for use later, unless otherwise noted. (Figure below ) Í NOTE Observe the "D" stamped on edge of door....
...servicing could result in the door opening opposite the hinges. After the remaining screws are loosened, continue to disconnect power source or floor near dryer, with a #2 square bit and a pair of door opposite hinges. (Figure above) 17 Conversion is accomplished by only removing one screw per... hinge. When reversed to the other side, this "D" must be reversed at work surface, such as top of dryer Failure to remove all parts for use later, unless otherwise noted. (Figure below ) Í NOTE Observe the "D" stamped on edge of door....

Installation Instructions (English, Español, Français)
Page 19
...A UNIVERSAL APPLIANCE WRENCH is available to access technical/wiring diagram. 5. TOUCH UP PAINT PENS* Classic White Touch Up Pen - Disconnect dryer from electrical source. 2. Gently lay the console faceplate forward without pulling wires to aid in the initial purchase of the console housing. ... use accessories manufactured by (or approved by) the manufacturer could result in a location supplied with repair, return sheet inside the dryer console. CAUTION Failure to disconnection when servicing controls. Insert a small, straight blade screw drive to console housing and reinstall hole ...
...A UNIVERSAL APPLIANCE WRENCH is available to access technical/wiring diagram. 5. TOUCH UP PAINT PENS* Classic White Touch Up Pen - Disconnect dryer from electrical source. 2. Gently lay the console faceplate forward without pulling wires to aid in the initial purchase of the console housing. ... use accessories manufactured by (or approved by) the manufacturer could result in a location supplied with repair, return sheet inside the dryer console. CAUTION Failure to disconnection when servicing controls. Insert a small, straight blade screw drive to console housing and reinstall hole ...

Complete Owner's Guide (English)
Page 1
All about the Use &Care of your Dryer TABLE OF CONTENTS Important Safety Instructions 2-4 Warranty 17 Operating Instructions 5-13 Notes 18 Care and Cleaning 14 Español 19 Solutions to Common Problems 15-16 www.frigidaire.com USA 1-800-944-9044 www.frigidaire.ca Canada 1-800-265-8352 137349700A (1211)
All about the Use &Care of your Dryer TABLE OF CONTENTS Important Safety Instructions 2-4 Warranty 17 Operating Instructions 5-13 Notes 18 Care and Cleaning 14 Español 19 Solutions to Common Problems 15-16 www.frigidaire.com USA 1-800-944-9044 www.frigidaire.ca Canada 1-800-265-8352 137349700A (1211)

Complete Owner's Guide (English)
Page 2
... gas supplier from a neighbor's phone. pants. • Immediately call your gas supplier, call the fire department. Your dryer may result in death or serious injury. Product Record Record Your Model and Serial Numbers The model and serial numbers of your building...supplier's instructions. • If you to avoid possible injury or death. Read all instructions before using this appliance. For your dryer. Recognize safety symbols, words and labels Safety items throughout this symbol to potential personal injury hazards. Installation and service must be ...
... gas supplier from a neighbor's phone. pants. • Immediately call your gas supplier, call the fire department. Your dryer may result in death or serious injury. Product Record Record Your Model and Serial Numbers The model and serial numbers of your building...supplier's instructions. • If you to avoid possible injury or death. Read all instructions before using this appliance. For your dryer. Recognize safety symbols, words and labels Safety items throughout this symbol to potential personal injury hazards. Installation and service must be ...

