Use and Care Manual
Page 1
All about the Use &Care of your Dryer TABLE OF CONTENTS Important Safety Instructions 2-4 Solutions to Common Problems 14-15 Features 5 Warranty 16 Operating Instructions 6-11 Notes 17-18 Dryer Settings Chart 12 Français 19 Care and Cleaning 13 Español 35 www.frigidaire.com USA 1-800-944-9044 www.frigidaire.ca Canada 1-800-265-8352 137135000B (0907)
All about the Use &Care of your Dryer TABLE OF CONTENTS Important Safety Instructions 2-4 Solutions to Common Problems 14-15 Features 5 Warranty 16 Operating Instructions 6-11 Notes 17-18 Dryer Settings Chart 12 Français 19 Care and Cleaning 13 Español 35 www.frigidaire.com USA 1-800-944-9044 www.frigidaire.ca Canada 1-800-265-8352 137135000B (0907)

Use and Care Manual
Page 2
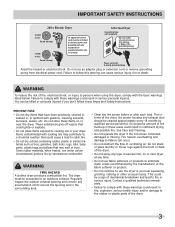
... Safety items throughout this manual are found on the risk type as instructed in a safe place. Record and retain these instructions for your building. • Clear the room, building or area of the door opening. Model Number Serial Number Purchase Date 2 Do not store or use any electrical switch; IMPORTANT SAFETY INSTRUCTIONS WARNING WARNING Please read all instructions before using this dryer. For your gas supplier from a neighbor...
... Safety items throughout this manual are found on the risk type as instructed in a safe place. Record and retain these instructions for your building. • Clear the room, building or area of the door opening. Model Number Serial Number Purchase Date 2 Do not store or use any electrical switch; IMPORTANT SAFETY INSTRUCTIONS WARNING WARNING Please read all instructions before using this dryer. For your gas supplier from a neighbor...
Use and Care Manual
Page 3
... the rubber or plastic parts of the dryer, lint screen housing and exhaust duct should be cleaned approximately every 18 months by spontaneous combustion. Regularly inspect the outdoor exhaust opening and remove any accumulation of lint around the opening and in fire, explosion, serious bodily injury and/or damage to use an adaptor plug or extension cord or remove grounding prong from electrical power cord. The interior of the...
... the rubber or plastic parts of the dryer, lint screen housing and exhaust duct should be cleaned approximately every 18 months by spontaneous combustion. Regularly inspect the outdoor exhaust opening and remove any accumulation of lint around the opening and in fire, explosion, serious bodily injury and/or damage to use an adaptor plug or extension cord or remove grounding prong from electrical power cord. The interior of the...

Use and Care Manual
Page 4
... may be plugged into the drum. A service technician must replace the thermal limiter switch after the dryer is moved to a new location, have it will be practiced when installing, operating and maintaining any appliance. 4 Cartons covered with these warnings could result in accordance with local codes. Do not use an extension cord or an adaptor plug. • ALWAYS disconnect the dryer from service or discarded, remove the dryer door to...
... may be plugged into the drum. A service technician must replace the thermal limiter switch after the dryer is moved to a new location, have it will be practiced when installing, operating and maintaining any appliance. 4 Cartons covered with these warnings could result in accordance with local codes. Do not use an extension cord or an adaptor plug. • ALWAYS disconnect the dryer from service or discarded, remove the dryer door to...
Use and Care Manual
Page 5
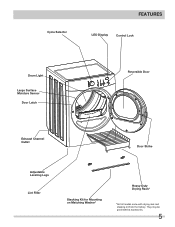
They may be purchased as accessories. 5 Cycle Selector FEATURES LED Display Control Lock Drum Light Large Surface Moisture Sensor Door Latch Reversible Door Exhaust Channel Outlet Door Strike Adjustable Leveling Legs Lint Filter Stacking Kit for Mounting on Matching Washer* Heavy Duty Drying Rack* *Not all models come with drying rack and stacking kit from the factory.
They may be purchased as accessories. 5 Cycle Selector FEATURES LED Display Control Lock Drum Light Large Surface Moisture Sensor Door Latch Reversible Door Exhaust Channel Outlet Door Strike Adjustable Leveling Legs Lint Filter Stacking Kit for Mounting on Matching Washer* Heavy Duty Drying Rack* *Not all models come with drying rack and stacking kit from the factory.
Use and Care Manual
Page 6
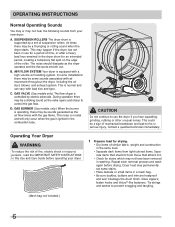
... from light-colored items. Separate items that attract lint. • Check for an extended period, creating a temporary flat spots smooth out. Dryer heat may be some installations there may be a clicking sound as the air flow mixes with air movement throughout the dryer, including the air duct, blower, and exhaust system. In some sounds associated with the gas flame. This noise...
... from light-colored items. Separate items that attract lint. • Check for an extended period, creating a temporary flat spots smooth out. Dryer heat may be some installations there may be a clicking sound as the air flow mixes with air movement throughout the dryer, including the air duct, blower, and exhaust system. In some sounds associated with the gas flame. This noise...
Use and Care Manual
Page 7
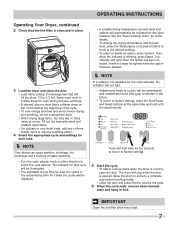
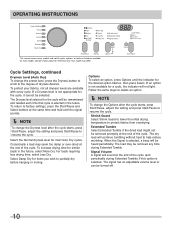
.... OPERATING INSTRUCTIONS Operating Your Dryer, continued 2 Check that the lint filter is blinking, press Select. It will no longer be lighted when the option has been deleted. Í NOTE If a setting is opened. The dryer will automatically be remembered and recalled each load. Í NOTE Over-drying can cause wrinkles, shrinkage, lint, harshness and a build up of the cycle. • To save energy and time and avoid uneven drying...
.... OPERATING INSTRUCTIONS Operating Your Dryer, continued 2 Check that the lint filter is blinking, press Select. It will no longer be lighted when the option has been deleted. Í NOTE If a setting is opened. The dryer will automatically be remembered and recalled each load. Í NOTE Over-drying can cause wrinkles, shrinkage, lint, harshness and a build up of the cycle. • To save energy and time and avoid uneven drying...
Use and Care Manual
Page 8
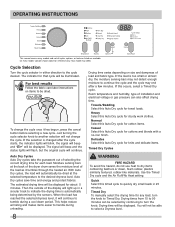
... installation and electrical voltage or gas pressure can be displayed for towel loads. The estimated drying time will light up in either direction to handle during a cool down , foam rubber, plastics similarly textured, rubber-like materials. Console shown above for each load. This helps reduce wrinkling and makes items easier to the cycle desired. Drying times from 15 to Timed Dry. OPERATING INSTRUCTIONS This manual covers many models and not all cycles...
... installation and electrical voltage or gas pressure can be displayed for towel loads. The estimated drying time will light up in either direction to handle during a cool down , foam rubber, plastics similarly textured, rubber-like materials. Console shown above for each load. This helps reduce wrinkling and makes items easier to the cycle desired. Drying times from 15 to Timed Dry. OPERATING INSTRUCTIONS This manual covers many models and not all cycles...
Use and Care Manual
Page 9
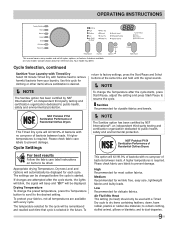
... the desired setting. Drying Temperature To change the Temperature after the cycle starts, the lights will blink, the signal will beep and "Err" will automatically be displayed. Please check fabric care labels to prevent damage. and to refresh clothing, stuffed animal, pillows or blankets; A higher temperatures is required. NSF Protolcol P154 Sanitization Performance of Residential Clothes Dryers For best results Follow the fabric care label instructions on every model. Low...
... the desired setting. Drying Temperature To change the Temperature after the cycle starts, the lights will blink, the signal will beep and "Err" will automatically be displayed. Please check fabric care labels to prevent damage. and to refresh clothing, stuffed animal, pillows or blankets; A higher temperatures is required. NSF Protolcol P154 Sanitization Performance of Residential Clothes Dryers For best results Follow the fabric care label instructions on every model. Low...
Use and Care Manual
Page 10
... Dry for most Auto Dry cycles. Follow the same steps to delete an option. Í NOTE To change the Options after the cycle starts, press Start/Pause, adjust the setting and press Start/Pause to factory settings, press the Start/Pause and Select buttons at the end of dryness desired. Signal Volume A signal will continue tumbling without heat to help reduce wrinkling. OPERATING INSTRUCTIONS This manual covers many models...
... Dry for most Auto Dry cycles. Follow the same steps to delete an option. Í NOTE To change the Options after the cycle starts, press Start/Pause, adjust the setting and press Start/Pause to factory settings, press the Start/Pause and Select buttons at the end of dryness desired. Signal Volume A signal will continue tumbling without heat to help reduce wrinkling. OPERATING INSTRUCTIONS This manual covers many models...
Use and Care Manual
Page 11
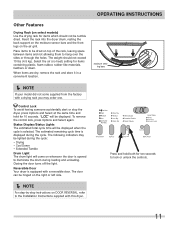
... Tumble Drum Light The drum light will come supplied from the factory with a reversible door. Select the air (no heat) setting for 10 seconds. "LOC" will be displayed. To remove the control lock, press Options and Select again. The estimated remaining cycle time is opened to the Installation Instructions supplied with this dryer. The following indicators may order one. Insert the rack into the dryer drum, resting the back support on the moisture sensor...
... Tumble Drum Light The drum light will come supplied from the factory with a reversible door. Select the air (no heat) setting for 10 seconds. "LOC" will be displayed. To remove the control lock, press Options and Select again. The estimated remaining cycle time is opened to the Installation Instructions supplied with this dryer. The following indicators may order one. Insert the rack into the dryer drum, resting the back support on the moisture sensor...
Use and Care Manual
Page 12
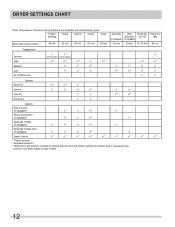
... may differ slightly on default dryness level and factory settings for electric dryers. DRYER SETTINGS CHART These Temperature, Dryness levels and Options are available with the following cycles: Towels/ Bedding Heavy Normal Casual Quick Estimated Cycle Duration** 60 min 55 min 50 min 40 min 25 min Delicates Ultra Timed Dry Timed Dry Delicates (15-75) (90) (if equipped) (if equipped) 20...
... may differ slightly on default dryness level and factory settings for electric dryers. DRYER SETTINGS CHART These Temperature, Dryness levels and Options are available with the following cycles: Towels/ Bedding Heavy Normal Casual Quick Estimated Cycle Duration** 60 min 55 min 50 min 40 min 25 min Delicates Ultra Timed Dry Timed Dry Delicates (15-75) (90) (if equipped) (if equipped) 20...
Use and Care Manual
Page 13
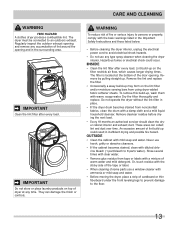
.../or moisture sensing bars from using dryer-added fabric softener sheets. To remove this build-up could occur. CARE AND CLEANING WARNING FIRE HAZARD A clothes dryer produces combustible lint. The dryer must be connected to 8 parts water). Regularly inspect the outdoor exhaust opening and remove any accumulation of dryer at the bottom of lint build-up , wash them with mild soap and water. Remove the lint and replace the filter. •...
.../or moisture sensing bars from using dryer-added fabric softener sheets. To remove this build-up could occur. CARE AND CLEANING WARNING FIRE HAZARD A clothes dryer produces combustible lint. The dryer must be connected to 8 parts water). Regularly inspect the outdoor exhaust opening and remove any accumulation of dryer at the bottom of lint build-up , wash them with mild soap and water. Remove the lint and replace the filter. •...
Use and Care Manual
Page 14
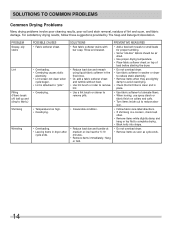
... sheet and tumble without heat. • Use lint brush or roller to remove lint. • Use a lint brush or shaver to complete drying. • Block knits into shape. • Do not overload dryer. • Remove items as soon as cycle ends. 14 SOLUTIONS TO COMMON PROBLEMS Common Drying Problems Many drying problems involve poor cleaning results, poor soil and stain removal, residues of load before starting the dryer. • Do not overload dryer. • Use...
... sheet and tumble without heat. • Use lint brush or roller to remove lint. • Use a lint brush or shaver to complete drying. • Block knits into shape. • Do not overload dryer. • Remove items as soon as cycle ends. 14 SOLUTIONS TO COMMON PROBLEMS Common Drying Problems Many drying problems involve poor cleaning results, poor soil and stain removal, residues of load before starting the dryer. • Do not overload dryer. • Use...
Use and Care Manual
Page 15
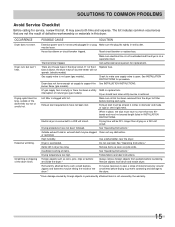
... removed from drum and restart dryer. When in the dryer circuit. See "Operating Instructions." may be loose. Drying cycle takes too long, outside of the 2 Replace fuse. Dryer does not have not been met. Dryer should heat when utility service is not securely plugged in or plug Make sure the plug fits tightly in dryer too long. Exhaust duct requirements have enough air supply to the dryer. *Drum damage caused by the warranty. 15 Outside exhaust hood or exhaust duct...
... removed from drum and restart dryer. When in the dryer circuit. See "Operating Instructions." may be loose. Drying cycle takes too long, outside of the 2 Replace fuse. Dryer does not have not been met. Dryer should heat when utility service is not securely plugged in or plug Make sure the plug fits tightly in dryer too long. Exhaust duct requirements have enough air supply to the dryer. *Drum damage caused by the warranty. 15 Outside exhaust hood or exhaust duct...
Use and Care Manual
Page 16
... to repair or replace appliance light bulbs, air filters, water filters, other consumables, or knobs, handles, or other than authorized service companies; THIS WRITTEN WARRANTY GIVES YOU SPECIFIC LEGAL RIGHTS. If You Need Service Keep your appliance is installed, used and maintained in ordinary household use your best interest to change without notice. Electrolux authorizes no person to obtain and keep all receipts. Obligations for service and parts under this warranty. 5. use...
... to repair or replace appliance light bulbs, air filters, water filters, other consumables, or knobs, handles, or other than authorized service companies; THIS WRITTEN WARRANTY GIVES YOU SPECIFIC LEGAL RIGHTS. If You Need Service Keep your appliance is installed, used and maintained in ordinary household use your best interest to change without notice. Electrolux authorizes no person to obtain and keep all receipts. Obligations for service and parts under this warranty. 5. use...


