Use and Care Manual
Page 1
All about the Use &Care of your Dryer TABLE OF CONTENTS Important Safety Instructions 2-4 Solutions to Common Problems 14-15 Features 5 Warranty 16 Operating Instructions 6-11 Notes 17-18 Dryer Settings Chart 12 Español 19 Care and Cleaning 13 www.frigidaire.com USA 1-800-944-9044 www.frigidaire.ca Canada 1-800-265-8352 137118600B (0907)
All about the Use &Care of your Dryer TABLE OF CONTENTS Important Safety Instructions 2-4 Solutions to Common Problems 14-15 Features 5 Warranty 16 Operating Instructions 6-11 Notes 17-18 Dryer Settings Chart 12 Español 19 Care and Cleaning 13 www.frigidaire.com USA 1-800-944-9044 www.frigidaire.ca Canada 1-800-265-8352 137118600B (0907)
Use and Care Manual
Page 2
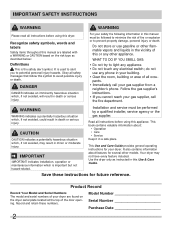
... installer, service agency or the gas supplier. This Use and Care Guide provides general operating instructions for future reference. Your dryer may result in this Use & Care Guide. It is the safety alert symbol. For your gas supplier from a neighbor's phone. Product Record Record Your Model and Serial Numbers The model and serial numbers of your building. • Clear the room, building or area of this or any electrical switch; IMPORTANT SAFETY INSTRUCTIONS...
... installer, service agency or the gas supplier. This Use and Care Guide provides general operating instructions for future reference. Your dryer may result in this Use & Care Guide. It is the safety alert symbol. For your gas supplier from a neighbor's phone. Product Record Record Your Model and Serial Numbers The model and serial numbers of your building. • Clear the room, building or area of this or any electrical switch; IMPORTANT SAFETY INSTRUCTIONS...
Use and Care Manual
Page 3
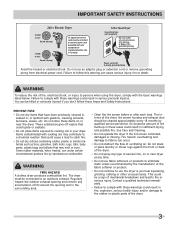
... noises. Fire hazard, overheating and damage to fabrics can under any time. • Do not use fabric softeners or products to use an adaptor plug or extension cord or remove grounding prong from electrical power cord. This could ignite or explode. • Do not place items exposed to fire or serious injury. See Care and Cleaning. • Do not operate the dryer if the lint screen...
... noises. Fire hazard, overheating and damage to fabrics can under any time. • Do not use fabric softeners or products to use an adaptor plug or extension cord or remove grounding prong from electrical power cord. This could ignite or explode. • Do not place items exposed to fire or serious injury. See Care and Cleaning. • Do not operate the dryer if the lint screen...
Use and Care Manual
Page 4
... covered with controls. • Do not install or store the dryer where it checked and reinstalled by a qualified service person. • To prevent personal injury or damage to the dryer, the electrical power cord of a gas dryer must be performed by the use any appliance. 4 PREVENT INJURY • To prevent shock hazard and assure stability during operation, the dryer must replace the thermal limiter switch after...
... covered with controls. • Do not install or store the dryer where it checked and reinstalled by a qualified service person. • To prevent personal injury or damage to the dryer, the electrical power cord of a gas dryer must be performed by the use any appliance. 4 PREVENT INJURY • To prevent shock hazard and assure stability during operation, the dryer must replace the thermal limiter switch after...

Use and Care Manual
Page 5
Cycle Selector FEATURES LED Display Control Lock Drum Light Large Surface Moisture Sensor Door Latch Reversible Door Exhaust Channel Outlet Door Strike Adjustable Leveling Legs Lint Filter Stacking Kit for Mounting on Matching Washer* Heavy Duty Drying Rack* *Not all models come with drying rack and stacking kit from the factory. They may be purchased as accessories. 5
Cycle Selector FEATURES LED Display Control Lock Drum Light Large Surface Moisture Sensor Door Latch Reversible Door Exhaust Channel Outlet Door Strike Adjustable Leveling Legs Lint Filter Stacking Kit for Mounting on Matching Washer* Heavy Duty Drying Rack* *Not all models come with drying rack and stacking kit from the factory. They may be purchased as accessories. 5
Use and Care Manual
Page 6
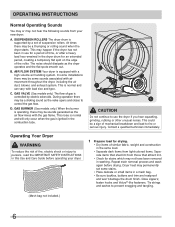
AIR FLOW SYSTEM Your dryer is controlled by a set some installations there may be a sign of the roller. GAS VALVE (Gas models only.) The flow of suspension rollers. GAS BURNER (Gas models only.) When the burner is supported by electric solenoids. Tie strings and sashes to use for a period of time, or after a heavy load has remained in the dryer drum for drying. • Dry items of fire, electric shock or injury...
AIR FLOW SYSTEM Your dryer is controlled by a set some installations there may be a sign of the roller. GAS VALVE (Gas models only.) The flow of suspension rollers. GAS BURNER (Gas models only.) When the burner is supported by electric solenoids. Tie strings and sashes to use for a period of time, or after a heavy load has remained in the dryer drum for drying. • Dry items of fire, electric shock or injury...
Use and Care Manual
Page 7
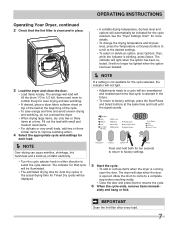
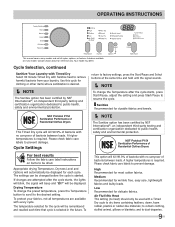
... need room to tumble freely for more details. • To change the drying temperature and dryness level, press the Temperature or Dryness buttons to scroll to select the cycle desired. Allow the drum to come to a complete stop when the door is blinking, press Select. The indicator will be indicated for each time that the lint filter is running, open the door. See the "Dryer Settings Chart...
... need room to tumble freely for more details. • To change the drying temperature and dryness level, press the Temperature or Dryness buttons to scroll to select the cycle desired. Allow the drum to come to a complete stop when the door is blinking, press Select. The indicator will be indicated for each time that the lint filter is running, open the door. See the "Dryer Settings Chart...
Use and Care Manual
Page 8
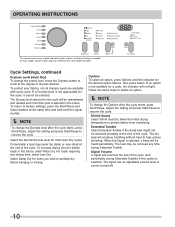
... cancel button before selecting a new cycle. Use the Timed Dry cycle and the Air Fluff/No Heat setting. Your model may end after the cycle starts, the indicator lights will blink, the signal will beep and "Err" will be able to the desired dryness level. Auto Dry cycles save time and energy and protect fabrics. This helps reduce wrinkling and makes items easier to another selection will not change the cycle once...
... cancel button before selecting a new cycle. Use the Timed Dry cycle and the Air Fluff/No Heat setting. Your model may end after the cycle starts, the indicator lights will blink, the signal will beep and "Err" will be able to the desired dryness level. Auto Dry cycles save time and energy and protect fabrics. This helps reduce wrinkling and makes items easier to another selection will not change the cycle once...
Use and Care Manual
Page 9
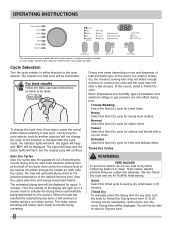
... clothing, stuffed animal, pillows or blankets; To protect your laundry. Low Recommended for wrinkle free, easy care, lightweight fabrics and bulky loads. and to public health, safety and environmental protection. Sanitize Recommended for each time that cycle is required. If changes are attempted after the cycle starts, press Start/Pause, adjust the setting and press Start/Pause to be changed before the cycle is required. OPERATING INSTRUCTIONS This manual covers many models...
... clothing, stuffed animal, pillows or blankets; To protect your laundry. Low Recommended for wrinkle free, easy care, lightweight fabrics and bulky loads. and to public health, safety and environmental protection. Sanitize Recommended for each time that cycle is required. If changes are attempted after the cycle starts, press Start/Pause, adjust the setting and press Start/Pause to be changed before the cycle is required. OPERATING INSTRUCTIONS This manual covers many models...
Use and Care Manual
Page 10
... recalled each time that cycle is not appropriate for items you wish to factory settings, press the Start/Pause and Select buttons at the end of the cycle. Select the Normal dryness level for a cycle, the indicator will be selected. The dry load will be removed any time during Extended Tumble) if this option is not available for most Auto Dry cycles. OPERATING INSTRUCTIONS This manual covers many models...
... recalled each time that cycle is not appropriate for items you wish to factory settings, press the Start/Pause and Select buttons at the end of the cycle. Select the Normal dryness level for a cycle, the indicator will be selected. The dry load will be removed any time during Extended Tumble) if this option is not available for most Auto Dry cycles. OPERATING INSTRUCTIONS This manual covers many models...
Use and Care Manual
Page 11
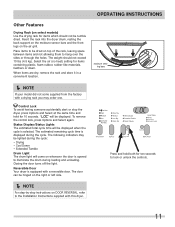
... support on the moisture sensor bars and the front legs on top of the rack, leaving space between items and not allowing them to the Installation Instructions supplied with this dryer. Status Display/Status Lights The estimated total cycle time will come supplied from the factory with a reversible door. Place items to be lighted during the cycle: • Drying • Cool Down • Extended Tumble Drum Light The drum light...
... support on the moisture sensor bars and the front legs on top of the rack, leaving space between items and not allowing them to the Installation Instructions supplied with this dryer. Status Display/Status Lights The estimated total cycle time will come supplied from the factory with a reversible door. Place items to be lighted during the cycle: • Drying • Cool Down • Extended Tumble Drum Light The drum light...
Use and Care Manual
Page 12
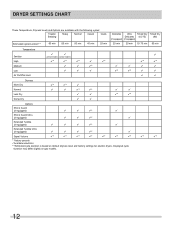
... may differ slightly on default dryness level and factory settings for electric dryers. DRYER SETTINGS CHART These Temperature, Dryness levels and Options are available with the following cycles: Towels/ Bedding Heavy Normal Casual Quick Estimated Cycle Duration** 60 min 55 min 50 min 40 min 25 min Delicates Ultra Timed Dry Timed Dry Delicates (15-75) (90) (if equipped) (if equipped) 20...
... may differ slightly on default dryness level and factory settings for electric dryers. DRYER SETTINGS CHART These Temperature, Dryness levels and Options are available with the following cycles: Towels/ Bedding Heavy Normal Casual Quick Estimated Cycle Duration** 60 min 55 min 50 min 40 min 25 min Delicates Ultra Timed Dry Timed Dry Delicates (15-75) (90) (if equipped) (if equipped) 20...
Use and Care Manual
Page 13
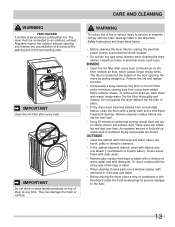
... Safety Instructions and those listed below. • Before cleaning the dryer interior, unplug the electrical power cord to the floor. 13 Rinse several times with ammonia or mild soap and water. • Before moving the dryer, place a strip of warm water and mild detergent. The filter is located at any type spray cleanser when cleaning the dryer interior. Remove cleanser residue before drying the next load...
... Safety Instructions and those listed below. • Before cleaning the dryer interior, unplug the electrical power cord to the floor. 13 Rinse several times with ammonia or mild soap and water. • Before moving the dryer, place a strip of warm water and mild detergent. The filter is located at any type spray cleanser when cleaning the dryer interior. Remove cleanser residue before drying the next load...
Use and Care Manual
Page 14
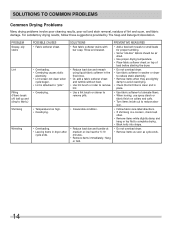
... overload dryer. • Remove items as soon as cycle ends. 14 sion. • Follow fabric care label directions. • If shrinking is a concern, check load often. • Remove items while slightly damp and hang or lay flat medium or low heat for proper tumbling. • Some "silk-like" fabrics should be air dried. • Use proper drying temperature. • Place fabric softener sheet on...
... overload dryer. • Remove items as soon as cycle ends. 14 sion. • Follow fabric care label directions. • If shrinking is a concern, check load often. • Remove items while slightly damp and hang or lay flat medium or low heat for proper tumbling. • Some "silk-like" fabrics should be air dried. • Use proper drying temperature. • Place fabric softener sheet on...
Use and Care Manual
Page 15
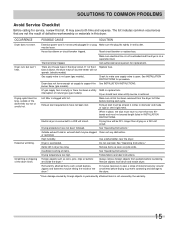
... in wall outlet. or restricted. House fuse blown or circuit breaker tripped. Scratching or chipping of the dryer feels too hot or smells hot. Make sure all lint has been removed from drum and restart dryer. See "Operating Instructions." Drying cycle takes too long, outside of the drum finish. If 1 of the drum.* It may turn but won't heat. Drying time will not operate. (electric models) Gas supply valve is connected to support the See INSTALLATION INSTRUCTIONS. High humidity. Dryer is...
... in wall outlet. or restricted. House fuse blown or circuit breaker tripped. Scratching or chipping of the dryer feels too hot or smells hot. Make sure all lint has been removed from drum and restart dryer. See "Operating Instructions." Drying cycle takes too long, outside of the drum finish. If 1 of the drum.* It may turn but won't heat. Drying time will not operate. (electric models) Gas supply valve is connected to support the See INSTALLATION INSTRUCTIONS. High humidity. Dryer is...
Use and Care Manual
Page 16
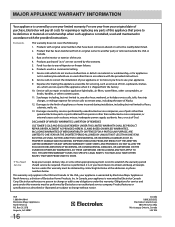
... its original owner to repair or replace appliance light bulbs, air filters, water filters, other consumables, or knobs, handles, or other than in accordance with the provided instructions. If You Need Service Keep your appliance is in a commercial setting. 7. In the USA, your receipt, delivery slip, or some other than authorized service companies; Products with the provided instructions. 8. THIS WRITTEN WARRANTY GIVES YOU SPECIFIC LEGAL RIGHTS. YOU MAY...
... its original owner to repair or replace appliance light bulbs, air filters, water filters, other consumables, or knobs, handles, or other than in accordance with the provided instructions. If You Need Service Keep your appliance is in a commercial setting. 7. In the USA, your receipt, delivery slip, or some other than authorized service companies; Products with the provided instructions. 8. THIS WRITTEN WARRANTY GIVES YOU SPECIFIC LEGAL RIGHTS. YOU MAY...

