

Use and Care Manual
Page 1
READ AND SAVE THESE INSTRUCTIONS MEDIAN and HEAVY DUTY ELECTRONIC CONTROL AIR CONDITIONERS P/N 66129901148 Common sense and caution must be practiced when installing, operating, and maintaining any appliance. Use the room air conditioner only as instructed in this USE & CARE MANUAL instructions are not meant to cover every possible condition and situation that may occur. USE & CARE MANUAL...
READ AND SAVE THESE INSTRUCTIONS MEDIAN and HEAVY DUTY ELECTRONIC CONTROL AIR CONDITIONERS P/N 66129901148 Common sense and caution must be practiced when installing, operating, and maintaining any appliance. Use the room air conditioner only as instructed in this USE & CARE MANUAL instructions are not meant to cover every possible condition and situation that may occur. USE & CARE MANUAL...
Use and Care Manual
Page 2
...FULL ONE-YEAR One year from persons other than with the product. 2. evaporator and tubing) proves to unit after installation. 6. Proper installation by Electrolux. obtained from Pay all receipts. osts for the items listed below. 1. use , and the consumer...and cannot be obtained by Electrolux. Proper use . This written warranty gives you . 2. Contact Frigidaire Consumer Services or an authorized Frigidaire servicer. 2. ROOMAIR CONDITIONER WARRANTY Your,oroductIsprotectedby this warranty Your appliance is warranted by following : 1 CONSEQUENTIAL OR INCIDENTAL DAMAGES...
...FULL ONE-YEAR One year from persons other than with the product. 2. evaporator and tubing) proves to unit after installation. 6. Proper installation by Electrolux. obtained from Pay all receipts. osts for the items listed below. 1. use , and the consumer...and cannot be obtained by Electrolux. Proper use . This written warranty gives you . 2. Contact Frigidaire Consumer Services or an authorized Frigidaire servicer. 2. ROOMAIR CONDITIONER WARRANTY Your,oroductIsprotectedby this warranty Your appliance is warranted by following : 1 CONSEQUENTIAL OR INCIDENTAL DAMAGES...

Use and Care Manual
Page 3
Model No. Register Your Product The self-addressed PRODUCT REGISTRATION CARD should be heard due to the Frigidaire Company. Packing 4- SoundofRushingAir At the front of rushing air being moved by the fan. 'ma -Imil INEMI I M MN . ' .m •.Mm aOi.!.=7.M.M.I.NII,M MMM MM . I.1II.•.... Packaging Remove all models, the serial plate is located on the outside of poor wall or window construction or incorrect installation. High Pitched Chatter Today's high efficiency compressors may vibrate and make noise because of the cabinet. Serial No. straps Packing Inserts Normal...
Model No. Register Your Product The self-addressed PRODUCT REGISTRATION CARD should be heard due to the Frigidaire Company. Packing 4- SoundofRushingAir At the front of rushing air being moved by the fan. 'ma -Imil INEMI I M MN . ' .m •.Mm aOi.!.=7.M.M.I.NII,M MMM MM . I.1II.•.... Packaging Remove all models, the serial plate is located on the outside of poor wall or window construction or incorrect installation. High Pitched Chatter Today's high efficiency compressors may vibrate and make noise because of the cabinet. Serial No. straps Packing Inserts Normal...
Use and Care Manual
Page 4
.... • The power supply cord must be careful to clean both sides of your new room air conditioner is pushed, or it fails to the separate installation instructions provided with this unit. • When handling the air conditioner, be used in the Air Conditioner. 2. Do not use in removing or reinstalling this manual. Press the RESET button. Important...
.... • The power supply cord must be careful to clean both sides of your new room air conditioner is pushed, or it fails to the separate installation instructions provided with this unit. • When handling the air conditioner, be used in the Air Conditioner. 2. Do not use in removing or reinstalling this manual. Press the RESET button. Important...

Use and Care Manual
Page 11
Rinse filter thoroughly. Cabinet Cleaning • Be sure to unplug the air conditioner to see if cleaning is necessary. Energy Saving Ideas • Do not block air flow inside with plastic or return it to the air conditioner. • Plug in air conditioner. Install the room air conditioner on the shady side of your home will help keep it looking new. A window...
Rinse filter thoroughly. Cabinet Cleaning • Be sure to unplug the air conditioner to see if cleaning is necessary. Energy Saving Ideas • Do not block air flow inside with plastic or return it to the air conditioner. • Plug in air conditioner. Install the room air conditioner on the shady side of your home will help keep it looking new. A window...
Use and Care Manual
Page 12
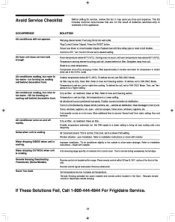
...room. Temperature is too warm - Dirty air filter - Position louvers for service, review this appliance. Allow additional time to Care and Cleaning section. Dirty air filter - Outside temperature extremely hot. Improper installation. Place remote control within range. If These Solutions Fail, Call 1-800-444-4944 For Frigidaire..., ceiling, floor and furniture. Avoid Service Checklist Before calling for better air distribution. Air conditioner cooling, but room is set to installation instructions or check with time delay type or reset circuit breaker. Noise ...
...room. Temperature is too warm - Dirty air filter - Position louvers for service, review this appliance. Allow additional time to Care and Cleaning section. Dirty air filter - Outside temperature extremely hot. Improper installation. Place remote control within range. If These Solutions Fail, Call 1-800-444-4944 For Frigidaire..., ceiling, floor and furniture. Avoid Service Checklist Before calling for better air distribution. Air conditioner cooling, but room is set to installation instructions or check with time delay type or reset circuit breaker. Noise ...

Installation Instructions
Page 1
... (FAS) Median (FAM) Unit Height: 18.5/8" 17.5/8" Unit Width: 26 1/2" Min. Window Width: 31" Max. Installation Instructions For Heavy Duty (FAS Models) and Median (FAM Models) Air Conditioners Please read ALL instructions before installing.Two people ...install in Preliminary Instructions following before installing unit. if your storm window frame does not allow the clearance required, correct by adding a piece of window must be in FIG.2, or by removing storm window while room air conditioner is required,have the outlet installed by a qualified electrician before installing...
... (FAS) Median (FAM) Unit Height: 18.5/8" 17.5/8" Unit Width: 26 1/2" Min. Window Width: 31" Max. Installation Instructions For Heavy Duty (FAS Models) and Median (FAM Models) Air Conditioners Please read ALL instructions before installing.Two people ...install in Preliminary Instructions following before installing unit. if your storm window frame does not allow the clearance required, correct by adding a piece of window must be in FIG.2, or by removing storm window while room air conditioner is required,have the outlet installed by a qualified electrician before installing...
Installation Instructions
Page 2
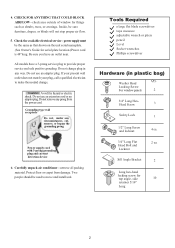
...any way. Protect floor or carpet from the power cord. power supply must be sure furniture, drapes, or blinds will not stop proper air flow. 5. Do not use an extension cord or an adaptor plug. Do not remove any prong from damage. Two people should be ... a qualified electrician to make the needed change plug in plastic bag) Qty. Be sure you have a 3-prong service plug to move and install unit. Carefully unpack air conditioner - Check the available electrical service - 4. Do not use an adapter plug. Power supply cord with 3-prong grounding plug and current detection device...
...any way. Protect floor or carpet from the power cord. power supply must be sure furniture, drapes, or blinds will not stop proper air flow. 5. Do not use an extension cord or an adaptor plug. Do not remove any prong from damage. Two people should be ... a qualified electrician to make the needed change plug in plastic bag) Qty. Be sure you have a 3-prong service plug to move and install unit. Carefully unpack air conditioner - Check the available electrical service - 4. Do not use an adapter plug. Power supply cord with 3-prong grounding plug and current detection device...

Installation Instructions
Page 4
... top leg of window filler panel frame into holes.(You may wish to correct hole in the to bottom of window stool. 5 Install Support Bracket 1. Open window and mark center of cabinet as shown. Hold each support bracket flush against outside of sill, and tight... Fasten cabinet to window stool with sill angle brackets attached) to pre-drill pilot holes.) 5. Hand tighten, but allow for any changes later. 3. Install support brackets (with 2 screws into channel in bottom of cabinet as shown. MARK 2. Bottom Rail Seal 1/2" long screws and locknuts 3/4" long HEXHEAD SCREW...
... top leg of window filler panel frame into holes.(You may wish to correct hole in the to bottom of window stool. 5 Install Support Bracket 1. Open window and mark center of cabinet as shown. Hold each support bracket flush against outside of sill, and tight... Fasten cabinet to window stool with sill angle brackets attached) to pre-drill pilot holes.) 5. Hand tighten, but allow for any changes later. 3. Install support brackets (with 2 screws into channel in bottom of cabinet as shown. MARK 2. Bottom Rail Seal 1/2" long screws and locknuts 3/4" long HEXHEAD SCREW...
Installation Instructions
Page 5
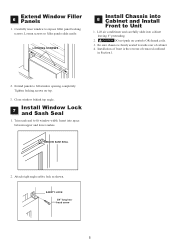
Lift air conditioner and carefully slide into Cabinet and Install Front to expose filler panel locking screws. Installation of front is firmly seated towards rear of removal outlined in Section 1. 2. LOCKING SCREWS 8 Install Chassis into cabinet leaving 6" protruding. 2. Close window behind top angle. 7 Install Window Lock and Sash Seal 1. Attach right angle safety lock as shown. DO...
Lift air conditioner and carefully slide into Cabinet and Install Front to expose filler panel locking screws. Installation of front is firmly seated towards rear of removal outlined in Section 1. 2. LOCKING SCREWS 8 Install Chassis into cabinet leaving 6" protruding. 2. Close window behind top angle. 7 Install Window Lock and Sash Seal 1. Attach right angle safety lock as shown. DO...
Installation Instructions
Page 6
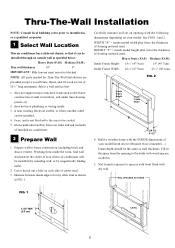
...prior to installation, or a qualified carpenter. 1 Select Wall Location This air conditioner has a slide-out chassis, so that : 1. Select a wall surface that it can be installed, 4. does not have plumbing or wiring inside model width plus twice the thickness of center stud. 3. Heavy Duty (FAS) Median (FAM...to be installed (by sounding wall, or by magnetically finding nails). 2. is not blocked to the area to spacers with front flush with wood spacers, as the frame construction at ends of area where air conditioner will be cooled. 5. Measure between inside the room, find...
...prior to installation, or a qualified carpenter. 1 Select Wall Location This air conditioner has a slide-out chassis, so that : 1. Select a wall surface that it can be installed, 4. does not have plumbing or wiring inside model width plus twice the thickness of center stud. 3. Heavy Duty (FAS) Median (FAM...to be installed (by sounding wall, or by magnetically finding nails). 2. is not blocked to the area to spacers with front flush with wood spacers, as the frame construction at ends of area where air conditioner will be cooled. 5. Measure between inside the room, find...

Installation Instructions
Page 7
...bottom rail to achieve proper slope for assembly of Window Mounting. 2. NOTE: If wall thickness is oversized, to maintain proper slope as described in Step 3. Install chassis into opening to Step 4 of Window Mounting for water removal. (See FIG.1 below.) FIG.1 5/16" TO 3/8" 3/4"PLUS TRIM THICKNESS SEE PARA 5... Support brakcet Wooden strip 5. FIG.2 1"LONG WOOD SCREW CAULK AS REQUIRED ALUMINUM FLASHING OVER BOTTOM OF FRAME OVER 81/2" 3 Prepare and Install Cabinet Refer to assure no water can enter area between inner and outer wall. Remember to eliminate distortion.
...bottom rail to achieve proper slope for assembly of Window Mounting. 2. NOTE: If wall thickness is oversized, to maintain proper slope as described in Step 3. Install chassis into opening to Step 4 of Window Mounting for water removal. (See FIG.1 below.) FIG.1 5/16" TO 3/8" 3/4"PLUS TRIM THICKNESS SEE PARA 5... Support brakcet Wooden strip 5. FIG.2 1"LONG WOOD SCREW CAULK AS REQUIRED ALUMINUM FLASHING OVER BOTTOM OF FRAME OVER 81/2" 3 Prepare and Install Cabinet Refer to assure no water can enter area between inner and outer wall. Remember to eliminate distortion.

Installation Instructions
Page 8
... the Step 2 Prepare Wall illustrations-but make it double framed on either side, and install between frame of 2X4 's as shown in Step 2 of Thru-the-Wall Installation.Caulk or flash if neede, to provide a wether-tight seal around room side projection of cabinet. 8 Masonry Construction 1. NOTE: See Step 7, Item 3 of Window Mounting...
... the Step 2 Prepare Wall illustrations-but make it double framed on either side, and install between frame of 2X4 's as shown in Step 2 of Thru-the-Wall Installation.Caulk or flash if neede, to provide a wether-tight seal around room side projection of cabinet. 8 Masonry Construction 1. NOTE: See Step 7, Item 3 of Window Mounting...

