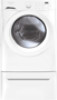
Complete Owner's Guide (English)
Page 22
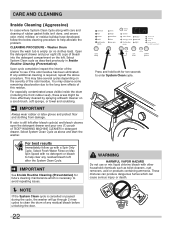
...Clean Cycle along with care and cleaning of the washer to see if the odor/residue has been eliminated. Select System Clean cycle as above procedure. You may take several cycles depending on Max Spin Speed with no clothes load). IMPORTANT Always wear rubber or latex gloves and ... These mixtures can cause serious injury or death. 22 If odor is cancelled or paused during the cycle, the washer will go through 2 rinse cycles to help alleviate the problem. Select System Clean Cycle as described previously in detergent drawer. Open the detergent drawer and pour eight (8) cups ...
...Clean Cycle along with care and cleaning of the washer to see if the odor/residue has been eliminated. Select System Clean cycle as above procedure. You may take several cycles depending on Max Spin Speed with no clothes load). IMPORTANT Always wear rubber or latex gloves and ... These mixtures can cause serious injury or death. 22 If odor is cancelled or paused during the cycle, the washer will go through 2 rinse cycles to help alleviate the problem. Select System Clean Cycle as described previously in detergent drawer. Open the detergent drawer and pour eight (8) cups ...

Complete Owner's Guide (English)
Page 24
...washer. • Not enough detergent. • Undissolved detergent has left a residue resembling lint. • Static cling is attracting lint. • Load washed too long. Soak item 1 hour. Rewash. • Rub fabric softener stains with prewash stain remover or liquid detergent. • Increase detergent and water temperature. SOLUTIONS TO COMMON PROBLEMS Common Washing Problems...Your, steps 1 and 2. • Do not overload washer. • Use correct temperature and amount of lint and scum, and fabric damage. PROBLEM Blue stains Discoloration, graying Greasy, oily stains Holes, tears,...
...washer. • Not enough detergent. • Undissolved detergent has left a residue resembling lint. • Static cling is attracting lint. • Load washed too long. Soak item 1 hour. Rewash. • Rub fabric softener stains with prewash stain remover or liquid detergent. • Increase detergent and water temperature. SOLUTIONS TO COMMON PROBLEMS Common Washing Problems...Your, steps 1 and 2. • Do not overload washer. • Use correct temperature and amount of lint and scum, and fabric damage. PROBLEM Blue stains Discoloration, graying Greasy, oily stains Holes, tears,...
Complete Owner's Guide (English)
Page 25
SOLUTIONS TO COMMON PROBLEMS Common Washing Problems, continued PROBLEM Pilling (Fibers ball up and cling to remove pills. • Rewash load. • Reduce load size. • Rinse in cold water with liq- Wrinkling Yellow buildup of whites, use chlorine bleach to remove rust...Yellow or brown rust stains POSSIBLE CAUSES • Pilling is normal with hard water minerals to form a residue. • Overloading the washer. • Overloading the washer. • Incorrect wash cycle for a few minutes to reduce abrasion. • Increase water temperature using hot or warm water. &#...
SOLUTIONS TO COMMON PROBLEMS Common Washing Problems, continued PROBLEM Pilling (Fibers ball up and cling to remove pills. • Rewash load. • Reduce load size. • Rinse in cold water with liq- Wrinkling Yellow buildup of whites, use chlorine bleach to remove rust...Yellow or brown rust stains POSSIBLE CAUSES • Pilling is normal with hard water minerals to form a residue. • Overloading the washer. • Overloading the washer. • Incorrect wash cycle for a few minutes to reduce abrasion. • Increase water temperature using hot or warm water. &#...
Complete Owner's Guide (English)
Page 26
... washing and part of normal operation. • Moisture in the washer. • Use of non-HE detergent. • Overdosing detergent. • Leaving a wet load remain in use. 26 PREVENTIVE MEASURES • Run dehumidifier...Problems, continued PROBLEM Residue stains / buildup, mold or mildew stains in gasket Residue stains / buildup, mold or mildew stains in dispenser drawer Water in fold of flexible gasket Odor POSSIBLE CAUSES • Moisture in the washer. • Use of non-HE detergent. • Overdosing detergent. • Overloading wash drum. • Leaving a wet load...
... washing and part of normal operation. • Moisture in the washer. • Use of non-HE detergent. • Overdosing detergent. • Leaving a wet load remain in use. 26 PREVENTIVE MEASURES • Run dehumidifier...Problems, continued PROBLEM Residue stains / buildup, mold or mildew stains in gasket Residue stains / buildup, mold or mildew stains in dispenser drawer Water in fold of flexible gasket Odor POSSIBLE CAUSES • Moisture in the washer. • Use of non-HE detergent. • Overdosing detergent. • Overloading wash drum. • Leaving a wet load...
Complete Owner's Guide (English)
Page 27
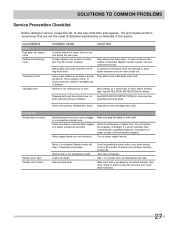
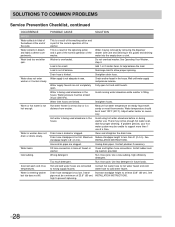
.... Thumping sound. Belt buckles and metal fasteners are not turned on floor. Do not increase fuse capacity. If problem is too small. Motor is not completely closed. Stop washer and rearrange wash load. Washer door is overheated. If noise continues after a cool down period of balance. This is probably out of up to...
.... Thumping sound. Belt buckles and metal fasteners are not turned on floor. Do not increase fuse capacity. If problem is too small. Motor is not completely closed. Stop washer and rearrange wash load. Washer door is overheated. If noise continues after a cool down period of balance. This is probably out of up to...
Complete Owner's Guide (English)
Page 28
... and tighten hose connections. See standpipe height is out of the siphoning action and is a distance from washer. Adjust water heater as necessary. SOLUTIONS TO COMMON PROBLEMS Service Prevention Checklist, continued OCCURRENCE WATER Water collects in the house. Do not overload washer. Load is 8' (2.4 m). open hot and cold faucets. Avoid running water elsewhere while...
... and tighten hose connections. See standpipe height is out of the siphoning action and is a distance from washer. Adjust water heater as necessary. SOLUTIONS TO COMMON PROBLEMS Service Prevention Checklist, continued OCCURRENCE WATER Water collects in the house. Do not overload washer. Load is 8' (2.4 m). open hot and cold faucets. Avoid running water elsewhere while...
Wiring Diagram (All Languages)
Page 1
... knob (1) click clockwise from the start position. Turn the program knob (5) clicks from the start position. Wake the washer by using charts on . 7. door problem. TO START THE TEST: • Turn the Program Knob to the start position, Spin Only. • Press ... knob clockwise 7 clicks from the start position. Once tumbling has started, the Boost Heater (if so equipped) will deactivate and the loading door can be opened . Press Options and Start/Pause buttons together for Future Reference Contents Page Error code explanation 1 Diagnostics 1 Error Code...
... knob (1) click clockwise from the start position. Turn the program knob (5) clicks from the start position. Wake the washer by using charts on . 7. door problem. TO START THE TEST: • Turn the Program Knob to the start position, Spin Only. • Press ... knob clockwise 7 clicks from the start position. Once tumbling has started, the Boost Heater (if so equipped) will deactivate and the loading door can be opened . Press Options and Start/Pause buttons together for Future Reference Contents Page Error code explanation 1 Diagnostics 1 Error Code...

Wiring Diagram (All Languages)
Page 3
...for kinked or blocked incoming water hoses, clean the incoming water screens. Go to step (3) Defective. Replace the inlet valve assembly. Washer spins. Is the incoming water flow normal? In the J2 plug on the console control, measure voltage from the start position. Yes...black wire to ground with power on . Defective door lock assembly. Replace the control board. 1. Is the loading door closed? 2. No. Good wiring. If this correct the problem? 1. Go to step (6) No. Inspect the wiring between the pressure sensor and the control board. 1. ...
...for kinked or blocked incoming water hoses, clean the incoming water screens. Go to step (3) Defective. Replace the inlet valve assembly. Washer spins. Is the incoming water flow normal? In the J2 plug on the console control, measure voltage from the start position. Yes...black wire to ground with power on . Defective door lock assembly. Replace the control board. 1. Is the loading door closed? 2. No. Good wiring. If this correct the problem? 1. Go to step (6) No. Inspect the wiring between the pressure sensor and the control board. 1. ...


