

Installation Instructions
Page 1
All about the Installation of your Washer TABLE OF CONTENTS Important Safety Instructions 2-3 Installation Instructions 9-10 Installation Requirements 4-5 Accessories 11 Installed Dryer Dimensions 6 Notes 12 Unpacking Washer 7-8 Français 13 137337000A (1003)
All about the Installation of your Washer TABLE OF CONTENTS Important Safety Instructions 2-3 Installation Instructions 9-10 Installation Requirements 4-5 Accessories 11 Installed Dryer Dimensions 6 Notes 12 Unpacking Washer 7-8 Français 13 137337000A (1003)
Installation Instructions
Page 2
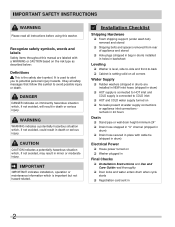
... with cable tie (shipped in drum) Electrical Power ‰ House power turned on ‰ Washer plugged in Final Checks ‰ Installation Instructions and Use and Care Guide read all instructions before using this symbol to avoid possible injury or death. IMPORTANT IMPORTANT indicates installation, operation or maintenance...appliance and stored ‰ Hole plugs (shipped in bag in drum) installed in holes in backsheet Leveling ‰ Washer is level, side-to-side and front-to-back ‰ Cabinet is setting solid on the risk type as described below: Definitions This is important...
... with cable tie (shipped in drum) Electrical Power ‰ House power turned on ‰ Washer plugged in Final Checks ‰ Installation Instructions and Use and Care Guide read all instructions before using this symbol to avoid possible injury or death. IMPORTANT IMPORTANT indicates installation, operation or maintenance...appliance and stored ‰ Hole plugs (shipped in bag in drum) installed in holes in backsheet Leveling ‰ Washer is level, side-to-side and front-to-back ‰ Cabinet is setting solid on the risk type as described below: Definitions This is important...
Installation Instructions
Page 3
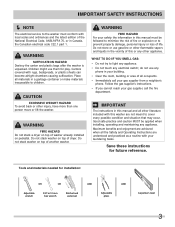
...fits and enjoyment are achieved when all the Safety and Operating Instructions are not meant to cover every possible condition and situation that may occur. Place all materials in the vicinity of this washer are understood and practiced as a routine with rugs, bedspreads, or ...safety the information in your gas supplier from a neighbor's phone. do not use them for play. IMPORTANT SAFETY INSTRUCTIONS Í NOTE The electrical service to the washer must be applied when installing, operating and maintaining any electrical switch; WARNING FIRE HAZARD Do not stack a dryer ...
...fits and enjoyment are achieved when all the Safety and Operating Instructions are not meant to cover every possible condition and situation that may occur. Place all materials in the vicinity of this washer are understood and practiced as a routine with rugs, bedspreads, or ...safety the information in your gas supplier from a neighbor's phone. do not use them for play. IMPORTANT SAFETY INSTRUCTIONS Í NOTE The electrical service to the washer must be applied when installing, operating and maintaining any electrical switch; WARNING FIRE HAZARD Do not stack a dryer ...
Installation Instructions
Page 8
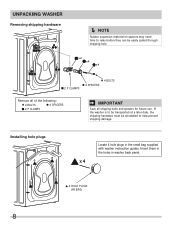
... Save all shipping bolts and spacers for future use. Insert them in the holes in the small bag supplied with washer instruction guides. Installing hole plugs Locate 4 hole plugs in washer back panel. UNPACKING WASHER Removing shipping hardware Í NOTE Rubber expansion material on spacers may need time to relax before they can be...
... Save all shipping bolts and spacers for future use. Insert them in the holes in the small bag supplied with washer instruction guides. Installing hole plugs Locate 4 hole plugs in washer back panel. UNPACKING WASHER Removing shipping hardware Í NOTE Rubber expansion material on spacers may need time to relax before they can be...
Installation Instructions
Page 9
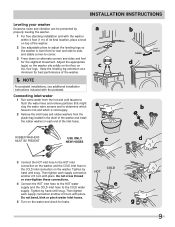
...to determine which faucet is hot and which is level front-to-rear and side-to-side, and stable corner-to-corner. 3 Press down on the washer. Tighten by hand until snug. Adjust the appropriate leg(s) so the washer sits solidly on the floor on the water and... COLD inlet hose to the COLD inlet connection on alternate corners and sides and feel for best performance of the washer. Í NOTE For pedestal installations, see additional installation instructions included with the pedestal. Then tighten each end of the inlet hoses. Then tighten each supply connection HOT COLD...
...to determine which faucet is hot and which is level front-to-rear and side-to-side, and stable corner-to-corner. 3 Press down on the washer. Tighten by hand until snug. Adjust the appropriate leg(s) so the washer sits solidly on the floor on the water and... COLD inlet hose to the COLD inlet connection on alternate corners and sides and feel for best performance of the washer. Í NOTE For pedestal installations, see additional installation instructions included with the pedestal. Then tighten each end of the inlet hoses. Then tighten each supply connection HOT COLD...
Installation Instructions
Page 10
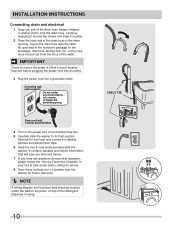
Recheck for level and rock corners for service. 8 Place these instructions in washer drum) onto the drain hose. It contains valuable and helpful information that will save you time and money. 7 If you have any circumstances, cut, remove, .... 10 CABLE TIE Secure the drain hose with the cable tie (provided in the drain opening. INSTALLATION INSTRUCTIONS Connecting drain and electrical 1 Snap one end of the drain hose hanger (shipped in a location near the washer for future reference. Í NOTE A wiring diagram and technical data sheet are located under any questions...
Recheck for level and rock corners for service. 8 Place these instructions in washer drum) onto the drain hose. It contains valuable and helpful information that will save you time and money. 7 If you have any circumstances, cut, remove, .... 10 CABLE TIE Secure the drain hose with the cable tie (provided in the drain opening. INSTALLATION INSTRUCTIONS Connecting drain and electrical 1 Snap one end of the drain hose hanger (shipped in a location near the washer for future reference. Í NOTE A wiring diagram and technical data sheet are located under any questions...


