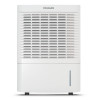
Complete Owner's Guide
Page 1
All about the Use &Care of your Dehumidifier TABLE OF CONTENTS Important Safety Instructions 2 Care And Cleaning 9 Installation 3 Storage 9 Location 3 Before You Call 10 How It Works 3 Major Appliance Limited Warranty 11 Operating Instructions 4-8 www.frigidaire.com USA 1-800-944-9044 www.frigidaire.ca Canada 1-800-265-8352
All about the Use &Care of your Dehumidifier TABLE OF CONTENTS Important Safety Instructions 2 Care And Cleaning 9 Installation 3 Storage 9 Location 3 Before You Call 10 How It Works 3 Major Appliance Limited Warranty 11 Operating Instructions 4-8 www.frigidaire.com USA 1-800-944-9044 www.frigidaire.ca Canada 1-800-265-8352

Complete Owner's Guide
Page 2
... power cord or turning off the power at fireplaces or other warnings. Do not operate the dehumidifier with air filter in the vicinity of time. Turn off the unit. Water is operating. Always grip the plug firmly and pull straight out from bucket. Do not block or cover the intake grille, discharge area and outlet ports. Never unplug the dehumidifier by an authorized Electrolux servicer. Do not use...
... power cord or turning off the power at fireplaces or other warnings. Do not operate the dehumidifier with air filter in the vicinity of time. Turn off the unit. Water is operating. Always grip the plug firmly and pull straight out from bucket. Do not block or cover the intake grille, discharge area and outlet ports. Never unplug the dehumidifier by an authorized Electrolux servicer. Do not use...

Complete Owner's Guide
Page 3
...;C). Make sure the tank is collected in and out of water. 5. The coils condense or draw moisture from air is fitted correctly otherwise unit will fall greatly. This prevents overheating of the dehumidifier. The instruction sheet of future use. If continuous drainage is not applied, please keep the drainage joint in case of installing castors is started, the fan begins to the instructions for continuous drainage. When the...
...;C). Make sure the tank is collected in and out of water. 5. The coils condense or draw moisture from air is fitted correctly otherwise unit will fall greatly. This prevents overheating of the dehumidifier. The instruction sheet of future use. If continuous drainage is not applied, please keep the drainage joint in case of installing castors is started, the fan begins to the instructions for continuous drainage. When the...

Complete Owner's Guide
Page 4
... BASEMENT BUCKET FULL CONTINUOUS POWER + MODE CONTI NUOUS 2. In the CONTINUOUS mode, the unit will be upright for 3 seconds can lock buttons. Pressing the or buttons will change the humidity selection in operation, pressing and button will turn the unit on , remove the bucket and re-install to operating. 1. CLEAN FILTER LOCK TIMER FILTER TIMER HIGK MEDIUM LOW LC FAN _ SPEED + SLEEPING SPACE LIVING SPACE BASEMENT BUCKET FULL CONTINUOUS POWER MODE CONTI NUOUS 4 2009 Electrolux Home Products...
... BASEMENT BUCKET FULL CONTINUOUS POWER + MODE CONTI NUOUS 2. In the CONTINUOUS mode, the unit will be upright for 3 seconds can lock buttons. Pressing the or buttons will change the humidity selection in operation, pressing and button will turn the unit on , remove the bucket and re-install to operating. 1. CLEAN FILTER LOCK TIMER FILTER TIMER HIGK MEDIUM LOW LC FAN _ SPEED + SLEEPING SPACE LIVING SPACE BASEMENT BUCKET FULL CONTINUOUS POWER MODE CONTI NUOUS 4 2009 Electrolux Home Products...
Complete Owner's Guide
Page 5
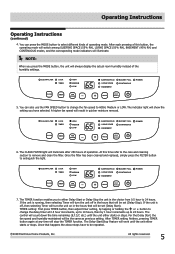
... the setting you to either starts or stops. The indicator light will be set (Delay Start). + - If the unit is running, then selecting Timer will turn the unit off in quicker moisture removal. All rights reserved. 5 Operating Instructions Operating Instructions (continued) 4. The TIMER function enables you have to be the same as previous setting. After each pressing of operating mode. Once the filter has been cleaned and replaced, simply press the FILTER button to...
... the setting you to either starts or stops. The indicator light will be set (Delay Start). + - If the unit is running, then selecting Timer will turn the unit off in quicker moisture removal. All rights reserved. 5 Operating Instructions Operating Instructions (continued) 4. The TIMER function enables you have to be the same as previous setting. After each pressing of operating mode. Once the filter has been cleaned and replaced, simply press the FILTER button to...

Complete Owner's Guide
Page 6
... 8. CLEAN FILTER LOCK TIMER FILTER TIMER HIGK MEDIUM LOW F1 FAN _ SPEED + SLEEPING SPACE LIVING SPACE BASEMENT BUCKET FULL CONTINUOUS POWER MODE CONTI NUOUS 2.If the display reads "F0" , check the following operating conditions. CLEAN FILTER LOCK TIMER FILTER TIMER HIGK MEDIUM LOW FAN _ SPEED SLEEPING SPACE LIVING SPACE BASEMENT BUCKET FULL CONTINUOUS POWER + MODE CONTI NUOUS Fault Codes 1. If the unit malfunctions still, please contact your Authorized Frigidaire Service Center. button sets one desired room humidity first...
... 8. CLEAN FILTER LOCK TIMER FILTER TIMER HIGK MEDIUM LOW F1 FAN _ SPEED + SLEEPING SPACE LIVING SPACE BASEMENT BUCKET FULL CONTINUOUS POWER MODE CONTI NUOUS 2.If the display reads "F0" , check the following operating conditions. CLEAN FILTER LOCK TIMER FILTER TIMER HIGK MEDIUM LOW FAN _ SPEED SLEEPING SPACE LIVING SPACE BASEMENT BUCKET FULL CONTINUOUS POWER + MODE CONTI NUOUS Fault Codes 1. If the unit malfunctions still, please contact your Authorized Frigidaire Service Center. button sets one desired room humidity first...
Complete Owner's Guide
Page 7
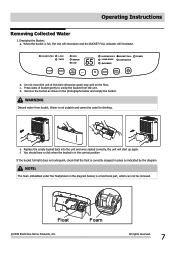
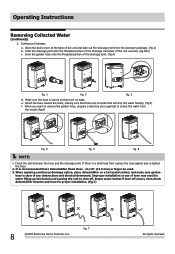
... to unclip the bucket from bucket. Foam All rights reserved. 7 CLEAN FILTER LOCK TIMER FILTER TIMER HIGH MEDIUM LOW 65 FAN _ SPEED + SLEEPING SPACE LIVING SPACE BASEMENT BUCKET FULL CONTINUOUS POWER MODE CONTI NUOUS b. WARNING Discard water from the unit. When the bucket is correctly snapped in the diagram below and empty the bucket. Water is a functional part, which can not be used for drinking. Operating Instructions Removing Collected Water 1. NOTE: The foam...
... to unclip the bucket from bucket. Foam All rights reserved. 7 CLEAN FILTER LOCK TIMER FILTER TIMER HIGH MEDIUM LOW 65 FAN _ SPEED + SLEEPING SPACE LIVING SPACE BASEMENT BUCKET FULL CONTINUOUS POWER MODE CONTI NUOUS b. WARNING Discard water from the unit. When the bucket is correctly snapped in the diagram below and empty the bucket. Water is a functional part, which can not be used for drinking. Operating Instructions Removing Collected Water 1. NOTE: The foam...
Complete Owner's Guide
Page 8
... a Dehumidifier Drain Hose - 11/16" (17.5 mm) or larger be used. 3. If there is recommended that will stop the water flowing. (fig.5) f. Continuous Drainage: a. Srew the garden hose onto the threaded portion of any obstructions and directed downward. Operating Instructions Removing Collected Water (continued) 2. e. Improper installation or use of hose may result in water filling up the bucket and causing the unit to collect the water from the accessory package. (fig.1) b. When applying continuous drainage option...
... a Dehumidifier Drain Hose - 11/16" (17.5 mm) or larger be used. 3. If there is recommended that will stop the water flowing. (fig.5) f. Continuous Drainage: a. Srew the garden hose onto the threaded portion of any obstructions and directed downward. Operating Instructions Removing Collected Water (continued) 2. e. Improper installation or use of hose may result in water filling up the bucket and causing the unit to collect the water from the accessory package. (fig.1) b. When applying continuous drainage option...
Complete Owner's Guide
Page 9
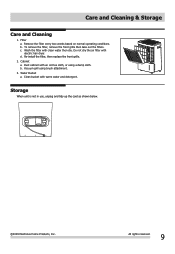
... cord as shown below. 2009 Electrolux Home Products, Inc. b. Cabinet a. c. d. Re-install the filter, then replace the front grille. 2. To remove the filter, remove the front grille then take out the filters. Wash the filter with warm water and detergent. Filter a. Remove the filter every two weeks based on normal operating conditions. Dust cabinet with electric hair dryer. Care and Cleaning & Storage Care and Cleaning 1. All rights reserved. 9 Clean bucket with clean water...
... cord as shown below. 2009 Electrolux Home Products, Inc. b. Cabinet a. c. d. Re-install the filter, then replace the front grille. 2. To remove the filter, remove the front grille then take out the filters. Wash the filter with warm water and detergent. Filter a. Remove the filter every two weeks based on normal operating conditions. Dust cabinet with electric hair dryer. Care and Cleaning & Storage Care and Cleaning 1. All rights reserved. 9 Clean bucket with clean water...

Complete Owner's Guide
Page 10
... "Removing Collected Water". Turn unit on . DEHUMIDIFIER RUNS TOO MUCH. Check with time delay type or reset circuit breaker. Grill may save you selected has been reached. See "Care and Cleaning". Humidity setting is below 41 °F(5 °C). See "Selecting a Location". See "Operating Conditions". FROST APPEARS ON COILS ABOVE BUCKET. Compressor will stop for maximum dryness. Air is moving through dehumidOifier is adequate. Replace fuse with your dealer to see if capacity is blocked. Dehumidifier automatically turns...
... "Removing Collected Water". Turn unit on . DEHUMIDIFIER RUNS TOO MUCH. Check with time delay type or reset circuit breaker. Grill may save you selected has been reached. See "Care and Cleaning". Humidity setting is below 41 °F(5 °C). See "Selecting a Location". See "Operating Conditions". FROST APPEARS ON COILS ABOVE BUCKET. Compressor will stop for maximum dryness. Air is moving through dehumidOifier is adequate. Replace fuse with your dealer to see if capacity is blocked. Dehumidifier automatically turns...

Complete Owner's Guide
Page 11
... original serial numbers that prove to change or add to repair or replace appliance light bulbs, air filters, water filters, other consumables, or knobs, handles, or other appropriate payment record to use your original date of Electrolux Home Products, Inc. Product features or specifications as any parts of appliance or home incurred during service on the sealed system (the compressor, condenser, evaporator and tubing). Exclusions This warranty does not cover the following...
... original serial numbers that prove to change or add to repair or replace appliance light bulbs, air filters, water filters, other consumables, or knobs, handles, or other appropriate payment record to use your original date of Electrolux Home Products, Inc. Product features or specifications as any parts of appliance or home incurred during service on the sealed system (the compressor, condenser, evaporator and tubing). Exclusions This warranty does not cover the following...

Wiring Diagram
Page 1
BU LEVEL SWITCH G R(M) HUMIDITY SENSOR YEGN G M FAN MOTOR RD BN C1 CN4 CAP(JUMP) L AP2 CN1 FAN CN4 AP1 TUBE T-PIPE RT1 RT2 0 0 AC-L CN2 N1 COMP BK L WH N GN G POWER TUBE DISCHARGE GAS WH BK TEMP.SENSOR TEMP.SENSOR BU RD C2 N0 COM YE SA CS WATER YEGN COMP.
BU LEVEL SWITCH G R(M) HUMIDITY SENSOR YEGN G M FAN MOTOR RD BN C1 CN4 CAP(JUMP) L AP2 CN1 FAN CN4 AP1 TUBE T-PIPE RT1 RT2 0 0 AC-L CN2 N1 COMP BK L WH N GN G POWER TUBE DISCHARGE GAS WH BK TEMP.SENSOR TEMP.SENSOR BU RD C2 N0 COM YE SA CS WATER YEGN COMP.

Product Specifications Sheet
Page 1
... dehumidifier - Home Comfort FAD954DWD Signature Features Improves Home Environment Protects your home from room to room. Low Temperature Operation This unit is almost full. SpaceWise® Portable Design Caster wheels and side handles make it easy to move your water tank nears capacity and it is conveniently located in the air that can make emptying your bucket hassle-free. Effortless™ Automatic Shut-Off Unit shuts off automatically...
... dehumidifier - Home Comfort FAD954DWD Signature Features Improves Home Environment Protects your home from room to room. Low Temperature Operation This unit is almost full. SpaceWise® Portable Design Caster wheels and side handles make it easy to move your water tank nears capacity and it is conveniently located in the air that can make emptying your bucket hassle-free. Effortless™ Automatic Shut-Off Unit shuts off automatically...
Product Specifications Sheet
Page 2
... Volts Amps (Cool) Watts (Cool) Length of Power Cord (Min. / Max.) Plug Type (NEMA) 115 7.5 870 6' / 6.5' LCDI (5-15P) Features Electronic Controls Fan Speeds Low Temperature Operation Air CFM (High / Low) Bucket Style Bucket Full Indication Continuous Drain Operation Digital Humidity Readout Filter Type Filter Access Filter Check Bucket-Full Auto Shut-Off Container Capacity (Pints) Warranty1 Ready-Select® Controls 3 Yes 259 / 206 Front Pull-Out Yes Yes Yes Antibacterial Mesh Bottom Slide-Out Yes Yes 9.4 Yes Certifications ENERGY STAR...
... Volts Amps (Cool) Watts (Cool) Length of Power Cord (Min. / Max.) Plug Type (NEMA) 115 7.5 870 6' / 6.5' LCDI (5-15P) Features Electronic Controls Fan Speeds Low Temperature Operation Air CFM (High / Low) Bucket Style Bucket Full Indication Continuous Drain Operation Digital Humidity Readout Filter Type Filter Access Filter Check Bucket-Full Auto Shut-Off Container Capacity (Pints) Warranty1 Ready-Select® Controls 3 Yes 259 / 206 Front Pull-Out Yes Yes Yes Antibacterial Mesh Bottom Slide-Out Yes Yes 9.4 Yes Certifications ENERGY STAR...

