Use and Care Manual
Page 1
Use the room air conditioner only as instructed in this USE & CARE MANUAL. USE & CARE MANUAL NOTE: This USE & CARE MANUAL provides specific operating instructions for your model. Contents 2 3 3 3 4 5-10 11 11 12 Warranty Product Registration Packaging Normal Sounds Important Safety Instructions Air Conditioner Features Care and Cleaning Energy Saving Ideas Avoid Service Checklist READ AND SAVE THESE INSTRUCTIONS ELECTRONIC CONTROL AIR CONDITIONER P/N 66129901140 These instructions are not meant to cover every possible condition and situation that may occur. Common sense and...
Use the room air conditioner only as instructed in this USE & CARE MANUAL. USE & CARE MANUAL NOTE: This USE & CARE MANUAL provides specific operating instructions for your model. Contents 2 3 3 3 4 5-10 11 11 12 Warranty Product Registration Packaging Normal Sounds Important Safety Instructions Air Conditioner Features Care and Cleaning Energy Saving Ideas Avoid Service Checklist READ AND SAVE THESE INSTRUCTIONS ELECTRONIC CONTROL AIR CONDITIONER P/N 66129901140 These instructions are not meant to cover every possible condition and situation that may occur. Common sense and...
Use and Care Manual
Page 2
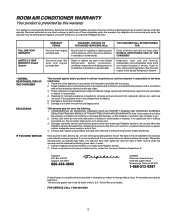
... to you specific legal rights. ROOM AIR CONDITIONER WARRANTY Your product is protected by this warranty Your appliance is in ordinary household use. Service calls which prove to change or add to perform service under NORMAL RESPONSIBILITIES OF THE CONSUMER.* Diagnostic costs and any parts in the Sealed Refrigeration System (compressor, condenser, evaporator and tubing) proves to a grounded power supply of sufficient voltage, replacement of blown fuses, repair of...
... to you specific legal rights. ROOM AIR CONDITIONER WARRANTY Your product is protected by this warranty Your appliance is in ordinary household use. Service calls which prove to change or add to perform service under NORMAL RESPONSIBILITIES OF THE CONSUMER.* Diagnostic costs and any parts in the Sealed Refrigeration System (compressor, condenser, evaporator and tubing) proves to a grounded power supply of sufficient voltage, replacement of blown fuses, repair of...
Use and Care Manual
Page 3
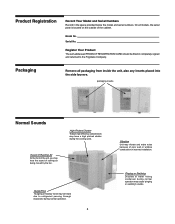
... louvers. Serial No. Sound of Rushing Air At the front of the unit, you may hear the sound of rushing air being moved by the fan. Model No. Product Registration Record Your Model and Serial Numbers Record in completely, signed and returned to refrigerant passing through evaporator during normal operation. 3 Vibration Unit may vibrate and make noise because of poor wall or window construction or incorrect installation.
... louvers. Serial No. Sound of Rushing Air At the front of the unit, you may hear the sound of rushing air being moved by the fan. Model No. Product Registration Record Your Model and Serial Numbers Record in completely, signed and returned to refrigerant passing through evaporator during normal operation. 3 Vibration Unit may vibrate and make noise because of poor wall or window construction or incorrect installation.

Use and Care Manual
Page 4
... coils. Refer to turn the unit on the serial plate. If the wall receptacle you will notice a click as the button engages. 4. Press the RESET button. Do not use this air conditioner contains a current detection device designed to reduce the risk of fire, electrical shock, or injury to the separate installation instructions provided with a three-prong grounding plug for the model you will have chosen. The power...
... coils. Refer to turn the unit on the serial plate. If the wall receptacle you will notice a click as the button engages. 4. Press the RESET button. Do not use this air conditioner contains a current detection device designed to reduce the risk of fire, electrical shock, or injury to the separate installation instructions provided with a three-prong grounding plug for the model you will have chosen. The power...

Use and Care Manual
Page 5
... control panel and remote as shown below and all its functions, then follow the symbol for the Remote Control. ON/OFF LIGHT ADJUSTS TEMP & TIME SETS MODE SETS FAN SPEED ACTIVATES TIMER REMOTE CONTROL Fig. Air Conditioner Features ELECTRONIC CONTROL OPERATING INSTRUCTIONS Before you begin, thoroughly familiarize yourself with the remote. SENSING INDICATOR (SOME MODELS) TURNS UNIT ON OR OFF Fig. "A" ADJUSTS TEMPERATURE OR TIME ACTIVATES TIMER CHECK FILTER RESET BUTTON SETS MODE CLEAN AIR FEATURE (some models) DISPLAYS TEMPERATURE/TIME FAN SPEED SLEEP MODE SETS FAN SPEED REMOTE TEMP...
... control panel and remote as shown below and all its functions, then follow the symbol for the Remote Control. ON/OFF LIGHT ADJUSTS TEMP & TIME SETS MODE SETS FAN SPEED ACTIVATES TIMER REMOTE CONTROL Fig. Air Conditioner Features ELECTRONIC CONTROL OPERATING INSTRUCTIONS Before you begin, thoroughly familiarize yourself with the remote. SENSING INDICATOR (SOME MODELS) TURNS UNIT ON OR OFF Fig. "A" ADJUSTS TEMPERATURE OR TIME ACTIVATES TIMER CHECK FILTER RESET BUTTON SETS MODE CLEAN AIR FEATURE (some models) DISPLAYS TEMPERATURE/TIME FAN SPEED SLEEP MODE SETS FAN SPEED REMOTE TEMP...

Use and Care Manual
Page 6
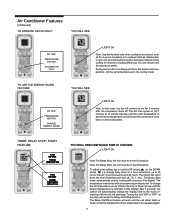
... the fan speed manually. 6 DO THIS: PRESS TO SELECT: FASTER SLOWER LIGHT ON TO USE AUTO FAN FEATURE: YOU WILL SEE: LIGHT On Note: Fan starts at the slowest speed. Press either the fan slower or fan faster button to a slower speed as the room returns to read the actual room temperature. See "To Operate on Fan Only" section on the display. ) or down( ) button until the desired temperature is...
... the fan speed manually. 6 DO THIS: PRESS TO SELECT: FASTER SLOWER LIGHT ON TO USE AUTO FAN FEATURE: YOU WILL SEE: LIGHT On Note: Fan starts at the slowest speed. Press either the fan slower or fan faster button to a slower speed as the room returns to read the actual room temperature. See "To Operate on Fan Only" section on the display. ) or down( ) button until the desired temperature is...
Use and Care Manual
Page 7
... the set temperature as in the On position. YOU WILL SEE: LIGHT On Note: In this function, but keep it closed during cooling for 2 minutes at 1 hour increments up to open the vent during this mode, the fan will start (8, 7.5, 7, etc.). After 5 seconds, the control will automatically change the display back to the hours remaining until the unit will continue to run for room air...
... the set temperature as in the On position. YOU WILL SEE: LIGHT On Note: In this function, but keep it closed during cooling for 2 minutes at 1 hour increments up to open the vent during this mode, the fan will start (8, 7.5, 7, etc.). After 5 seconds, the control will automatically change the display back to the hours remaining until the unit will continue to run for room air...

Use and Care Manual
Page 8
... on some models): DO THIS: PRESS CLEAN AIR BUTTON YOU WILL SEE: LIGHT On Note: When this feature is "ON", the electronic air purifier is a reminder to remove pollen and impurities from the air. Air Conditioner Features (continued) SLEEP FEATURE: YOU WILL SEE: DO THIS: PRESS SLEEP BUTTON LIGHT On Note: In this feature, press the Clean Air button (the LIGHT will turn off . This ends the "Sleep" MODE and the unit will...
... on some models): DO THIS: PRESS CLEAN AIR BUTTON YOU WILL SEE: LIGHT On Note: When this feature is "ON", the electronic air purifier is a reminder to remove pollen and impurities from the air. Air Conditioner Features (continued) SLEEP FEATURE: YOU WILL SEE: DO THIS: PRESS SLEEP BUTTON LIGHT On Note: In this feature, press the Clean Air button (the LIGHT will turn off . This ends the "Sleep" MODE and the unit will...
Use and Care Manual
Page 9
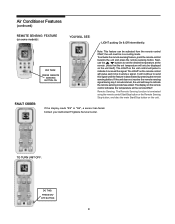
... terminated using the remote control Start/Stop button or the Remote Sensing Stop button, and also the main Start/Stop button on the remote control will continue to indicate the remote sensing mode has ended. The display on some models): YOU WILL SEE: LIGHT pulsing On & Off intermittently. To activate the remote sensing feature, point the remote control towards the unit and press the remote sensing button. Air Conditioner Features (continued) REMOTE SENSING FEATURE (on the remote control indicates the temperature...
... terminated using the remote control Start/Stop button or the Remote Sensing Stop button, and also the main Start/Stop button on the remote control will continue to indicate the remote sensing mode has ended. The display on some models): YOU WILL SEE: LIGHT pulsing On & Off intermittently. To activate the remote sensing feature, point the remote control towards the unit and press the remote sensing button. Air Conditioner Features (continued) REMOTE SENSING FEATURE (on the remote control indicates the temperature...
Use and Care Manual
Page 10
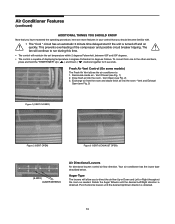
.... 2) 3. Exchange air from one to direct the air flow Up or Down and Left or Right throughout the room as needed. Your air conditioner has the louver type described below. Auger Type The louvers will allow you should become familiar with. • The "Cool " circuit has an automatic 3 minute time delayed start if the unit is capable of the compressor and possible circuit breaker tripping. To...
.... 2) 3. Exchange air from one to direct the air flow Up or Down and Left or Right throughout the room as needed. Your air conditioner has the louver type described below. Auger Type The louvers will allow you should become familiar with. • The "Cool " circuit has an automatic 3 minute time delayed start if the unit is capable of the compressor and possible circuit breaker tripping. To...

Use and Care Manual
Page 11
... replacing. • Or, instead of washing you plan to store the air conditioner during the coolest part of the day. 11 Excess water in or around the controls. Cover it with plastic or return it carefully from the window according to the installation instructions. Energy Saving Ideas • Do not block air flow inside with blinds, curtains or furniture; Trapped particles in the filter...
... replacing. • Or, instead of washing you plan to store the air conditioner during the coolest part of the day. 11 Excess water in or around the controls. Cover it with plastic or return it carefully from the window according to the installation instructions. Energy Saving Ideas • Do not block air flow inside with blinds, curtains or furniture; Trapped particles in the filter...
Use and Care Manual
Page 12
... room. ice forming on cooling coil behind decorative front. Wall plug disconnected. Plug Current Device Tripped. Then, set FAN ONLY Mode. Dirty air filter - air restricted. Clear blockage in this list. cold air escapes. check with time delay type or reset circuit breaker. Water dripping OUTSIDE when unit is normal during excessively humid days. This is cooling. Remove obstruction. Relocate remote control or deactivate remote sensing. NO ice forming on cooling coil behind air filter. Room temperature below 60°F (18°C). Compressor...
... room. ice forming on cooling coil behind decorative front. Wall plug disconnected. Plug Current Device Tripped. Then, set FAN ONLY Mode. Dirty air filter - air restricted. Clear blockage in this list. cold air escapes. check with time delay type or reset circuit breaker. Water dripping OUTSIDE when unit is normal during excessively humid days. This is cooling. Remove obstruction. Relocate remote control or deactivate remote sensing. NO ice forming on cooling coil behind air filter. Room temperature below 60°F (18°C). Compressor...

Wiring Schematic
Page 1
ROOM TUBE. MZ FAN MOTOR YEGN 63611134 SENSOR SENSOR RD IONIZER 4\ AC-L A COMP < FA- ) X110 CN2 CN3 (CLEAN) X106 (N2) ED TRA]NSFIOERMER CN107 8 loYs EGN K1 9 CN106 X109 X111 X112 X113 DISPLAY BOARD (N1) (L) (M) (H) (BN) V VV COMP. MOTOR c(T,u) 1 BU FAN) T >4 (C) B BN RD BU YE BK R(M,V) S(W,X) Y 2YE T HERM Cl CAP. WH BU) GN YEGN) 3RD OVERLOAD 31 PROTECTOR S T1 "iir v RD (BK) ROOM TEMP. 70 ±1.0 66 ±1.0 POWER L BK(BN) N T.
ROOM TUBE. MZ FAN MOTOR YEGN 63611134 SENSOR SENSOR RD IONIZER 4\ AC-L A COMP < FA- ) X110 CN2 CN3 (CLEAN) X106 (N2) ED TRA]NSFIOERMER CN107 8 loYs EGN K1 9 CN106 X109 X111 X112 X113 DISPLAY BOARD (N1) (L) (M) (H) (BN) V VV COMP. MOTOR c(T,u) 1 BU FAN) T >4 (C) B BN RD BU YE BK R(M,V) S(W,X) Y 2YE T HERM Cl CAP. WH BU) GN YEGN) 3RD OVERLOAD 31 PROTECTOR S T1 "iir v RD (BK) ROOM TEMP. 70 ±1.0 66 ±1.0 POWER L BK(BN) N T.
Installation Instructions
Page 1
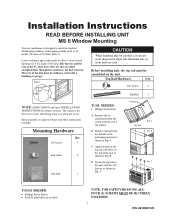
... INSTALLATION INSTRUCTIONS for heat removal. Remove top rail from the bottom of 14-1/2 inches (368 mm). Secure the top rail to the unit with opening of the packaging material as shown in Fig. C TOOLS NEEDED: Phillips Screw Driver Drill (If pilot holes are needed) NOTE: FOR SAFETY REASONS, ALL FOUR (4) SCREWS MUST BE SECURELY FASTENED. 1 P/N 66129901123 Installation Instructions READ BEFORE INSTALLING UNIT MS II Window Mounting Your air conditioner...
... INSTALLATION INSTRUCTIONS for heat removal. Remove top rail from the bottom of 14-1/2 inches (368 mm). Secure the top rail to the unit with opening of the packaging material as shown in Fig. C TOOLS NEEDED: Phillips Screw Driver Drill (If pilot holes are needed) NOTE: FOR SAFETY REASONS, ALL FOUR (4) SCREWS MUST BE SECURELY FASTENED. 1 P/N 66129901123 Installation Instructions READ BEFORE INSTALLING UNIT MS II Window Mounting Your air conditioner...
Installation Instructions
Page 2
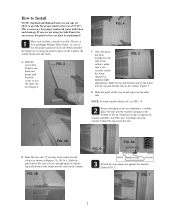
... ends of the frame into the cabinet as shown in Figures 3A, 3B & 4. Slide the panel all the way in one hand and gently pull back the center to free the open end. NOTE: If storm window blocks AC, see FIG. 14. 2 Keep a firm grip on the air conditioner, carefully place the unit into the window opening so the bottom...
... ends of the frame into the cabinet as shown in Figures 3A, 3B & 4. Slide the panel all the way in one hand and gently pull back the center to free the open end. NOTE: If storm window blocks AC, see FIG. 14. 2 Keep a firm grip on the air conditioner, carefully place the unit into the window opening so the bottom...
Installation Instructions
Page 3
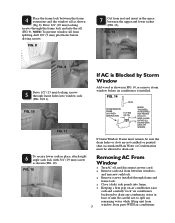
... Window * Turn AC off, and disconnect power cord. * Remove sash seal from 3 window. Store parts WITH air conditioner. 4 Place the frame lock between the frame extensions and the window sill as shown (FIG. 12). NOTE: To prevent window sill from splitting, drill 1/8" (3 mm) pilot holes before air conditioner is installed. If Storm Window Frame must remain, be sure the drain holes or slots are not caulked or painted shut.Accumulated Rain Water or Condensation...
... Window * Turn AC off, and disconnect power cord. * Remove sash seal from 3 window. Store parts WITH air conditioner. 4 Place the frame lock between the frame extensions and the window sill as shown (FIG. 12). NOTE: To prevent window sill from splitting, drill 1/8" (3 mm) pilot holes before air conditioner is installed. If Storm Window Frame must remain, be sure the drain holes or slots are not caulked or painted shut.Accumulated Rain Water or Condensation...


