
Use and Care Guide
Page 2
... negative consequences for Record Your Model and Serial Numbers several other appliance. - and the Operating Instructions included with your gas supplier, call your washer. Read all safety messages. Pedestal A pedestal accessory, Model No. We have every feature The model and serial numbers of your appliance. do not use . It also contains information about...
... negative consequences for Record Your Model and Serial Numbers several other appliance. - and the Operating Instructions included with your gas supplier, call your washer. Read all safety messages. Pedestal A pedestal accessory, Model No. We have every feature The model and serial numbers of your appliance. do not use . It also contains information about...
Installation Instructions
Page 3
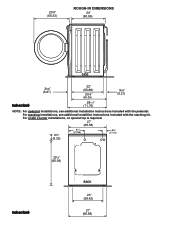
23¾" (60.33) ROUGH-IN DIMENSIONS 24" (60.96) SIDE 25/8 " (6.67) 22" (55.88) 255/8 " (65.09) 35/8" (9.21) inches (cm) 281/4" (71.76) NOTE: For pedestal installations, see additional installtion instructions included with the pedestal. For under counter installations, no special top is required. 27" (68.58) 2½" (6.35) 8½" (21.59) 6¾" (17.15) 33½" (85.09) inches (cm) BACK 23" (58.42) 27" (68.58) 3 For stacking installations, see additional installation instructions included with the stacking kit.
23¾" (60.33) ROUGH-IN DIMENSIONS 24" (60.96) SIDE 25/8 " (6.67) 22" (55.88) 255/8 " (65.09) 35/8" (9.21) inches (cm) 281/4" (71.76) NOTE: For pedestal installations, see additional installtion instructions included with the pedestal. For under counter installations, no special top is required. 27" (68.58) 2½" (6.35) 8½" (21.59) 6¾" (17.15) 33½" (85.09) inches (cm) BACK 23" (58.42) 27" (68.58) 3 For stacking installations, see additional installation instructions included with the stacking kit.
Installation Instructions
Page 5
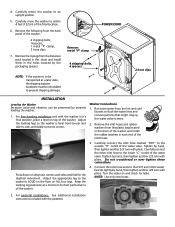
...another 2/3 turn with pliers. Connect the inlet hose ends to an upright position. 5. For pedestal installations, See additional installation instructions included with pliers. Carefully move the washer to -corner. Washer Connections 1. Turn the water on alternate corners and sides and feel for leaks. Tighten by hand..., then tighten another 2/3 turn with the pedestal. Adjust the appropriate leg so the washer is level front-to-rear and side-to-side, and stable corner-to within 4 feet (122cm) of the washer. Carefully connect the inlet hose marked "HOT" to be ...
...another 2/3 turn with pliers. Connect the inlet hose ends to an upright position. 5. For pedestal installations, See additional installation instructions included with pliers. Carefully move the washer to -corner. Washer Connections 1. Turn the water on alternate corners and sides and feel for leaks. Tighten by hand..., then tighten another 2/3 turn with the pedestal. Adjust the appropriate leg so the washer is level front-to-rear and side-to-side, and stable corner-to within 4 feet (122cm) of the washer. Carefully connect the inlet hose marked "HOT" to be ...
Installation Instructions
Page 6
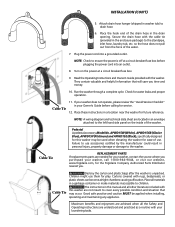
...Cable Tie REPLACEMENT PARTS If replacements parts are understood and practiced as a routine with your washer, call 1-800-944-9044, or visit our website, www.frigidaire.com, for this washer may occur. Maximum benefits and enjoyment are achieved when all the Safety and Operating instructions ...in personal injury, property damage or damage to the standpipe, inlet hose, laundry tub, etc. Pedestal A pedestal accessory,Model No. Cable Tie Destroy the carton and plastic bags after the washer is off at a circuit breaker/fuse box. 9. NOTE: Check to the left hand side panel...
...Cable Tie REPLACEMENT PARTS If replacements parts are understood and practiced as a routine with your washer, call 1-800-944-9044, or visit our website, www.frigidaire.com, for this washer may occur. Maximum benefits and enjoyment are achieved when all the Safety and Operating instructions ...in personal injury, property damage or damage to the standpipe, inlet hose, laundry tub, etc. Pedestal A pedestal accessory,Model No. Cable Tie Destroy the carton and plastic bags after the washer is off at a circuit breaker/fuse box. 9. NOTE: Check to the left hand side panel...
