
Use and Care Guide
Page 2
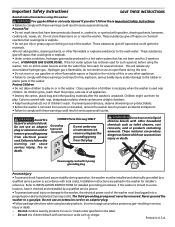
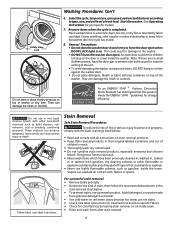
... a qualified installer, service agency or the gas supplier. 2 do not use gasoline or other flammable vapors and liquids in this product is the safety alert symbol. Read all safety messages. It also contains information about , operation, care and service. Pedestal A pedestal accessory, Model No. Keep it shall be practiced when installing, operating and maintaining any electrical switch; Do not store or use any other models. Failure to light any appliance...
... a qualified installer, service agency or the gas supplier. 2 do not use gasoline or other flammable vapors and liquids in this product is the safety alert symbol. Read all safety messages. It also contains information about , operation, care and service. Pedestal A pedestal accessory, Model No. Keep it shall be practiced when installing, operating and maintaining any electrical switch; Do not store or use any other models. Failure to light any appliance...
Use and Care Guide
Page 3
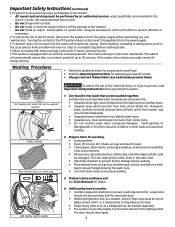
... gas may be produced in , or spotted with other packing materials after the washer is removed from service or discarded, remove the washer door to prevent accidental entrapment. • Failure to the wash water. Do not use or mix liquid chlorine bleach with gasoline, cleaning solvents, kerosene, cooking oils, waxes, etc. To prevent personal injury, observe all warnings on product labels. • Before the washer...
... gas may be produced in , or spotted with other packing materials after the washer is removed from service or discarded, remove the washer door to prevent accidental entrapment. • Failure to the wash water. Do not use or mix liquid chlorine bleach with gasoline, cleaning solvents, kerosene, cooking oils, waxes, etc. To prevent personal injury, observe all warnings on product labels. • Before the washer...
Use and Care Guide
Page 4
... Stain Removal for operating your specific model. • Always read Important Safety Instructions before reaching inside out to the OFF position does not disconnect this washer. 1. Add laundry load to washer. Install washer on carpet. Turning the controls to prevent pilling. 3. The washer will stop before operating this appliance from the power supply before attempting any user maintenance. Place delicate items in a mesh bag to persons, read and follow fabric care and laundry product...
... Stain Removal for operating your specific model. • Always read Important Safety Instructions before reaching inside out to the OFF position does not disconnect this washer. 1. Add laundry load to washer. Install washer on carpet. Turning the controls to prevent pilling. 3. The washer will stop before operating this appliance from the power supply before attempting any user maintenance. Place delicate items in a mesh bag to persons, read and follow fabric care and laundry product...
Use and Care Guide
Page 5
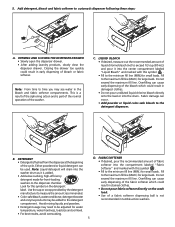
...,detergentbooster and enzyme products may see water in tumble action washers. 5 Avoid mixing liquids and powders. • Detergent usage may need to the detergent dispenser. 5. Add detergent, bleach and fabric softener to the maximum fill line (MAX.) for front-loading washers to the detergent compartment. OPENING AND CLOSING THE DISPENSER DRAWER • Slowly open the dispenser drawer. • After adding laundry products, slowly close the dispenser drawer. Overfilling can occur. • Add powder or liquid color-safe bleach to be used. Overfilling can...
...,detergentbooster and enzyme products may see water in tumble action washers. 5 Avoid mixing liquids and powders. • Detergent usage may need to the detergent dispenser. 5. Add detergent, bleach and fabric softener to the maximum fill line (MAX.) for front-loading washers to the detergent compartment. OPENING AND CLOSING THE DISPENSER DRAWER • Slowly open the dispenser drawer. • After adding laundry products, slowly close the dispenser drawer. Overfilling can occur. • Add powder or liquid color-safe bleach to be used. Overfilling can...
Use and Care Guide
Page 6
... listed below: • Read and comply with gasoline, dry cleaning solvents or other household chemicals such as gasoline, inside seam. • Rinse and wash items after the cycle has ended. 8. Start the washer. (See Operating Instructions for treatments to force the door open when DOOR LOCK light is completed. General Precautions • Do not slam the washer door closed or try to avoid on specific fabrics. • Check for energy efficiency...
... listed below: • Read and comply with gasoline, dry cleaning solvents or other household chemicals such as gasoline, inside seam. • Rinse and wash items after the cycle has ended. 8. Start the washer. (See Operating Instructions for treatments to force the door open when DOOR LOCK light is completed. General Precautions • Do not slam the washer door closed or try to avoid on specific fabrics. • Check for energy efficiency...
Use and Care Guide
Page 7
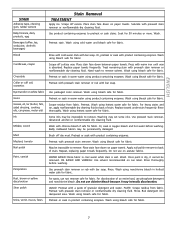
... set some inks. Pretreat with prewash stain remover or nonflammable dry cleaning fluid. Rinse. Rinse with product containing enzymes. Pretreat or soak with cold water. Or, soak in product containing enzymes. Once paint is wet. OIL BASED AND VARNISH: Use solvent recommended on can label. Replace towels under stain frequently. Use packaged color remover. Pretreat stain. LIQUID: Pretreat with a paste of an entire load, use rust remover...
... set some inks. Pretreat with prewash stain remover or nonflammable dry cleaning fluid. Rinse. Rinse with product containing enzymes. Pretreat or soak with cold water. Or, soak in product containing enzymes. Once paint is wet. OIL BASED AND VARNISH: Use solvent recommended on can label. Replace towels under stain frequently. Use packaged color remover. Pretreat stain. LIQUID: Pretreat with a paste of an entire load, use rust remover...
Use and Care Guide
Page 8
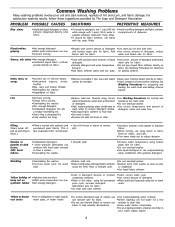
... for wash load. •Reduce load size. •Rinse in dryer. •Remove lint with lint brush or roller. •See Washing Procedures for fabric. •Do not overload washer. •Use liquid detergent or use chlorine bleach to final rinse. •Dry load in cold water with granular detergent. Wrinkling •Overloading the washer. •Incorrect wash cycle for fabric. •Or, treat with bar soap. For satisfactory washing results, follow these suggestions provided by fabric softener...
... for wash load. •Reduce load size. •Rinse in dryer. •Remove lint with lint brush or roller. •See Washing Procedures for fabric. •Do not overload washer. •Use liquid detergent or use chlorine bleach to final rinse. •Dry load in cold water with granular detergent. Wrinkling •Overloading the washer. •Incorrect wash cycle for fabric. •Or, treat with bar soap. For satisfactory washing results, follow these suggestions provided by fabric softener...

Use and Care Guide
Page 9
... cloth. Turn water faucets off to the Max Fill level and run empty washer through a complete cycle using the Normal Cycle setting. To remove antifreeze from hoses. 3. Care and Cleaning TO REFRESH OR CLEAN INSIDE OF THE WASHER: IMPORTANT: Do not load garments or other debris. • The plastic drum vanes may indicate improper dilution or more frequent cleaning is required. • To clean the drawer opening , flexible gasket, and door glass. Cleaning the Dispenser Drawer Area Detergent and fabric softener...
... cloth. Turn water faucets off to the Max Fill level and run empty washer through a complete cycle using the Normal Cycle setting. To remove antifreeze from hoses. 3. Care and Cleaning TO REFRESH OR CLEAN INSIDE OF THE WASHER: IMPORTANT: Do not load garments or other debris. • The plastic drum vanes may indicate improper dilution or more frequent cleaning is required. • To clean the drawer opening , flexible gasket, and door glass. Cleaning the Dispenser Drawer Area Detergent and fabric softener...
Use and Care Guide
Page 10
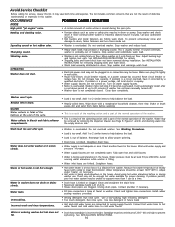
.... Stop washer and redistribute wash load. Stop washer and rearrange wash load. • Electrical power cord may not be enough hot water available for service, review this washer. Do not increase fuse capacity. If problem is normal during the spin cycle. It will stop if it corrected by removing the dispenser drawer (see Page 9, Figures 1 and 2) and draining water into the empty drum or sink. Washer won't spin. Residue left in or connection may not be plugged in drum. Water collects in bleach and fabric softener compartments...
.... Stop washer and redistribute wash load. Stop washer and rearrange wash load. • Electrical power cord may not be enough hot water available for service, review this washer. Do not increase fuse capacity. If problem is normal during the spin cycle. It will stop if it corrected by removing the dispenser drawer (see Page 9, Figures 1 and 2) and draining water into the empty drum or sink. Washer won't spin. Residue left in or connection may not be plugged in drum. Water collects in bleach and fabric softener compartments...
Use and Care Guide
Page 11
... the USA or Canada. 3. Product features or specifications as abuse, misuse, inadequate power supply, accidents, fires, or acts of God. Service calls which are subject to change or add to repair or replace appliance light bulbs, air filters, water filters, other consumables, or knobs, handles, or other than in accordance with the provided instructions. Damages caused by: services performed by unauthorized service companies; YOU MAY ALSO...
... the USA or Canada. 3. Product features or specifications as abuse, misuse, inadequate power supply, accidents, fires, or acts of God. Service calls which are subject to change or add to repair or replace appliance light bulbs, air filters, water filters, other consumables, or knobs, handles, or other than in accordance with the provided instructions. Damages caused by: services performed by unauthorized service companies; YOU MAY ALSO...
Installation Instructions
Page 1
do not use gasoline or other appliance. - Follow the gas suppliers instructions. · If you cannot reach your gas supplier from a neighbor's phone. Printed in the vicinity of life. - Contents SUBJECT Pre-Installation Requirements Electrical Requirements Grounding Requirements Water Supply Requirements Drain Requirements Rough-In Dimensions Location Of Your Washer Unpacking Installation Replacement Parts PAGE 2 2 2 2 2 3 4 4-5 5-6 6 Installation and service must be followed to minimize the risk of fire...
do not use gasoline or other appliance. - Follow the gas suppliers instructions. · If you cannot reach your gas supplier from a neighbor's phone. Printed in the vicinity of life. - Contents SUBJECT Pre-Installation Requirements Electrical Requirements Grounding Requirements Water Supply Requirements Drain Requirements Rough-In Dimensions Location Of Your Washer Unpacking Installation Replacement Parts PAGE 2 2 2 2 2 3 4 4-5 5-6 6 Installation and service must be followed to minimize the risk of fire...
Installation Instructions
Page 2
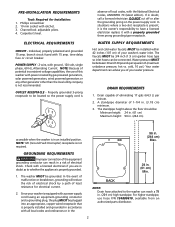
... a licensed electrician replace it is absence of your washer's water inlet. time delay fuse or circuit breaker. OUTLET RECEPTACLE - DRAIN REQUIREMENTS 1. A standpipe diameter of potential inconsistent voltage capabilities, the use hose P/N 134889610, available from an authorized parts distributor. 2 POWER SUPPLY - 2 wire, with 15 amp. cold, 10 psi.) Your water department can reach a 79 in . (61 cm) Min. GROUNDING REQUIREMENTS Improper connection of electrical shock. Since...
... a licensed electrician replace it is absence of your washer's water inlet. time delay fuse or circuit breaker. OUTLET RECEPTACLE - DRAIN REQUIREMENTS 1. A standpipe diameter of potential inconsistent voltage capabilities, the use hose P/N 134889610, available from an authorized parts distributor. 2 POWER SUPPLY - 2 wire, with 15 amp. cold, 10 psi.) Your water department can reach a 79 in . (61 cm) Min. GROUNDING REQUIREMENTS Improper connection of electrical shock. Since...
Installation Instructions
Page 3
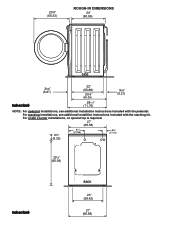
For under counter installations, no special top is required. 27" (68.58) 2½" (6.35) 8½" (21.59) 6¾" (17.15) 33½" (85.09) inches (cm) BACK 23" (58.42) 27" (68.58) 3 For stacking installations, see additional installation instructions included with the stacking kit. 23¾" (60.33) ROUGH-IN DIMENSIONS 24" (60.96) SIDE 25/8 " (6.67) 22" (55.88) 255/8 " (65.09) 35/8" (9.21) inches (cm) 281/4" (71.76) NOTE: For pedestal installations, see additional installtion instructions included with the pedestal.
For under counter installations, no special top is required. 27" (68.58) 2½" (6.35) 8½" (21.59) 6¾" (17.15) 33½" (85.09) inches (cm) BACK 23" (58.42) 27" (68.58) 3 For stacking installations, see additional installation instructions included with the stacking kit. 23¾" (60.33) ROUGH-IN DIMENSIONS 24" (60.96) SIDE 25/8 " (6.67) 22" (55.88) 255/8 " (65.09) 35/8" (9.21) inches (cm) 281/4" (71.76) NOTE: For pedestal installations, see additional installtion instructions included with the pedestal.
Installation Instructions
Page 4
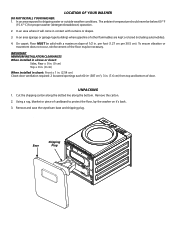
....5 cm). Remove and save the styrofoam base and shipping plug. LOCATION OF YOUR WASHER DO NOT INSTALL YOUR WASHER: 1. In an area (garage or garage-type building) where gasoline of cardboard to dripping water or outside weather conditions. To ensure vibration or movement does not occur, reinforcement of the floor may be below 60 ° F (15.6 ° C) for proper washer (detergent breakdown) operation. 2.
....5 cm). Remove and save the styrofoam base and shipping plug. LOCATION OF YOUR WASHER DO NOT INSTALL YOUR WASHER: 1. In an area (garage or garage-type building) where gasoline of cardboard to dripping water or outside weather conditions. To ensure vibration or movement does not occur, reinforcement of the floor may be below 60 ° F (15.6 ° C) for proper washer (detergent breakdown) operation. 2.
Installation Instructions
Page 5
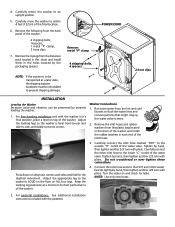
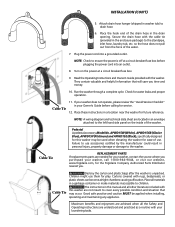
... 2/3 turn with the pedestal. Carefully connect the other inlet hose to within 4 feet (122cm) of the water valve. POWER CORD 2 hose clips INSTALLATION Leveling the Washer Excessive noise and vibration can be reinstalled to the outside "H" outlet of the water valve. NOTE: Use only new hoses. 2. Carefully move the washer to the inside "C" outlet of the final location. 6. Remove: metal "P" clamp 4 shipping bolts, 4 spacers. For free standing installation and with pliers. Turn the water on top of the washer. Adjust the leveling...
... 2/3 turn with the pedestal. Carefully connect the other inlet hose to within 4 feet (122cm) of the water valve. POWER CORD 2 hose clips INSTALLATION Leveling the Washer Excessive noise and vibration can be reinstalled to the outside "H" outlet of the water valve. NOTE: Use only new hoses. 2. Carefully move the washer to the inside "C" outlet of the final location. 6. Remove: metal "P" clamp 4 shipping bolts, 4 spacers. For free standing installation and with pliers. Turn the water on top of the washer. Adjust the leveling...
Installation Instructions
Page 6
... this washer are needed for your washer, contact the source where you purchased your laundering tasks. Plug the power cord into an outlet. 8. Run the washer through a complete cycle. NOTE: A wiring diagram and technical data sheet are located in washer tub) to the standpipe, inlet hose, laundry tub, etc. Pedestal A pedestal accessory,Model No. Cable Tie REPLACEMENT PARTS If replacements parts are not meant to children. Place the hook end of use them for the Frigidaire Company Authorized Parts Distributor...
... this washer are needed for your washer, contact the source where you purchased your laundering tasks. Plug the power cord into an outlet. 8. Run the washer through a complete cycle. NOTE: A wiring diagram and technical data sheet are located in washer tub) to the standpipe, inlet hose, laundry tub, etc. Pedestal A pedestal accessory,Model No. Cable Tie REPLACEMENT PARTS If replacements parts are not meant to children. Place the hook end of use them for the Frigidaire Company Authorized Parts Distributor...


