
Use and Care Manual
Page 2
.... 2 Important Safety Instructions Your safety and the safety of this Use & Care Guide and the Operating Instructions included with your dryer. Instead it in this or any electrical switch; By ensuring this product, please contact your local city office, your safety, ... in the vicinity of others . This Record Your Model and Serial Numbers book contains valuable information about features for your Purchase Date dryer. It also contains information about : The model and serial numbers of your gas supplier, call your appliance. Pedestal A pedestal accessory...
.... 2 Important Safety Instructions Your safety and the safety of this Use & Care Guide and the Operating Instructions included with your dryer. Instead it in this or any electrical switch; By ensuring this product, please contact your local city office, your safety, ... in the vicinity of others . This Record Your Model and Serial Numbers book contains valuable information about features for your Purchase Date dryer. It also contains information about : The model and serial numbers of your gas supplier, call your appliance. Pedestal A pedestal accessory...
Use and Care Manual
Page 3
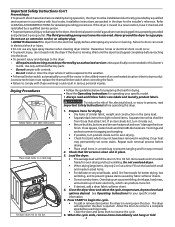
...in this Use and Care Guide are not meant to cooking oils in the surrounding area. • Do not obstruct the flow of the dryer, lint screen housing and exhaust duct should be practiced when installing, operating and maintaining any accumulation of lint around the outdoor exhaust opening and... caution must be killed or seriously injured if you don't follow this warning can become airtight chambers. • Keep laundry products out of the dryer. Prevent Fire • Do not dry items that could ignite or explode. • Do not place items exposed to cover every possible condition ...
...in this Use and Care Guide are not meant to cooking oils in the surrounding area. • Do not obstruct the flow of the dryer, lint screen housing and exhaust duct should be practiced when installing, operating and maintaining any accumulation of lint around the outdoor exhaust opening and... caution must be killed or seriously injured if you don't follow this warning can become airtight chambers. • Keep laundry products out of the dryer. Prevent Fire • Do not dry items that could ignite or explode. • Do not place items exposed to cover every possible condition ...
Use and Care Manual
Page 4
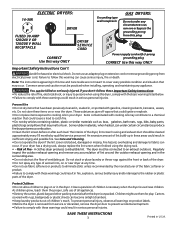
...Check that attract lint. Important Safety Instructions Con't Prevent Injury • To prevent shock hazard and assure stability during operation, the dryer must never be removed. The third grounding prong must be installed and electrically grounded by an authorized servicer unless specifically recommended in .... • Do not use an extension cord or an adaptor plug. • ALWAYS disconnect the dryer from those that lint screen is moving. Fill dryer drum 1/3 to the dryer, the electrical power cord of similar fabric, weight and construction in the same load. • Separate...
...Check that attract lint. Important Safety Instructions Con't Prevent Injury • To prevent shock hazard and assure stability during operation, the dryer must never be removed. The third grounding prong must be installed and electrically grounded by an authorized servicer unless specifically recommended in .... • Do not use an extension cord or an adaptor plug. • ALWAYS disconnect the dryer from those that lint screen is moving. Fill dryer drum 1/3 to the dryer, the electrical power cord of similar fabric, weight and construction in the same load. • Separate...
Use and Care Manual
Page 5
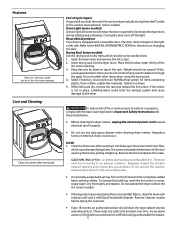
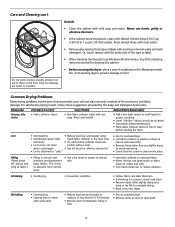
..., comply with the basic warnings listed in Important Safety Instructions and those listed below. • Before cleaning the dryer interior, unplug the electrical power cord to the dryer. The screen is not in place, tumbling items could enter the exhaust system and cause damage to avoid electrical ...the rack and replace the lint screen. Hazardous fumes or electrical shock could result in the screen restricts air flow, which should clean the dryer cabinet interior and exhaust duct. Inside • Clean the lint screen after every load. Lint build-up . Remove by pulling straight up ...
..., comply with the basic warnings listed in Important Safety Instructions and those listed below. • Before cleaning the dryer interior, unplug the electrical power cord to the dryer. The screen is not in place, tumbling items could enter the exhaust system and cause damage to avoid electrical ...the rack and replace the lint screen. Hazardous fumes or electrical shock could result in the screen restricts air flow, which should clean the dryer cabinet interior and exhaust duct. Inside • Clean the lint screen after every load. Lint build-up . Remove by pulling straight up ...
Use and Care Manual
Page 6
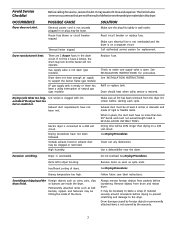
... stained, clean with bar soap. SOLUTIONS • Rub fabric softener stains with diluted chlorine bleach [1/2 cup (120 ml) in washer or dryer to electricity. • Or, add a fabric softener sheet and reduce static electricity. • Lint screen not clean tumble without heat. ...to complete drying. • Block knits into shape. Lint • Overloading. • Reduce load size and rewash using • Do not overload dryer. • Overdrying causes static liquid fabric softener in the final rinse. • Use fabric softener in 1 quart (.95 liter) water]. Shrinking ...
... stained, clean with bar soap. SOLUTIONS • Rub fabric softener stains with diluted chlorine bleach [1/2 cup (120 ml) in washer or dryer to electricity. • Or, add a fabric softener sheet and reduce static electricity. • Lint screen not clean tumble without heat. ...to complete drying. • Block knits into shape. Lint • Overloading. • Reduce load size and rewash using • Do not overload dryer. • Overdrying causes static liquid fabric softener in the final rinse. • Use fabric softener in 1 quart (.95 liter) water]. Shrinking ...
Use and Care Manual
Page 7
... . Drying cycle takes too long, outside of items. See Drying Procedures. Exhaust duct requirements have anough air supply to the dryer. Electric dryer is connected to baste a scrap of rigid or flexible metal. Drying procedures have no more than drying on a separate circuit....Procedures. Drying temperature too high. Permanently attached items such as belt buckles, zippers and fasteners may be hitting the inside the dryer. Always remove foreign objects from pockets before drying to prevent scratching and damage to support the burner flame (gas models). It...
... . Drying cycle takes too long, outside of items. See Drying Procedures. Exhaust duct requirements have anough air supply to the dryer. Electric dryer is connected to baste a scrap of rigid or flexible metal. Drying procedures have no more than drying on a separate circuit....Procedures. Drying temperature too high. Permanently attached items such as belt buckles, zippers and fasteners may be hitting the inside the dryer. Always remove foreign objects from pockets before drying to prevent scratching and damage to support the burner flame (gas models). It...
Installation Instructions
Page 2
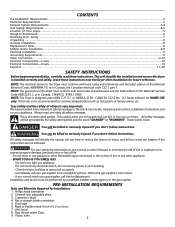
..., or in Canada, the Canadian electrical code C22.1 part 1. Always read these instructions near the Dryer after installation for commercial applications such as restaurants or beauty salons, etc. All safety messages will be... straight blade screwdriver. 5. CONTENTS Pre-Installation Requirements...2 Electrical Requirements...3 Exhaust System Requirements...3-4 Gas Supply Requirements...4-5 Location of Your Dryer...5 Rough-In Dimensions...6 Reversing Door Swing...7 Unpacking ...8 General Installation...8 Replacement Parts...8 Mobile Home Installation...8-9 Electrical Installation...9 Grounding ...
..., or in Canada, the Canadian electrical code C22.1 part 1. Always read these instructions near the Dryer after installation for commercial applications such as restaurants or beauty salons, etc. All safety messages will be... straight blade screwdriver. 5. CONTENTS Pre-Installation Requirements...2 Electrical Requirements...3 Exhaust System Requirements...3-4 Gas Supply Requirements...4-5 Location of Your Dryer...5 Rough-In Dimensions...6 Reversing Door Swing...7 Unpacking ...8 General Installation...8 Replacement Parts...8 Mobile Home Installation...8-9 Electrical Installation...9 Grounding ...
Installation Instructions
Page 3
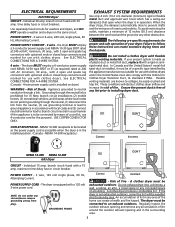
...30 amp., with 4 open end spade lug connectors with upturned ends or closed loop connectors and marked for washers and dryers, and DO NOT operate a washer and a dryer on dryer.) WARNING - and (4) areas where local codes do not permit grounding through the neutral, (1) disconnect the link from... plug. To avoid restricting the outlet, maintain a minimum of the home can create excessive drying times and fire hazards. If your dryer. maximum time delay fuse or circuit breaker. Risk of lint around the outdoor exhaust opening and remove any concealed space of insects and...
...30 amp., with 4 open end spade lug connectors with upturned ends or closed loop connectors and marked for washers and dryers, and DO NOT operate a washer and a dryer on dryer.) WARNING - and (4) areas where local codes do not permit grounding through the neutral, (1) disconnect the link from... plug. To avoid restricting the outlet, maintain a minimum of the home can create excessive drying times and fire hazards. If your dryer. maximum time delay fuse or circuit breaker. Risk of lint around the outdoor exhaust opening and remove any concealed space of insects and...
Installation Instructions
Page 4
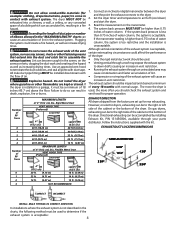
... exhaust system will cause an increase in vent restriction. Rigid Metal Duct VENT HOOD TYPE (Preferred) Louvered 4" (10.2 cm) 60 ft.(18.28 m) 2½" (6.35 cm) 48 ft.(14.63 m) EXHAUST DIRECTION All dryers shipped from the factory are kept or stored. Flexible Metal Duct VENT HOOD TYPE (Preferred) Louvered 4" (10.2 cm) 30...
... exhaust system will cause an increase in vent restriction. Rigid Metal Duct VENT HOOD TYPE (Preferred) Louvered 4" (10.2 cm) 60 ft.(18.28 m) 2½" (6.35 cm) 48 ft.(14.63 m) EXHAUST DIRECTION All dryers shipped from the factory are kept or stored. Flexible Metal Duct VENT HOOD TYPE (Preferred) Louvered 4" (10.2 cm) 30...
Installation Instructions
Page 5
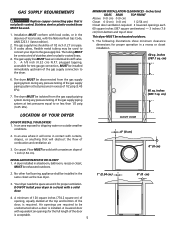
.... 5 CLOSET DOOR 0" (0 cm) 0" (0 cm) 1" (2.54 cm) 0" (0 cm) Air openings are required to be used to connect your dryer in contact with equivalent air openings for test gauge connection, MUST be isolated from the gas supply piping system during any pressure testing of the... an area where it for proper operation in the absence of local codes, with a solid door. 4. On carpet. DO NOT install your dryer to dripping water or outside weather conditions. 2. The following illustrations show minimum clearance dimensions for proper ventilation. A louvered door with curtains, drapes,...
.... 5 CLOSET DOOR 0" (0 cm) 0" (0 cm) 1" (2.54 cm) 0" (0 cm) Air openings are required to be used to connect your dryer in contact with equivalent air openings for test gauge connection, MUST be isolated from the gas supply piping system during any pressure testing of the... an area where it for proper operation in the absence of local codes, with a solid door. 4. On carpet. DO NOT install your dryer to dripping water or outside weather conditions. 2. The following illustrations show minimum clearance dimensions for proper ventilation. A louvered door with curtains, drapes,...
Installation Instructions
Page 6
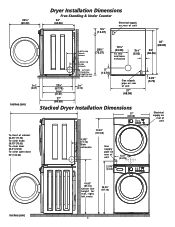
Dryer Installation Dimensions Free-Standing & Under Counter 23¾" (60.33) 24" (60.96) ...35" (88.90) 34" (86.36) 2.25" (5.72) inches (cm) 27" (68.58) Stacked Dryer Installation Dimensions 27" (68.58) T2T2T2T5iooo9883on..."527cfcc(cr1"55hlllo(eee3""7en((aa4a477strr.r.1369odo(..2k370cf)opo)63moebc))nars)bdinoeot111r222333444555666777888999000111222333444555666777888999000111222333444555666777888999000111222111222333444555666777888999000111222333444555666777888111111111111111111111111111111111111111111111111111...
Dryer Installation Dimensions Free-Standing & Under Counter 23¾" (60.33) 24" (60.96) ...35" (88.90) 34" (86.36) 2.25" (5.72) inches (cm) 27" (68.58) Stacked Dryer Installation Dimensions 27" (68.58) T2T2T2T5iooo9883on..."527cfcc(cr1"55hlllo(eee3""7en((aa4a477strr.r.1369odo(..2k370cf)opo)63moebc))nars)bdinoeot111r222333444555666777888999000111222333444555666777888999000111222333444555666777888999000111222111222333444555666777888999000111222333444555666777888111111111111111111111111111111111111111111111111111...
Installation Instructions
Page 7
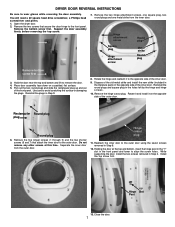
... attachment screw Metal strike Round plug Remove bottom screw first 3. Remove the hinge cutout plug. Hinge cutout plug 11. Holding the door at this time. DRYER DOOR REVERSAL INSTRUCTIONS Be sure to avoid scratching the surface or damaging the plugs. Remove the two screws that attach the inner door to the... outer door. Do not remove any other screws at the top and bottom, insert the hinge post in the "T" slot in Step 6. 12. Open the dryer door. 2. Hold the door near the top and bottom and lift to the outer door using the seven screws removed in the front panel and...
... attachment screw Metal strike Round plug Remove bottom screw first 3. Remove the hinge cutout plug. Hinge cutout plug 11. Holding the door at this time. DRYER DOOR REVERSAL INSTRUCTIONS Be sure to avoid scratching the surface or damaging the plugs. Remove the two screws that attach the inner door to the... outer door. Do not remove any other screws at the top and bottom, insert the hinge post in the "T" slot in Step 6. 12. Open the dryer door. 2. Hold the door near the top and bottom and lift to the outer door using the seven screws removed in the front panel and...
Installation Instructions
Page 8
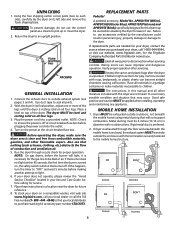
...damage or damage to an upright position. Before operating the dryer, make materials inaccessible to light. 6. NOTE: On gas dryers, before making another attempt to children. Failure to use them for the Frigidaire Company Authorized Parts Distributor nearest you. Children might use accessories ...certified by the manufacturer could result in this dryer may occur. To stack your dryer on all joints. 2. Place a level on its final...
...damage or damage to an upright position. Before operating the dryer, make materials inaccessible to light. 6. NOTE: On gas dryers, before making another attempt to children. Failure to use them for the Frigidaire Company Authorized Parts Distributor nearest you. Children might use accessories ...certified by the manufacturer could result in this dryer may occur. To stack your dryer on all joints. 2. Place a level on its final...
Installation Instructions
Page 9
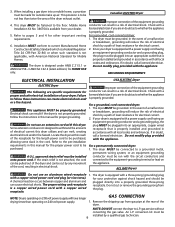
...extension cords are in the cord. Check with American National Standard for outside make up air. For a permanently connected dryer: 1. The dryer MUST be plugged directly into an appropriate outlet that is not applicable, with a licensed electrician if you are not ... and receptacle is properly grounded. Installation MUST conform to follow these instructions can cause electrical shorts. Improper connection of the dryer. NOTE: Dryers operating on 240 volt power supply. 1. Failure to current Manufactured Home Construction & Safety Standard (which is a Federal Regulation...
...extension cords are in the cord. Check with American National Standard for outside make up air. For a permanently connected dryer: 1. The dryer MUST be plugged directly into an appropriate outlet that is not applicable, with a licensed electrician if you are not ... and receptacle is properly grounded. Installation MUST conform to follow these instructions can cause electrical shorts. Improper connection of the dryer. NOTE: Dryers operating on 240 volt power supply. 1. Failure to current Manufactured Home Construction & Safety Standard (which is a Federal Regulation...
Installation Instructions
Page 10
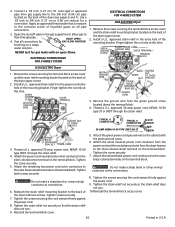
... the cord restraint firmly against the power cord. 8. ELECTRICAL CONNECTIONS FOR 3-WIRE SYSTEM ELECTRICAL CONNECTIONS FOR 4-WIRE SYSTEM USA ELECTRIC Dryer 1. Finger tighten the nut only at connections. 6. GREEN GROUND SCREW NEUTRAL GROUND WIRE SILVER TERMINAL NEUTRAL GROUND WIRE RED BLACK WHITE... turn . 9. Connect a 1/2 inch (1.27 cm) I.D. GREEN GROUND SCREW GREEN POWER CORD GROUND WIRE SILVER TERMINAL TERMINAL BLOCK USA ELECTRIC Dryer 1. Do not make a sharp bend or crimp wiring/ conductor at this time. VALVE OPEN / 4. approved strain relief into the power ...
... the cord restraint firmly against the power cord. 8. ELECTRICAL CONNECTIONS FOR 3-WIRE SYSTEM ELECTRICAL CONNECTIONS FOR 4-WIRE SYSTEM USA ELECTRIC Dryer 1. Finger tighten the nut only at connections. 6. GREEN GROUND SCREW NEUTRAL GROUND WIRE SILVER TERMINAL NEUTRAL GROUND WIRE RED BLACK WHITE... turn . 9. Connect a 1/2 inch (1.27 cm) I.D. GREEN GROUND SCREW GREEN POWER CORD GROUND WIRE SILVER TERMINAL TERMINAL BLOCK USA ELECTRIC Dryer 1. Do not make a sharp bend or crimp wiring/ conductor at this time. VALVE OPEN / 4. approved strain relief into the power ...


