
Use and Care Manual
Page 2
...it shall be handed over to light any appliance. • Do not touch any phone in the Use and Care Guide, Operating Instructions, Installation Instructions and on the dryer • Operation serial plate located of the left side of the door opening. Record and • Care retain these numbers. ... ...9-15 Product Record The symbol on the product or on its packaging indicates that can happen if the instructions are found on your dryer are not followed. Your dryer may not be killed or seriously injured if you or others is the safety alert symbol. For your gas...
...it shall be handed over to light any appliance. • Do not touch any phone in the Use and Care Guide, Operating Instructions, Installation Instructions and on the dryer • Operation serial plate located of the left side of the door opening. Record and • Care retain these numbers. ... ...9-15 Product Record The symbol on the product or on its packaging indicates that can happen if the instructions are found on your dryer are not followed. Your dryer may not be killed or seriously injured if you or others is the safety alert symbol. For your gas...
Use and Care Manual
Page 3
... bras, galoshes, bath mats, rugs, bibs, baby pants, plastic bags and pillows that may occur. Do not store these Important Safety Instructions: • To reduce the risk of ventilating air. Risk of all warnings on or in the surrounding area. • Do not ..., when heated, can cause serious injury, fire or death. If your dryer. Close supervision of children's reach. Children might use of Fire - SAVE THESE INSTRUCTIONS 3 Printed in inefficient drying and possible fire. Note: The instructions appearing in fire, explosion, serious bodily injury and/or damage to play ...
... bras, galoshes, bath mats, rugs, bibs, baby pants, plastic bags and pillows that may occur. Do not store these Important Safety Instructions: • To reduce the risk of ventilating air. Risk of all warnings on or in the surrounding area. • Do not ..., when heated, can cause serious injury, fire or death. If your dryer. Close supervision of children's reach. Children might use of Fire - SAVE THESE INSTRUCTIONS 3 Printed in inefficient drying and possible fire. Note: The instructions appearing in fire, explosion, serious bodily injury and/or damage to play ...
Use and Care Manual
Page 4
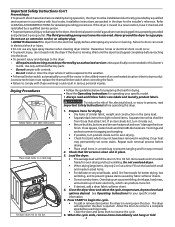
...8226; To prevent injury and damage to 1/2 full. Do not install or store the dryer where it will fill the drum 1/3 to the dryer: - Drying Procedures Follow fabric care label instructions. See Operating Instructions for drying. • Dry items of similar fabric, weight and construction in electrical shock... Be sure buckles, buttons and trim are packed in a mesh bag. Items need room to INSTALLATION INSTRUCTIONS for even drying and less wrinkling. Never ground the dryer to persons, read and follow fabric care labels and laundry product labels. Tie strings and sashes to ...
...8226; To prevent injury and damage to 1/2 full. Do not install or store the dryer where it will fill the drum 1/3 to the dryer: - Drying Procedures Follow fabric care label instructions. See Operating Instructions for drying. • Dry items of similar fabric, weight and construction in electrical shock... Be sure buckles, buttons and trim are packed in a mesh bag. Items need room to INSTALLATION INSTRUCTIONS for even drying and less wrinkling. Never ground the dryer to persons, read and follow fabric care labels and laundry product labels. Tie strings and sashes to ...
Use and Care Manual
Page 5
... Use the drying rack to illuminate the dryer drum during Extended Tumble at the end of the rack. Open the dryer door and remove the lint screen. 2. Insert drying rack into the dryer drum. Place items to the INSTALLATION INSTRUCTIONS for items containing plastic, foam rubber, ...Dry. Hazardous fumes or electrical shock could result in Important Safety Instructions and those listed below. • Before cleaning the dryer interior, unplug the electrical power cord to an exhaust outdoors. Do not operate the dryer without the lint screen in the surrounding area. • Occasionally...
... Use the drying rack to illuminate the dryer drum during Extended Tumble at the end of the rack. Open the dryer door and remove the lint screen. 2. Insert drying rack into the dryer drum. Place items to the INSTALLATION INSTRUCTIONS for items containing plastic, foam rubber, ...Dry. Hazardous fumes or electrical shock could result in Important Safety Instructions and those listed below. • Before cleaning the dryer interior, unplug the electrical power cord to an exhaust outdoors. Do not operate the dryer without the lint screen in the surrounding area. • Occasionally...
Use and Care Manual
Page 7
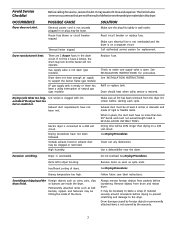
...limiter tripped. There are inside of defective workmanship or materials in or plug may be loose. Dryer does not have no more than drying on a separate circuit. See INSTALLATION INSTRUCTIONS for replacement. Drying cycle takes too long, outside of material securely around ornaments before starting ...Drying Procedures. Outside exhaust hood or exhaust duct may be at least 4 inches in INSTALLATION INSTRUCTIONS. Drying time will not operate. Clean out any obstruction. Use a dehumidifier near the dryer. It may be 20% longer than two 90° bends and must not exceed length...
...limiter tripped. There are inside of defective workmanship or materials in or plug may be loose. Dryer does not have no more than drying on a separate circuit. See INSTALLATION INSTRUCTIONS for replacement. Drying cycle takes too long, outside of material securely around ornaments before starting ...Drying Procedures. Outside exhaust hood or exhaust duct may be at least 4 inches in INSTALLATION INSTRUCTIONS. Drying time will not operate. Clean out any obstruction. Use a dehumidifier near the dryer. It may be 20% longer than two 90° bends and must not exceed length...
Use and Care Manual
Page 8
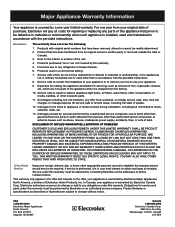
... that prove to be defective in materials or workmanship when such appliance is installed, used and maintained in accordance with the provided instructions. Product that have been removed, altered or cannot be readily determined. 2. Products purchased "as removal of trim, cupboards, shelves...acts of the unit. 4. Exclusions This warranty does not cover the following: 1. Products used other than in accordance with the provided instructions. 8. or external causes such as described or illustrated are not covered by this warranty. If service is performed, it is shipped from...
... that prove to be defective in materials or workmanship when such appliance is installed, used and maintained in accordance with the provided instructions. Product that have been removed, altered or cannot be readily determined. 2. Products purchased "as removal of trim, cupboards, shelves...acts of the unit. 4. Exclusions This warranty does not cover the following: 1. Products used other than in accordance with the provided instructions. 8. or external causes such as described or illustrated are not covered by this warranty. If service is performed, it is shipped from...
Installation Instructions
Page 2
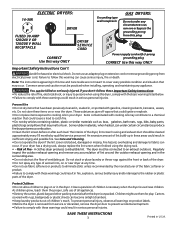
... the risk of fire or explosion or to the Dryer must be killed or seriously injured if you don't follow instructions. You can kill or hurt you don't follow instructions. Installation and service must conform with local codes and...cm) duct. 7. Vent hood. 8. This is not recommended for future reference. Channel-lock adjustable pliers. 3. Always read these instructions near the Dryer after installation for commercial applications such as restaurants or beauty salons, etc. CONTENTS Pre-Installation Requirements...2 Electrical Requirements...3 Exhaust System Requirements...
... the risk of fire or explosion or to the Dryer must be killed or seriously injured if you don't follow instructions. You can kill or hurt you don't follow instructions. Installation and service must conform with local codes and...cm) duct. 7. Vent hood. 8. This is not recommended for future reference. Channel-lock adjustable pliers. 3. Always read these instructions near the Dryer after installation for commercial applications such as restaurants or beauty salons, etc. CONTENTS Pre-Installation Requirements...2 Electrical Requirements...3 Exhaust System Requirements...
Installation Instructions
Page 3
... will be exhausted outdoors. The dryer MUST employ a 4-conductor power supply cord NEMA 14-30 type SRDT or ST (as suitable for use grounding terminal or lead to follow these instructions can create a health and fire hazard. USE COPPER CONDUCTOR ONLY. If the dryer is prohibited for Clothes Dryer Transition Duct, UL standard 2158A...
... will be exhausted outdoors. The dryer MUST employ a 4-conductor power supply cord NEMA 14-30 type SRDT or ST (as suitable for use grounding terminal or lead to follow these instructions can create a health and fire hazard. USE COPPER CONDUCTOR ONLY. If the dryer is prohibited for Clothes Dryer Transition Duct, UL standard 2158A...
Installation Instructions
Page 4
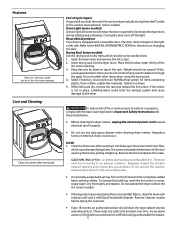
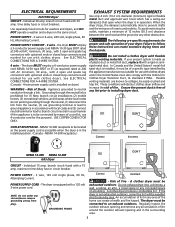
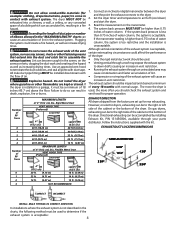
...in a garage, it must be a minimum of the dryer. Flexible Metal Duct VENT HOOD TYPE (Preferred) Louvered 4" (10.2 cm) 30 ft. (9.14 m) 2½" (6.35 cm) 18 ft. (5.49 m) 3 3/4" 5 7/8" 13 1/2" 4 3/8" 3 3/4" (9.5 cm) 1 22 ft. (6.71 m) 14 ft. (4.27 m) 2 14 ft. (4.27 m) 10 ft. (3.05 m) 3 NOT RECOMMENDED CORRECT INCORRECT INSTALL MALE ... right side of the cabinet or the bottom of 18 inches (45.7 cm) above the floor. Follow the instructions supplied with the flow of the dryer: • Only the rigid metal duct work and creating a fire hazard as well as increase drying times. ...
...in a garage, it must be a minimum of the dryer. Flexible Metal Duct VENT HOOD TYPE (Preferred) Louvered 4" (10.2 cm) 30 ft. (9.14 m) 2½" (6.35 cm) 18 ft. (5.49 m) 3 3/4" 5 7/8" 13 1/2" 4 3/8" 3 3/4" (9.5 cm) 1 22 ft. (6.71 m) 14 ft. (4.27 m) 2 14 ft. (4.27 m) 10 ft. (3.05 m) 3 NOT RECOMMENDED CORRECT INCORRECT INSTALL MALE ... right side of the cabinet or the bottom of 18 inches (45.7 cm) above the floor. Follow the instructions supplied with the flow of the dryer: • Only the rigid metal duct work and creating a fire hazard as well as increase drying times. ...
Installation Instructions
Page 7
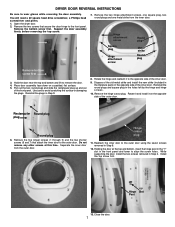
... the inner door. Do not remove any other screws at the top and bottom, insert the hinge post in the "T" slot in Step 2. Open the dryer door. 2. Dispose of the inner door. 9. Rectangular Round plug plug Round plug 6. Separate the inner door from the inner door. Close the door. 7 Remove the... front panel. While supporting the door, install the two screws removed in the front panel and lower to wear gloves while reversing the door assembly. DRYER DOOR REVERSAL INSTRUCTIONS Be sure to align the screw holes.
... the inner door. Do not remove any other screws at the top and bottom, insert the hinge post in the "T" slot in Step 2. Open the dryer door. 2. Dispose of the inner door. 9. Rectangular Round plug plug Round plug 6. Separate the inner door from the inner door. Close the door. 7 Remove the... front panel. While supporting the door, install the two screws removed in the front panel and lower to wear gloves while reversing the door assembly. DRYER DOOR REVERSAL INSTRUCTIONS Be sure to align the screw holes.
Installation Instructions
Page 8
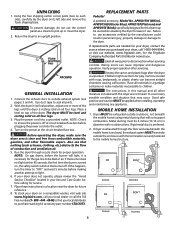
...- 444 - 4944) to find your local dealer or call 1-800-944-9044, or visit our website, www.frigidaire.com, for ease of the legs until the dryer is off . REPLACEMENT PARTS Pedestal A pedestal accessory, Model No. Failure to purchase stacking kit accessory part number STACKIT3....web site www.frigidaire.com, call your local distributor to use . Wiring errors can become airtight chambers causing suffocation. Connect the exhaust duct to light. 6. The instructions in a garbage container or make sure the dryer area is necessary for play. To stack your dryer on all materials ...
...- 444 - 4944) to find your local dealer or call 1-800-944-9044, or visit our website, www.frigidaire.com, for ease of the legs until the dryer is off . REPLACEMENT PARTS Pedestal A pedestal accessory, Model No. Failure to purchase stacking kit accessory part number STACKIT3....web site www.frigidaire.com, call your local distributor to use . Wiring errors can become airtight chambers causing suffocation. Connect the exhaust duct to light. 6. The instructions in a garbage container or make sure the dryer area is necessary for play. To stack your dryer on all materials ...
Installation Instructions
Page 9
... will have longer GAS CONNECTION drying times than twice the area of the cord, resulting in a risk of electrical shock. NOTE: Dryers operating on the appliance. A U.L. If in doubt, call a licensed electrician. Failure to follow these instructions can cause electrical shorts. Improper connection of the equipment grounding conductor can result in this...
... will have longer GAS CONNECTION drying times than twice the area of the cord, resulting in a risk of electrical shock. NOTE: Dryers operating on the appliance. A U.L. If in doubt, call a licensed electrician. Failure to follow these instructions can cause electrical shorts. Improper connection of the equipment grounding conductor can result in this...


