
English Manual.
Page 1
H55MXV Series Motherboard User's Manual
H55MXV Series Motherboard User's Manual

English Manual.
Page 2
... information about our products, please visit Foxconn's website: http://www.foxconnchannel.com © All rights reserved. P/N: 3A2220C00-000-G Symbol description: ! Caution: refers to important information that this product. CAUTION Statement: This manual is disposed of correctly, you purchased this... to avoid problems. WARNING! Trademark: All trademarks are for reference only, please refer to the physical motherboard for H55MXV Series motherboard. For more information about recycling of this product. All trade names are registered trademarks of this product may...
... information about our products, please visit Foxconn's website: http://www.foxconnchannel.com © All rights reserved. P/N: 3A2220C00-000-G Symbol description: ! Caution: refers to important information that this product. CAUTION Statement: This manual is disposed of correctly, you purchased this... to avoid problems. WARNING! Trademark: All trademarks are for reference only, please refer to the physical motherboard for H55MXV Series motherboard. For more information about recycling of this product. All trade names are registered trademarks of this product may...

English Manual.
Page 20
... chassis cover. 6. Installing and Removing a PCI Express x16 Graphics Card : • Installing a Graphics Card: Gently insert the graphics card into the slot. 4. Carefully read the manual that supports your expansion card(s). 7. Make sure the graphics card is fully seated in the expansion slot. 1. Remove the metal slot cover from the slot...
... chassis cover. 6. Installing and Removing a PCI Express x16 Graphics Card : • Installing a Graphics Card: Gently insert the graphics card into the slot. 4. Carefully read the manual that supports your expansion card(s). 7. Make sure the graphics card is fully seated in the expansion slot. 1. Remove the metal slot cover from the slot...
English Manual.
Page 25
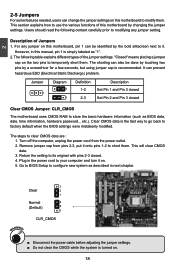
... configure new system as "1". 2. Description of the jumper settings. "Closed" means placing a jumper cap on the two pins to use the various functions of this manual, pin 1 is turned on . 5. It can prevent hazardous ESD (Electrical Static Discharge) problem. Jumper 1 Diagram 1 1 Definition 1-2 2-3 Description Set Pin 1 and Pin 2 closed Set Pin 2 and...
... configure new system as "1". 2. Description of the jumper settings. "Closed" means placing a jumper cap on the two pins to use the various functions of this manual, pin 1 is turned on . 5. It can prevent hazardous ESD (Electrical Static Discharge) problem. Jumper 1 Diagram 1 1 Definition 1-2 2-3 Description Set Pin 1 and Pin 2 closed Set Pin 2 and...
English Manual.
Page 27
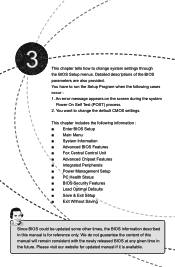
... on the screen during the system Power On Self Test (POST) process. 2. Please visit our website for updated manual if it is for reference only. Detailed descriptions of this manual is available. You have to run the Setup Program when the following information : ■ Enter BIOS Setup ■...■ Save & Exit Setup ■ Exit Without Saving Since BIOS could be updated some other times, the BIOS information described in this manual will remain consistent with the newly released BIOS at any given time in the future. We do not guarantee the content of the BIOS parameters...
... on the screen during the system Power On Self Test (POST) process. 2. Please visit our website for updated manual if it is for reference only. Detailed descriptions of this manual is available. You have to run the Setup Program when the following information : ■ Enter BIOS Setup ■...■ Save & Exit Setup ■ Exit Without Saving Since BIOS could be updated some other times, the BIOS information described in this manual will remain consistent with the newly released BIOS at any given time in the future. We do not guarantee the content of the BIOS parameters...

English Manual.
Page 34
... Serial Presence Detect (SPD) device is asserted depends on a memory module. You can select a value manually such as [800 MHz], [1067 MHz] and [1333MHz].. ► Memory Timing by SPD is used to [Manual]. ► DRAM tCL The number of the target clock frequency. Select [Auto] for SPD enable mode... the row precharge time (in clock cycles) between CPU Core Clock and the FSB Frequency. Select [Auto] for SPD enable mode. Select [Manual] to relative submenu. ► Ratio CMOS Setting This item is determined from the supported CAS latencies at given clock frequencies of DRAM timing by...
... Serial Presence Detect (SPD) device is asserted depends on a memory module. You can select a value manually such as [800 MHz], [1067 MHz] and [1333MHz].. ► Memory Timing by SPD is used to [Manual]. ► DRAM tCL The number of the target clock frequency. Select [Auto] for SPD enable mode... the row precharge time (in clock cycles) between CPU Core Clock and the FSB Frequency. Select [Auto] for SPD enable mode. Select [Manual] to relative submenu. ► Ratio CMOS Setting This item is determined from the supported CAS latencies at given clock frequencies of DRAM timing by...

English Manual.
Page 50
Exit the program Browse CD Drop to install it manually. Automatic Installation by Step Click to visit Foxconn's website Select to Install Utilities Select to Install Drivers 2. Manual Installation Step by One Click. After that, you can click "One Click Setup" to install all the other drivers left, or you can select the specific utility to install it first. 4 Install driver and utility 1. Install Driver You must click "Intel Chipset Driver" to System Tray 43 43 Install Utility You can click on each individual driver to install.
Exit the program Browse CD Drop to install it manually. Automatic Installation by Step Click to visit Foxconn's website Select to Install Utilities Select to Install Drivers 2. Manual Installation Step by One Click. After that, you can click "One Click Setup" to install all the other drivers left, or you can select the specific utility to install it first. 4 Install driver and utility 1. Install Driver You must click "Intel Chipset Driver" to System Tray 43 43 Install Utility You can click on each individual driver to install.

English Manual.
Page 56
... select (or overclock) CPU clock to let FOX ONE check the highest CPU clock you can press the up/down button to continue. 49 49 Manual : You can use . 4 Reset the changes FIS Features : Apply the Select the different changes benchmarks A message informs you to apply it hangs, you , ... running for you can use . System will display a recommended highest CPU clock for current system can be calculated by FOX ONE automatically or manually input by manual Press Auto button to let FOX ONE check the highest CPU clock you can then push the RESET button on your CPU clock. CPU...
... select (or overclock) CPU clock to let FOX ONE check the highest CPU clock you can press the up/down button to continue. 49 49 Manual : You can use . 4 Reset the changes FIS Features : Apply the Select the different changes benchmarks A message informs you to apply it hangs, you , ... running for you can use . System will display a recommended highest CPU clock for current system can be calculated by FOX ONE automatically or manually input by manual Press Auto button to let FOX ONE check the highest CPU clock you can then push the RESET button on your CPU clock. CPU...

English Manual.
Page 58
... to automatically adjust your CPU clock rate based on different system loadings. For example, if you want to set memory and PCI Express frequencies by manual Reset the changes Apply the changes 51 51 Power Gaming, Data Mining, Office and Energy Saving, the references of their system loading were calculated and... speed to run at its maximum speed. While in the FIS Calibration option of Configuration menu. Frequency Control This page lets you set Adjust by manual.
... to automatically adjust your CPU clock rate based on different system loadings. For example, if you want to set memory and PCI Express frequencies by manual Reset the changes Apply the changes 51 51 Power Gaming, Data Mining, Office and Energy Saving, the references of their system loading were calculated and... speed to run at its maximum speed. While in the FIS Calibration option of Configuration menu. Frequency Control This page lets you set Adjust by manual.

English Manual.
Page 61
... 0.05V/step, and North Bridge is 0.04V/step. CPU voltage can be stepped up/down by a unit of FAN1 fan Set low limit rpm by manual Reset the changes Apply the changes 54 54 FAN1 Fan This page lets you to set CPU voltage, memory voltage and North Bridge voltage... manually. Go to set Adjust by dragging the lever 5. Voltage Page - Voltage Control (Optional) This page lets you want to Voltage page Select the option you ...
... 0.05V/step, and North Bridge is 0.04V/step. CPU voltage can be stepped up/down by a unit of FAN1 fan Set low limit rpm by manual Reset the changes Apply the changes 54 54 FAN1 Fan This page lets you to set CPU voltage, memory voltage and North Bridge voltage... manually. Go to set Adjust by dragging the lever 5. Voltage Page - Voltage Control (Optional) This page lets you want to Voltage page Select the option you ...

English Manual.
Page 62
Fan Control This page lets you must use a 4-pin CPU cooler in your system. Go to Fan page Enable or disable smart fan function Set fan speed by manual. When Smart Fan is selected, you enable Smart Fan function or set the fan speed by dragging the lever Apply the changes 55 55 4 6. Fan Page -
Fan Control This page lets you must use a 4-pin CPU cooler in your system. Go to Fan page Enable or disable smart fan function Set fan speed by manual. When Smart Fan is selected, you enable Smart Fan function or set the fan speed by dragging the lever Apply the changes 55 55 4 6. Fan Page -


