
English Manual.
Page 1
G45M Series Motherboard User's Manual
G45M Series Motherboard User's Manual
English Manual.
Page 2
.... CAUTION Statement: This manual is disposed of correctly, you will help you to use of this product is the intellectual property of respective manufacturers listed. Trademark: All trademarks are for G45M Series motherboard. P/N: 3A2216800-000-G Symbol description: ! More information: If you want more detailed information about our products, please visit Foxconn's website: http://www...
.... CAUTION Statement: This manual is disposed of correctly, you will help you to use of this product is the intellectual property of respective manufacturers listed. Trademark: All trademarks are for G45M Series motherboard. P/N: 3A2216800-000-G Symbol description: ! More information: If you want more detailed information about our products, please visit Foxconn's website: http://www...
English Manual.
Page 20
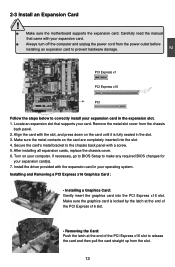
... straight up from the slot. 13 13 After installing all expansion cards, replace the chassis cover. 6. CAUTION 2 2-3 Install an Expansion Card ! ■ Make sure the motherboard supports the expansion card. Installing and Removing a PCI Express x16 Graphics Card : • Installing a Graphics Card: Gently insert the graphics card into the slot. 4. PCI... the PCI Express x16 slot. If necessary, go to BIOS Setup to correctly install your card. Install the driver provided with a screw. 5. Carefully read the manual that supports your expansion card in your computer.
... straight up from the slot. 13 13 After installing all expansion cards, replace the chassis cover. 6. CAUTION 2 2-3 Install an Expansion Card ! ■ Make sure the motherboard supports the expansion card. Installing and Removing a PCI Express x16 Graphics Card : • Installing a Graphics Card: Gently insert the graphics card into the slot. 4. PCI... the PCI Express x16 slot. If necessary, go to BIOS Setup to correctly install your card. Install the driver provided with a screw. 5. Carefully read the manual that supports your expansion card in your computer.

English Manual.
Page 26
... explains different types of Jumpers 1. "Closed" means placing a jumper cap on the two pins to configure new system as described in this manual, pin 1 is turned on. 19 19 Go to BIOS Setup to temporarily short them . The shorting can also be done by touching ...to short them. Jumper 1 Diagram 1 1 Definition 1-2 2-3 Description Set Pin 1 and Pin 2 closed Set Pin 2 and Pin 3 closed ClearCMOS Jumper: CLR_CMOS The motherboard uses CMOS RAM to its original with pins 2-3 closed. 4. The steps to modify them . 2 2-5 Jumpers For some features needed, users can change the jumper ...
... explains different types of Jumpers 1. "Closed" means placing a jumper cap on the two pins to configure new system as described in this manual, pin 1 is turned on. 19 19 Go to BIOS Setup to temporarily short them . The shorting can also be done by touching ...to short them. Jumper 1 Diagram 1 1 Definition 1-2 2-3 Description Set Pin 1 and Pin 2 closed Set Pin 2 and Pin 3 closed ClearCMOS Jumper: CLR_CMOS The motherboard uses CMOS RAM to its original with pins 2-3 closed. 4. The steps to modify them . 2 2-5 Jumpers For some features needed, users can change the jumper ...
English Manual.
Page 39
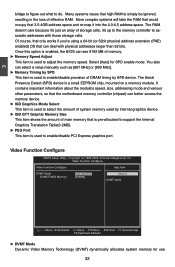
... PCI Express graphics port. It contains important information about the module's speed, size, addressing mode and various other parameters, so that the motherboard memory controller (chipset) can select a value manually such as [667 MHz] or [800 MHz]. ► Memory Timing by SPD This item is used to enable/disable provision of main...
... PCI Express graphics port. It contains important information about the module's speed, size, addressing mode and various other parameters, so that the motherboard memory controller (chipset) can select a value manually such as [667 MHz] or [800 MHz]. ► Memory Timing by SPD This item is used to enable/disable provision of main...


