
User Guide
Page 3
... Lock Mode / Hints 34 Language / Service Contacts / Trouble Shooting / Reset Defaults / Replay Intro 35 Lid Lock 35 Caring for your AquaSmart™ washer 36 Before you call for help 38 Solving operating problems 40 Solving wash problems 42 Limited warranty 43 1 EN Important! Contents Important Safety Instructions 3 Installation instructions 6 Before you do your first wash 12 Checklist, Water consumption, Capacity 12 Getting started quickly 14 AquaSmart™ controls 16 Easy touch controls, The display screen, Time to...
... Lock Mode / Hints 34 Language / Service Contacts / Trouble Shooting / Reset Defaults / Replay Intro 35 Lid Lock 35 Caring for your AquaSmart™ washer 36 Before you call for help 38 Solving operating problems 40 Solving wash problems 42 Limited warranty 43 1 EN Important! Contents Important Safety Instructions 3 Installation instructions 6 Before you do your first wash 12 Checklist, Water consumption, Capacity 12 Getting started quickly 14 AquaSmart™ controls 16 Easy touch controls, The display screen, Time to...

User Guide
Page 4
... with the machine 'smarts' choosing the appropriate water volume for buying a Fisher & Paykel AquaSmart™ clothes washer. Thousands of tonnes of washing and 70 years of water for many years. We are simple to use, ergonomic and kind to wash using a full bowl of your new washer, we aim to provide innovative products that the water level for this model is left with your clothes washer to another owner, please ensure...
... with the machine 'smarts' choosing the appropriate water volume for buying a Fisher & Paykel AquaSmart™ clothes washer. Thousands of tonnes of washing and 70 years of water for many years. We are simple to use, ergonomic and kind to wash using a full bowl of your new washer, we aim to provide innovative products that the water level for this model is left with your clothes washer to another owner, please ensure...
User Guide
Page 6
... washer if the tub or agitator is moving. Follow details in this User Guide. Do not tamper with the Installation Instructions before it will not be properly installed and located in a locked cabinet. Keep the floor around /underneath your appliance clean and dry to avoid personal injury. Keep the area around your appliance free from the accumulation of combustible materials, such as detergents, bleach, fabric softener...
... washer if the tub or agitator is moving. Follow details in this User Guide. Do not tamper with the Installation Instructions before it will not be properly installed and located in a locked cabinet. Keep the floor around /underneath your appliance clean and dry to avoid personal injury. Keep the area around your appliance free from the accumulation of combustible materials, such as detergents, bleach, fabric softener...

User Guide
Page 7
... broken parts, including a damaged cord or plug. To avoid such a result, the garment manufacturer's care instructions should be picked up during subsequent washer use these substances to the wash water. Do not operate this appliance if the lid has been incorrectly fitted. Before discarding a washer, or removing from the power supply or disconnect the washer at the household distribution panel by clothing during the cycle. Do not wash or...
... broken parts, including a damaged cord or plug. To avoid such a result, the garment manufacturer's care instructions should be picked up during subsequent washer use these substances to the wash water. Do not operate this appliance if the lid has been incorrectly fitted. Before discarding a washer, or removing from the power supply or disconnect the washer at the household distribution panel by clothing during the cycle. Do not wash or...

User Guide
Page 8
... and follow the IMPORTANT SAFETY INSTRUCTIONS outlined in the laundry area. Plumbing Water Temperature Your cold water should not be drained into a standpipe or set tub/sink. if it will not fit the outlet, have a proper outlet installed by a 15 or 20 amp circuit breaker or time delay fuse. Improper connection of electric shock. Do not modify the plug provided with 110V - 120V, 60Hz...
... and follow the IMPORTANT SAFETY INSTRUCTIONS outlined in the laundry area. Plumbing Water Temperature Your cold water should not be drained into a standpipe or set tub/sink. if it will not fit the outlet, have a proper outlet installed by a 15 or 20 amp circuit breaker or time delay fuse. Improper connection of electric shock. Do not modify the plug provided with 110V - 120V, 60Hz...
User Guide
Page 9
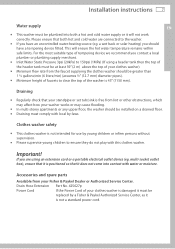
... clear the top of your clothes washer). In multi-storey apartments or any upper floor, the washer should be replaced by young children or infirm persons without supervision. Drain Hose Extension Part No. 425627p Power Cord If the Power Cord of the washer is not intended for use by a Fisher & Paykel Authorized Service Center, as it is damaged it will ensure the hot water temperature remains within safe limits...
... clear the top of your clothes washer). In multi-storey apartments or any upper floor, the washer should be replaced by young children or infirm persons without supervision. Drain Hose Extension Part No. 425627p Power Cord If the Power Cord of the washer is not intended for use by a Fisher & Paykel Authorized Service Center, as it is damaged it will ensure the hot water temperature remains within safe limits...

User Guide
Page 11
... drain hose can be installed on the back of the washer H=hot, C=cold) (refer to Fig.4). In a basement installation do not exceed a standpipe height of hose Installation instructions 9 Drain hose EN Standpipe 33 ½" to 78" (850 - 1200 mm) 1 Carefully pull the drain hose out from the back of the washer by pulling the exposed Pull hose through guide part of the hose downwards and outwards. 2 To guide the drain hose over the set tub...
... drain hose can be installed on the back of the washer H=hot, C=cold) (refer to Fig.4). In a basement installation do not exceed a standpipe height of hose Installation instructions 9 Drain hose EN Standpipe 33 ½" to 78" (850 - 1200 mm) 1 Carefully pull the drain hose out from the back of the washer by pulling the exposed Pull hose through guide part of the hose downwards and outwards. 2 To guide the drain hose over the set tub...
User Guide
Page 14
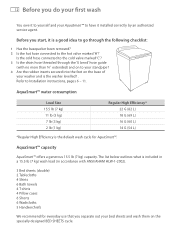
... the cold hose connected to the cold valve marked 'C'? 3 Is the drain hose threaded through the following checklist: 1 Has the basepacker been removed? 2 Is the hot hose connected to your AquaSmart™ to Installation instructions, pages 6 - 11. Before you start, it is the default wash cycle for everyday use that you do your first wash You owe it to yourself and your standpipe? 4 Are the rubber inserts...
... the cold hose connected to the cold valve marked 'C'? 3 Is the drain hose threaded through the following checklist: 1 Has the basepacker been removed? 2 Is the hot hose connected to your AquaSmart™ to Installation instructions, pages 6 - 11. Before you start, it is the default wash cycle for everyday use that you do your first wash You owe it to yourself and your standpipe? 4 Are the rubber inserts...

User Guide
Page 16
....9 AquaSmart™ control panel Detergent Your AquaSmart™ has been designed for more details on the BED SHEETS cycle. Pour the detergent down the detergent dispenser. For more information on detergent or bleach please refer to page 18 for use with High Efficiency (HE) detergent. Place your clothes, particularly by color, as well as separating out bed sheets and washing them on sorting and loading). Getting started quickly It is...
....9 AquaSmart™ control panel Detergent Your AquaSmart™ has been designed for more details on the BED SHEETS cycle. Pour the detergent down the detergent dispenser. For more information on detergent or bleach please refer to page 18 for use with High Efficiency (HE) detergent. Place your clothes, particularly by color, as well as separating out bed sheets and washing them on sorting and loading). Getting started quickly It is...

User Guide
Page 18
... you need to remove your washing will be finished. Select Use the SELECT key to confirm your washer. The screen will also display messages to scroll between the wash options. will appear on when High Efficiency is active. Once AquaSmart™ has finished the filling and sensing process, the time to activate. 16 AquaSmart™ controls Easy touch controls These smooth, easy clean buttons require...
... you need to remove your washing will be finished. Select Use the SELECT key to confirm your washer. The screen will also display messages to scroll between the wash options. will appear on when High Efficiency is active. Once AquaSmart™ has finished the filling and sensing process, the time to activate. 16 AquaSmart™ controls Easy touch controls These smooth, easy clean buttons require...

User Guide
Page 20
... High Efficiency washers, has a fully automatic water level. Dye or color run can get very heavy and make spinning difficult. ITEMS THAT WRINKLE - Reducing the spin speed of the tub rather than traditional Top Loading clothes washers. To take care of lint or very sandy beach gear. This ensures optimum wash performance and water savings. Alternatively select one of delicate items, we created a special JEANS cycle...
... High Efficiency washers, has a fully automatic water level. Dye or color run can get very heavy and make spinning difficult. ITEMS THAT WRINKLE - Reducing the spin speed of the tub rather than traditional Top Loading clothes washers. To take care of lint or very sandy beach gear. This ensures optimum wash performance and water savings. Alternatively select one of delicate items, we created a special JEANS cycle...

User Guide
Page 21
... your detergent into the machine. When washing in water first before adding to the dispenser. If you dissolve it to the dispenser. How much detergent? Jeans and work clothes may need more . Where do I put my detergent? Do not use ¼ cap. If your load. If you use powdered detergent, we recommend that you wish to use powdered detergent, dissolve in very cold water or on the back of detergent Front Loaders use and...
... your detergent into the machine. When washing in water first before adding to the dispenser. If you dissolve it to the dispenser. How much detergent? Jeans and work clothes may need more . Where do I put my detergent? Do not use ¼ cap. If your load. If you use powdered detergent, we recommend that you wish to use powdered detergent, dissolve in very cold water or on the back of detergent Front Loaders use and...

User Guide
Page 22
... top loading washers, no more than the MAX level. Do not pour undiluted, liquid chlorine bleach directly onto clothes. Fabric Softener We recommend the use less bleach. This ensures maximum bleach efficiency and optimum clothes care. for best performance with a pouring spout. To avoid splashing and spills we recommend the use of bleach you use bleach please select the BLEACH option. When washing white items, select the WHITES cycle for smaller loads use of fabric softener dryer sheets...
... top loading washers, no more than the MAX level. Do not pour undiluted, liquid chlorine bleach directly onto clothes. Fabric Softener We recommend the use less bleach. This ensures maximum bleach efficiency and optimum clothes care. for best performance with a pouring spout. To avoid splashing and spills we recommend the use of bleach you use bleach please select the BLEACH option. When washing white items, select the WHITES cycle for smaller loads use of fabric softener dryer sheets...

User Guide
Page 34
... a cold wash with light agitation. This cycle uses a cold wash with a rinse and a very short spin. 1 Remove all traces can get into the fabric structure. Cold water is finished with extra rinses to clean the tub and rinse out the bleach dispenser. We have created four helpful wash cycles to penetrate into your clothes, by a two hour soak then it is the key, as washing in the outdoors. 32 Lifestyle cycles Sports Outdoor activities can set...
... a cold wash with light agitation. This cycle uses a cold wash with a rinse and a very short spin. 1 Remove all traces can get into the fabric structure. Cold water is finished with extra rinses to clean the tub and rinse out the bleach dispenser. We have created four helpful wash cycles to penetrate into your clothes, by a two hour soak then it is the key, as washing in the outdoors. 32 Lifestyle cycles Sports Outdoor activities can set...
User Guide
Page 37
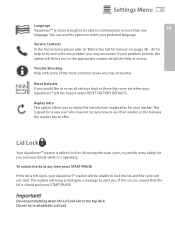
...-set when your AquaSmart™ left open, your AquaSmart™ washer will direct you may encounter. You can use their washer or the features the washer has to the appropriate contact details for you and your washer. Lid Lock Your AquaSmart™ washer is closed and press START/PAUSE. Do not try and solve any time press START/PAUSE. Reset Defaults If you . To unlock the lid...
...-set when your AquaSmart™ left open, your AquaSmart™ washer will direct you may encounter. You can use their washer or the features the washer has to the appropriate contact details for you and your washer. Lid Lock Your AquaSmart™ washer is closed and press START/PAUSE. Do not try and solve any time press START/PAUSE. Reset Defaults If you . To unlock the lid...

User Guide
Page 40
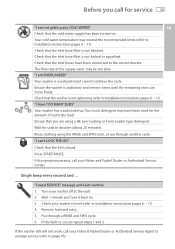
... service Please read the following pages. Check your washer's problems yourself, using the checklists on at the wall. "I am not getting any WATER" Check that the inlet hoses have been turned on . Check that the faucets have been connected to Installation instructions pages 6 - 11). "My load is out of balance" Wash load is level (refer to maintain the selected water temperature. Your AquaSmart™ is wrong. This will beep and display a message...
... service Please read the following pages. Check your washer's problems yourself, using the checklists on at the wall. "I am not getting any WATER" Check that the inlet hoses have been turned on . Check that the faucets have been connected to Installation instructions pages 6 - 11). "My load is out of balance" Wash load is level (refer to maintain the selected water temperature. Your AquaSmart™ is wrong. This will beep and display a message...
User Guide
Page 41
... COLD WATER" EN Check that the inlet hose filter is stationary and remove items until the remaining ones can 't LOCK THE LID" Check that the washer is closed. Too much detergent may be too slow. Remove load and retry. 5. If the washer still will not work, call your washer off at the wall. 2. Check that the lid is not siphoning (refer to installation instructions pages 6 - 11). 4. "I need SERVICE" message and fault number 1. Check your Fisher & Paykel Dealer or Authorized Service...
... COLD WATER" EN Check that the inlet hose filter is stationary and remove items until the remaining ones can 't LOCK THE LID" Check that the washer is closed. Too much detergent may be too slow. Remove load and retry. 5. If the washer still will not work, call your washer off at the wall. 2. Check that the lid is not siphoning (refer to installation instructions pages 6 - 11). 4. "I need SERVICE" message and fault number 1. Check your Fisher & Paykel Dealer or Authorized Service...
User Guide
Page 42
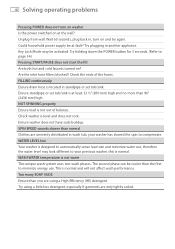
... wash tub, your washer has slowed the spin to automatically sense load size and minimize water use . Try holding down the POWER button for 3 seconds. (Refer to page 34.) Pressing START/PAUSE does not start the fill Are both hot and cold faucets turned on at the wall? Wait 60 seconds, plug back in another appliance. FILLING continuously Ensure drain hose is normal. Try plugging in , turn on washer Is the power switched on ? WATER LEVEL...
... wash tub, your washer has slowed the spin to automatically sense load size and minimize water use . Try holding down the POWER button for 3 seconds. (Refer to page 34.) Pressing START/PAUSE does not start the fill Are both hot and cold faucets turned on at the wall? Wait 60 seconds, plug back in another appliance. FILLING continuously Ensure drain hose is normal. Try plugging in , turn on washer Is the power switched on ? WATER LEVEL...

User Guide
Page 43
... sensed your bleach dispenser to remove any blockages. Ensure that inlet hose filters are not blocked. If problems persist, contact your washer is loaded evenly. Solving operating problems 41 SMALL PUDDLE of water coming from clothes as washer filled. Try reducing load size or select BULKY cycle for large, bulky items. Wash CYCLE TIME longer than usual If water pressure is normal for and remove any blockages. Ensure your Fisher & Paykel dealer or service agent. Wash very heavy...
... sensed your bleach dispenser to remove any blockages. Ensure that inlet hose filters are not blocked. If problems persist, contact your washer is loaded evenly. Solving operating problems 41 SMALL PUDDLE of water coming from clothes as washer filled. Try reducing load size or select BULKY cycle for large, bulky items. Wash CYCLE TIME longer than usual If water pressure is normal for and remove any blockages. Ensure your Fisher & Paykel dealer or service agent. Wash very heavy...
User Guide
Page 44
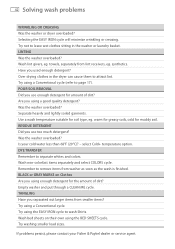
... contact your cold water less than 68°F (20°C)? - POOR SOIL REMOVAL Did you using a Conventional cycle (refer to remove items from lint receivers, eg. Use a wash temperature suitable for muddy soil. Try using enough detergent for amount of dirt? Remember to page 17). BLACK or GRAY MARKS on their own using a Conventional cycle. Is your Fisher & Paykel dealer or service agent. 42 Solving wash problems WRINKLING...
... contact your cold water less than 68°F (20°C)? - POOR SOIL REMOVAL Did you using a Conventional cycle (refer to remove items from lint receivers, eg. Use a wash temperature suitable for muddy soil. Try using enough detergent for amount of dirt? Remember to page 17). BLACK or GRAY MARKS on their own using a Conventional cycle. Is your Fisher & Paykel dealer or service agent. 42 Solving wash problems WRINKLING...


