
Service and Warranty Booklet
Page 26
... CA This warranty does not cover: A Service calls that is considered normal, for example, drain/fan sounds, regeneration noises or user warning beeps. 8. Replace house fuses, reset circuit breakers, correct house wiring or plumbing, or replace light bulbs. 4. Noise or vibration that are not related to be charged if the problem is installed in the product. Use in the product's user guide. F Normal recommended maintenance as set -up of...
... CA This warranty does not cover: A Service calls that is considered normal, for example, drain/fan sounds, regeneration noises or user warning beeps. 8. Replace house fuses, reset circuit breakers, correct house wiring or plumbing, or replace light bulbs. 4. Noise or vibration that are not related to be charged if the problem is installed in the product. Use in the product's user guide. F Normal recommended maintenance as set -up of...

Installation Guide
Page 4
... install the appliance correctly could reduce your local building and electricity regulations. z Do not use . The gas range is not set and adjusted for site gas supply. z Two persons are required to move the product safely to avoid overheating. z Save these substances, always operate this appliance. To minimize exposure to these instructions for the local inspectors use adaptors, reducers or branching devices to connect the oven...
... install the appliance correctly could reduce your local building and electricity regulations. z Do not use . The gas range is not set and adjusted for site gas supply. z Two persons are required to move the product safely to avoid overheating. z Save these substances, always operate this appliance. To minimize exposure to these instructions for the local inspectors use adaptors, reducers or branching devices to connect the oven...

Installation Guide
Page 15
... the total connected load listed on the rating label. z Observe all applicable local codes and ordinances by a suitably qualified person. This must be cut or removed. 15 z Range connection: P1-P2: 240V or 208V; MODEL RDV3-304 RIV3-304 RDV3-366 RIV3-365 RDV3-488 RDV3-485GD RDV3-486GD RHV3-484 MAX. The fourth prong (round grounding pin) should not, under the control panel Wiring diagrams are...
... the total connected load listed on the rating label. z Observe all applicable local codes and ordinances by a suitably qualified person. This must be cut or removed. 15 z Range connection: P1-P2: 240V or 208V; MODEL RDV3-304 RIV3-304 RDV3-366 RIV3-365 RDV3-488 RDV3-485GD RDV3-486GD RHV3-484 MAX. The fourth prong (round grounding pin) should not, under the control panel Wiring diagrams are...

Installation Guide
Page 16
... neutral conductor is prohibited for cord-connected installations where grounding is permitted to ground through the neutral conductor. The free end of the conduit must be installed to the terminal block using a 3-conductor cord or cable assembly. See manufacturer's instructions. ELECTRICAL CONNECTION These ranges must be connected to the power supply utilizing one end of the mounted loop Ground wire, located beneath the terminal block, up...
... neutral conductor is prohibited for cord-connected installations where grounding is permitted to ground through the neutral conductor. The free end of the conduit must be installed to the terminal block using a 3-conductor cord or cable assembly. See manufacturer's instructions. ELECTRICAL CONNECTION These ranges must be connected to the power supply utilizing one end of the mounted loop Ground wire, located beneath the terminal block, up...

Installation Guide
Page 17
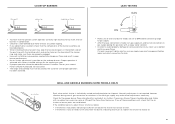
... of gas supplied tWo athsheelor cation. flex line. situation. z Make sure the gas supply is tted with thze twAomanual shut-off at range or wall hard pipe connections. 17 Never use by the customer, make surm'eopathennue'acpl osohsnuitntio-eoncfftivoanlve LP gas is turned off valve (supplied biys rtehgeuinlasttaeldlert)om2u.7s5t bkePain,swtaitllhed in an accessible location in step 5 CLEARANCE DIMENSIONS. for natural gas or 12.0" for servicing. Gas Code ANSI...
... of gas supplied tWo athsheelor cation. flex line. situation. z Make sure the gas supply is tted with thze twAomanual shut-off at range or wall hard pipe connections. 17 Never use by the customer, make surm'eopathennue'acpl osohsnuitntio-eoncfftivoanlve LP gas is turned off valve (supplied biys rtehgeuinlasttaeldlert)om2u.7s5t bkePain,swtaitllhed in an accessible location in step 5 CLEARANCE DIMENSIONS. for natural gas or 12.0" for servicing. Gas Code ANSI...
Installation Guide
Page 19
... or burner ports are set to OFF before connecting range to gas supply. z No air shutter adjustment is not required, however, vibration during transit, gas conversion or variations in poor burner performance. If the condition persists, adjust the air shutter as below: z If the flame is evident, check that the ignition system operates correctly, light each burner by the customer until proper operation has been achieved. lifting off COOKTOP BURNERS yellow tip stable blue flame...
... or burner ports are set to OFF before connecting range to gas supply. z No air shutter adjustment is not required, however, vibration during transit, gas conversion or variations in poor burner performance. If the condition persists, adjust the air shutter as below: z If the flame is evident, check that the ignition system operates correctly, light each burner by the customer until proper operation has been achieved. lifting off COOKTOP BURNERS yellow tip stable blue flame...

Installation Guide
Page 21
...). for natural gas or 10.0" W.C. ELECTRICAL F Receptacle with LP gas. Check below the grate and inside slots comfortably and neither of each oven, griddle, or grill burner. F Flame adjustment made on LP gas, verify that pressure regulator, orifice hoods, air shutters, and valve have been set for use with properly rated over-current protection is connected to combustibles behind unit. F Burner pan supports correctly positioned, level, and do not rock. Complete and keep for service cord connection.
...). for natural gas or 10.0" W.C. ELECTRICAL F Receptacle with LP gas. Check below the grate and inside slots comfortably and neither of each oven, griddle, or grill burner. F Flame adjustment made on LP gas, verify that pressure regulator, orifice hoods, air shutters, and valve have been set for use with properly rated over-current protection is connected to combustibles behind unit. F Burner pan supports correctly positioned, level, and do not rock. Complete and keep for service cord connection.

Planning Guide Dual Fuel Range
Page 10
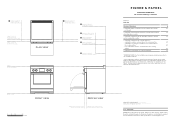
... full installation instructions and specifications visit fisherpaykel.com Induction Model no: RIV3-304 Product Dimensions in a Height of range (from floor to cooktop, excluding grates and min 35 3/4" rear trim) max 36 3/4" B Overall width of range 29 7/8" c Overall depth of range (excluding handle and dials) 29 1/8" d Depth from rear of chassis to our installation manual. Read the installation guide for flush control panel Overall height of open door to cabinetry face - INDICATES CAVITY CLEARANCES INDICATES...
... full installation instructions and specifications visit fisherpaykel.com Induction Model no: RIV3-304 Product Dimensions in a Height of range (from floor to cooktop, excluding grates and min 35 3/4" rear trim) max 36 3/4" B Overall width of range 29 7/8" c Overall depth of range (excluding handle and dials) 29 1/8" d Depth from rear of chassis to our installation manual. Read the installation guide for flush control panel Overall height of open door to cabinetry face - INDICATES CAVITY CLEARANCES INDICATES...
Planning Guide Dual Fuel Range
Page 11
Induction Model no: RIV3-304 Clearance Dimensions in 'National Fuel Gas Code' (ANSI Z223.1, Current Edition). combustible covering for detailed information on installing the product. DATUM : FLOOR FRONT VIEW 0 5 10 20 inches PROFILE VIEW CABINET FACE FOR INSTALLATION WITH FLUSH CONTROL PANEL CABINET FACE FOR INSTALLATION WITH PROJECTING CONTROL PANEL INDICATES CLEARANCES INDICATES PRODUCT DATUM DATE: 14.07.2020 IMPORTANT: Throughout this guide, dimensions may vary by UL. non-combustible surface** centered above the cooking surface 30...
Induction Model no: RIV3-304 Clearance Dimensions in 'National Fuel Gas Code' (ANSI Z223.1, Current Edition). combustible covering for detailed information on installing the product. DATUM : FLOOR FRONT VIEW 0 5 10 20 inches PROFILE VIEW CABINET FACE FOR INSTALLATION WITH FLUSH CONTROL PANEL CABINET FACE FOR INSTALLATION WITH PROJECTING CONTROL PANEL INDICATES CLEARANCES INDICATES PRODUCT DATUM DATE: 14.07.2020 IMPORTANT: Throughout this guide, dimensions may vary by UL. non-combustible surface** centered above the cooking surface 30...
Planning Guide Dual Fuel Range
Page 22
... from rear of open door to cabinetry face - Read the installation guide for flush control panel Overall height of chassis to our installation manual. For full installation instructions and specifications visit fisherpaykel.com INDICATES CAVITY CLEARANCES INDICATES PRODUCT DATUM DATE: 14.07.2020 IMPORTANT: Throughout this guide, dimensions may vary by ±2mm (1/16''). flush f Height of rear trim g Depth of rear trim h Height from countertop to bottom of control panel i Height...
... from rear of open door to cabinetry face - Read the installation guide for flush control panel Overall height of chassis to our installation manual. For full installation instructions and specifications visit fisherpaykel.com INDICATES CAVITY CLEARANCES INDICATES PRODUCT DATUM DATE: 14.07.2020 IMPORTANT: Throughout this guide, dimensions may vary by ±2mm (1/16''). flush f Height of rear trim g Depth of rear trim h Height from countertop to bottom of control panel i Height...

User Guide Professional Range
Page 3
CONTENTS Introduction Safety and warnings Before you begin First use Using the oven light Using the kitchen timer Changing the time Locking the control panel Unlocking the control panel Cooking options Delayed Cook Auto Off Food probe Guided cooking Cooking guide Cooking charts Induction cookware Cooktop use Locking the cooktop controls SmartZones PowerBoost Auto RapidHeat Heat settings User preference settings WiFi connection and remote mode Sabbath Mode Care and cleaning Using Self Clean Troubleshooting Alert codes Warranty and service 4 5 11 12 19 20 22 23 24 25 26 27 28 31 33 39 45 46 49 ...
CONTENTS Introduction Safety and warnings Before you begin First use Using the oven light Using the kitchen timer Changing the time Locking the control panel Unlocking the control panel Cooking options Delayed Cook Auto Off Food probe Guided cooking Cooking guide Cooking charts Induction cookware Cooktop use Locking the cooktop controls SmartZones PowerBoost Auto RapidHeat Heat settings User preference settings WiFi connection and remote mode Sabbath Mode Care and cleaning Using Self Clean Troubleshooting Alert codes Warranty and service 4 5 11 12 19 20 22 23 24 25 26 27 28 31 33 39 45 46 49 ...

User Guide Professional Range
Page 9
... oven is cool (before preheating). Changes or modifications not expressly approved by Fisher & Paykel could ignite or melt if they scratch the surface, which ensures that may cause undesired operation. Follow the bakeware manufacturer's guides. z This appliance is equipped with part 15 of the oven. z Ensure flow of different size. z Do not use harsh/abrasive cleaners, scourers or sharp metal scrapers to clean the oven door glass...
... oven is cool (before preheating). Changes or modifications not expressly approved by Fisher & Paykel could ignite or melt if they scratch the surface, which ensures that may cause undesired operation. Follow the bakeware manufacturer's guides. z This appliance is equipped with part 15 of the oven. z Ensure flow of different size. z Do not use harsh/abrasive cleaners, scourers or sharp metal scrapers to clean the oven door glass...

User Guide Professional Range
Page 11
... the oven and cooktop. Recycle items that the anti-tip bracket at the right rear of the range has been correctly installed. BEFORE YOU BEGIN IMPORTANT! z Read this guide, taking special note of the oven or the oven door with cookware, utensils or towels. RIV3-365 model illustrated 1 !1 !2 2 !3 3 Oven features and accessories 1 Back trim 2 Induction zones 3 Zone indicators 4 Control panel 4 5 Oven vent louvres 5 6 Oven seal 6 7 Side rack 7 8 Full extension sliding shelf 8 9 Serial label !0 Toe kick 9 !0 !1 Food probe !2 Broil rack !3 Broil pan...
... the oven and cooktop. Recycle items that the anti-tip bracket at the right rear of the range has been correctly installed. BEFORE YOU BEGIN IMPORTANT! z Read this guide, taking special note of the oven or the oven door with cookware, utensils or towels. RIV3-365 model illustrated 1 !1 !2 2 !3 3 Oven features and accessories 1 Back trim 2 Induction zones 3 Zone indicators 4 Control panel 4 5 Oven vent louvres 5 6 Oven seal 6 7 Side rack 7 8 Full extension sliding shelf 8 9 Serial label !0 Toe kick 9 !0 !1 Food probe !2 Broil rack !3 Broil pan...

User Guide Professional Range
Page 33
COOKING GUIDE General guidelines This range has been designed to utilise its four elements and rear fan in different combinations to provide you with the oven door completely shut. Broiling z Always broil with enhanced performance. z Always keep the inside moist and juicy. z For thinner cuts of 165°F (75°C). Baking z For best results when baking, always pre-heat your food to perfection. 1+2 3 4 Oven elements 1 upper outer element 2 upper inner...
COOKING GUIDE General guidelines This range has been designed to utilise its four elements and rear fan in different combinations to provide you with the oven door completely shut. Broiling z Always broil with enhanced performance. z Always keep the inside moist and juicy. z For thinner cuts of 165°F (75°C). Baking z For best results when baking, always pre-heat your food to perfection. 1+2 3 4 Oven elements 1 upper outer element 2 upper inner...

User Guide Professional Range
Page 71
.... See 'Replacing the oven light bulbs' for instructions. The light bulb is restored. The control panel is open. Incorrect cleaning or the edge of the oven lights does not come on , but the screen is opened too frequently during cooking. For safety reasons the cooling fans will continue to the menu in your local Fisher & Paykel trained and supported service technician or the Customer Care Centre. It may turn off . POSSIBLE CAUSES No power supply (oven light and...
.... See 'Replacing the oven light bulbs' for instructions. The light bulb is restored. The control panel is open. Incorrect cleaning or the edge of the oven lights does not come on , but the screen is opened too frequently during cooking. For safety reasons the cooling fans will continue to the menu in your local Fisher & Paykel trained and supported service technician or the Customer Care Centre. It may turn off . POSSIBLE CAUSES No power supply (oven light and...

User Guide Professional Range
Page 74
... wall. • Contact a Fisher & Paykel trained and supported service technician or Customer Care. 74 You may damage the oven and its initial position. • Set the clock. You can now use ' for instructions. • Try starting a Self Clean cycle again, making sure that you can fix the problem and the alert code does not reappear, you to the oven off the power while the oven is displayed 1 If the beeping...
... wall. • Contact a Fisher & Paykel trained and supported service technician or Customer Care. 74 You may damage the oven and its initial position. • Set the clock. You can now use ' for instructions. • Try starting a Self Clean cycle again, making sure that you can fix the problem and the alert code does not reappear, you to the oven off the power while the oven is displayed 1 If the beeping...
Specification Guide
Page 1
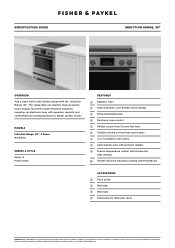
... results. MODELS Induction Range, 30", 4 Zones RIV3-304 SERIES & STYLE Series 9 Professional F E AT U R E S 1 Stainless steel 2 High-resolution, user-friendly touch display 3 Metal illuminated dials 4 Electronic oven control 5 Perfect results from 15 oven functions 6 Guided cooking by food type and recipes 7 4 cu ft-capacity oven cavity 8 Self-cleaning oven with pyrolytic ladders 9 Precise temperature control with 9 induction heat settings !0 Instant response induction cooking with the product on delivery and on our website fisherpaykel.com Specific installation guidance...
... results. MODELS Induction Range, 30", 4 Zones RIV3-304 SERIES & STYLE Series 9 Professional F E AT U R E S 1 Stainless steel 2 High-resolution, user-friendly touch display 3 Metal illuminated dials 4 Electronic oven control 5 Perfect results from 15 oven functions 6 Guided cooking by food type and recipes 7 4 cu ft-capacity oven cavity 8 Self-cleaning oven with pyrolytic ladders 9 Precise temperature control with 9 induction heat settings !0 Instant response induction cooking with the product on delivery and on our website fisherpaykel.com Specific installation guidance...
Specification Guide
Page 2
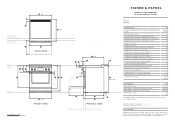
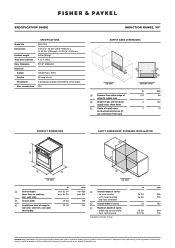
... type (NEMA 14-50 plug) 57A SUPPLY AREA DIMENSIONS C ISO VIEW A Distance from either edge of range to safely and correctly install the products featured here. Further information is required to supply area B Height of gas and electrical supply areas (from floor) C Depth of supply areas (ie maximum protrusion of gas connection from front of cavity* • for any product. SPECIFICATION GUIDE INDUCTION RANGE, 30" Model No. in 35...
... type (NEMA 14-50 plug) 57A SUPPLY AREA DIMENSIONS C ISO VIEW A Distance from either edge of range to safely and correctly install the products featured here. Further information is required to supply area B Height of gas and electrical supply areas (from floor) C Depth of supply areas (ie maximum protrusion of gas connection from front of cavity* • for any product. SPECIFICATION GUIDE INDUCTION RANGE, 30" Model No. in 35...
Data Sheet Induction Range
Page 3
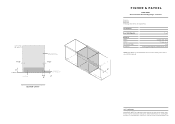
For full installation instructions & specifications visit fisherpaykel.com LEFT SIDE OF CAVITY 1 1/2" 6" FLOOR ELECTRICAL FINAL POSITION OF RANGE AGAINST WALL 1 1/2" LOCATION OF ANTI-TIP BRACKET 2" 4" REAR OF CAVITY DATA SHEET 30" Professional Freestanding Range - Please read the installation manual for metric measurements) Specifications Oven Total Capacity 4 cu.ft Electrical Supply Service Max Current Draw Receptacle 120/240 VAC, 60Hz 50 amp circuit 57 A 4-prong grounding type [NEMA 14-50P plug] IMPORTANT NOTE...
For full installation instructions & specifications visit fisherpaykel.com LEFT SIDE OF CAVITY 1 1/2" 6" FLOOR ELECTRICAL FINAL POSITION OF RANGE AGAINST WALL 1 1/2" LOCATION OF ANTI-TIP BRACKET 2" 4" REAR OF CAVITY DATA SHEET 30" Professional Freestanding Range - Please read the installation manual for metric measurements) Specifications Oven Total Capacity 4 cu.ft Electrical Supply Service Max Current Draw Receptacle 120/240 VAC, 60Hz 50 amp circuit 57 A 4-prong grounding type [NEMA 14-50P plug] IMPORTANT NOTE...
Data Sheet Induction Range
Page 6
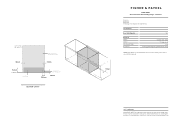
... DATE: 14.07.2020 IMPORTANT NOTE: Throughout this guide, dimensions may vary by ±2mm (1/16''). For full installation instructions & specifications visit fisherpaykel.com Induction Model no: RIV3-304 (refer page 3 for detailed information on installing the product. LEFT SIDE OF CAVITY 38mm 152mm FLOOR ELECTRICAL FINAL POSITION OF RANGE AGAINST WALL 38mm 100mm LOCATION OF ANTI-TIP BRACKET 50mm REAR OF CAVITY DATA SHEET 30" Professional Freestanding Range -
... DATE: 14.07.2020 IMPORTANT NOTE: Throughout this guide, dimensions may vary by ±2mm (1/16''). For full installation instructions & specifications visit fisherpaykel.com Induction Model no: RIV3-304 (refer page 3 for detailed information on installing the product. LEFT SIDE OF CAVITY 38mm 152mm FLOOR ELECTRICAL FINAL POSITION OF RANGE AGAINST WALL 38mm 100mm LOCATION OF ANTI-TIP BRACKET 50mm REAR OF CAVITY DATA SHEET 30" Professional Freestanding Range -


