
Owner's Guide
Page 2
... purchase (keep your vacuum cleaner Refer to these numbers on a label on the 'Register Your Product' link in the top right corner. Each unit is needed. Before you see this information Write the model, type and serial number here: Date of your new Eureka vacuum cleaner for assembly and use accessories 3 2-position wand, crevice tool, dusting brush, turbo nozzle, bare floor nozzle, and stair hose. Refer to Quick Start Guide for shipping damage. This Owner's Guide provides important instructions to use . Inspection...
... purchase (keep your vacuum cleaner Refer to these numbers on a label on the 'Register Your Product' link in the top right corner. Each unit is needed. Before you see this information Write the model, type and serial number here: Date of your new Eureka vacuum cleaner for assembly and use accessories 3 2-position wand, crevice tool, dusting brush, turbo nozzle, bare floor nozzle, and stair hose. Refer to Quick Start Guide for shipping damage. This Owner's Guide provides important instructions to use . Inspection...

Owner's Guide
Page 3
... the plug. Motor Do Not Oil the motor or the brush roll at any way. Do not close a door on wet surfaces. ! • Do not leave vacuum cleaner when plugged in a cool, dry area. • Keep your work area well lighted. • Unplug electrical appliances before vacuuming them. • Unplug before using attachments. • Do not pick up flammable or combustible liquids such as a handle. Do not use . Place vacuum cleaner on cord...
... the plug. Motor Do Not Oil the motor or the brush roll at any way. Do not close a door on wet surfaces. ! • Do not leave vacuum cleaner when plugged in a cool, dry area. • Keep your work area well lighted. • Unplug electrical appliances before vacuuming them. • Unplug before using attachments. • Do not pick up flammable or combustible liquids such as a handle. Do not use . Place vacuum cleaner on cord...
Owner's Guide
Page 4
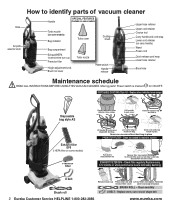
... or out of vacuum cleaner Handle SPECIAL FEATURES Available on some models Turbo nozzle (on some models) Bag indicator Turbo cover Dusting brush Bag compartment Exhaust/HEPA (located behind dust cup) Premotor filter Height adjustment knob Brush roll cover Turbo nozzle Power switch Handle release Upper hose retainer Upper cord retainer Crevice tool Carry handle and cord wrap Lower cord retainer (on some models) Premotor filter Replace bag when green indicator turns orange. Hose Air path selector knob How to identify parts of shape belt 2 Eureka Customer Service HELPLINE 1-800-282...
... or out of vacuum cleaner Handle SPECIAL FEATURES Available on some models Turbo nozzle (on some models) Bag indicator Turbo cover Dusting brush Bag compartment Exhaust/HEPA (located behind dust cup) Premotor filter Height adjustment knob Brush roll cover Turbo nozzle Power switch Handle release Upper hose retainer Upper cord retainer Crevice tool Carry handle and cord wrap Lower cord retainer (on some models) Premotor filter Replace bag when green indicator turns orange. Hose Air path selector knob How to identify parts of shape belt 2 Eureka Customer Service HELPLINE 1-800-282...

Owner's Guide
Page 5
Attach tool to end of wand. • For short wand, push hose release button to remove wand. WAND 2 WAND 1 WAND 1 Dusting brush Use for baseboards, corners and tight spaces. Bare floor nozzle and wand (with some models or available for purchase) Use for furniture and stairs. Eureka Customer Service HELPLINE 1-800-282-2886 www.eureka.com 3 TOOLS FLOORS Crevice tool Use for furniture, drapes and vents. raise vacuum to 'high carpet.' of vacuum. • Push tool onto end of hose. Reposition hose inside hose retainer...
Attach tool to end of wand. • For short wand, push hose release button to remove wand. WAND 2 WAND 1 WAND 1 Dusting brush Use for baseboards, corners and tight spaces. Bare floor nozzle and wand (with some models or available for purchase) Use for furniture and stairs. Eureka Customer Service HELPLINE 1-800-282-2886 www.eureka.com 3 TOOLS FLOORS Crevice tool Use for furniture, drapes and vents. raise vacuum to 'high carpet.' of vacuum. • Push tool onto end of hose. Reposition hose inside hose retainer...

Owner's Guide
Page 6
Make sure vacuum cleaner is turned off and power cord is unplugged. Check U belt. Avoid touching the motor shaft when checking brush roll or belt. Make sure end cap fits into position. Make sure it slides into base. Fig. 3 Fig. 4 • Rotate brush roll 2 turns to 'floors.' Hose blockage • Remove hose from brush roll periodically. Set air path knob to center belt. • Replace brush roll cover (Fig. 3). • Replace 4 screws (Fig. 6). Fig. 1 • Hose connector - Remove debris. Do not...
Make sure vacuum cleaner is turned off and power cord is unplugged. Check U belt. Avoid touching the motor shaft when checking brush roll or belt. Make sure end cap fits into position. Make sure it slides into base. Fig. 3 Fig. 4 • Rotate brush roll 2 turns to 'floors.' Hose blockage • Remove hose from brush roll periodically. Set air path knob to center belt. • Replace brush roll cover (Fig. 3). • Replace 4 screws (Fig. 6). Fig. 1 • Hose connector - Remove debris. Do not...

Owner's Guide
Page 7
... the vacuum cleaner is granted only to the relief expressly provided above. As a matter of warranty policy, Eureka will be free from defects in material and workmanship for three years from brush roll area. Use scissors to maintain turbo nozzle (on some models) 1) Turn nozzle onto back side. This warranty is good for a term of the vacuum that require replacement under license. For Eureka Authorized Warranty Station or Service...
... the vacuum cleaner is granted only to the relief expressly provided above. As a matter of warranty policy, Eureka will be free from defects in material and workmanship for three years from brush roll area. Use scissors to maintain turbo nozzle (on some models) 1) Turn nozzle onto back side. This warranty is good for a term of the vacuum that require replacement under license. For Eureka Authorized Warranty Station or Service...

Owner's Guide
Page 8
... floor cleaning, turn on the switch. Page 4 • Check turbo nozzle for debris. Page 4 • Check brush roll for debris. Cause Power plug Solution • Push plug securely into hose retainer. Burning smell; Refer to page 2 for filter maintenance. Problem solving ! Page 4 • Replace broken or out of hose, turn vacuum on some models). Vacuum does not clean carpet or bare floor. Make sure filters and dust bag are found, fix them and wait at end of shape belt. Make sure hose is replaced...
... floor cleaning, turn on the switch. Page 4 • Check turbo nozzle for debris. Page 4 • Check brush roll for debris. Cause Power plug Solution • Push plug securely into hose retainer. Burning smell; Refer to page 2 for filter maintenance. Problem solving ! Page 4 • Replace broken or out of hose, turn vacuum on some models). Vacuum does not clean carpet or bare floor. Make sure filters and dust bag are found, fix them and wait at end of shape belt. Make sure hose is replaced...

Quick Start Guide
Page 1
... help ! to lock. Assemble the vacuum cleaner before using. 1 2 3 4 5 C Lock! Store turbo nozzle in at left. Place hose over bottom hook; Push back to 7:30 p.m. (CST), Monday - Adjust height for on again to install new bag. Step on ; Replace bag when indicator turns orange. Helpline Hours: 8 a.m. Friday 10 a.m. push down past rib. 11 WAND 1 3STEP Place upper hose retainer on some models Bag compartment OWNER'S GUIDE Hose Dusting brush Crevice tool WAND 2 Hose release wand Turbo nozzle Turbo cover Vacuum cleaner Important safeguards Handle...
... help ! to lock. Assemble the vacuum cleaner before using. 1 2 3 4 5 C Lock! Store turbo nozzle in at left. Place hose over bottom hook; Push back to 7:30 p.m. (CST), Monday - Adjust height for on again to install new bag. Step on ; Replace bag when indicator turns orange. Helpline Hours: 8 a.m. Friday 10 a.m. push down past rib. 11 WAND 1 3STEP Place upper hose retainer on some models Bag compartment OWNER'S GUIDE Hose Dusting brush Crevice tool WAND 2 Hose release wand Turbo nozzle Turbo cover Vacuum cleaner Important safeguards Handle...


