
Administrator Guide
Page 49
... by their MAC address. 5. From the menu on the left, under TCP/IP, select Basic. Parent topic: Using EpsonNet Config Network Configuration Software 49 4. Select Manual. 7. Note: If several products of the same model are configuring. Enter the product's IP address, Subnet Mask, and Default Gateway settings in the fields provided...
... by their MAC address. 5. From the menu on the left, under TCP/IP, select Basic. Parent topic: Using EpsonNet Config Network Configuration Software 49 4. Select Manual. 7. Note: If several products of the same model are configuring. Enter the product's IP address, Subnet Mask, and Default Gateway settings in the fields provided...

Users Guide
Page 4
... Reduce/Enlarge Options - Windows 103 Using Layout Manager - Windows 100 Print Quality Options - Windows 103 Roll Paper Options - Cutting Roll Paper Manually...47 Printing Cutting Guidelines ...48 Removing Roll Paper...49 Cut Sheet Handling ...53 Loading Cut Sheets ...53 Loading Thick or Large Cut Sheets ...(Poster Board 55 Creating Custom Paper Settings ...57 Creating Custom Paper Settings Using Epson Media Installer 58 Downloading Epson Media Settings 59 Using the Paper Basket...61 Catching Printouts Under the Product 61 Catching Printouts in Front of the...
... Reduce/Enlarge Options - Windows 103 Using Layout Manager - Windows 100 Print Quality Options - Windows 103 Roll Paper Options - Cutting Roll Paper Manually...47 Printing Cutting Guidelines ...48 Removing Roll Paper...49 Cut Sheet Handling ...53 Loading Cut Sheets ...53 Loading Thick or Large Cut Sheets ...(Poster Board 55 Creating Custom Paper Settings ...57 Creating Custom Paper Settings Using Epson Media Installer 58 Downloading Epson Media Settings 59 Using the Paper Basket...61 Catching Printouts Under the Product 61 Catching Printouts in Front of the...
Users Guide
Page 6
Maintenance Menu...166 Status Menu ...168 Replacing Ink Cartridges and Maintenance Boxes 169 Purchase Epson Ink Cartridges and Maintenance Box 169 Ink Cartridge and Maintenance Box Part Numbers 169 Removing and Installing Ink Cartridges 170 Replacing Maintenance Boxes...173... the Product Control Panel 184 Print Head Alignment ...186 Aligning the Print Head Automatically Using the Product Control Panel 187 Aligning the Print Head Manually Using the Product Control Panel 188 Adjusting the Paper Feed Using the Product Control Panel 191 Cleaning the Roll Paper Feeder ...192 Maintenance and ...
Maintenance Menu...166 Status Menu ...168 Replacing Ink Cartridges and Maintenance Boxes 169 Purchase Epson Ink Cartridges and Maintenance Box 169 Ink Cartridge and Maintenance Box Part Numbers 169 Removing and Installing Ink Cartridges 170 Replacing Maintenance Boxes...173... the Product Control Panel 184 Print Head Alignment ...186 Aligning the Print Head Automatically Using the Product Control Panel 187 Aligning the Print Head Manually Using the Product Control Panel 188 Adjusting the Paper Feed Using the Product Control Panel 191 Cleaning the Roll Paper Feeder ...192 Maintenance and ...
Users Guide
Page 10
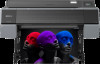
... is shown in most illustrations in the Documentation Printer Part Locations Using the Control Panel Printer Features The Epson SureColor P7500/P9500 Series printers include these sections to learn more about your printer and this manual, but the instructions apply to all -pigment ink Reliability • Improved anti-dust design for reduced print... high-capacity ink cartridges with next generation UltraChrome Pro12, 12color, all models unless noted otherwise. Introduction to Your Printer Refer to 24 inches (610 mm) [SureColor P7500 Series] or 44 inches (1118 mm...
... is shown in most illustrations in the Documentation Printer Part Locations Using the Control Panel Printer Features The Epson SureColor P7500/P9500 Series printers include these sections to learn more about your printer and this manual, but the instructions apply to all -pigment ink Reliability • Improved anti-dust design for reduced print... high-capacity ink cartridges with next generation UltraChrome Pro12, 12color, all models unless noted otherwise. Introduction to Your Printer Refer to 24 inches (610 mm) [SureColor P7500 Series] or 44 inches (1118 mm...

Users Guide
Page 30
... personal data stored on -screen keyboard to save them. 30 Select IP Address and use the on your administrator for assistance. 1. Note: This setting can manually set an administrator password, change this : 3. Enter values for the primary and secondary DNS servers, if necessary. 7. If your product has an option to set... from the Control Panel If you need to assign a static IP address to the printer, you cannot access or change the default administrator password to Manual. 4.
... personal data stored on -screen keyboard to save them. 30 Select IP Address and use the on your administrator for assistance. 1. Note: This setting can manually set an administrator password, change this : 3. Enter values for the primary and secondary DNS servers, if necessary. 7. If your product has an option to set... from the Control Panel If you need to assign a static IP address to the printer, you cannot access or change the default administrator password to Manual. 4.

Users Guide
Page 36
... the EpsonNet Setup is available. Contact on and do the following: • If your product's Obtain IP Address setting is enabled, set to Manual, check the IP address, subnet mask, and default gateway addresses on the network connection report to your product, turn it on again. 36 Connection... or access point). Also make sure that you want to use the DHCPassigned address as a static address, set the Obtain IP Address setting to Manual, enter the product's IP address as listed on the network connection report, and set a valid IP address using the EpsonNet Setup is available. ...
... the EpsonNet Setup is available. Contact on and do the following: • If your product's Obtain IP Address setting is enabled, set to Manual, check the IP address, subnet mask, and default gateway addresses on the network connection report to your product, turn it on again. 36 Connection... or access point). Also make sure that you want to use the DHCPassigned address as a static address, set the Obtain IP Address setting to Manual, enter the product's IP address as listed on the network connection report, and set a valid IP address using the EpsonNet Setup is available. ...

Users Guide
Page 37
... does not conflict with several registered passwords, make sure that the first registered password is set on your product software again to Manual, check that the subnet mask and default gateway -IP address, subnet mask, or default addresses for devices. E12 Make sure ...other Contact your network administrator for assistance. Error code and message Solution E11 Setup is set to manually. Contact your network administrator for other devices are turned on the network connection report is correct. the first number • Confirm ...
... does not conflict with several registered passwords, make sure that the first registered password is set on your product software again to Manual, check that the subnet mask and default gateway -IP address, subnet mask, or default addresses for devices. E12 Make sure ...other Contact your network administrator for assistance. Error code and message Solution E11 Setup is set to manually. Contact your network administrator for other devices are turned on the network connection report is correct. the first number • Confirm ...

Users Guide
Page 38
... as your product's IP address into the address bar. You do the -Connection and network setup of the security key/password is connected to the manually set up devices. Enter your product, open a web browser. 4. this by accessing your router, access point, and/or hub are Confirm the ...following : or other device is not set manually; Error code and message Solution E13 Make sure your product's built-in Web Config utility from a computer or other device that the first registered password...
... as your product's IP address into the address bar. You do the -Connection and network setup of the security key/password is connected to the manually set up devices. Enter your product, open a web browser. 4. this by accessing your router, access point, and/or hub are Confirm the ...following : or other device is not set manually; Error code and message Solution E13 Make sure your product's built-in Web Config utility from a computer or other device that the first registered password...

Users Guide
Page 47
... and cut setting in the printer driver and on the control panel. Cutting Roll Paper Manually Printing Cutting Guidelines Parent topic: Roll Paper Handling Related topics Using the Auto Take-up Reel, disable ...the auto cut the print manually. Note: If you are using the built-in cutter. 47 Cutting Roll Paper The printer has... types or you can cut your prints on the roll until you manually cut them using the optional Auto Take-up Reel Cutting Roll Paper Manually You can disable the Auto Cut option to help you. To switch...
... and cut setting in the printer driver and on the control panel. Cutting Roll Paper Manually Printing Cutting Guidelines Parent topic: Roll Paper Handling Related topics Using the Auto Take-up Reel, disable ...the auto cut the print manually. Note: If you are using the built-in cutter. 47 Cutting Roll Paper The printer has... types or you can cut your prints on the roll until you manually cut them using the optional Auto Take-up Reel Cutting Roll Paper Manually You can disable the Auto Cut option to help you. To switch...

Users Guide
Page 48
... Backwards until your print is clear of the printer, then cut the paper. With the front cover closed, select on the printer as a guide for manual cutting. 1. You see a confirmation screen. Parent topic: Cutting Roll Paper Printing Cutting Guidelines When you disable the Auto Cut setting, you can print a cutting guideline...
... Backwards until your print is clear of the printer, then cut the paper. With the front cover closed, select on the printer as a guide for manual cutting. 1. You see a confirmation screen. Parent topic: Cutting Roll Paper Printing Cutting Guidelines When you disable the Auto Cut setting, you can print a cutting guideline...

Users Guide
Page 73
Note: The media will not take -up correctly if it is some slack in the media and that it until the media wraps around the core three times. 9. 8. Move the Manual switch on one side than the other. 73 Make sure that there is looser on the take up reel to the Backward position and hold it loads evenly on both sides.
Note: The media will not take -up correctly if it is some slack in the media and that it until the media wraps around the core three times. 9. 8. Move the Manual switch on one side than the other. 73 Make sure that there is looser on the take up reel to the Backward position and hold it loads evenly on both sides.

Users Guide
Page 77
Make sure that it until the media wraps around the core three times. 8. Move the Manual switch on the take up reel to the Forward position and hold it loads evenly on one side than the other. 77 Note: The media will not take -up correctly if it is some slack in the media and that there is looser on both sides. 7.
Make sure that it until the media wraps around the core three times. 8. Move the Manual switch on the take up reel to the Forward position and hold it loads evenly on one side than the other. 77 Note: The media will not take -up correctly if it is some slack in the media and that there is looser on both sides. 7.

Users Guide
Page 80
Cut the media and roll the cut end onto the take -up reel manually. 80 Move the Auto switch on the take -up reel to the Off position. 2. 1.
Cut the media and roll the cut end onto the take -up reel manually. 80 Move the Auto switch on the take -up reel to the Off position. 2. 1.

Users Guide
Page 104
These margins vary by media type and may be available, depending on the Roll Paper Option you selected for your image. Note: Some settings may not be changed from their defaults using custom media settings. • Single Cut: Prints images within the same print job end-to cut your prints manually. • Normal Cut: Creates a margin at the top and bottom of your paper size. Auto Cut options: • Off: Select this option to -end with no gap between them. Borderless images may overlap slightly. 104
These margins vary by media type and may be available, depending on the Roll Paper Option you selected for your image. Note: Some settings may not be changed from their defaults using custom media settings. • Single Cut: Prints images within the same print job end-to cut your prints manually. • Normal Cut: Creates a margin at the top and bottom of your paper size. Auto Cut options: • Off: Select this option to -end with no gap between them. Borderless images may overlap slightly. 104

Users Guide
Page 105
When Auto Rotate is selected, select the width of the paper as a guide for borderless printing. Windows 105 • Double Cut: Increases the space between pages as the Roll Width setting. Parent topic: Selecting Basic Print Settings - Print Page Line Prints lines between each image and trims each print individually, providing the cleanest edge with no image overlap for manual cutting. Auto Rotate Automatically positions the image or file to fit the roll paper.
When Auto Rotate is selected, select the width of the paper as a guide for borderless printing. Windows 105 • Double Cut: Increases the space between pages as the Roll Width setting. Parent topic: Selecting Basic Print Settings - Print Page Line Prints lines between each image and trims each print individually, providing the cleanest edge with no image overlap for manual cutting. Auto Rotate Automatically positions the image or file to fit the roll paper.

Users Guide
Page 124
... on a Mac You can change how often the software checks for updates to exit. Access the Windows Desktop and right-click the icon for updates manually. Select Software Update Settings. You see this feature. 1. Click OK to the product software. Do one of the Windows taskbar, or click the up arrow...
... on a Mac You can change how often the software checks for updates to exit. Access the Windows Desktop and right-click the icon for updates manually. Select Software Update Settings. You see this feature. 1. Click OK to the product software. Do one of the Windows taskbar, or click the up arrow...

Users Guide
Page 134
You see this option to cut your prints manually. • Normal Cut: Creates a margin and the top and bottom of your Paper Size. 9. Select one of the following Auto Cut Settings: • Off: Select this window: Note: Some settings may not be available, depending on the Roll Paper option you selected for your image. 134
You see this option to cut your prints manually. • Normal Cut: Creates a margin and the top and bottom of your Paper Size. 9. Select one of the following Auto Cut Settings: • Off: Select this window: Note: Some settings may not be available, depending on the Roll Paper option you selected for your image. 134

Users Guide
Page 146
.../Cut Paper Prepare for bi-directional printing For each alignment setting, select the following: • Select Auto to automatically align the print head • Select Manual if an error appears during automatic alignment or if you are printing images that require more precise dimensions and length, such as CAD files Select...
.../Cut Paper Prepare for bi-directional printing For each alignment setting, select the following: • Select Auto to automatically align the print head • Select Manual if an error appears during automatic alignment or if you are printing images that require more precise dimensions and length, such as CAD files Select...

Users Guide
Page 149
... Paper Source Settings > Roll Paper Setup > Cut Settings, or select Never Cut to reduce banding on the printer. Description Ejects the loaded cut paper manually Select On to enable paper skew reduction Select the paper core size for the loaded roll paper Select On to correct differences between the left... right sides of offset necessary to cut sheet 149 select Auto to use the roller to Off, the printer may print beyond the edges of Epson paper; not available with custom paper types Caution: If the Paper Size Check setting is set to eject paper; displayed when using a custom...
... Paper Source Settings > Roll Paper Setup > Cut Settings, or select Never Cut to reduce banding on the printer. Description Ejects the loaded cut paper manually Select On to enable paper skew reduction Select the paper core size for the loaded roll paper Select On to correct differences between the left... right sides of offset necessary to cut sheet 149 select Auto to use the roller to Off, the printer may print beyond the edges of Epson paper; not available with custom paper types Caution: If the Paper Size Check setting is set to eject paper; displayed when using a custom...

Users Guide
Page 150
... Accuracy First if you are not satisfied with the results of the automatic alignment Automatic alignment takes 9 to automatically align the print head • Select Manual if an error appears during automatic alignment or if you connect the optional PostScript print server and select a custom paper type 150 Setting Print Adjustments...
... Accuracy First if you are not satisfied with the results of the automatic alignment Automatic alignment takes 9 to automatically align the print head • Select Manual if an error appears during automatic alignment or if you connect the optional PostScript print server and select a custom paper type 150 Setting Print Adjustments...


