User Manual
Page 8
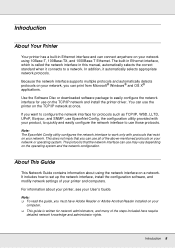
..., and modify network settings of the steps included here require detailed network knowledge and administrator rights. O This guide is called the network interface in this manual, automatically selects the correct standard when it automatically selects appropriate network protocols. Note: O To read the guide, you can print from Microsoft® Windows®...
..., and modify network settings of the steps included here require detailed network knowledge and administrator rights. O This guide is called the network interface in this manual, automatically selects the correct standard when it automatically selects appropriate network protocols. Note: O To read the guide, you can print from Microsoft® Windows®...
User Manual
Page 9
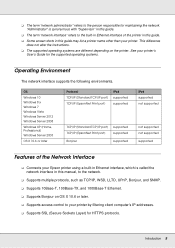
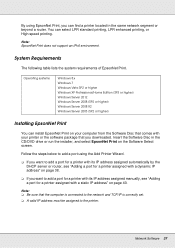
...TCP/IP (EpsonNet Print port) supported supported Bonjour supported IPv6 supported not supported not supported not supported supported Features of the printer in this manual, to the person responsible for HTTPS protocols. O Supports SSL (Secure Sockets Layer) for maintaining the network. This difference does not alter the...your printer's User's Guide for the supported operating systems. Operating Environment The network interface supports the following environments. See your Epson printer using a built-in Ethernet interface, which is synonymous with "Supervisor" in this guide.
...TCP/IP (EpsonNet Print port) supported supported Bonjour supported IPv6 supported not supported not supported not supported supported Features of the printer in this manual, to the person responsible for HTTPS protocols. O Supports SSL (Secure Sockets Layer) for maintaining the network. This difference does not alter the...your printer's User's Guide for the supported operating systems. Operating Environment The network interface supports the following environments. See your Epson printer using a built-in Ethernet interface, which is synonymous with "Supervisor" in this guide.
User Manual
Page 21
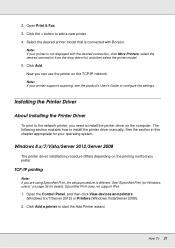
.... See "EpsonNet Print (for Windows users)" on the computer. Note: If your printer supports scanning, see the product's User's Guide to install the printer driver manually. Windows 8.x/7/Vista/Server 2012/Server 2008 The printer driver installation procedure differs depending on the TCP/IP network. Open the Control Panel, and then click...
.... See "EpsonNet Print (for Windows users)" on the computer. Note: If your printer supports scanning, see the product's User's Guide to install the printer driver manually. Windows 8.x/7/Vista/Server 2012/Server 2008 The printer driver installation procedure differs depending on the TCP/IP network. Open the Control Panel, and then click...
User Manual
Page 30
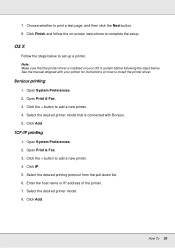
7. See the manual shipped with Bonjour. 5. Click Add. Click the + button to install the printer driver. Click Add. Click the + button to complete the setup. TCP/IP printing 1. ...
7. See the manual shipped with Bonjour. 5. Click Add. Click the + button to install the printer driver. Click Add. Click the + button to complete the setup. TCP/IP printing 1. ...

User Manual
Page 34
... available and assigns an IP address automatically. Network Software 34 O Open your printer. 2. This is not supported, we recommend that you select Manual and then enter an IP address. https://IP address of network interface/ Example: https://192.168.100.201/ Note: ❏ To check the... IP address of configuring the network interface on the Configuration menu, then click IPv4 Address to set the IP address manually, select Manual. When you want to display the TCP/IP IPv4 settings screen. To use EpsonNet Config. Click TCP/IP under Network on a TCP...
... available and assigns an IP address automatically. Network Software 34 O Open your printer. 2. This is not supported, we recommend that you select Manual and then enter an IP address. https://IP address of network interface/ Example: https://192.168.100.201/ Note: ❏ To check the... IP address of configuring the network interface on the Configuration menu, then click IPv4 Address to set the IP address manually, select Manual. When you want to display the TCP/IP IPv4 settings screen. To use EpsonNet Config. Click TCP/IP under Network on a TCP...

User Manual
Page 35
... for Set Using PING. For OS X users: Select Enable or Disable for Acquire Host Name and Domain Name Automatically if you want to specify manually, enter the host name and the domain name in the text boxes. 10. Select Disable when setting an IP address with any unexpected change of... the host name and the domain name using the DHCP server. Select Enable for Use Bonjour. otherwise, select Disable. 7. To assign an IP address manually, enter the IP address, the subnet mask, and the default gateway. If there is reset, you need to restart EpsonNet Config by the DHCP server...
... for Set Using PING. For OS X users: Select Enable or Disable for Acquire Host Name and Domain Name Automatically if you want to specify manually, enter the host name and the domain name in the text boxes. 10. Select Disable when setting an IP address with any unexpected change of... the host name and the domain name using the DHCP server. Select Enable for Use Bonjour. otherwise, select Disable. 7. To assign an IP address manually, enter the IP address, the subnet mask, and the default gateway. If there is reset, you need to restart EpsonNet Config by the DHCP server...
User Manual
Page 37
.... O If you want to the network and TCP/IP is correctly set. O If you want to add a port for a printer with its IP address assigned manually, see "Adding a port for a printer assigned with your printer or the software package that the computer is connected to add a port for a printer with its...
.... O If you want to the network and TCP/IP is correctly set. O If you want to add a port for a printer with its IP address assigned manually, see "Adding a port for a printer assigned with your printer or the software package that the computer is connected to add a port for a printer with its...
User Manual
Page 39
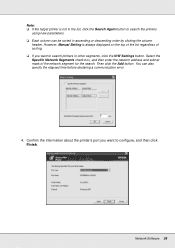
... search the printers using new parameters. ❏ Each column can also specify the elapsed time before declaring a communication error. 4. Then click the Add button. However, Manual Setting is not in ascending or descending order by clicking the column header.
... search the printers using new parameters. ❏ Each column can also specify the elapsed time before declaring a communication error. 4. Then click the Add button. However, Manual Setting is not in ascending or descending order by clicking the column header.
User Manual
Page 40
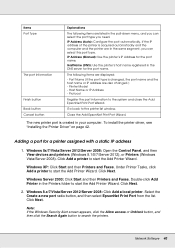
... the Printer Driver" on page 42. Double-click Add Printer in the Printers folder to start the Add Printer Wizard. Network Software 40 IP Address (Manual): Use the printer's IP Address for a printer assigned with a static IP address 1. The following items are in the pull-down menu, and you need. Host...
... the Printer Driver" on page 42. Double-click Add Printer in the Printers folder to start the Add Printer Wizard. Network Software 40 IP Address (Manual): Use the printer's IP Address for a printer assigned with a static IP address 1. The following items are in the pull-down menu, and you need. Host...
User Manual
Page 41
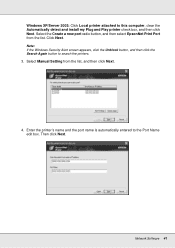
... name is automatically entered to this computer, clear the Automatically detect and install my Plug and Play printer check box, and then click Next. Select Manual Setting from the list. Network Software 41 Windows XP/Server 2003: Click Local printer attached to the Port Name edit box. Select the Create a new...
... name is automatically entered to this computer, clear the Automatically detect and install my Plug and Play printer check box, and then click Next. Select Manual Setting from the list. Network Software 41 Windows XP/Server 2003: Click Local printer attached to the Port Name edit box. Select the Create a new...

User Manual
Page 45
... settings may be wrong. If you assigned the IP address to start EpsonNet Config with. Cause You have assigned an IP address to the computer manually, but you can print a status sheet, as the computer. Troubleshooting 45 Cannot print even if you can print a status sheet, check the network settings; Use...
... settings may be wrong. If you assigned the IP address to start EpsonNet Config with. Cause You have assigned an IP address to the computer manually, but you can print a status sheet, as the computer. Troubleshooting 45 Cannot print even if you can print a status sheet, check the network settings; Use...
User Manual
Page 49
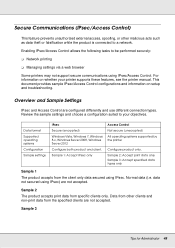
... setup and troubleshooting. Sample 3 Tips for Administrator 49 Enabling IPsec/Access Control allows the following tasks to your printer supports these features, see the printer manual. Sample 1: Accept IPsec only Access Control Not secure (unecrypted) All operating systems supported by the printer Configure product only. Data from other malicious acts such...
... setup and troubleshooting. Sample 3 Tips for Administrator 49 Enabling IPsec/Access Control allows the following tasks to your printer supports these features, see the printer manual. Sample 1: Accept IPsec only Access Control Not secure (unecrypted) All operating systems supported by the printer Configure product only. Data from other malicious acts such...

Users Guide
Page 3
Inside ...12 Product Parts - Contents Epson SureColor F9370 User's Guide ...7 Introduction to Your Printer...8 Notations Used in the Documentation 8 Printer Part Locations...8 Product Parts - Back...13 Control Panel Parts ...14 Consumables and Replacement ... the Amount of Media Remaining 44 Aligning the Print Head...45 Media Feed Adjustment ...46 Adjusting the Media Feed Automatically 47 Adjusting the Media Feed Manually 47 Adjusting the Media Feed During Printing 49 Adjusting Heating and Drying During Printing 49 Cutting Media ...50 Using the Auto Take-up Reel ...52...
Inside ...12 Product Parts - Contents Epson SureColor F9370 User's Guide ...7 Introduction to Your Printer...8 Notations Used in the Documentation 8 Printer Part Locations...8 Product Parts - Back...13 Control Panel Parts ...14 Consumables and Replacement ... the Amount of Media Remaining 44 Aligning the Print Head...45 Media Feed Adjustment ...46 Adjusting the Media Feed Automatically 47 Adjusting the Media Feed Manually 47 Adjusting the Media Feed During Printing 49 Adjusting Heating and Drying During Printing 49 Cutting Media ...50 Using the Auto Take-up Reel ...52...

Users Guide
Page 8
... Part Locations Check the printer part illustrations to Your Printer 8 Back Control Panel Parts Parent topic: Introduction to learn more about your printer and this manual. Product Parts - Notations Used in the Documentation Printer Part Locations Consumables and Replacement Parts Printer Usage Guidelines Notations Used in the Documentation Follow the guidelines...
... Part Locations Check the printer part illustrations to Your Printer 8 Back Control Panel Parts Parent topic: Introduction to learn more about your printer and this manual. Product Parts - Notations Used in the Documentation Printer Part Locations Consumables and Replacement Parts Printer Usage Guidelines Notations Used in the Documentation Follow the guidelines...

Users Guide
Page 9
Product Parts - Top and Right Side Front/Top 1 Maintenance cover (left) 2 After heater 3 Media guide bar 4 Roll core holder handle 5 Roll core holder (auto take-up reel) 6 Roll supports 7 Auto switch 8 Manual switch 9 Heat shield 10 Ink tank 9
Product Parts - Top and Right Side Front/Top 1 Maintenance cover (left) 2 After heater 3 Media guide bar 4 Roll core holder handle 5 Roll core holder (auto take-up reel) 6 Roll supports 7 Auto switch 8 Manual switch 9 Heat shield 10 Ink tank 9

Users Guide
Page 45
... of media you select. Press the down arrow button to select Head Alignment and press the OK button. 3. Press the down arrow button to select Manual and press the OK button. 7. Then press the OK button. 5. Press the OK button to viewing position. Press the OK button to select Print Remaining...
... of media you select. Press the down arrow button to select Head Alignment and press the OK button. 3. Press the down arrow button to select Manual and press the OK button. 7. Then press the OK button. 5. Press the OK button to viewing position. Press the OK button to select Print Remaining...

Users Guide
Page 47
... OK button. 5. Press the down arrow button to select Auto Feed Adjustment. Adjusting the Media Feed Automatically Adjusting the Media Feed Manually Adjusting the Media Feed During Printing Parent topic: Media Handling Adjusting the Media Feed Automatically You can perform an automatic feed adjustment from...you can still see banding after performing an automatic feed adjustment. 1. Press the Menu button. 2. View the results and determine if a manual adjustment is printed. Press the OK button to select Media Setup. 3. Press the OK button to select Feed Adjustment. 47 An adjustment pattern...
... OK button. 5. Press the down arrow button to select Auto Feed Adjustment. Adjusting the Media Feed Automatically Adjusting the Media Feed Manually Adjusting the Media Feed During Printing Parent topic: Media Handling Adjusting the Media Feed Automatically You can perform an automatic feed adjustment from...you can still see banding after performing an automatic feed adjustment. 1. Press the Menu button. 2. View the results and determine if a manual adjustment is printed. Press the OK button to select Media Setup. 3. Press the OK button to select Feed Adjustment. 47 An adjustment pattern...

Users Guide
Page 51
If you are using the auto take up reel, move the Auto switch to the position for printable-side-out media. 51 4. Use the Manual switch to take -up the cut the media along the cutter groove. 5. Use your cutting tool to cut media, depending on the printable side of the media: • Move the switch to the off position.
If you are using the auto take up reel, move the Auto switch to the position for printable-side-out media. 51 4. Use the Manual switch to take -up the cut the media along the cutter groove. 5. Use your cutting tool to cut media, depending on the printable side of the media: • Move the switch to the off position.

Users Guide
Page 63
3. Confirm that the Auto switch on the auto take-up reel is set to the off position, then push and hold the Manual switch up to the position to wind the media around the roll core. 63
3. Confirm that the Auto switch on the auto take-up reel is set to the off position, then push and hold the Manual switch up to the position to wind the media around the roll core. 63

Users Guide
Page 69
Confirm that the Auto switch is set to the off position, then push and hold the Manual switch down to the position to wind the media around the roll core. 69 3.
Confirm that the Auto switch is set to the off position, then push and hold the Manual switch down to the position to wind the media around the roll core. 69 3.


