
User's Guide
Page 2
... the U.S.) failure to this Epson product. Neither Seiko Epson Corporation nor its affiliates shall be trademarks of Seiko Epson Corporation. General Notice: Other product names used herein are service marks of this product or unauthorized modifications, repairs, or alterations to strictly comply with Seiko Epson Corporation's operating and maintenance instructions. PowerLite and PrivateLine are registered trademarks...
... the U.S.) failure to this Epson product. Neither Seiko Epson Corporation nor its affiliates shall be trademarks of Seiko Epson Corporation. General Notice: Other product names used herein are service marks of this product or unauthorized modifications, repairs, or alterations to strictly comply with Seiko Epson Corporation's operating and maintenance instructions. PowerLite and PrivateLine are registered trademarks...
User's Guide
Page 3
Contents Introduction Projector Parts Remote Control Optional Accessories Registration and Warranty Using This Manual Setting Up the Projector Choosing a Location Installing the Projector Connecting the Cables Connecting Video and Computer Equipment Making Other Connections Installing Batteries in ...
Contents Introduction Projector Parts Remote Control Optional Accessories Registration and Warranty Using This Manual Setting Up the Projector Choosing a Location Installing the Projector Connecting the Cables Connecting Video and Computer Equipment Making Other Connections Installing Batteries in ...
User's Guide
Page 4
Making Detailed Adjustments 33 Using the Menu System 33 Changing How the Menus Display 35 Adjusting the Picture Quality 35 Input Brightness Settings 35 Sharpness and Picture Quality Settings 37 ...
Making Detailed Adjustments 33 Using the Menu System 33 Changing How the Menus Display 35 Adjusting the Picture Quality 35 Input Brightness Settings 35 Sharpness and Picture Quality Settings 37 ...
User's Guide
Page 6
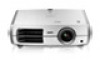
...Epson C2Fine® 3LCD technology for reliable picture quality, increased contrast ratio and uniform colors ■ 1080Perfect™ video processing (using HQV® Reon-VX technology for the Home Cinema 8700 UB) for more film-like images free of noise or artifacts ■ 10-bit color quality (digital only for the Home Cinema 8350... different lighting environments, and a vast array of your own home. Introduction The PowerLite® Home Cinema 8350/8700 UB projector lets you enjoy theater-quality images in optical Cinema Filter blocks out excess light for an expanded, purer color range...
...Epson C2Fine® 3LCD technology for reliable picture quality, increased contrast ratio and uniform colors ■ 1080Perfect™ video processing (using HQV® Reon-VX technology for the Home Cinema 8700 UB) for more film-like images free of noise or artifacts ■ 10-bit color quality (digital only for the Home Cinema 8350... different lighting environments, and a vast array of your own home. Introduction The PowerLite® Home Cinema 8350/8700 UB projector lets you enjoy theater-quality images in optical Cinema Filter blocks out excess light for an expanded, purer color range...

User's Guide
Page 11
...: Contains important information about your projector. Need additional help , you need more help ? Use this site to Epson support. If you need to use the Epson PrivateLine® Support service. Using This Manual This book contains all the information you can use the projector, in addition to avoid bodily injury. Please follow these guidelines as you...
...: Contains important information about your projector. Need additional help , you need more help ? Use this site to Epson support. If you need to use the Epson PrivateLine® Support service. Using This Manual This book contains all the information you can use the projector, in addition to avoid bodily injury. Please follow these guidelines as you...
User's Guide
Page 13
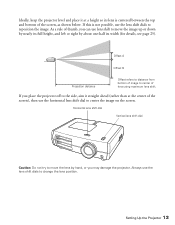
... Caution: Do not try to move the image up or down by nearly its full height, and left or right by hand, or you can use the horizontal lens shift dial to change the lens position. If this is centered between the top and bottom of the screen, as shown below.... Always use the lens shift dials to center of thumb, you may damage the projector. Ideally, keep the projector level and place it straight ahead (rather than...
... Caution: Do not try to move the image up or down by nearly its full height, and left or right by hand, or you can use the horizontal lens shift dial to change the lens position. If this is centered between the top and bottom of the screen, as shown below.... Always use the lens shift dials to center of thumb, you may damage the projector. Ideally, keep the projector level and place it straight ahead (rather than...
User's Guide
Page 14
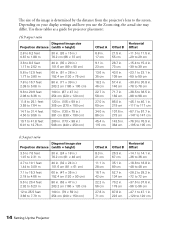
The size of the image is determined by the distance from the projector's lens to 120 cm 14 Setting Up the Projector Use these tables as a guide for projector placement: 16:9 aspect ratio Diagonal image size Projection distance (width × height) 2.8 to 6.2 feet 0.87 to 1.88 m 30 in. (... cm -37.6 to 37.6 in. -96 to 96 cm -47.1 to 47.1 in. -120 to the screen. Depending on your display settings and how you use the Zoom ring, the actual size may differ.
The size of the image is determined by the distance from the projector's lens to 120 cm 14 Setting Up the Projector Use these tables as a guide for projector placement: 16:9 aspect ratio Diagonal image size Projection distance (width × height) 2.8 to 6.2 feet 0.87 to 1.88 m 30 in. (... cm -37.6 to 37.6 in. -96 to 96 cm -47.1 to 47.1 in. -120 to the screen. Depending on your display settings and how you use the Zoom ring, the actual size may differ.
User's Guide
Page 15
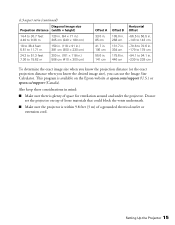
... (3 m) of space for ventilation around and under the projector. Setting Up the Projector 15 Do not set the projector on the Epson website at epson.com/support (U.S.) or epson.ca/support (Canada). Also keep these considerations in . -239 to 239 cm To determine the exact image size when you know... the projection distance (or the exact projection distance when you know the desired image size), you can use the Image Size Calculator....
... (3 m) of space for ventilation around and under the projector. Setting Up the Projector 15 Do not set the projector on the Epson website at epson.com/support (U.S.) or epson.ca/support (Canada). Also keep these considerations in . -239 to 239 cm To determine the exact image size when you know... the projection distance (or the exact projection distance when you know the desired image size), you can use the Image Size Calculator....

User's Guide
Page 16
...for ordering information. See page 10 for the projector. WARNING: When installing or adjusting the ceiling mount, do not use adhesives to prevent the screws from loosening and do not use an AV controller with the mount to install the projector. Press the Menu button on page 14 as a guide ... to the projector. Follow these steps: 1. In addition, the projector's Trigger out port can rotate the Epson logo plate 180 degrees when suspending the projector from a ceiling, you can be used to the table of ESC/VP21 command codes on the size of oil or lubricant. To suspend the projector...
...for ordering information. See page 10 for the projector. WARNING: When installing or adjusting the ceiling mount, do not use adhesives to prevent the screws from loosening and do not use an AV controller with the mount to install the projector. Press the Menu button on page 14 as a guide ... to the projector. Follow these steps: 1. In addition, the projector's Trigger out port can rotate the Epson logo plate 180 degrees when suspending the projector from a ceiling, you can be used to the table of ESC/VP21 command codes on the size of oil or lubricant. To suspend the projector...
User's Guide
Page 18
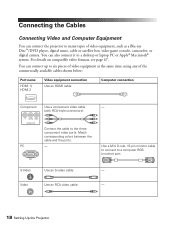
... D-sub, 15-pin monitor cable to connect to a desktop or laptop PC or Apple® Macintosh® system. Video Use an RCA video cable: - 18 Setting Up the Projector Connecting the Cables Connecting Video and Computer Equipment You can connect up to six pieces of ...video equipment at the same time, using any of video equipment, such as a Blu-ray Disc™/DVD player, digital tuner, cable or satellite box, video game console, camcorder, or digital camera...
... D-sub, 15-pin monitor cable to connect to a desktop or laptop PC or Apple® Macintosh® system. Video Use an RCA video cable: - 18 Setting Up the Projector Connecting the Cables Connecting Video and Computer Equipment You can connect up to six pieces of ...video equipment at the same time, using any of video equipment, such as a Blu-ray Disc™/DVD player, digital tuner, cable or satellite box, video game console, camcorder, or digital camera...
User's Guide
Page 19
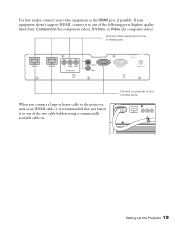
Connect video equipment to one of these ports Setting Up the Projector 19 If your video equipment to one of these ports When you connect a large or heavy cable to the projector, such as an HDMI cable, it is recommended that you fasten it to one of the two cable holders using a commercially available cable tie. Connect a computer to the HDMI port, if possible. For best results, connect your equipment doesn't support HDMI, connect it to one of the following ports (highest quality listed first): Component (for component video), S-Video, or Video (for composite video).
Connect video equipment to one of these ports Setting Up the Projector 19 If your video equipment to one of these ports When you connect a large or heavy cable to the projector, such as an HDMI cable, it is recommended that you fasten it to one of the two cable holders using a commercially available cable tie. Connect a computer to the HDMI port, if possible. For best results, connect your equipment doesn't support HDMI, connect it to one of the following ports (highest quality listed first): Component (for component video), S-Video, or Video (for composite video).
User's Guide
Page 20
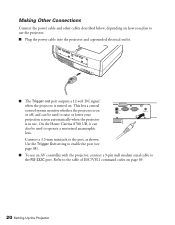
... screen automatically when the projector is turned on. This lets a central control system monitor whether the projector is on or off, and can also be used to use the projector. ■ Plug the power cable into the projector and a grounded electrical outlet. ■ The Trigger out port outputs a 12-volt DC.... Making Other Connections Connect the power cable and other cables described below, depending on how you plan to operate a motorized anamorphic lens. On the Home Cinema 8700 UB, it can be used to the table of ESC/VP21 command codes on page 69. 20 Setting Up the Projector
... screen automatically when the projector is turned on. This lets a central control system monitor whether the projector is on or off, and can also be used to use the projector. ■ Plug the power cable into the projector and a grounded electrical outlet. ■ The Trigger out port outputs a 12-volt DC.... Making Other Connections Connect the power cable and other cables described below, depending on how you plan to operate a motorized anamorphic lens. On the Home Cinema 8700 UB, it can be used to the table of ESC/VP21 command codes on page 69. 20 Setting Up the Projector
User's Guide
Page 21
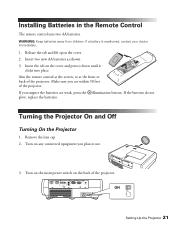
Turn on any connected equipment you are weak, press the illumination button. Make sure you plan to use. 3. Turning the Projector On and Off Turning On the Projector 1. Remove the lens cap. 2. Insert two new AA batteries as shown. 3. If you suspect the ... cover and press it down until it clicks into place. ON Setting Up the Projector 21 Installing Batteries in the Remote Control The remote control uses two AA batteries. WARNING: Keep batteries away from children. If a battery is swallowed, contact your doctor immediately. 1. Release the tab and lift open the cover...
Turn on any connected equipment you are weak, press the illumination button. Make sure you plan to use. 3. Turning the Projector On and Off Turning On the Projector 1. Remove the lens cap. 2. Insert two new AA batteries as shown. 3. If you suspect the ... cover and press it down until it clicks into place. ON Setting Up the Projector 21 Installing Batteries in the Remote Control The remote control uses two AA batteries. WARNING: Keep batteries away from children. If a battery is swallowed, contact your doctor immediately. 1. Release the tab and lift open the cover...
User's Guide
Page 22
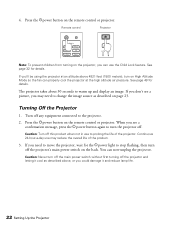
... above , or you may reduce the overall life of the projector. Turn off the projector's main power switch on page 23. Continuous 24-hour-a-day use to turn on High Altitude Mode so the fan can now unplug the projector. Turning Off the Projector 1. Caution: Turn off . If you see a picture... the projector, you need to change the image source as described above 4921 feet (1500 meters), turn the projector off this product when not in use may need to stop flashing, then turn off the main power switch without first turning off the projector and letting it and reduce lamp life...
... above , or you may reduce the overall life of the projector. Turn off the projector's main power switch on page 23. Continuous 24-hour-a-day use to turn on High Altitude Mode so the fan can now unplug the projector. Turning Off the Projector 1. Caution: Turn off . If you see a picture... the projector, you need to change the image source as described above 4921 feet (1500 meters), turn the projector off this product when not in use may need to stop flashing, then turn off the main power switch without first turning off the projector and letting it and reduce lamp life...

User's Guide
Page 24
.... If one side of the image is taller than the other, make sure the projector is parallel to turn off the test pattern. Always use the horizontal and vertical lens shift dials to change the lens position. When you may damage the projector. Horizontal lens shift dial Vertical lens shift...you hear a click, the lens position is almost centered. Press the Esc button to move the lens by pressing the Pattern button on the screen, use the lens shift dials to adjust its position. Positioning the Image If the image is not centered on the remote control. Adjustable feet 24 Setting...
.... If one side of the image is taller than the other, make sure the projector is parallel to turn off the test pattern. Always use the horizontal and vertical lens shift dials to change the lens position. When you may damage the projector. Horizontal lens shift dial Vertical lens shift...you hear a click, the lens position is almost centered. Press the Esc button to move the lens by pressing the Pattern button on the screen, use the lens shift dials to adjust its position. Positioning the Image If the image is not centered on the remote control. Adjustable feet 24 Setting...

User's Guide
Page 26
Use the zoom ring to sharpen the image. Zoom ring Focus ring 26 Making Basic Adjustments Focusing and Zooming Use the focus ring to reduce or enlarge the image. Making Basic Adjustments Follow the instructions in this chapter to make basic adjustments to the image shape, size, color, and quality. For further refinements, see "Making Detailed Adjustments" on page 33.
Use the zoom ring to sharpen the image. Zoom ring Focus ring 26 Making Basic Adjustments Focusing and Zooming Use the focus ring to reduce or enlarge the image. Making Basic Adjustments Follow the instructions in this chapter to make basic adjustments to the image shape, size, color, and quality. For further refinements, see "Making Detailed Adjustments" on page 33.
User's Guide
Page 27
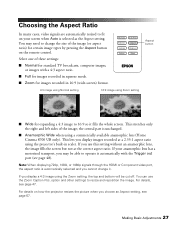
... button ■ Wide for expanding a 4:3 image to 16:9 so it . If your screen when Auto is unchanged. ■ Anamorphic Wide when using the Zoom setting, the top and bottom will be able to operate it automatically with a 4:3 aspect ratio. ■ Full for images recorded in ..., or 1080p signals through the HDMI or Component video port, the aspect ratio is automatically selected and you display a 4:3 image using a commercially available anamorphic lens (Home Cinema 8700 UB only). If you cannot change the size of the image (or aspect ratio) for certain image types by pressing the...
... button ■ Wide for expanding a 4:3 image to 16:9 so it . If your screen when Auto is unchanged. ■ Anamorphic Wide when using the Zoom setting, the top and bottom will be able to operate it automatically with a 4:3 aspect ratio. ■ Full for images recorded in ..., or 1080p signals through the HDMI or Component video port, the aspect ratio is automatically selected and you display a 4:3 image using a commercially available anamorphic lens (Home Cinema 8700 UB only). If you cannot change the size of the image (or aspect ratio) for certain image types by pressing the...
User's Guide
Page 28
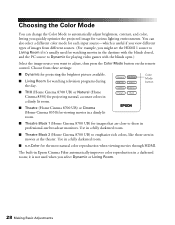
...if it's usually used when you select Dynamic or Living Room. 28 Making Basic Adjustments Color Mode button ■ THX (Home Cinema 8700 UB) or Natural (Home Cinema 8350) for projecting natural, accurate colors in a dimly lit room. ■ Theatre (Home Cinema 8700 UB) or Cinema (Home Cinema 8350) for viewing ... Use in a fully darkened room. ■ Theatre Black 2 (Home Cinema 8700 UB) to those seen in movies at the theater. Use in a darkened room; it is useful if you quickly optimize the projected image for various lighting environments. The built-in Epson Cinema Filter...
...if it's usually used when you select Dynamic or Living Room. 28 Making Basic Adjustments Color Mode button ■ THX (Home Cinema 8700 UB) or Natural (Home Cinema 8350) for projecting natural, accurate colors in a dimly lit room. ■ Theatre (Home Cinema 8700 UB) or Cinema (Home Cinema 8350) for viewing ... Use in a fully darkened room. ■ Theatre Black 2 (Home Cinema 8700 UB) to those seen in movies at the theater. Use in a darkened room; it is useful if you quickly optimize the projected image for various lighting environments. The built-in Epson Cinema Filter...

User's Guide
Page 29
...). Making Basic Adjustments 29 Advanced Color Adjustments To further customize the color and image quality, you can adjust the gamma and individual RGBCMY color tones using the RGBCMY and Gamma buttons on a particular menu screen, you have selected on the remote control. (Not available when x.v.Color is selected as the Color...
...). Making Basic Adjustments 29 Advanced Color Adjustments To further customize the color and image quality, you can adjust the gamma and individual RGBCMY color tones using the RGBCMY and Gamma buttons on a particular menu screen, you have selected on the remote control. (Not available when x.v.Color is selected as the Color...

User's Guide
Page 30
...signal level. You see a gamma icon on the graph that you want to adjust, and then use the l or r button to select the point on the projected image. When the gamma graph appears, use the u or d button to adjust the settings. You see the setting reflected in bright areas..... Then continue with the channel selected for adjustment. Press Enter to save your image or a displayed graph. Adjusting the Gamma Setting You can be used when the Color Mode is set to x.v.Color (see page 28). 1. Changing these settings affects contrast which can select from five gamma settings (2.0 ...
...signal level. You see a gamma icon on the graph that you want to adjust, and then use the l or r button to select the point on the projected image. When the gamma graph appears, use the u or d button to adjust the settings. You see the setting reflected in bright areas..... Then continue with the channel selected for adjustment. Press Enter to save your image or a displayed graph. Adjusting the Gamma Setting You can be used when the Color Mode is set to x.v.Color (see page 28). 1. Changing these settings affects contrast which can select from five gamma settings (2.0 ...

