
Product Information Guide
Page 5
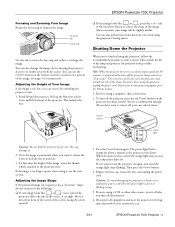
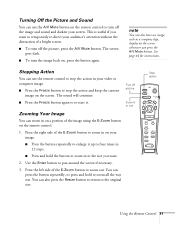
...for instructions. You can also change the image size by the lens; You see the next section. Adjusting the Height of the screen, at an angle. This conserves electricity, cools the projector, and extends the life of the projector. Then press the Power button. 4. EPSON PowerLite 703c Projector...button to correct the shape of the image, rotate the thumb wheels attached to turn it off to zoom in a protective case. 2/01 EPSON PowerLite 703c Projector - 5 Once the image is green or flashing orange. 5. Note: When the projector has not received any other video source, ...
...for instructions. You can also change the image size by the lens; You see the next section. Adjusting the Height of the screen, at an angle. This conserves electricity, cools the projector, and extends the life of the projector. Then press the Power button. 4. EPSON PowerLite 703c Projector...button to correct the shape of the image, rotate the thumb wheels attached to turn it off to zoom in a protective case. 2/01 EPSON PowerLite 703c Projector - 5 Once the image is green or flashing orange. 5. Note: When the projector has not received any other video source, ...
Product Information Guide
Page 6
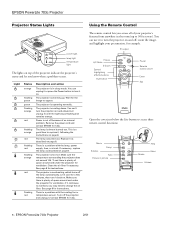
...does not exceed 104 °F and there is a good time to change the air filter. Let it , following the instructions on page 8. If it continues to overheat, you may need to replace it cool for help . Turn off the lamp...status and let you access all of space around and under the projector for instructions. EPSON PowerLite 703c Projector Projector Status Lights power light lamp light temperature light The lights on . See page 8 for ventilation. Wait...(up . Using the Remote Control The remote control lets you know when a problem occurs. EPSON PowerLite 703c Projector 2/01
...does not exceed 104 °F and there is a good time to change the air filter. Let it , following the instructions on page 8. If it continues to overheat, you may need to replace it cool for help . Turn off the lamp...status and let you access all of space around and under the projector for instructions. EPSON PowerLite 703c Projector Projector Status Lights power light lamp light temperature light The lights on . See page 8 for ventilation. Wait...(up . Using the Remote Control The remote control lets you know when a problem occurs. EPSON PowerLite 703c Projector 2/01

User Manual
Page 2
...bags. and PrivateLine, Presenters Club, and PowerLite are registered trademarks of Epson America, Inc. EPSON disclaims any and all servicing to qualified service personnel. Except as specifically explained in those designated as Original EPSON Products or EPSON Approved Products by purchaser or third parties ...the bright light can severely injure you replace the lamp, never touch the new lamp with SEIKO EPSON CORPORATION's operating and maintenance instructions. EPSON is turned on the projector, except the lamp and filter covers. Important Safety Information WARNING: Never...
...bags. and PrivateLine, Presenters Club, and PowerLite are registered trademarks of Epson America, Inc. EPSON disclaims any and all servicing to qualified service personnel. Except as specifically explained in those designated as Original EPSON Products or EPSON Approved Products by purchaser or third parties ...the bright light can severely injure you replace the lamp, never touch the new lamp with SEIKO EPSON CORPORATION's operating and maintenance instructions. EPSON is turned on the projector, except the lamp and filter covers. Important Safety Information WARNING: Never...
User Manual
Page 6
... the Computer Cable 77 Connecting the Mouse Cable 78 Connecting the Audio Cable 79 Connecting to a High-End Workstation 79 Appendix B: Notices 81 Important Safety Instructions 81 Remote Control Information 83 Declaration of Conformity 84 FCC Compliance Statement 85 Appendix C: Technical Specifications 87 General 87 Projection Lamp 88 Remote Control 88...
... the Computer Cable 77 Connecting the Mouse Cable 78 Connecting the Audio Cable 79 Connecting to a High-End Workstation 79 Appendix B: Notices 81 Important Safety Instructions 81 Remote Control Information 83 Declaration of Conformity 84 FCC Compliance Statement 85 Appendix C: Technical Specifications 87 General 87 Projection Lamp 88 Remote Control 88...
User Manual
Page 8
... and easily switch between them. This lets you want to connect to a PC laptop or Macintosh PowerBook, see page 14 (for laptops) or Appendix A (for instructions. Getting the Most from Your Projector Depending on your presentation, you can take advantage of these options: s Connecting to a laptop or other computer If you...
... and easily switch between them. This lets you want to connect to a PC laptop or Macintosh PowerBook, see page 14 (for laptops) or Appendix A (for instructions. Getting the Most from Your Projector Depending on your presentation, you can take advantage of these options: s Connecting to a laptop or other computer If you...
User Manual
Page 10
...epson.com Download FAQs and e-mail your questions to use on giving presentations? Even more information, see your Acrobat Reader online guide. s Built-in help : s www.presentersonline.com Includes a library of this User's Guide in the envelope and keep the envelope with your projector at all the instructions.... s Owner's Kit envelope Includes your Quick Setup sheet, warranty brochures, CD-ROMs, and EPSON PrivateLine® Support card. s CD-ROM The PowerLite 703c CD-ROM lets you register electronically and includes the electronic copy of articles covering presentation tips, ...
...epson.com Download FAQs and e-mail your questions to use on giving presentations? Even more information, see your Acrobat Reader online guide. s Built-in help : s www.presentersonline.com Includes a library of this User's Guide in the envelope and keep the envelope with your projector at all the instructions.... s Owner's Kit envelope Includes your Quick Setup sheet, warranty brochures, CD-ROMs, and EPSON PrivateLine® Support card. s CD-ROM The PowerLite 703c CD-ROM lets you register electronically and includes the electronic copy of articles covering presentation tips, ...
User Manual
Page 15
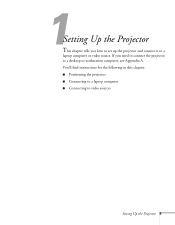
If you how to set up the projector and connect it to a laptop computer or video source. You'll find instructions for the following in this chapter: s Positioning the projector s Connecting to a laptop computer s Connecting to a desktop or workstation computer, see Appendix A. 1Setting Up the Projector This chapter tells you need to connect the projector to video sources Setting Up the Projector 9
If you how to set up the projector and connect it to a laptop computer or video source. You'll find instructions for the following in this chapter: s Positioning the projector s Connecting to a laptop computer s Connecting to a desktop or workstation computer, see Appendix A. 1Setting Up the Projector This chapter tells you need to connect the projector to video sources Setting Up the Projector 9
User Manual
Page 18
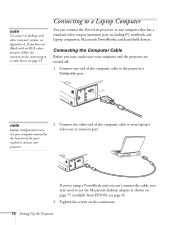
.... 2. Connecting to a Laptop Computer You can 't connect the cable, you have an iBook with an RCA videoout port, follow the instructions for the location of the ports needed to connect your computer manual for connecting to a video device on page 15. Connect one end of..., Macintosh PowerBooks, and hand-held devices. If you're using a PowerBook and you can connect the PowerLite projector to the projector's Computer port. Tighten the screws on page 77 (available from EPSON; Connect the other computer systems, see page 8). 3. note To connect to desktops and other end of...
.... 2. Connecting to a Laptop Computer You can 't connect the cable, you have an iBook with an RCA videoout port, follow the instructions for the location of the ports needed to connect your computer manual for connecting to a video device on page 15. Connect one end of..., Macintosh PowerBooks, and hand-held devices. If you're using a PowerBook and you can connect the PowerLite projector to the projector's Computer port. Tighten the screws on page 77 (available from EPSON; Connect the other computer systems, see page 8). 3. note To connect to desktops and other end of...

User Manual
Page 19
... to make any other end of the appropriate mouse cable to the projector's Mouse/Com port, as PowerPoint, from up to 30 feet away (for instructions. This gives you more flexibility in your projector and turn it on whether your projector dealer to obtain the correct cable.
... to make any other end of the appropriate mouse cable to the projector's Mouse/Com port, as PowerPoint, from up to 30 feet away (for instructions. This gives you more flexibility in your projector and turn it on whether your projector dealer to obtain the correct cable.
User Manual
Page 20
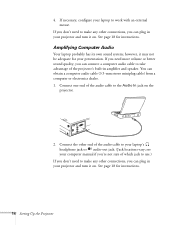
.... (Jack locations vary; You can plug in your projector and turn it on . See page 18 for instructions. Connect one end of the projector's built-in amplifier and speaker. See page 18 for instructions. 14 Setting Up the Projector If you can connect a computer audio cable to take advantage of the audio...
.... (Jack locations vary; You can plug in your projector and turn it on . See page 18 for instructions. Connect one end of the projector's built-in amplifier and speaker. See page 18 for instructions. 14 Setting Up the Projector If you can connect a computer audio cable to take advantage of the audio...
User Manual
Page 21
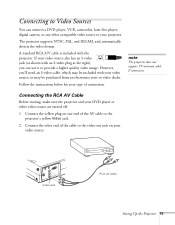
... included with an S-video plug at the right), you 'll need an S-video cable, which may be included with your type of connection. Follow the instructions below for your video source, or may be purchased from an electronics store or video dealer. Video jack RCA AV cable Setting Up the Projector...
... included with an S-video plug at the right), you 'll need an S-video cable, which may be included with your type of connection. Follow the instructions below for your video source, or may be purchased from an electronics store or video dealer. Video jack RCA AV cable Setting Up the Projector...
User Manual
Page 23
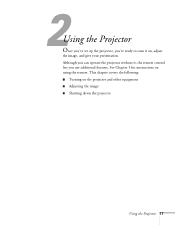
This chapter covers the following: s Turning on using the remote. See Chapter 3 for instructions on the projector and other equipment s Adjusting the image s Shutting down the projector Using the Projector 17 Although you use additional features. 2Using the Projector Once you've set up the projector, you're ready to turn it , the remote control lets you can operate the projector without it on, adjust the image, and give your presentation.
This chapter covers the following: s Turning on using the remote. See Chapter 3 for instructions on the projector and other equipment s Adjusting the image s Shutting down the projector Using the Projector 17 Although you use additional features. 2Using the Projector Once you've set up the projector, you're ready to turn it , the remote control lets you can operate the projector without it on, adjust the image, and give your presentation.
User Manual
Page 26
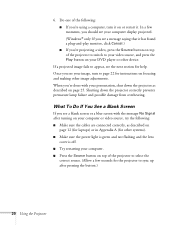
... : s Make sure the cables are connected correctly, as described on focusing and making other systems). s Try restarting your image, turn it . In a few seconds for instructions on page 25. When you see the next section for other image adjustments. s Press the Source button on or restart it on top of the...
... : s Make sure the cables are connected correctly, as described on focusing and making other systems). s Try restarting your image, turn it . In a few seconds for instructions on page 25. When you see the next section for other image adjustments. s Press the Source button on or restart it on top of the...
User Manual
Page 29
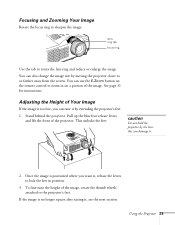
... can use the E-Zoom button on the remote control to zoom in position. 3. You can raise it , see the next section. See page 31 for instructions. caution Do not hold the projector by moving the projector closer to the projector's feet. Using the Projector 23 Once the image is no longer...
... can use the E-Zoom button on the remote control to zoom in position. 3. You can raise it , see the next section. See page 31 for instructions. caution Do not hold the projector by moving the projector closer to the projector's feet. Using the Projector 23 Once the image is no longer...

User Manual
Page 35
... with your thumb-or grasp it between your thumb and finger and tilt it in P - Press the edge of the projector. s Press the button for instructions. s To access additional buttons, pull down the cover below the Esc button, as shown below: 1 5 Enter Esc Menu Help Comp EasyMP S-Video Video Auto Resize...
... with your thumb-or grasp it between your thumb and finger and tilt it in P - Press the edge of the projector. s Press the button for instructions. s To access additional buttons, pull down the cover below the Esc button, as shown below: 1 5 Enter Esc Menu Help Comp EasyMP S-Video Video Auto Resize...
User Manual
Page 37
... will continue. Press the right side of the E-Zoom button to zoom in your screen. Volume + Using the Remote Control 31 See page 44 for instructions. Turn off picture Zoom in or out Zooming Your Image You can zoom in to zoom out. Press the left side of a bright screen. Turning...
... will continue. Press the right side of the E-Zoom button to zoom in your screen. Volume + Using the Remote Control 31 See page 44 for instructions. Turn off picture Zoom in or out Zooming Your Image You can zoom in to zoom out. Press the left side of a bright screen. Turning...
User Manual
Page 39
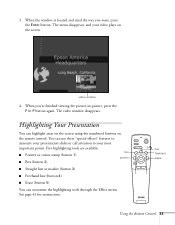
... use these "special effects" features to annotate your presentation slides or call attention to your video plays on the remote control. See page 43 for instructions. The menu disappears, and your most important points. When you want, press the Enter button. Five highlighting tools are available: s Pointer or cursor stamp (button...
... use these "special effects" features to annotate your presentation slides or call attention to your video plays on the remote control. See page 43 for instructions. The menu disappears, and your most important points. When you want, press the Enter button. Five highlighting tools are available: s Pointer or cursor stamp (button...
User Manual
Page 53
... to the projector. s A/V Mute Selects the screen color or image to display when the projector is not receiving a signal. See page 44 for instructions on transferring an image to use for the A/V Mute display. s Prompt Turns off when the projector has not received any input signals for... instructions on transferring an image to a video source. Fine-tuning the Projector 47 s Power Mgmt Sys Enables or disables the power management system, which ...
... to the projector. s A/V Mute Selects the screen color or image to display when the projector is not receiving a signal. See page 44 for instructions on transferring an image to use for the A/V Mute display. s Prompt Turns off when the projector has not received any input signals for... instructions on transferring an image to a video source. Fine-tuning the Projector 47 s Power Mgmt Sys Enables or disables the power management system, which ...
User Manual
Page 67
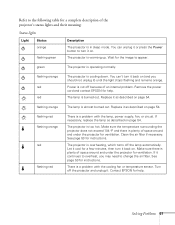
...Light Status orange flashing green Description The projector is overheating, which turns off because of an internal problem. Refer to the following table for instructions. The projector is too hot. flashing orange The lamp is cooling down. The projector is in sleep mode. You can unplug it ...or press the Power button to change the air filter. Remove the power cord and contact EPSON for help . If it . Contact EPSON for help . flashing orange red red The projector is almost burned out. Let it on . There is a problem with...
...Light Status orange flashing green Description The projector is overheating, which turns off because of an internal problem. Refer to the following table for instructions. The projector is too hot. flashing orange The lamp is cooling down. The projector is in sleep mode. You can unplug it ...or press the Power button to change the air filter. Remove the power cord and contact EPSON for help . If it . Contact EPSON for help . flashing orange red red The projector is almost burned out. Let it on . There is a problem with...
User Manual
Page 79
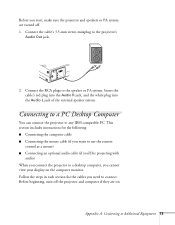
.... Insert the cable's red plug into the Audio R jack, and the white plug into the Audio L jack of the external speaker system. This section includes instructions for the cables you need to a desktop computer, you cannot view your display on . Before beginning, turn off . 1. Connect the RCA plugs to the projector...
.... Insert the cable's red plug into the Audio R jack, and the white plug into the Audio L jack of the external speaker system. This section includes instructions for the cables you need to a desktop computer, you cannot view your display on . Before beginning, turn off . 1. Connect the RCA plugs to the projector...

