
Users Guide
Page 2
Welcome to the BT-300 These smart glasses allow you to enjoy viewing images and use apps anywhere and anytime you to create your own world using AR (Augmented Reality) which overlays images on your actual surroundings. 2 The see-through lenses allow you like.
Welcome to the BT-300 These smart glasses allow you to enjoy viewing images and use apps anywhere and anytime you to create your own world using AR (Augmented Reality) which overlays images on your actual surroundings. 2 The see-through lenses allow you like.

Users Guide
Page 3
... page 38 (this guide) Sync with images on a smartphone ➡"Viewing Images on Other Devices (Miracast)" on page 44 (this guide) Having Fun with Apps You can download apps and use them with your product. Games Business Entertainment Life Style ➡"Downloading...
... page 38 (this guide) Sync with images on a smartphone ➡"Viewing Images on Other Devices (Miracast)" on page 44 (this guide) Having Fun with Apps You can download apps and use them with your product. Games Business Entertainment Life Style ➡"Downloading...
Users Guide
Page 4
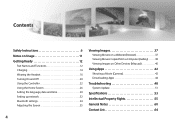
... 35 Viewing Images 37 Viewing Movies on a Website (Browser 37 Viewing Movies Copied from a Computer (Gallery 38 Viewing Images on Other Devices (Miracast 40 Using Apps 42 Shooting a Movie (Camera 42 Downloading Apps 44 Troubleshooting 48 System Update 51 Specifications 53 Intellectual Property Rights 55 General Notes 60 Contact List 64 4
... 35 Viewing Images 37 Viewing Movies on a Website (Browser 37 Viewing Movies Copied from a Computer (Gallery 38 Viewing Images on Other Devices (Miracast 40 Using Apps 42 Shooting a Movie (Camera 42 Downloading Apps 44 Troubleshooting 48 System Update 51 Specifications 53 Intellectual Property Rights 55 General Notes 60 Contact List 64 4
Users Guide
Page 12
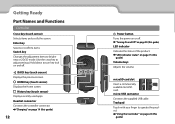
... cable. Getting Ready Part Names and Functions Controller Cross-key (touch sensor) Selects items and scrolls the screen. History key (touch sensor) Displays recently used apps. HOME key (touch sensor) Displays the Home screen.
... cable. Getting Ready Part Names and Functions Controller Cross-key (touch sensor) Selects items and scrolls the screen. History key (touch sensor) Displays recently used apps. HOME key (touch sensor) Displays the Home screen.

Users Guide
Page 23
Getting Ready 23 01_Chapter title 0˙1■E_nHterekaeyd A 02_S_eleleadcts or confirms items or launches the app.
Getting Ready 23 01_Chapter title 0˙1■E_nHterekaeyd A 02_S_eleleadcts or confirms items or launches the app.

Users Guide
Page 24
Getting Ready 24 Drag performs actions such as launching apps and selecting items. ˙■Drag Touch the track pad for about one second to select the icon or displayed item, and then drag your ...
Getting Ready 24 Drag performs actions such as launching apps and selecting items. ˙■Drag Touch the track pad for about one second to select the icon or displayed item, and then drag your ...
Users Guide
Page 26
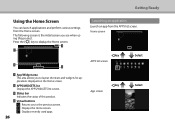
... this product. C Status bar Indicates the status of this product. 01_Chapter title 0U1si_nHgetahdeAHome Screen 0Y2o_u_cleaandlaunch applications and perform various settings from the APPS list screen. B APPS/WIDGETS list Displays the APPS/WIDGETS list screen. The following screen is the initial screen you to the previous screen. : Displays the Home screen. : Displays recently used...
... this product. C Status bar Indicates the status of this product. 01_Chapter title 0U1si_nHgetahdeAHome Screen 0Y2o_u_cleaandlaunch applications and perform various settings from the APPS list screen. B APPS/WIDGETS list Displays the APPS/WIDGETS list screen. The following screen is the initial screen you to the previous screen. : Displays the Home screen. : Displays recently used...

Users Guide
Page 27
... is displayed at the top of the screen. B Drag to the location you want to place the icon, and then release your finger on the app/widget you to select the location to delete. [ ] is displayed. A On the Home screen, hold your finger down your finger. 27 The... screen that have been placed on the Home screen. A On the APPS/WIDGETS list screen, move the pointer to display on the Home APPS/WIDGETS list screen, and then ar- 01_Chapter title 01Ar_raHngeiangdaApps and widgets on the Home screen 0Ssc2er_lee_eclentaadfpropms and the widgets...
... is displayed at the top of the screen. B Drag to the location you want to place the icon, and then release your finger on the app/widget you to select the location to delete. [ ] is displayed. A On the Home screen, hold your finger down your finger. 27 The... screen that have been placed on the Home screen. A On the APPS/WIDGETS list screen, move the pointer to display on the Home APPS/WIDGETS list screen, and then ar- 01_Chapter title 01Ar_raHngeiangdaApps and widgets on the Home screen 0Ssc2er_lee_eclentaadfpropms and the widgets...

Users Guide
Page 29
01_Chapter title 01_HeaMdOVAERIO Apps Market 02__lead Contacts Mov Filer Getting Ready Available widgets Widgets are available for this product. Analog clock Bookmark Calendar Contacts Email Music Music playlist Search Digital clock Photo Gallery 29 The following widgets are small applications that display information on the Home screen.
01_Chapter title 01_HeaMdOVAERIO Apps Market 02__lead Contacts Mov Filer Getting Ready Available widgets Widgets are available for this product. Analog clock Bookmark Calendar Contacts Email Music Music playlist Search Digital clock Photo Gallery 29 The following widgets are small applications that display information on the Home screen.

Users Guide
Page 30
C Select [Language]. 30 Getting Ready D Select the language you want to use. A Select [ ] on the APPS list screen. The display language changes. 01_Chapter title 0Se1t_tHinegadthAe language, date and 0t2i_m_leead Setting the language You can set the display language. B Select [Personal] - [Language & input].
C Select [Language]. 30 Getting Ready D Select the language you want to use. A Select [ ] on the APPS list screen. The display language changes. 01_Chapter title 0Se1t_tHinegadthAe language, date and 0t2i_m_leead Setting the language You can set the display language. B Select [Personal] - [Language & input].
Users Guide
Page 31
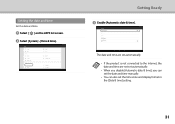
Getting Ready C Enable [Automatic date & time]. The date and time are set automatically. • If the product is not connected to the Internet, the date and time are not set automatically. • When you disable [Automatic date & time], you can set the date and time manually. • You can also set the time zone and display format in the [Date & time] setting. 31 B Select [System] - [Date & time]. A Select [ ] on the APPS list screen. 01_Chapter title 01Se_ttHinegathde dAate and time 0Se2t_t_hleeaddate and time.
Getting Ready C Enable [Automatic date & time]. The date and time are set automatically. • If the product is not connected to the Internet, the date and time are not set automatically. • When you disable [Automatic date & time], you can set the date and time manually. • You can also set the time zone and display format in the [Date & time] setting. 31 B Select [System] - [Date & time]. A Select [ ] on the APPS list screen. 01_Chapter title 01Se_ttHinegathde dAate and time 0Se2t_t_hleeaddate and time.

Users Guide
Page 32
... access point or public wireless LAN service you want to connect to. • The password and security system to connect to . 32 A Select [ ] on the APPS list screen. Available SSIDs (network names) are displayed.
... access point or public wireless LAN service you want to connect to. • The password and security system to connect to . 32 A Select [ ] on the APPS list screen. Available SSIDs (network names) are displayed.

Users Guide
Page 34
... complete. B Select [Wireless & networks] - [Bluetooth]. D Select the device you want to connect to. When [ ] is displayed on the status bar, setup is turned on the APPS list screen. Available devices are displayed. If the device you want to connect to is selected, set it to Bluetooth enabled devices. Getting Ready C If...
... complete. B Select [Wireless & networks] - [Bluetooth]. D Select the device you want to connect to. When [ ] is displayed on the status bar, setup is turned on the APPS list screen. Available devices are displayed. If the device you want to connect to is selected, set it to Bluetooth enabled devices. Getting Ready C If...

Users Guide
Page 36
01_Chapter title 01Ad_juHsteinagdthAe Brightness of the Screen 0Tmh2ae_t_ipclareolaldyduacdtjucsotms tehsewbirtihghatbnueislts-ionf ambient light sensor that autothe image to the brightness of the images, follow the steps below to turn off . 36 Getting Ready C Disable [Adaptive brightness]. B Select [Device] - [Display]. The brightness auto adjust feature turns off the auto adjustment feature. A Select [ ] on the APPS list screen. To manually adjust the brightness of the surroundings.
01_Chapter title 01Ad_juHsteinagdthAe Brightness of the Screen 0Tmh2ae_t_ipclareolaldyduacdtjucsotms tehsewbirtihghatbnueislts-ionf ambient light sensor that autothe image to the brightness of the images, follow the steps below to turn off . 36 Getting Ready C Disable [Adaptive brightness]. B Select [Device] - [Display]. The brightness auto adjust feature turns off the auto adjustment feature. A Select [ ] on the APPS list screen. To manually adjust the brightness of the surroundings.

Users Guide
Page 37
... tab to show it again. Connect to the next page [ ], refresh the page [ ] B Menu list [ ] You can add new tabs, or browse text on the APPS list screen.
... tab to show it again. Connect to the next page [ ], refresh the page [ ] B Menu list [ ] You can add new tabs, or browse text on the APPS list screen.
Users Guide
Page 38
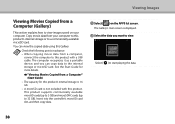
... view. Check the following points in advance. • When copying movie data from a 0C2o__mleadputer (Gallery) This section explains how to view images saved on the APPS list screen. You can copy data to 32 GB). B Select the data you can view the copied data using this Gallery. Insert into the controller...
... view. Check the following points in advance. • When copying movie data from a 0C2o__mleadputer (Gallery) This section explains how to view images saved on the APPS list screen. You can copy data to 32 GB). B Select the data you can view the copied data using this Gallery. Insert into the controller...

Users Guide
Page 40
... ready to accept images from other and streams movies and music between the devices. The device is established, the image being cast appears on the APPS list screen. 40 Viewing Images C Select [Device] - [Display]. When the connection is ready to accept the image being used supports Miracast. • Connections are not...
... ready to accept images from other and streams movies and music between the devices. The device is established, the image being cast appears on the APPS list screen. 40 Viewing Images C Select [Device] - [Display]. When the connection is ready to accept the image being used supports Miracast. • Connections are not...

Users Guide
Page 41
C Select [Device] - [Display]. F Select the ID for the product receiving the image. Depending on the APPS list screen. 01_Chapter title 0Ca1st_inHgeImadagAes 0A2__Sleatdup the device receiving the image so that it is established, the image on the device appears on the device ...
C Select [Device] - [Display]. F Select the ID for the product receiving the image. Depending on the APPS list screen. 01_Chapter title 0Ca1st_inHgeImadagAes 0A2__Sleatdup the device receiving the image so that it is established, the image on the device appears on the device ...

Users Guide
Page 42
... left edge of personality rights. • Make sure you follow the instructions in places in camera. • Make sure you do not infringe on the APPS list screen. The camera's image is displayed. C Select [ ]. A Select [ ] on any copyrights when shooting a video with this device to perform acts that are considered as...
... left edge of personality rights. • Make sure you follow the instructions in places in camera. • Make sure you do not infringe on the APPS list screen. The camera's image is displayed. C Select [ ]. A Select [ ] on any copyrights when shooting a video with this device to perform acts that are considered as...

Users Guide
Page 43
01_Chapter title 0D1S_elHecet [ad A]. 02__lead Shooting ends and the video you shot is automatically saved to the product's internal storage. Using Apps 43
01_Chapter title 0D1S_elHecet [ad A]. 02__lead Shooting ends and the video you shot is automatically saved to the product's internal storage. Using Apps 43