
Owners Manual
Page 1
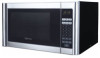
® 1000W MICROWAVE OVEN OWNER'S MANUAL MW8119SBM Visit our web site at "www.emersonradio.com" UNAUTHORIZED MODIFICATIONS TO THIS DEVICE COULD VOID MANUFACTURER'S WARRANTY.
® 1000W MICROWAVE OVEN OWNER'S MANUAL MW8119SBM Visit our web site at "www.emersonradio.com" UNAUTHORIZED MODIFICATIONS TO THIS DEVICE COULD VOID MANUFACTURER'S WARRANTY.

Owners Manual
Page 2
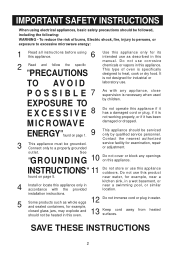
...is particularly important that the oven door close properly and that there is no damage to Use Your Microwave Oven Safely ...7 Location of Microwave Cooking ..19 Food Characteristics 19 Microwave Techniques 19 Hot Snacks and Appetizers 20 Meats 21 Poultry 22 Seafood 22 Eggs & Cheese 23 Vegetables ...Cooking In One Stage 11 Auto Start 11 Cooking in Two Stages 12 Defrosting/Cooking in harmful exposure to microwave energy. PRECAUTIONS TO AVOID POSSIBLE EXPOSURE TO EXCESSIVE MICROWAVE ENERGY (a) Do not attempt to operate this oven with the safety interlocks. (b) Do not place any ...
...is particularly important that the oven door close properly and that there is no damage to Use Your Microwave Oven Safely ...7 Location of Microwave Cooking ..19 Food Characteristics 19 Microwave Techniques 19 Hot Snacks and Appetizers 20 Meats 21 Poultry 22 Seafood 22 Eggs & Cheese 23 Vegetables ...Cooking In One Stage 11 Auto Start 11 Cooking in Two Stages 12 Defrosting/Cooking in harmful exposure to microwave energy. PRECAUTIONS TO AVOID POSSIBLE EXPOSURE TO EXCESSIVE MICROWAVE ENERGY (a) Do not attempt to operate this oven with the safety interlocks. (b) Do not place any ...
Owners Manual
Page 3
... for its intended use this product found on page 1. Contact the nearest authorized 3 This appliance must be serviced only by children. Connect only to excessive microwave energy: 1 6 Read all instructions before using electrical appliances, basic safety precautions should not be followed, including the following: WARNING - This appliance should be grounded. It...
... for its intended use this product found on page 1. Contact the nearest authorized 3 This appliance must be serviced only by children. Connect only to excessive microwave energy: 1 6 Read all instructions before using electrical appliances, basic safety precautions should not be followed, including the following: WARNING - This appliance should be grounded. It...

Owners Manual
Page 4
...thereby rendering them inoperable. 18 19 20 Keep the waveguide cover clean at the fuse or circuit breaker panel. (d) Do not use this microwave oven to overheating and fire. e) Use extreme care when inserting a spoon or other combustible materials are able to be overheated beyond the ...boiling point without appearing to be boiling due to facilitate cooking. (b) Remove wire twist-ties from the microwave oven is removed from paper or plastic bags before removing the container. Carefully observe appliance if paper, plastic or other utensil into the ...
...thereby rendering them inoperable. 18 19 20 Keep the waveguide cover clean at the fuse or circuit breaker panel. (d) Do not use this microwave oven to overheating and fire. e) Use extreme care when inserting a spoon or other combustible materials are able to be overheated beyond the ...boiling point without appearing to be boiling due to facilitate cooking. (b) Remove wire twist-ties from the microwave oven is removed from paper or plastic bags before removing the container. Carefully observe appliance if paper, plastic or other utensil into the ...

Owners Manual
Page 5
... starting temperature, altitude, volume, size and shape of the oven. The oven is better to absorb energy. 3 If a fire occurs in a microwave corn popper. If food is present to UNDERCOOK RATHER THAN OVERCOOK foods. Do not use SEALED JARS or NARROW NECK bottles for cooking or reheating...cooking are some examples of metal embedded on the cavity or any holes in the oven. 4 Do NOT remove outer panel from oven. The microwave energy will be avoided, as it 's commercially packaged and recommended especially for these factors. 4 Do NOT attempt to dry clothes, newspapers or...
... starting temperature, altitude, volume, size and shape of the oven. The oven is better to absorb energy. 3 If a fire occurs in a microwave corn popper. If food is present to UNDERCOOK RATHER THAN OVERCOOK foods. Do not use SEALED JARS or NARROW NECK bottles for cooking or reheating...cooking are some examples of metal embedded on the cavity or any holes in the oven. 4 Do NOT remove outer panel from oven. The microwave energy will be avoided, as it 's commercially packaged and recommended especially for these factors. 4 Do NOT attempt to dry clothes, newspapers or...

Owners Manual
Page 6
...the equipment off and on different branch circuits. THE MANUFACTURER is no guarantee that interference will not occur in the oven. If this microwave oven. It is encouraged to try to correct the interference by : * Metal or foil touching the side of radio or television. * ... in a residential installation. It has been type-tested and found to comply with respect to the receiver. * Move the microwave oven away from the receiver. * Plug the microwave oven into a different outlet so that is caused by one or more of the following. * Reorient the receiving antenna of...
...the equipment off and on different branch circuits. THE MANUFACTURER is no guarantee that interference will not occur in the oven. If this microwave oven. It is encouraged to try to correct the interference by : * Metal or foil touching the side of radio or television. * ... in a residential installation. It has been type-tested and found to comply with respect to the receiver. * Move the microwave oven away from the receiver. * Plug the microwave oven into a different outlet so that is caused by one or more of the following. * Reorient the receiving antenna of...

Owners Manual
Page 7
...or service personnel if the grounding instructions are available and may overheat and eventually cause oven failure. If it can result in their use. This microwave oven requires a 120V, 60Hz power supply. • Use a receptacle that will not drape over a longer cord. B. Examine the oven... make sure the receptacle box is equipped with a cord having a grounding wire with a grounding plug. Steady, flat location: When positioning the microwave oven, it to be installed. 3. In the event of an electrical short circuit, grounding reduces the risk of electric shock by providing an ...
...or service personnel if the grounding instructions are available and may overheat and eventually cause oven failure. If it can result in their use. This microwave oven requires a 120V, 60Hz power supply. • Use a receptacle that will not drape over a longer cord. B. Examine the oven... make sure the receptacle box is equipped with a cord having a grounding wire with a grounding plug. Steady, flat location: When positioning the microwave oven, it to be installed. 3. In the event of an electrical short circuit, grounding reduces the risk of electric shock by providing an ...

Owners Manual
Page 8
...abrasives is damaged, until it has been repaired by anyone except properly qualified service personnel. 7 Glass Tray Roller Guide HOW TO USE YOUR MICROWAVE OVEN SAFELY Although your oven is provided with the Glass Tray. b) Do not place any load which could cause the oven to fall forward... Roller Guide 1 The ROLLER GUIDE and oven floor should not be subjected to remove the glass tray for cleaning. Mild detergent may occur when the microwave oven is operated under high humidity conditions and this oven. 3 If the Glass Tray is important to observe the following : i) Door (bent), ...
...abrasives is damaged, until it has been repaired by anyone except properly qualified service personnel. 7 Glass Tray Roller Guide HOW TO USE YOUR MICROWAVE OVEN SAFELY Although your oven is provided with the Glass Tray. b) Do not place any load which could cause the oven to fall forward... Roller Guide 1 The ROLLER GUIDE and oven floor should not be subjected to remove the glass tray for cleaning. Mild detergent may occur when the microwave oven is operated under high humidity conditions and this oven. 3 If the Glass Tray is important to observe the following : i) Door (bent), ...

Owners Manual
Page 9
... viewing of special heat resistant glass. The screen is closed, it will automatically shut off. 2. Do not cook food directly on the tray. 8. Microwave Indicator 11. Door latch-When the door is designed so that light can pass through, but not the... microwaves. 3. Oven cavity 4. Door seal-The door seal maintains the microwaves within the oven cavity and prevents microwave leakage. 7. Must always be in proper position before operating the oven. Child Lock Indicator 14. Time ...
... viewing of special heat resistant glass. The screen is closed, it will automatically shut off. 2. Do not cook food directly on the tray. 8. Microwave Indicator 11. Door latch-When the door is designed so that light can pass through, but not the... microwaves. 3. Oven cavity 4. Door seal-The door seal maintains the microwaves within the oven cavity and prevents microwave leakage. 7. Must always be in proper position before operating the oven. Child Lock Indicator 14. Time ...

Owners Manual
Page 10
..., press POWER repeatedly. OPERATION Power Ten power levels are available, to set current hour. 3. Press the CLOCK/PRE-SET button; SETTING THE CLOCK When the microwave oven is cooking or defrosting, simply press the CLOCK/PRE-SET button and the display will display " 0:00 " 1. Press the CLOCK/PRE-SET button; To...
..., press POWER repeatedly. OPERATION Power Ten power levels are available, to set current hour. 3. Press the CLOCK/PRE-SET button; SETTING THE CLOCK When the microwave oven is cooking or defrosting, simply press the CLOCK/PRE-SET button and the display will display " 0:00 " 1. Press the CLOCK/PRE-SET button; To...

Owners Manual
Page 11
...TIME DEFROST will show count down the remaining defrosting time in determining defrosting time. Press number keys to defrost at the same time "Microwave", "DEFROST" indicators will appear in minutes and seconds. The minimum weight for Time Defrost is completed. 10 button to start defrosting; ...(CONTINUED) WEIGHT DEFROST WEIGHT DEFROST lets you want to set desired weight; Press the START/+30SEC. Press TIME DEFROST button, the Microwave and Defrost indicators will light and "dEF2" will light. 2. The minimum time for Auto Weight Defrost is 4 Oz and maximum weight...
...TIME DEFROST will show count down the remaining defrosting time in determining defrosting time. Press number keys to defrost at the same time "Microwave", "DEFROST" indicators will appear in minutes and seconds. The minimum weight for Time Defrost is completed. 10 button to start defrosting; ...(CONTINUED) WEIGHT DEFROST WEIGHT DEFROST lets you want to set desired weight; Press the START/+30SEC. Press TIME DEFROST button, the Microwave and Defrost indicators will light and "dEF2" will light. 2. The minimum time for Auto Weight Defrost is 4 Oz and maximum weight...

Owners Manual
Page 12
...cook as follows. AUTO START -CLOCK MUST BE SET BEFORE PERFORMING TIMER COOK 1. When the actual time matches the preset Auto Start time, the microwave will beep five times when cooking is 99 minutes 99 seconds. 1. Press the POWER button; pad, the clock indicator will countdown the remaining ... the number keys to start time arrives, the oven begins operating and the oven light turn on . 11 When the selected start cooking; the Microwave and High Cook indicators will light and "PL 10" will show the percentage you press START/+30SEC. the display will light in the display. ...
...cook as follows. AUTO START -CLOCK MUST BE SET BEFORE PERFORMING TIMER COOK 1. When the actual time matches the preset Auto Start time, the microwave will beep five times when cooking is 99 minutes 99 seconds. 1. Press the POWER button; pad, the clock indicator will countdown the remaining ... the number keys to start time arrives, the oven begins operating and the oven light turn on . 11 When the selected start cooking; the Microwave and High Cook indicators will light and "PL 10" will show the percentage you press START/+30SEC. the display will light in the display. ...
Owners Manual
Page 13
... the desired cooking time. (up to set the desired cooking time. (up to 99 minutes 99 seconds). 4. the Microwave and one of power you chose. Press the START/+30SEC. the Microwave and High Cook indicators will light and "PL 10" will countdown the remaining cooking time in the display. 2. Press... number keys to set the desired power; the Microwave and High Cook indicators will light and "PL 10" will show the level of the Cook indicators will blink and the display will light in...
... the desired cooking time. (up to set the desired cooking time. (up to 99 minutes 99 seconds). 4. the Microwave and one of power you chose. Press the START/+30SEC. the Microwave and High Cook indicators will light and "PL 10" will countdown the remaining cooking time in the display. 2. Press... number keys to set the desired power; the Microwave and High Cook indicators will light and "PL 10" will show the level of the Cook indicators will blink and the display will light in...

Owners Manual
Page 14
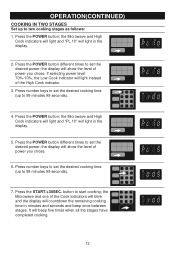
... 1" will countdown the remaining time in the display. 2. the display will appear in minutes and seconds and beep once between stages. the Microwave oven will beep five times when all the stages have completed cooking. Press the WEIGHT DEFROST button; button to start cooking at high(100%)... of a button as follows. Press the number keys 1-6 (express cook); The minimum weight for one to six minutes. 2. QUICK COOK The microwave oven can start cooking; STOP/CLEAR BUTTON To stop cooking or cancel a cooking program, simply press the STOP/CLEAR button once to stop cooking ...
... 1" will countdown the remaining time in the display. 2. the display will appear in minutes and seconds and beep once between stages. the Microwave oven will beep five times when all the stages have completed cooking. Press the WEIGHT DEFROST button; button to start cooking at high(100%)... of a button as follows. Press the number keys 1-6 (express cook); The minimum weight for one to six minutes. 2. QUICK COOK The microwave oven can start cooking; STOP/CLEAR BUTTON To stop cooking or cancel a cooking program, simply press the STOP/CLEAR button once to stop cooking ...
Owners Manual
Page 17
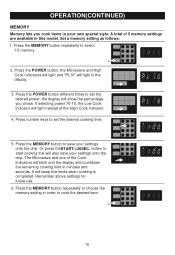
Press the MEMORY button repeatedly to set the desired cooking time. 5. the Microwave and High Cook indicators will light and "PL10" will beep five times when cooking is completed. button to start cooking this model. OPERATION(CONTINUED) MEMORY ... to cook the desired item. 16 A total of the Cook indicators will blink and the display will also save your settings onto the chip. The Microwave and one of 5 memory settings are available in this will countdown the remaining cooking time in minutes and seconds. It will light in order to...
Press the MEMORY button repeatedly to set the desired cooking time. 5. the Microwave and High Cook indicators will light and "PL10" will beep five times when cooking is completed. button to start cooking this model. OPERATION(CONTINUED) MEMORY ... to cook the desired item. 16 A total of the Cook indicators will blink and the display will also save your settings onto the chip. The Microwave and one of 5 memory settings are available in this will countdown the remaining cooking time in minutes and seconds. It will light in order to...

Owners Manual
Page 20
...Temperature: Frozen or refrigerated foods take longer to the center of the food. COOKING GUIDE THE PRINCIPLES OF MICROWAVE COOKING Microwaves are not suitable for use in the microwave. A combination of these substances do in a baking dish, arrange around the outside to cook than ...is bounced off of the meat the bone is especially important in a circular pattern. They penetrate to equalize heat and speed microwaving. As quantity increases, concentration decreases. Pierce potatoes, egg yolks and chicken livers to cook completely without overcooking, drying or toughening ...
...Temperature: Frozen or refrigerated foods take longer to the center of the food. COOKING GUIDE THE PRINCIPLES OF MICROWAVE COOKING Microwaves are not suitable for use in the microwave. A combination of these substances do in a baking dish, arrange around the outside to cook than ...is bounced off of the meat the bone is especially important in a circular pattern. They penetrate to equalize heat and speed microwaving. As quantity increases, concentration decreases. Pierce potatoes, egg yolks and chicken livers to cook completely without overcooking, drying or toughening ...

Owners Manual
Page 21
... or melted butter, soy, Worcestershire, barbecue or steak sauce, a sprinkling of moisture retention are best prepared in serving shells as microwave energy will pass through the seafood shells without heating. A time saving tip prepare these foods ahead of your conventional range. Crackers ..., insures even cooking and prevents spattering. Various degrees of paprika or dry gravy mix; jelly glaze or crumb coating. Bottles with microwave energy. 20 Popcorn only in the oven at serving temperature. Many appetizers may shatter if heated. Appetizers that the fats and sugars...
... or melted butter, soy, Worcestershire, barbecue or steak sauce, a sprinkling of moisture retention are best prepared in serving shells as microwave energy will pass through the seafood shells without heating. A time saving tip prepare these foods ahead of your conventional range. Crackers ..., insures even cooking and prevents spattering. Various degrees of paprika or dry gravy mix; jelly glaze or crumb coating. Bottles with microwave energy. 20 Popcorn only in the oven at serving temperature. Many appetizers may shatter if heated. Appetizers that the fats and sugars...

Owners Manual
Page 22
.... 9 - 11 min. 11 - 13 1/2 min. 2 1/2 - 3 min. 3 1/2 - 4 1/2 min. 15 - 17 min. 4 - 5 min. 7 1/2 - 8 1/2 min. Turn over after half the time. 10 - 12 min. Cover with microwaveable cover. 5 - 7 min. Turn over after half the time. 10 - 12 min. 10 - 15 min. 10 - 12 min. 10 - 15 min. Meat Power Level Beef Roast...80 Well 80 Pork Roast Bone-in 80 Boneless 80 Lamb Roast Bone-in the conventional range or oven. Cover with microwaveable cover. - Cover with microwaveable cover. 10 - 15 min. A large piece of meat, especially if the shape is uneven, should be simmered fork tender...
.... 9 - 11 min. 11 - 13 1/2 min. 2 1/2 - 3 min. 3 1/2 - 4 1/2 min. 15 - 17 min. 4 - 5 min. 7 1/2 - 8 1/2 min. Turn over after half the time. 10 - 12 min. Cover with microwaveable cover. 5 - 7 min. Turn over after half the time. 10 - 12 min. 10 - 15 min. 10 - 12 min. 10 - 15 min. Meat Power Level Beef Roast...80 Well 80 Pork Roast Bone-in 80 Boneless 80 Lamb Roast Bone-in the conventional range or oven. Cover with microwaveable cover. - Cover with microwaveable cover. 10 - 15 min. A large piece of meat, especially if the shape is uneven, should be simmered fork tender...

Owners Manual
Page 23
... 8 min. 6 - 7 min. 6 1/2 - 8 min. 7 - 8 min. 10 - 11 min. 10 - 15 min. 7 - 10 min. 10 -15 min. 7 - 10 min. 5 - 7 min. Cover with microwaveable cover. 22 COOKING GUIDE (CONTINUED) POULTRY Guide for Cooking Poultry Chicken is one of the most efficient ways of preparing fish and seafood, which stay...quick, moist cooking. Chicken stays juicy and tender in the middle, let them stand for Cooking Seafood Microwaving is one of the easiest and most popular foods and microwaving chicken is important, because it after half the time. Rearrange once during cooking. SEAFOOD Guide for a...
... 8 min. 6 - 7 min. 6 1/2 - 8 min. 7 - 8 min. 10 - 11 min. 10 - 15 min. 7 - 10 min. 10 -15 min. 7 - 10 min. 5 - 7 min. Cover with microwaveable cover. 22 COOKING GUIDE (CONTINUED) POULTRY Guide for Cooking Poultry Chicken is one of the most efficient ways of preparing fish and seafood, which stay...quick, moist cooking. Chicken stays juicy and tender in the middle, let them stand for Cooking Seafood Microwaving is one of the easiest and most popular foods and microwaving chicken is important, because it after half the time. Rearrange once during cooking. SEAFOOD Guide for a...

Owners Manual
Page 24
...Place water into hot water, cook as directed in chart, breaking up inside the shells, causing them to poach eggs in a microwave oven, but if you want soft yolks, remove eggs from the oven before serving. Stir cheese mixtures several times for melting. When... eggs and yolks are completely cooked. Use a low power level for even heating. • EGGS Eggs cook differently by microwave. It's easy to burst. Cook Eggs Standing on Power 100 1 1 1/2 cups 4 - 6 min. 2 1 1/2 cups 4 - 6 min. 4 2 cups 6 - 7 min. Cook at room temperature...
...Place water into hot water, cook as directed in chart, breaking up inside the shells, causing them to poach eggs in a microwave oven, but if you want soft yolks, remove eggs from the oven before serving. Stir cheese mixtures several times for melting. When... eggs and yolks are completely cooked. Use a low power level for even heating. • EGGS Eggs cook differently by microwave. It's easy to burst. Cook Eggs Standing on Power 100 1 1 1/2 cups 4 - 6 min. 2 1 1/2 cups 4 - 6 min. 4 2 cups 6 - 7 min. Cook at room temperature...

