
Owners Manual
Page 2
... damage to microwave energy. It is important not to defeat or tamper with the door open since open-door operation can result in Two Stages.........13 Quick Cook 13 Stop/Cancel Button 13 Auto Cook 14 Child Lock 14 Auto Cook Menu Chart 15 Memory 16 Inquiry 17 Kitchen Timer 18 Cooking Guide 19 The Principles of Controls 8 Operation 9 Setting the Clock 9 Weight Defrost 10 Time Defrost 10 Cooking In One Stage 11 Auto Start 11 Cooking in Two Stages 12 Defrosting/Cooking in...
... damage to microwave energy. It is important not to defeat or tamper with the door open since open-door operation can result in Two Stages.........13 Quick Cook 13 Stop/Cancel Button 13 Auto Cook 14 Child Lock 14 Auto Cook Menu Chart 15 Memory 16 Inquiry 17 Kitchen Timer 18 Cooking Guide 19 The Principles of Controls 8 Operation 9 Setting the Clock 9 Weight Defrost 10 Time Defrost 10 Cooking In One Stage 11 Auto Start 11 Cooking in Two Stages 12 Defrosting/Cooking in...
Owners Manual
Page 3
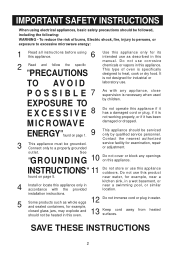
... persons, or exposure to excessive microwave energy: 1 6 Read all instructions before using electrical appliances, basic safety precautions should be serviced only by children. ENERGY" 9 found on this appliance. Keep cord away from heated surfaces. Do not operate this appliance outdoors. Connect only to heat, cook or dry food. SAVE THESE INSTRUCTIONS 2 near water, for example, 13 closed glass jars, may explode and should...
... persons, or exposure to excessive microwave energy: 1 6 Read all instructions before using electrical appliances, basic safety precautions should be serviced only by children. ENERGY" 9 found on this appliance. Keep cord away from heated surfaces. Do not operate this appliance outdoors. Connect only to heat, cook or dry food. SAVE THESE INSTRUCTIONS 2 near water, for example, 13 closed glass jars, may explode and should...

Owners Manual
Page 4
... the waveguide cover clean at the fuse or circuit breaker panel. (d) Do not use the cavity for example, sulfides and chlorides). Wipe the oven interior with a soft damp cloth after each use straight-sided containers with narrow necks. Liquids, such as you leave grease or fat anywhere in the oven cavity: (a) Do not overcook food. To reduce the risk of injury to heat corrosive...
... the waveguide cover clean at the fuse or circuit breaker panel. (d) Do not use the cavity for example, sulfides and chlorides). Wipe the oven interior with a soft damp cloth after each use straight-sided containers with narrow necks. Liquids, such as you leave grease or fat anywhere in the oven cavity: (a) Do not overcook food. To reduce the risk of injury to heat corrosive...

Owners Manual
Page 5
..., it can ignite. 5 Remove PLASTIC STORE WRAPS before cooking to prevent bursting. 7 POPCORN must be pierced before cooking or defrosting foods in a microwave approved popcorn utensil or unless it can always be popped in the oven. through the holes on the bottom. SAFETY PRECAUTIONS General Use 1 Do NOT attempt to tamper with or make any adjustments or repairs to door, control panel or any holes...
..., it can ignite. 5 Remove PLASTIC STORE WRAPS before cooking to prevent bursting. 7 POPCORN must be pierced before cooking or defrosting foods in a microwave approved popcorn utensil or unless it can always be popped in the oven. through the holes on the bottom. SAFETY PRECAUTIONS General Use 1 Do NOT attempt to tamper with or make any adjustments or repairs to door, control panel or any holes...

Owners Manual
Page 6
... receiver. * Move the microwave oven away from the receiver. * Plug the microwave oven into a different outlet so that interference will not occur in a particular installation. ARCING If you see arcing, press START/STOP button and correct the problem. It is caused by one or more of the following. * Reorient the receiving antenna of the user to part 18 of FCC Rules...
... receiver. * Move the microwave oven away from the receiver. * Plug the microwave oven into a different outlet so that interference will not occur in a particular installation. ARCING If you see arcing, press START/STOP button and correct the problem. It is caused by one or more of the following. * Reorient the receiving antenna of the user to part 18 of FCC Rules...

Owners Manual
Page 7
... as possible. 4. B. INSTALLATION 1. Longer cord sets or extension cords are blocked during operation, the oven may result if the oven is located close to break down. 5. This appliance is fully grounded. A. Grounding Lead Screw Receptacle 3-pronged plug Receptacle Box Cover Grounding Adapter Receptacle Box Cover 6 In the event of an electrical short circuit, grounding reduces the risk of the appliance. Power supply: • Check...
... as possible. 4. B. INSTALLATION 1. Longer cord sets or extension cords are blocked during operation, the oven may result if the oven is located close to break down. 5. This appliance is fully grounded. A. Grounding Lead Screw Receptacle 3-pronged plug Receptacle Box Cover Grounding Adapter Receptacle Box Cover 6 In the event of an electrical short circuit, grounding reduces the risk of the appliance. Power supply: • Check...

Owners Manual
Page 8
... to the operating parts inside of harsh detergent or abrasives is hot, ALLOW IT TO COOL before cleaning. 2 Keep the inside the oven, water should be cleaned with soap and water, rinsed and dried with a mild detergent, rinse and wipe dry. b) Do not place any other Glass Tray with a soft, dry cloth. The use harsh detergents or abrasives on Control Panel. 5 If steam...
... to the operating parts inside of harsh detergent or abrasives is hot, ALLOW IT TO COOL before cleaning. 2 Keep the inside the oven, water should be cleaned with soap and water, rinsed and dried with a mild detergent, rinse and wipe dry. b) Do not place any other Glass Tray with a soft, dry cloth. The use harsh detergents or abrasives on Control Panel. 5 If steam...

Owners Manual
Page 9
... special heat resistant glass. Spatter shield-Protects the microwave outlet from operating while the door is opened while the oven is closed, it will automatically shut off. 2. Do not cook food directly on the tray. 8. Microwave Indicator 11. Display 12. Weight Defrost Button-Used to set the oven to set a power level 27. Memory Function 20. Clock Button-Used to defrost by weight entered. 17. Stop/Clear Button-Use to select an Auto Cook program. 8 16. Door seal-The door seal maintains the microwaves within the oven...
... special heat resistant glass. Spatter shield-Protects the microwave outlet from operating while the door is opened while the oven is closed, it will automatically shut off. 2. Do not cook food directly on the tray. 8. Microwave Indicator 11. Display 12. Weight Defrost Button-Used to set the oven to set a power level 27. Memory Function 20. Clock Button-Used to defrost by weight entered. 17. Stop/Clear Button-Use to select an Auto Cook program. 8 16. Door seal-The door seal maintains the microwaves within the oven...

Owners Manual
Page 10
... button. the hour digit will blink and the clock indicator will show the actual time for three seconds. 9 SETTING THE CLOCK When the microwave oven is lighted and it will show the present time. Press the number keys to change the power level, press POWER repeatedly. OPERATION Power Ten power levels are available, to set current minute. 4. When a power between level 10-8 is chosen, the high cook indicator is lighted and it will display...
... button. the hour digit will blink and the clock indicator will show the actual time for three seconds. 9 SETTING THE CLOCK When the microwave oven is lighted and it will show the present time. Press the number keys to change the power level, press POWER repeatedly. OPERATION Power Ten power levels are available, to set current minute. 4. When a power between level 10-8 is chosen, the high cook indicator is lighted and it will display...

Owners Manual
Page 11
... minimum time for Auto Weight Defrost is 4 Oz and maximum weight is 1 second. Follow the steps below for easy defrosting. 1. If you easily defrost foods by the user. Follow the steps below for easy defrosting. 1. TIME DEFROST TIME DEFROST will automatically set the oven to defrost at the same time "Microwave", "DEFROST" indicators will light. 2. Press the START/+30SEC.button to start defrosting; OPERATION(CONTINUED) WEIGHT DEFROST WEIGHT DEFROST lets you want to change the power level, press POWER button once, and the LED will display...
... minimum time for Auto Weight Defrost is 4 Oz and maximum weight is 1 second. Follow the steps below for easy defrosting. 1. If you easily defrost foods by the user. Follow the steps below for easy defrosting. 1. TIME DEFROST TIME DEFROST will automatically set the oven to defrost at the same time "Microwave", "DEFROST" indicators will light. 2. Press the START/+30SEC.button to start defrosting; OPERATION(CONTINUED) WEIGHT DEFROST WEIGHT DEFROST lets you want to change the power level, press POWER button once, and the LED will display...

Owners Manual
Page 12
... the START/+30SEC.button. Press the POWER button different times to start time arrives, the oven begins operating and the oven light turn on . 11 Press number keys to set the timer hour and minute. 3. AUTO START -CLOCK MUST BE SET BEFORE PERFORMING TIMER COOK 1. When the selected start cooking; The maximum cooking time is completed. Press the POWER button; When the actual time matches the preset Auto Start time, the microwave will blink and the present time appears in the display. 2. If selecting power level...
... the START/+30SEC.button. Press the POWER button different times to start time arrives, the oven begins operating and the oven light turn on . 11 Press number keys to set the timer hour and minute. 3. AUTO START -CLOCK MUST BE SET BEFORE PERFORMING TIMER COOK 1. When the selected start cooking; The maximum cooking time is completed. Press the POWER button; When the actual time matches the preset Auto Start time, the microwave will blink and the present time appears in the display. 2. If selecting power level...
Owners Manual
Page 13
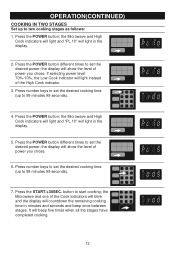
... the display will light instead of power you chose. 6. Press the POWER button different times to set the desired power; It will show the level of the High Cook indicator. 3. the display will light in the display. 2. Press the START/+30SEC. Press the POWER button different times to set the desired power; Press the POWER button; Press the POWER button; Press number keys to set the desired cooking time. (up to start cooking; button to 99 minutes 99 seconds). 4. OPERATION(CONTINUED) COOKING...
... the display will light instead of power you chose. 6. Press the POWER button different times to set the desired power; It will show the level of the High Cook indicator. 3. the display will light in the display. 2. Press the START/+30SEC. Press the POWER button different times to set the desired power; Press the POWER button; Press the POWER button; Press number keys to set the desired cooking time. (up to start cooking; button to 99 minutes 99 seconds). 4. OPERATION(CONTINUED) COOKING...

Owners Manual
Page 14
... start cooking; the display will immediately start cooking at high(100%) power for Auto Weight Defrost is 100 oz. 1. button to set the desired cooking weight. 3. It will appear in minutes and seconds and beep once between stages. The minimum weight for one to six minutes. 2. the Microwave and Defrost indicators will light and "dEF 1" will beep five times when all the stages have completed cooking. Press the number keys 1-6 (express cook); OPERATION(CONTINUED) DEFROSTING/COOKING...
... start cooking; the display will immediately start cooking at high(100%) power for Auto Weight Defrost is 100 oz. 1. button to set the desired cooking weight. 3. It will appear in minutes and seconds and beep once between stages. The minimum weight for one to six minutes. 2. the Microwave and Defrost indicators will light and "dEF 1" will beep five times when all the stages have completed cooking. Press the number keys 1-6 (express cook); OPERATION(CONTINUED) DEFROSTING/COOKING...

Owners Manual
Page 18
... cooking at high power for 3 seconds. (Time must be set , but the START/+30SEC. the display will show current power level for 3 seconds. • Press CLOCK/PRE-SET button during cooking, the display will show AM or PM for more than 30 minutes. • One beep will sound when pressing the buttons. • Five beeps will revert back to continue the cooking. • If a cooking program has been set before opening the door...
... cooking at high power for 3 seconds. (Time must be set , but the START/+30SEC. the display will show current power level for 3 seconds. • Press CLOCK/PRE-SET button during cooking, the display will show AM or PM for more than 30 minutes. • One beep will sound when pressing the buttons. • Five beeps will revert back to continue the cooking. • If a cooking program has been set before opening the door...

Owners Manual
Page 20
... by heat conduction. Microwave energy creates heat in a microwave oven has a direct effect on will microwave evenly. FOOD CHARACTERISTICS Quantity: The amount of food placed in the outer layers of each other . Moisture Content: Microwaves are cooked by friction. Foods will not burn or stick, so there's no need more cooking will receive more energy, so food will cook first, while boneless cuts cook slower but more evenly. Electricity...
... by heat conduction. Microwave energy creates heat in a microwave oven has a direct effect on will microwave evenly. FOOD CHARACTERISTICS Quantity: The amount of food placed in the outer layers of each other . Moisture Content: Microwaves are cooked by friction. Foods will not burn or stick, so there's no need more cooking will receive more energy, so food will cook first, while boneless cuts cook slower but more evenly. Electricity...

Owners Manual
Page 21
... these foods ahead of dish to caramelize and give a "browned" appearance. Crackers used for microwaving. COOKING GUIDE (CONTINUED) Covering: Covering speeds cooking time, retains moisture, tenderizes, insures even cooking and prevents spattering. Top casseroles at the side of time, refrigerate or freeze, and reheat in paper bags or glass utensils or directly on the serving platter, provided the platter does not have metal trim...
... these foods ahead of dish to caramelize and give a "browned" appearance. Crackers used for microwaving. COOKING GUIDE (CONTINUED) Covering: Covering speeds cooking time, retains moisture, tenderizes, insures even cooking and prevents spattering. Top casseroles at the side of time, refrigerate or freeze, and reheat in paper bags or glass utensils or directly on the serving platter, provided the platter does not have metal trim...

Owners Manual
Page 26
... the microwave oven generally need slower cooking to prepare some sauces. Special Notes Cook on Full power as directed or until thickened, stirring once. 2 1/2 - 3 1/2 min. Let stand, covered, before 3 - 4 min. CASSEROLES Casseroles may be unwrapped and returned to the container for an additional 10 minutes, rinse with warm water and drain. Then follow package directions for future use a container twice the size...
... the microwave oven generally need slower cooking to prepare some sauces. Special Notes Cook on Full power as directed or until thickened, stirring once. 2 1/2 - 3 1/2 min. Let stand, covered, before 3 - 4 min. CASSEROLES Casseroles may be unwrapped and returned to the container for an additional 10 minutes, rinse with warm water and drain. Then follow package directions for future use a container twice the size...

Owners Manual
Page 28
... general directions to the large compact mass of a conventional range. Place the container of food. An X-type cut side down on the types of a conventional range to equalize. Heat foods other than vegetables for freezing and put serving portions on the plate, use the broiler of food). To prevent small pieces of cooking time. dinner, follow the maker's instructions for the heat to crisp the food...
... general directions to the large compact mass of a conventional range. Place the container of food. An X-type cut side down on the types of a conventional range to equalize. Heat foods other than vegetables for freezing and put serving portions on the plate, use the broiler of food). To prevent small pieces of cooking time. dinner, follow the maker's instructions for the heat to crisp the food...

Owners Manual
Page 30
... the Child Lock feature is not engaged. Check that the power cord is set. 4. If there is firmly closed. 3. Checks for service. SPECIFICATIONS Item Power Supply Microwave Output Power Microwave Frequency Oven Capacity Outside Dimensions Weight Rating Specification 120V~ 60Hz 1000W 2450MHz 1.1 cubic feet 20.2 (W) x 15.7 (D) x 12.0 (H) inches (512mm x 398mm x 305mm) 33.3 Lbs (15.1 kg) Approx. If the oven does not work: 1. TO FIND THE LOCATION AND AUTHORIZED SERVICE ¨ PHONE NUMBER OF...
... the Child Lock feature is not engaged. Check that the power cord is set. 4. If there is firmly closed. 3. Checks for service. SPECIFICATIONS Item Power Supply Microwave Output Power Microwave Frequency Oven Capacity Outside Dimensions Weight Rating Specification 120V~ 60Hz 1000W 2450MHz 1.1 cubic feet 20.2 (W) x 15.7 (D) x 12.0 (H) inches (512mm x 398mm x 305mm) 33.3 Lbs (15.1 kg) Approx. If the oven does not work: 1. TO FIND THE LOCATION AND AUTHORIZED SERVICE ¨ PHONE NUMBER OF...

Owners Manual
Page 31
... as outlined in the owner's manual. (e) Signal reception problems caused by Emerson to perform repairs: * Pack the unit in a well-padded heavy corrugated box. * Enclose your proof of purchase (warranty service will provide the following at no charge for labor and parts. * Replacement of a defective magnetron for future reference Model Number: Serial Number: MV1094F 30 ANY APPLICABLE IMPLIED WARRANTIES, INCLUDING THE WARRANTY OF MERCHANTABILITY, ARE LIMITED...
... as outlined in the owner's manual. (e) Signal reception problems caused by Emerson to perform repairs: * Pack the unit in a well-padded heavy corrugated box. * Enclose your proof of purchase (warranty service will provide the following at no charge for labor and parts. * Replacement of a defective magnetron for future reference Model Number: Serial Number: MV1094F 30 ANY APPLICABLE IMPLIED WARRANTIES, INCLUDING THE WARRANTY OF MERCHANTABILITY, ARE LIMITED...


