

Use and Care Manual
Page 1
Microwave Oven GLMB209DB, GLMB209DS, GLMB209DQ PLMB209DC, CPLMB209DC Visit the Frigidaire Web Site at: http://www.frigidaire.com READ AND SAVE THESE INSTRUCTIONS Welcome & Congratulations .... 2 Important Safety Instructions .. 2-7 Part Names 8 Before Operating 9 Manual Operation 9 Operating Instructions 10-14 Cleaning and Care 15 Service Call Check 15 Specifications 16 Warranty 17 p/n 316137232 TINSEB383MRR1
Microwave Oven GLMB209DB, GLMB209DS, GLMB209DQ PLMB209DC, CPLMB209DC Visit the Frigidaire Web Site at: http://www.frigidaire.com READ AND SAVE THESE INSTRUCTIONS Welcome & Congratulations .... 2 Important Safety Instructions .. 2-7 Part Names 8 Before Operating 9 Manual Operation 9 Operating Instructions 10-14 Cleaning and Care 15 Service Call Check 15 Specifications 16 Warranty 17 p/n 316137232 TINSEB383MRR1

Use and Care Manual
Page 6
... power levels below 100%, you use popcorn labeled for more as soft drink bottles, wine flasks and especially narrow necked coffee cups. It is a normal part of 180˚F. Cook for the shortest amount of such foods as whole eggs and sealed containers-for 30 to at least once. • Rearrange...
... power levels below 100%, you use popcorn labeled for more as soft drink bottles, wine flasks and especially narrow necked coffee cups. It is a normal part of 180˚F. Cook for the shortest amount of such foods as whole eggs and sealed containers-for 30 to at least once. • Rearrange...

Use and Care Manual
Page 8
... (rear) 10.Microwave Oven light It will rotate clockwise or counterclockwise. One touch door open door. 2. Door seals and sealing surfaces 6. Only remove for cleaning. 9. Part Names The 7-digit Interactive Display spells out operating steps and shows cooking hints. Removable turntable support Carefully place the turntable support in the display, touch...
... (rear) 10.Microwave Oven light It will rotate clockwise or counterclockwise. One touch door open door. 2. Door seals and sealing surfaces 6. Only remove for cleaning. 9. Part Names The 7-digit Interactive Display spells out operating steps and shows cooking hints. Removable turntable support Carefully place the turntable support in the display, touch...

Use and Care Manual
Page 10
... should be at room temperature. 4. More or less food than the quantity listed in any microwave cookbook. 6. During the first part of SENSOR COOKING, food name will be displayed, and the microwave oven will appear. If the sensor does not detect vapor properly.... Pierce. Flatten, if possible. Place on the display. PROCEDURE Use only popcorn packaged for tender vegetables. Operating Instructions Special Features SENSOR COOKING Electrolux's Sensor is a semi-conductor device that detects the vapor (moisture and humidity) emitted from the food, remainder of cooking time will appear. ...
... should be at room temperature. 4. More or less food than the quantity listed in any microwave cookbook. 6. During the first part of SENSOR COOKING, food name will be displayed, and the microwave oven will appear. If the sensor does not detect vapor properly.... Pierce. Flatten, if possible. Place on the display. PROCEDURE Use only popcorn packaged for tender vegetables. Operating Instructions Special Features SENSOR COOKING Electrolux's Sensor is a semi-conductor device that detects the vapor (moisture and humidity) emitted from the food, remainder of cooking time will appear. ...

Use and Care Manual
Page 15
rinse and dry with a damp cloth. Metal parts will be easier to maintain if wiped frequently with a soft cloth. Cleaners which are marked specifically for easy cleaning. Do not scrub or use any ... with a damp cloth any harsh cleaner or one not marked for service: Place one minute at HIGH 100%. They are functioning properly, CONTACT YOUR NEAREST ELECTROLUX AUTHORIZED SERVICER. A microwave oven should be used. Carefully wipe with a soft cloth. Close door and touch Clear/Off. For heavier soil, use a mild cleanser and...
rinse and dry with a damp cloth. Metal parts will be easier to maintain if wiped frequently with a soft cloth. Cleaners which are marked specifically for easy cleaning. Do not scrub or use any ... with a damp cloth any harsh cleaner or one not marked for service: Place one minute at HIGH 100%. They are functioning properly, CONTACT YOUR NEAREST ELECTROLUX AUTHORIZED SERVICER. A microwave oven should be used. Carefully wipe with a soft cloth. Close door and touch Clear/Off. For heavier soil, use a mild cleanser and...

Use and Care Manual
Page 17
.... 2. Our obligations for servicing, such as removal of trim, cupboards, shelves, etc., which Cost of parts other than Electrolux Home Products, Inc., Electrolux Canada Corp., or their authorized servicers; Proper installation by an authorized servicer in accordance with instructions provided with ...local plumbing, electrical and/or gas codes. 3. The date on models with original serial numbers that have other than genuine Electrolux parts; Replacement of the microwave oven which are listed under this warranty must be required. LIMITED 2nd - 10th YEAR WARRANTY (Magnetron...
.... 2. Our obligations for servicing, such as removal of trim, cupboards, shelves, etc., which Cost of parts other than Electrolux Home Products, Inc., Electrolux Canada Corp., or their authorized servicers; Proper installation by an authorized servicer in accordance with instructions provided with ...local plumbing, electrical and/or gas codes. 3. The date on models with original serial numbers that have other than genuine Electrolux parts; Replacement of the microwave oven which are listed under this warranty must be required. LIMITED 2nd - 10th YEAR WARRANTY (Magnetron...

Parts Catalog
Page 3
... x 8mm Screw, torx head, tamper proof Screw Screw, black, outer casing Screw, 4mm x 12mm Bracket, noise filter, angle Fuse, magnetron Publication No: 5995456752 # Functional Parts 3 * Non-Illustrated Parts 01/06 NO 1 # 2 # 3 # 4 # 5 # 6 # 7 # 8 # 9 # 10 # 11 # 12 # 13 14 15 15 15 28 29 30 31 32 ...# 36 37 38 39 40 53 54 55 56 59 60 61 63 64 65 66 67 67 69 70 # PART NO. 5304440777 5304440778 5304440779 5304448490 5303319559 5304440026 5304440780 5304440781 5304448832 5304440783 5304440784 5304440785 5304440814 5304440815 5304440816 5304440818 5304440817 5304440838 5304440839 5304440840 ...
... x 8mm Screw, torx head, tamper proof Screw Screw, black, outer casing Screw, 4mm x 12mm Bracket, noise filter, angle Fuse, magnetron Publication No: 5995456752 # Functional Parts 3 * Non-Illustrated Parts 01/06 NO 1 # 2 # 3 # 4 # 5 # 6 # 7 # 8 # 9 # 10 # 11 # 12 # 13 14 15 15 15 28 29 30 31 32 ...# 36 37 38 39 40 53 54 55 56 59 60 61 63 64 65 66 67 67 69 70 # PART NO. 5304440777 5304440778 5304440779 5304448490 5303319559 5304440026 5304440780 5304440781 5304448832 5304440783 5304440784 5304440785 5304440814 5304440815 5304440816 5304440818 5304440817 5304440838 5304440839 5304440840 ...

Parts Catalog
Page 5
... # 26 27 41 41 41 41 42 42 42 42 43 44 45 45 45 46 47 48 49 49 49 50 51 52 # 58 # PART NO. 5304440820 5304442129 5304440823 5304440822 5304440821 5304440824 5304440826 5304440825 5304440827 5304440829 5304440828 5304448833 5304440831 5304440282 5304440832 5304440833 5304440834 5304440835 5304440836 5304448834 5304440848 5304440850 5304440849 5304448835..., door front Panel, glass, bisque, door front Panel, glass, white, door front Door Stop Screw Wiring Harness, main Wire, high voltage-A Publication No: 5995456752 # Functional Parts 5 * Non-Illustrated Parts 01/06
... # 26 27 41 41 41 41 42 42 42 42 43 44 45 45 45 46 47 48 49 49 49 50 51 52 # 58 # PART NO. 5304440820 5304442129 5304440823 5304440822 5304440821 5304440824 5304440826 5304440825 5304440827 5304440829 5304440828 5304448833 5304440831 5304440282 5304440832 5304440833 5304440834 5304440835 5304440836 5304448834 5304440848 5304440850 5304440849 5304448835..., door front Panel, glass, bisque, door front Panel, glass, white, door front Door Stop Screw Wiring Harness, main Wire, high voltage-A Publication No: 5995456752 # Functional Parts 5 * Non-Illustrated Parts 01/06

Installation Instructions
Page 1
... beginning the installation, switch power off at : www.frigidaire.com READ CAREFULLY. KEEP THESE INSTRUCTIONS. Installation of this kit. • Because the kit includes metal parts, caution should be locked, securely fasten a prominent warning device, such as a tag, to Installer - FOR YOUR SAFETY: WARNING - For customers in the United States call...
... beginning the installation, switch power off at : www.frigidaire.com READ CAREFULLY. KEEP THESE INSTRUCTIONS. Installation of this kit. • Because the kit includes metal parts, caution should be locked, securely fasten a prominent warning device, such as a tag, to Installer - FOR YOUR SAFETY: WARNING - For customers in the United States call...
Installation Instructions
Page 2
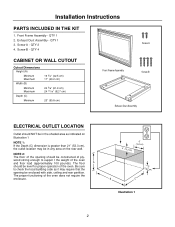
..." (50.8 cm) Front Frame Assembly Screw B Exhaust Duct Assembly ELECTRICAL OUTLET LOCATION Outlet should NOT be in any area on the rear wall. Installation Instructions PARTS INCLUDED IN THE KIT 1. Screw A - Front Frame Assembly - The floor A should be in the shaded area as it may be constructed of the oven. QTY...
..." (50.8 cm) Front Frame Assembly Screw B Exhaust Duct Assembly ELECTRICAL OUTLET LOCATION Outlet should NOT be in any area on the rear wall. Installation Instructions PARTS INCLUDED IN THE KIT 1. Screw A - Front Frame Assembly - The floor A should be in the shaded area as it may be constructed of the oven. QTY...


