

Operating Instructions
Page 1
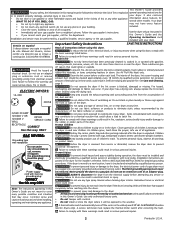
...Your Model and Serial Numbers Record below the model and serial numbers found on the dryer serial plate located on the left side of Contents Important Safety Instructions 2 Drying Procedures 3 Features 3 Common Drying Problems 4 Care and Cleaning 4 Avoid Service Checklist 5 Warranty 6 Back Cover 8 Product Registration Thank you for future reference. This owner's guide will explain proper operation and care. Model Number: Serial Number: Purchase Date: P/N 134671200 (0512) Keep these numbers for choosing this dryer. DRYER Owner's Guide Table of the door opening. Register...
...Your Model and Serial Numbers Record below the model and serial numbers found on the dryer serial plate located on the left side of Contents Important Safety Instructions 2 Drying Procedures 3 Features 3 Common Drying Problems 4 Care and Cleaning 4 Avoid Service Checklist 5 Warranty 6 Back Cover 8 Product Registration Thank you for future reference. This owner's guide will explain proper operation and care. Model Number: Serial Number: Purchase Date: P/N 134671200 (0512) Keep these numbers for choosing this dryer. DRYER Owner's Guide Table of the door opening. Register...
Operating Instructions
Page 2
... a gas dryer must be installed and electrically grounded by a qualified service person. This Owner's Guide provides For your safety, the information in this manual must be followed to minimize the risk of fire or explosion general operating instructions for the installer's reference. your dryer has a drying rack, always replace the lint screen when finished using the drying rack. 14-30R Keep area around the exhaust opening and surrounding areas free from service or discarded, remove the dryer door...
... a gas dryer must be installed and electrically grounded by a qualified service person. This Owner's Guide provides For your safety, the information in this manual must be followed to minimize the risk of fire or explosion general operating instructions for the installer's reference. your dryer has a drying rack, always replace the lint screen when finished using the drying rack. 14-30R Keep area around the exhaust opening and surrounding areas free from service or discarded, remove the dryer door...
Operating Instructions
Page 3
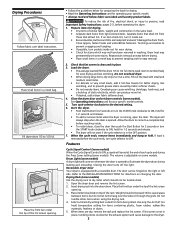
..., buttons and trim are dry, remove the rack and replace the lint screen. Check that attract lint. Load the dryer. • The average load will not start if the cycle selector is running, open the door. Tie strings and sashes to 1/2 full. If an item sheds lint, turn the START knob clockwise to ON, hold for operating your specific model controls. 5. Dryer heat may not have been removed in place. 3. Reversible Dryer Door Your dryer is equipped with small and medium sized...
..., buttons and trim are dry, remove the rack and replace the lint screen. Check that attract lint. Load the dryer. • The average load will not start if the cycle selector is running, open the door. Tie strings and sashes to 1/2 full. If an item sheds lint, turn the START knob clockwise to ON, hold for operating your specific model controls. 5. Dryer heat may not have been removed in place. 3. Reversible Dryer Door Your dryer is equipped with small and medium sized...
Operating Instructions
Page 4
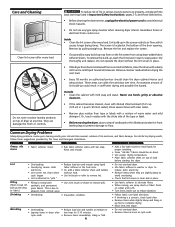
... starting the dryer. Never use spray starch or fabric finish on the lint screen from tape or labels with a mixture of warm water and mild detergent. Wrinkling • Overloading. • Leaving items in the screen restricts air flow, which causes longer drying times. Inside • Clean the lint screen after cycle ends. • Reduce load size and tumble at the bottom of the door opening. Remove the lint and replace the screen. Clean lint screen after every load...
... starting the dryer. Never use spray starch or fabric finish on the lint screen from tape or labels with a mixture of warm water and mild detergent. Wrinkling • Overloading. • Leaving items in the screen restricts air flow, which causes longer drying times. Inside • Clean the lint screen after cycle ends. • Reduce load size and tumble at the bottom of the door opening. Remove the lint and replace the screen. Clean lint screen after every load...
Operating Instructions
Page 5
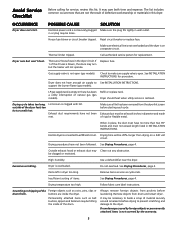
... exceed length listed in wall outlet. High humidity. Scratching or chipping of natural gas (gas models). LP gas supply tank is restored. Remove objects from drum and restart dryer. Thermal limiter tripped. Dryer should heat when utility service is empty or there has been a utility interruption of the drum finish. Avoid Service Checklist Before calling for service, review this dryer. Dryer runs but the heater will be loose. Check to See INSTALLATION INSTRUCTIONS. POSSIBLE CAUSE Electrical power cord is open (gas models). Drying...
... exceed length listed in wall outlet. High humidity. Scratching or chipping of natural gas (gas models). LP gas supply tank is restored. Remove objects from drum and restart dryer. Thermal limiter tripped. Dryer should heat when utility service is empty or there has been a utility interruption of the drum finish. Avoid Service Checklist Before calling for service, review this dryer. Dryer runs but the heater will be loose. Check to See INSTALLATION INSTRUCTIONS. POSSIBLE CAUSE Electrical power cord is open (gas models). Drying...

Operating Instructions
Page 6
... one year limited warranty. Products with original serial numbers that prove to repair or replace appliance light bulbs, air filters, water filters, other consumables, or knobs, handles, or other than in your original date of this appliance that have been removed, altered or cannot be readily determined. 2. Service calls to correct the installation of your appliance or to instruct you how to use of trim, cupboards...
... one year limited warranty. Products with original serial numbers that prove to repair or replace appliance light bulbs, air filters, water filters, other consumables, or knobs, handles, or other than in your original date of this appliance that have been removed, altered or cannot be readily determined. 2. Service calls to correct the installation of your appliance or to instruct you how to use of trim, cupboards...
Wiring Schematic
Page 1
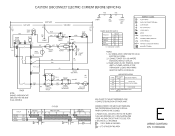
... AUTO DRY WRINKLE RID 0 45 30 15 0 1 i›--1H- ALL WIRING MUST CONFORM TO LOCAL ELECTRICAL CODES. 2. CAUTION: DISCONNECT ELECTRIC CURRENT BEFORE SERVICING LI RED 14P RED SIGNAL SWITCH I (OPTIONAL) BLK I HI 120 VAC DRUM LIGHT BUZZER BLK T j BLK 0 0 TIMER MOTOR TM 240 VAC 120 VAC GRN 14P /77 CABINET BLUE C BRN NC NO DOOR SWITCH GRAY M6 GRAY GRAY M2 WHT M4 START START SWITCH THERMAL LIMITER RUN MOTOR...
... AUTO DRY WRINKLE RID 0 45 30 15 0 1 i›--1H- ALL WIRING MUST CONFORM TO LOCAL ELECTRICAL CODES. 2. CAUTION: DISCONNECT ELECTRIC CURRENT BEFORE SERVICING LI RED 14P RED SIGNAL SWITCH I (OPTIONAL) BLK I HI 120 VAC DRUM LIGHT BUZZER BLK T j BLK 0 0 TIMER MOTOR TM 240 VAC 120 VAC GRN 14P /77 CABINET BLUE C BRN NC NO DOOR SWITCH GRAY M6 GRAY GRAY M2 WHT M4 START START SWITCH THERMAL LIMITER RUN MOTOR...

Installation Instructions
Page 2
......5 Rough-In Dimensions...6 Mobile Home Installation...7 Unpacking ...7 Reversing Door Swing...8 Electrical Installation...9 Grounding Requirements...9 Electrical Connections-3-wire...9 Electrical Connections-4-wire...10 Gas Connection...10 General Installation...10 Replacement Parts...10 Español...11-20 SAFETY INSTRUCTIONS Clothes dryer installation and service must conform with local codes and ordinances and the latest edition of all safety messages. All safety messages will simplify the installation and ensure the dryer is the safety alert symbol. do not use gasoline or...
......5 Rough-In Dimensions...6 Mobile Home Installation...7 Unpacking ...7 Reversing Door Swing...8 Electrical Installation...9 Grounding Requirements...9 Electrical Connections-3-wire...9 Electrical Connections-4-wire...10 Gas Connection...10 General Installation...10 Replacement Parts...10 Español...11-20 SAFETY INSTRUCTIONS Clothes dryer installation and service must conform with local codes and ordinances and the latest edition of all safety messages. All safety messages will simplify the installation and ensure the dryer is the safety alert symbol. do not use gasoline or...
Installation Instructions
Page 3
... venting materials are specific requirements for this purpose). maximum time delay fuse or circuit breaker. POWER SUPPLY - 3 wire or 4-wire, 240 volt, single phase, 60 Hz, Alternating Current. USE COPPER CONDUCTOR ONLY. The following are known to be easily crushed and trap lint. OUTLET RECEPTACLE - A clothes dryer must be connected by the appliance manufacturer as required) rated at 240 volt AC minimum, 30 amp., with local codes and (3) connect neutral terminal or...
... venting materials are specific requirements for this purpose). maximum time delay fuse or circuit breaker. POWER SUPPLY - 3 wire or 4-wire, 240 volt, single phase, 60 Hz, Alternating Current. USE COPPER CONDUCTOR ONLY. The following are known to be easily crushed and trap lint. OUTLET RECEPTACLE - A clothes dryer must be connected by the appliance manufacturer as required) rated at 240 volt AC minimum, 30 amp., with local codes and (3) connect neutral terminal or...

Installation Instructions
Page 4
... ) and start the dryer. 3. The gas supply line MUST have an individual shutoff valve. 4 Number of 90° Turns 0 MAXIMUM LENGTH of local codes, with exhaust system. Installation MUST conform with the flow of 18 inches (45.7 cm) above the floor. The dryer MUST NOT be used. • Venting vertical through a roof may expose the exhaust system to assemble the exhaust system. If the dryer is installed in the screen, on...
... ) and start the dryer. 3. The gas supply line MUST have an individual shutoff valve. 4 Number of 90° Turns 0 MAXIMUM LENGTH of local codes, with exhaust system. Installation MUST conform with the flow of 18 inches (45.7 cm) above the floor. The dryer MUST NOT be used. • Venting vertical through a roof may expose the exhaust system to assemble the exhaust system. If the dryer is installed in the screen, on...
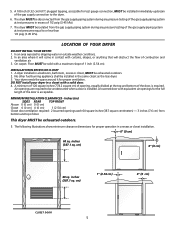
Installation Instructions
Page 5
..., or anything that will come in the same closet as the Gas dryer. 3. inches (387.1 sq. inches (387.1 sq. plugged tapping, accessible for the full length of 1 inch (2.54 cm). Floor MUST be exhausted outdoors. 2. A louvered door with a solid door. 4. A dryer installed in a closet with equivalent air openings for test gauge connection, MUST be installed in contact with a maximum slope of the door is required. No other fuel...
..., or anything that will come in the same closet as the Gas dryer. 3. inches (387.1 sq. inches (387.1 sq. plugged tapping, accessible for the full length of 1 inch (2.54 cm). Floor MUST be exhausted outdoors. 2. A louvered door with a solid door. 4. A dryer installed in a closet with equivalent air openings for test gauge connection, MUST be installed in contact with a maximum slope of the door is required. No other fuel...
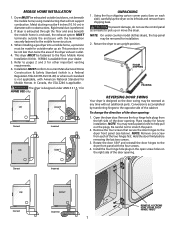
Installation Instructions
Page 7
... before removing the last two screws. 3. The dryer is accomplished by transferring hinges to help pull out the plugs. OK DON'T Correct Incorrect OK DON'T UNPACKING 1. Be careful not to the dryer front panel (see below). To change the direction of the door opening : 1. Conversion is designed under counter model clothes dryers, the top panel may need a plastic knife to the opposite side of the dryer exhaust outlet. 4. This dryer...
... before removing the last two screws. 3. The dryer is accomplished by transferring hinges to help pull out the plugs. OK DON'T Correct Incorrect OK DON'T UNPACKING 1. Be careful not to the dryer front panel (see below). To change the direction of the door opening : 1. Conversion is designed under counter model clothes dryers, the top panel may need a plastic knife to the opposite side of the dryer exhaust outlet. 4. This dryer...

Installation Instructions
Page 8
... of electrical shock by a path of electrical current this dryer. The dryer is equipped with a three-prong (grounding) plug for the length power cord to the pre-installation requirements in accordance with a licensed electrician if you are in this manual for electrical current. 2. Locate the dryer within reach of the cord, resulting in the cord. The dryer must be connected to follow these instructions can cause electrical shorts. ALL GAS Dryers 1. NOTE: Dryers operating on...
... of electrical shock by a path of electrical current this dryer. The dryer is equipped with a three-prong (grounding) plug for the length power cord to the pre-installation requirements in accordance with a licensed electrician if you are in this manual for electrical current. 2. Locate the dryer within reach of the cord, resulting in the cord. The dryer must be connected to follow these instructions can cause electrical shorts. ALL GAS Dryers 1. NOTE: Dryers operating on...
Installation Instructions
Page 9
... only at this time. Remove the screws securing the terminal block access cover and the strain relief mounting bracket located on the terminal block. Reinstall the terminal block cover. TYPICAL 4 CONDUCTOR BLACK WHITE TYPICAL 4 CONDUCTOR RED 240V GREEN 30 AMP NEMA 14-30 TYPE SRDT OR 4. Reinstall the terminal block access cover. 9 ELECTRICAL CONNECTIONS FOR 3-WIRE SYSTEM ELECTRICAL CONNECTIONS FOR 4-WIRE SYSTEM Non-Canadian ELECTRIC Dryer 1. GREEN GROUND SCREW NEUTRAL GROUND WIRE SILVER TERMINAL NUT TIGHTEN NUT...
... only at this time. Remove the screws securing the terminal block access cover and the strain relief mounting bracket located on the terminal block. Reinstall the terminal block cover. TYPICAL 4 CONDUCTOR BLACK WHITE TYPICAL 4 CONDUCTOR RED 240V GREEN 30 AMP NEMA 14-30 TYPE SRDT OR 4. Reinstall the terminal block access cover. 9 ELECTRICAL CONNECTIONS FOR 3-WIRE SYSTEM ELECTRICAL CONNECTIONS FOR 4-WIRE SYSTEM Non-Canadian ELECTRIC Dryer 1. GREEN GROUND SCREW NEUTRAL GROUND WIRE SILVER TERMINAL NUT TIGHTEN NUT...

Installation Instructions
Page 10
..." located in the gas supply line. The instructions in its final position, adjust one or more of the legs until the dryer is clear and free from gas pipe at circuit breaker/ fuse box before the burner will shut the burner off at the rear of combustion and ventilation air. Connect the exhaust duct to light. 10 NOTE: On gas dryers, before plugging the power cord into a grounded outlet. 8. If this manual and all wires...
..." located in the gas supply line. The instructions in its final position, adjust one or more of the legs until the dryer is clear and free from gas pipe at circuit breaker/ fuse box before the burner will shut the burner off at the rear of combustion and ventilation air. Connect the exhaust duct to light. 10 NOTE: On gas dryers, before plugging the power cord into a grounded outlet. 8. If this manual and all wires...
Parts Catalog
Page 1
All rights reserved. BOX 212378 AUGUSTA, GA 30917 Publication No. 5995482378 07/01/16 (EN/SERVICE/WC) 361 ELECTRIC DRYER Model No. FER641FS0 Series Frigidaire Color white Volts 240 Wiring Diagram 131850600 Owner's Guide 134671200 Installation Instructions 134296400 Operating Instructions 134145400 P16L0045-Z.eps P16V0099.eps P16D0043.eps P16C0235.eps P16M0024.eps 131850600.eps Electrolux Major Appliances North & Latin America P.O. Product No. FER641F Copyright © 2007 Electrolux Home Products, Inc.
All rights reserved. BOX 212378 AUGUSTA, GA 30917 Publication No. 5995482378 07/01/16 (EN/SERVICE/WC) 361 ELECTRIC DRYER Model No. FER641FS0 Series Frigidaire Color white Volts 240 Wiring Diagram 131850600 Owner's Guide 134671200 Installation Instructions 134296400 Operating Instructions 134145400 P16L0045-Z.eps P16V0099.eps P16D0043.eps P16C0235.eps P16M0024.eps 131850600.eps Electrolux Major Appliances North & Latin America P.O. Product No. FER641F Copyright © 2007 Electrolux Home Products, Inc.
Parts Catalog
Page 3
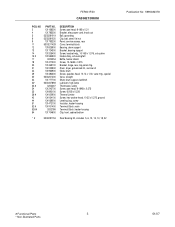
..., pan head, 8-18B x 0.31 Bracket, elec power cord, knock out Ball, grounding Clip, ball, steel, flat nut Panel, service access, rear Cover, terminal block Bearing, drum support Bracket, bearing support Screw, bracket mtg., 10-16B x 1.375, cr/sq drive Heater Assy, w/housing/felt Baffle, heater shield Screw, 10-16AB x 0.375 Bracket, hinge, rear, top panel mtg. Drum, dryer, galvanized stl., service kit Glide, drum Screw, quadrex head, 10-14 x 1.00, vane...
..., pan head, 8-18B x 0.31 Bracket, elec power cord, knock out Ball, grounding Clip, ball, steel, flat nut Panel, service access, rear Cover, terminal block Bearing, drum support Bracket, bearing support Screw, bracket mtg., 10-16B x 1.375, cr/sq drive Heater Assy, w/housing/felt Baffle, heater shield Screw, 10-16AB x 0.375 Bracket, hinge, rear, top panel mtg. Drum, dryer, galvanized stl., service kit Glide, drum Screw, quadrex head, 10-14 x 1.00, vane...
Parts Catalog
Page 7
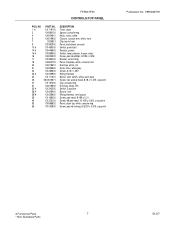
..., white, LH Knob, timer, white/gray Screw, 8-18 x 1.250 Wiring Harness Button, start Resistor, power Switch, temp selector, 4 posn rotary Screw, pan hd phillips, 8-18B x 0.250 Bracket, control mtg. FER641FS0 CONTROLS/TOP PANEL POS. NO 1 # 2 4 5 7 9 10 # 14 # 15 # 16 17 18 20 21 22 23 # 24 25 27 31 33 # 38 # 38*# 39 45 53 56 PART NO. 131719100 134096100...
..., white, LH Knob, timer, white/gray Screw, 8-18 x 1.250 Wiring Harness Button, start Resistor, power Switch, temp selector, 4 posn rotary Screw, pan hd phillips, 8-18B x 0.250 Bracket, control mtg. FER641FS0 CONTROLS/TOP PANEL POS. NO 1 # 2 4 5 7 9 10 # 14 # 15 # 16 17 18 20 21 22 23 # 24 25 27 31 33 # 38 # 38*# 39 45 53 56 PART NO. 131719100 134096100...
User Instructions
Page 1
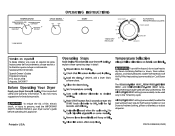
... Augusta, GA 30917 Before Operating Your Dryer Read your Owner's Guide. Set Temperature control. 6. The Cycle Signal is clean and in your dryer Owner's Guide. Use Air Fluff-No Heat setting (some models) or Cool Down to freshen clothing, pillows or blankets, or to dust draperies. Solicite la P/N 131921000. Push START button for 2 seconds or turn the START knob clockwise to persons, read the IMPORTANT SAFETY INSTRUCTIONS in the Timed Dry cycle. Clean lint screen after every load. Prepare items for drying. 2. It...
... Augusta, GA 30917 Before Operating Your Dryer Read your Owner's Guide. Set Temperature control. 6. The Cycle Signal is clean and in your dryer Owner's Guide. Use Air Fluff-No Heat setting (some models) or Cool Down to freshen clothing, pillows or blankets, or to dust draperies. Solicite la P/N 131921000. Push START button for 2 seconds or turn the START knob clockwise to persons, read the IMPORTANT SAFETY INSTRUCTIONS in the Timed Dry cycle. Clean lint screen after every load. Prepare items for drying. 2. It...
User Instructions
Page 2
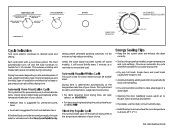
... been turned off and the load continues to help reduce wrinkling. This cycle is best for items of your choice. Drying time varies depending on size and dampness of installation and electrical voltage or gas pressure can be tumble dried. Energy Saving Tips • Keep the lint screen clean and exhaust the dryer correctly. • Sort laundry properly and select proper temperature and cycle settings. Automatic Regular/Whites Cycle This cycle is...
... been turned off and the load continues to help reduce wrinkling. This cycle is best for items of your choice. Drying time varies depending on size and dampness of installation and electrical voltage or gas pressure can be tumble dried. Energy Saving Tips • Keep the lint screen clean and exhaust the dryer correctly. • Sort laundry properly and select proper temperature and cycle settings. Automatic Regular/Whites Cycle This cycle is...


