Installation Instructions
Page 8
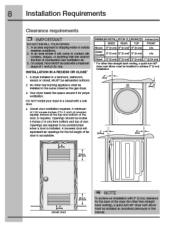
...obstrut the now of comb.etion and ventuabon air. 3. MINIMUM INSTALLATION CLEARANCES - in this manual. A dryer installed In a bedroom, bathroom, recess or closet. DO NOT install your flyer In a closetwith a sollc door. 4. U. °CM) VOGT,' If (., cm) rva Closet 0'(0 cm) 0' (0 ant ... of dccr. z. COW°. Pal " pa)$ 7 7$17^4 11 closet door • NOTE TO achieve an instailzdon with a maximun sbpe of tle door Is acceptable. a quick-tum SO° dryer vent elbow must be installed to be enausted otitdocrs. 2. 8 Installation Requirements Clearance requirements...
...obstrut the now of comb.etion and ventuabon air. 3. MINIMUM INSTALLATION CLEARANCES - in this manual. A dryer installed In a bedroom, bathroom, recess or closet. DO NOT install your flyer In a closetwith a sollc door. 4. U. °CM) VOGT,' If (., cm) rva Closet 0'(0 cm) 0' (0 ant ... of dccr. z. COW°. Pal " pa)$ 7 7$17^4 11 closet door • NOTE TO achieve an instailzdon with a maximun sbpe of tle door Is acceptable. a quick-tum SO° dryer vent elbow must be installed to be enausted otitdocrs. 2. 8 Installation Requirements Clearance requirements...

Installation Instructions
Page 9
... Maid *We OAK (temo In4v *Mack" loony below cradear pia" -4-4/00 Mean aw 01.50rol ni ne einsani rar w. Installation Requirements 9 AIM Installed dryer dimensions ferroideiny to dampen door ea Mel as dear (Oder, O ter assn gest IleceNns J Oar (110.Sal sr, IsId.la tv-wft re".7 dive navitid *peens, piefatell lice...
... Maid *We OAK (temo In4v *Mack" loony below cradear pia" -4-4/00 Mean aw 01.50rol ni ne einsani rar w. Installation Requirements 9 AIM Installed dryer dimensions ferroideiny to dampen door ea Mel as dear (Oder, O ter assn gest IleceNns J Oar (110.Sal sr, IsId.la tv-wft re".7 dive navitid *peens, piefatell lice...
Installation Instructions
Page 17
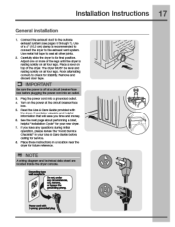
...statillty. The diyer MUST be level and resting solidly on top of a r (10.2 a damp Is recommended to connect the dryer to your new dryer. 7 It you have any questbns duilng Initial opetatbn, please neview the "Avoid Service Cheddis In ycurUse & Care Guide before pugging... •installation Cycle" to the exhaust vent system. Place a level on all tourlegs. Remove and discern door tape. use motet fog tape to seal all otner joints. 2 Canefully slide the dryer to check for future reference. Rock alternating corners to Its anal posaion. NOTE I A wiring diagram and ...
...statillty. The diyer MUST be level and resting solidly on top of a r (10.2 a damp Is recommended to connect the dryer to your new dryer. 7 It you have any questbns duilng Initial opetatbn, please neview the "Avoid Service Cheddis In ycurUse & Care Guide before pugging... •installation Cycle" to the exhaust vent system. Place a level on all tourlegs. Remove and discern door tape. use motet fog tape to seal all otner joints. 2 Canefully slide the dryer to check for future reference. Rock alternating corners to Its anal posaion. NOTE I A wiring diagram and ...
Installation Instructions
Page 19
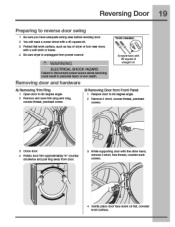
...source) th WARNING ELECTRICAL SHOCK HkZARD Failureto disconnect power source Iatom savicIng could result in persona injury or eve death. Removing door and hardware Tools healed: Scrwedrivers with the other hand, remove 3 short, line-thread, ccunter-sunk screws. 4 Gently place door/ace down on...square bit. 3 Protect flat woik surface, such as top of dryer or11)or near dryer, with a soft cloth or towel. 4 Be sure dryer Is unplucged from dear. 3 Mlle supporting dear with square straight bit A) Removing Trim Ring 1 Open door to 90 degree angle. 2 Remove 2 shdrt, coursathread, panhead ...
...source) th WARNING ELECTRICAL SHOCK HkZARD Failureto disconnect power source Iatom savicIng could result in persona injury or eve death. Removing door and hardware Tools healed: Scrwedrivers with the other hand, remove 3 short, line-thread, ccunter-sunk screws. 4 Gently place door/ace down on...square bit. 3 Protect flat woik surface, such as top of dryer or11)or near dryer, with a soft cloth or towel. 4 Be sure dryer Is unplucged from dear. 3 Mlle supporting dear with square straight bit A) Removing Trim Ring 1 Open door to 90 degree angle. 2 Remove 2 shdrt, coursathread, panhead ...
Installation Instructions
Page 20
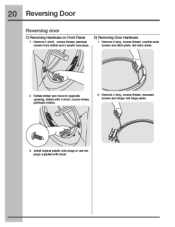
recessed screws and hinge. couise-trireai, pannead scams. 2 Remove 4 Iamb course-thread. Set latch aside. 2 Rotate striker and movetooppsite opening. Mt:at-Iwith 2 short. Set hinge aside. 3 Install nal plastic hole plugs or use new plugs suppliedwith dryer. Iy D) Removing Door Hardware 1 Remove 2 Iamb course-thread. 20 Reversing Door Reversing door C) Reversing Hardware on Front Panel 1 Remove 2 slut, course-thread, panhead screws trom sinker and 2 plastic hole plugs. counter-surd( screws and latch plate.
recessed screws and hinge. couise-trireai, pannead scams. 2 Remove 4 Iamb course-thread. Set latch aside. 2 Rotate striker and movetooppsite opening. Mt:at-Iwith 2 short. Set hinge aside. 3 Install nal plastic hole plugs or use new plugs suppliedwith dryer. Iy D) Removing Door Hardware 1 Remove 2 Iamb course-thread. 20 Reversing Door Reversing door C) Reversing Hardware on Front Panel 1 Remove 2 slut, course-thread, panhead screws trom sinker and 2 plastic hole plugs. counter-surd( screws and latch plate.

Installation Instructions
Page 21
Set inalcatcr aside. tab atatiat antab Inlet 1 Grasp hole plug tehveen linger and thumb and cock upward, pboting away Iran center of glass to release tab. E) Removing Latch Indicator Reversing Door 21 F) Removing Hole Plug 1 Grasp indicator on latch side between linger and thumb and rock upward, pivoting away from center of glass. 2 Gently push Indicator tward center of glass, releasing tab. •mane& In** 3 Rock tab upward. 4 Pull Indicator out.
Set inalcatcr aside. tab atatiat antab Inlet 1 Grasp hole plug tehveen linger and thumb and cock upward, pboting away Iran center of glass to release tab. E) Removing Latch Indicator Reversing Door 21 F) Removing Hole Plug 1 Grasp indicator on latch side between linger and thumb and rock upward, pivoting away from center of glass. 2 Gently push Indicator tward center of glass, releasing tab. •mane& In** 3 Rock tab upward. 4 Pull Indicator out.
Installation Instructions
Page 22
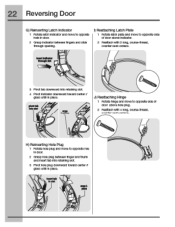
... tough alt =bp 3 Pivot tab clownvara into retaining slot. 3 PIVOt hole plug aownwara toward center a glass until In place. 22 Reversing Door G) Reinserting Latch Indicator 1 Rotate latch inlicator and moveto opposba ride in place. Inserltab Ins* ir J) Reattaching Hinge 1 Rotate range ash moveto opposite... sloe of door above Irdlcatcr. 2 Reattach with 2 long course-thread, counter-sunk saays. I -Ic le Plug 1 Rotate hole plug and move to opposite hoe In door 2 Grasp hobo plug botwoon finger and thumb and inset tab into retaining...
... tough alt =bp 3 Pivot tab clownvara into retaining slot. 3 PIVOt hole plug aownwara toward center a glass until In place. 22 Reversing Door G) Reinserting Latch Indicator 1 Rotate latch inlicator and moveto opposba ride in place. Inserltab Ins* ir J) Reattaching Hinge 1 Rotate range ash moveto opposite... sloe of door above Irdlcatcr. 2 Reattach with 2 long course-thread, counter-sunk saays. I -Ic le Plug 1 Rotate hole plug and move to opposite hoe In door 2 Grasp hobo plug botwoon finger and thumb and inset tab into retaining...
Installation Instructions
Page 23
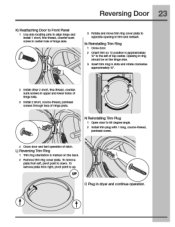
... Front Panel 1 Use side locating pins to ao degreemg*. 2 Install trim plug with 1 icng, course-thread, panhead screw. 4 Close door and test opera bn 01 latch. fine-thread, countersunk screws In upper snd lower holes 01 hinge side. 3 Install 2 short, course-Thread, panhead screws through .... L.) Reversing Trim Ring 1 mm ring orientation Is marked on the hinge side. 3 Insert trim ring in dryer and cant nue operation. Opening In ring should be on the tack 2 Remove trim ring cove' plate. Reversing Door 23 AIM 3 Rotate and move trim ring cover plate to the lett or top center. lb...
... Front Panel 1 Use side locating pins to ao degreemg*. 2 Install trim plug with 1 icng, course-thread, panhead screw. 4 Close door and test opera bn 01 latch. fine-thread, countersunk screws In upper snd lower holes 01 hinge side. 3 Install 2 short, course-Thread, panhead screws through .... L.) Reversing Trim Ring 1 mm ring orientation Is marked on the hinge side. 3 Insert trim ring in dryer and cant nue operation. Opening In ring should be on the tack 2 Remove trim ring cove' plate. Reversing Door 23 AIM 3 Rotate and move trim ring cover plate to the lett or top center. lb...

