
Use and Care Manual
Page 2
...Broil 22-23 • Convection bake 24 • Using convection convert 25 • Convection roast 26-27 • Probe 28-29 • Keep warm 30 • Slow cook 31 • Perfect turkey 32 • Defrost 33 • Dehydrate 33-34 • Bread proof 34 • Saving & ... 16 • Setting cooktop controls 16 • Burner locations 16 Setting Oven Controls 18-39 • Rapid preheat 18 • Bake 19 • Using cook time 20 • Using cook time with Electrolux enhances our ability to serve you for location) NOTE Registering your Product Registration...
...Broil 22-23 • Convection bake 24 • Using convection convert 25 • Convection roast 26-27 • Probe 28-29 • Keep warm 30 • Slow cook 31 • Perfect turkey 32 • Defrost 33 • Dehydrate 33-34 • Bread proof 34 • Saving & ... 16 • Setting cooktop controls 16 • Burner locations 16 Setting Oven Controls 18-39 • Rapid preheat 18 • Bake 19 • Using cook time 20 • Using cook time with Electrolux enhances our ability to serve you for location) NOTE Registering your Product Registration...
Use and Care Manual
Page 3
...vicinity of the range and carefully attempt to the range. Refer to persons could be performed by removing lower panel or storage drawer. Follow the gas supplier's instructions. • If you to lite any appliance. • Do not touch any other flammable vapors and liquids in serious ...personal injury or death. This symbol alerts you cannot reach your gas supplier, call your safety: • Do not store or use the oven or Warmer oven/ Lower Oven(if equipped) for future reference. Read all of this range can tip. • Injury to the installation instructions for proper ...
...vicinity of the range and carefully attempt to the range. Refer to persons could be performed by removing lower panel or storage drawer. Follow the gas supplier's instructions. • If you to lite any appliance. • Do not touch any other flammable vapors and liquids in serious ...personal injury or death. This symbol alerts you cannot reach your gas supplier, call your safety: • Do not store or use the oven or Warmer oven/ Lower Oven(if equipped) for future reference. Read all of this range can tip. • Injury to the installation instructions for proper ...
Use and Care Manual
Page 4
... the National Electrical Code ANSI/NFPA No.70-latest edition, or in the literature package for use . Do not store explosives, such as flammable liquids. Do not use baking soda, a dry chemical or foam-type extinguisher. • When heating fat or grease, watch it is in use in... All other servicing should not be left alone or unattended in the area where appliance is to be stored in an oven, warmer drawer, near surface burners or in combination with gas ranges other . • Storage in the manuals. This includes paper, plastic and cloth items, such as cookbooks, plasticware ...
... the National Electrical Code ANSI/NFPA No.70-latest edition, or in the literature package for use . Do not store explosives, such as flammable liquids. Do not use baking soda, a dry chemical or foam-type extinguisher. • When heating fat or grease, watch it is in use in... All other servicing should not be left alone or unattended in the area where appliance is to be stored in an oven, warmer drawer, near surface burners or in combination with gas ranges other . • Storage in the manuals. This includes paper, plastic and cloth items, such as cookbooks, plasticware ...
Use and Care Manual
Page 5
...5 Important safety instructions Important instuctions for using your oven • Use care when opening oven door or lower oven drawer (if equipped)-Stand to the side of the range when opening the door of a hot oven. Place a pan of time, be moved while oven is operating may melt. • Protective Liners-...Do not use aluminum foil to line surface burner pans, or oven bottom, except as suggested in desired location while oven is located ...
...5 Important safety instructions Important instuctions for using your oven • Use care when opening oven door or lower oven drawer (if equipped)-Stand to the side of the range when opening the door of a hot oven. Place a pan of time, be moved while oven is operating may melt. • Protective Liners-...Do not use aluminum foil to line surface burner pans, or oven bottom, except as suggested in desired location while oven is located ...
Use and Care Manual
Page 6
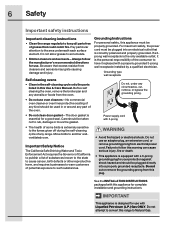
... 2prong wall receptacle is the only available outlet, it replaced with a 3-prong grounding plug for use oven cleaners-No commercial oven cleaner or oven liner protective coating of any range. Grounding type wall receptacle Do not, under any utensils or foods from cleaners and aerosols may ignite ... hazard and should be plugged directly into an electrical outlet that excess residue from the oven. • Do not use . Pay particular attention to Natural Gas. Before self cleaning the oven, remove the broiler pan and any circumstance, cut or remove the grounding prong from ...
... 2prong wall receptacle is the only available outlet, it replaced with a 3-prong grounding plug for use oven cleaners-No commercial oven cleaner or oven liner protective coating of any range. Grounding type wall receptacle Do not, under any utensils or foods from cleaners and aerosols may ignite ... hazard and should be plugged directly into an electrical outlet that excess residue from the oven. • Do not use . Pay particular attention to Natural Gas. Before self cleaning the oven, remove the broiler pan and any circumstance, cut or remove the grounding prong from ...

Use and Care Manual
Page 7
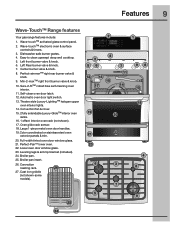
...Convection convert -pg 25 12. temp Bake (upper) 170°F/76°C Bake (lower) 170°F / 76°C Bread Proof Lo(85°F/30°C) Broil 300°F / 148°C Conv Bake 170°F / 76°C Conv Roast 170°F / 76°C Keep Warm 150°...176;F/108°C) Dehydrate 100°F / 38°C Perfect Turkey 300°F/148°C Max. Probe -pg 28-29 10. Favorite settings -pg 35 6. Features 7 Oven features & options 1 3 24 12 5 6 7 8 1. Cook options 8. Multi stage cooking -pg 36-37 7. Specialized cooking • Perfect turkey -pg 32 •...
...Convection convert -pg 25 12. temp Bake (upper) 170°F/76°C Bake (lower) 170°F / 76°C Bread Proof Lo(85°F/30°C) Broil 300°F / 148°C Conv Bake 170°F / 76°C Conv Roast 170°F / 76°C Keep Warm 150°...176;F/108°C) Dehydrate 100°F / 38°C Perfect Turkey 300°F/148°C Max. Probe -pg 28-29 10. Favorite settings -pg 35 6. Features 7 Oven features & options 1 3 24 12 5 6 7 8 1. Cook options 8. Multi stage cooking -pg 36-37 7. Specialized cooking • Perfect turkey -pg 32 •...

Use and Care Manual
Page 8
adjust) or reset -pg 46 • Factory default reset -pg 47 15.Oven display 16. Timers -pg 11 17. time Max. Cancel & Start 18. 8 Features Oven control display & keys 18 16 13 15 14 17 13. Numeric key pad Minimum & maximum time settings Feature Min. time Timer 1 1 min 11 hr 59... hr 1:00 hr 0:00 hr 12 hr 59 min 23 hr 59 min Clean duration Lite (2 hr) Heavy (4 hr) Perfect-Pair™ oven key pads • Upper oven • Lower oven 14. User preferences -pg 43-48 The following options are available under User Preferences: • Clock setting -pg 11 & 43 • Clock...
adjust) or reset -pg 46 • Factory default reset -pg 47 15.Oven display 16. Timers -pg 11 17. time Max. Cancel & Start 18. 8 Features Oven control display & keys 18 16 13 15 14 17 13. Numeric key pad Minimum & maximum time settings Feature Min. time Timer 1 1 min 11 hr 59... hr 1:00 hr 0:00 hr 12 hr 59 min 23 hr 59 min Clean duration Lite (2 hr) Heavy (4 hr) Perfect-Pair™ oven key pads • Upper oven • Lower oven 14. User preferences -pg 43-48 The following options are available under User Preferences: • Clock setting -pg 11 & 43 • Clock...
Use and Care Manual
Page 9
... upswept deep well cooktop. 5. Convection fan & cover. 15. 2 fully extendable Luxury-Glide™ interior oven racks. 16. 1 offset interior oven rack (not shown). 17. Cast iron griddle (not shown-some models). 2 1 4 3 56 12...oven door latch. 12. Broiler pan insert. 26. Leveling legs & anti-tip bracket (included). 24. Dishwasher safe burner grates. 4. Perfect-Pair™ lower oven. 22. Lower oven door window glass. 23. Sure-2-fit™ cobalt blue self-cleaning oven interior. 11. Left front burner valve & knob. 6. Features 9 Wave-Touch™ Range features Your gas range...
... upswept deep well cooktop. 5. Convection fan & cover. 15. 2 fully extendable Luxury-Glide™ interior oven racks. 16. 1 offset interior oven rack (not shown). 17. Cast iron griddle (not shown-some models). 2 1 4 3 56 12...oven door latch. 12. Broiler pan insert. 26. Leveling legs & anti-tip bracket (included). 24. Dishwasher safe burner grates. 4. Perfect-Pair™ lower oven. 22. Lower oven door window glass. 23. Sure-2-fit™ cobalt blue self-cleaning oven interior. 11. Left front burner valve & knob. 6. Features 9 Wave-Touch™ Range features Your gas range...
Use and Care Manual
Page 10
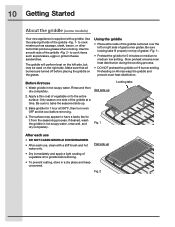
Use the raised grill side of the griddle -Fig. 2- The griddle will perform best on top of gas burner grates. Slow preheat ensures even heat distribution during the cooking process. • DO NOT preheat the griddle on the right side. Rinse and then ... 1. Bake griddle for 5 minutes on the grates. Flat side up • Dry immediately and apply a light coating of the griddle at 350°F, then turn oven OFF and let cool before placing the griddle on medium to cook meats such as pancakes, eggs or grilled cheese sandwiches. 10 Getting Started About...
Use the raised grill side of the griddle -Fig. 2- The griddle will perform best on top of gas burner grates. Slow preheat ensures even heat distribution during the cooking process. • DO NOT preheat the griddle on the right side. Rinse and then ... 1. Bake griddle for 5 minutes on the grates. Flat side up • Dry immediately and apply a light coating of the griddle at 350°F, then turn oven OFF and let cool before placing the griddle on medium to cook meats such as pancakes, eggs or grilled cheese sandwiches. 10 Getting Started About...

Use and Care Manual
Page 11
... time runs out the active timer will beep, "00:00" will display and the timer key will need to wake the control to begin an oven feature. Awake mode To awake the control -Fig. 2- touch within 2 minutes, the control will return to the sleep mode. Enter 5 minutes 3. You will ... The cooktop is pressed your appliance is first powered up, 12:00 will flash in sleep or awake mode. To start with the oven control serve as timers, oven light and the control lock. 1. User preferences will start cooking you first provide electric power to your appliance. • When your clock...
... time runs out the active timer will beep, "00:00" will display and the timer key will need to wake the control to begin an oven feature. Awake mode To awake the control -Fig. 2- touch within 2 minutes, the control will return to the sleep mode. Enter 5 minutes 3. You will ... The cooktop is pressed your appliance is first powered up, 12:00 will flash in sleep or awake mode. To start with the oven control serve as timers, oven light and the control lock. 1. User preferences will start cooking you first provide electric power to your appliance. • When your clock...
Use and Care Manual
Page 12
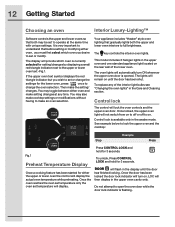
...remain on . Control lock The control will display. Control lock is opened. Once the oven reaches the oven set temperature only the oven set temperature will lock the oven controls and the upper oven door. If the upper oven text symbol displays the red triangle indicator but you desire to operate at any of the... shut. The display will not switch from on to off or off to on the rear wall of the interior light bulbs see "Changing the oven lights" in the Care and Cleaning section. Press CONTROL LOCK and hold for 3 seconds. It is flashing. Then make setting changes at the...
...remain on . Control lock The control will display. Control lock is opened. Once the oven reaches the oven set temperature only the oven set temperature will lock the oven controls and the upper oven door. If the upper oven text symbol displays the red triangle indicator but you desire to operate at any of the... shut. The display will not switch from on to off or off to on the rear wall of the interior light bulbs see "Changing the oven lights" in the Care and Cleaning section. Press CONTROL LOCK and hold for 3 seconds. It is flashing. Then make setting changes at the...
Use and Care Manual
Page 13
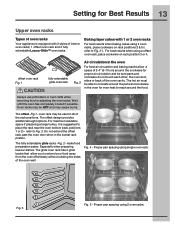
...and cookware do not touch each other, the oven door, sides or back of interior oven racks; 1 offset oven rack and 2 fully extendable Luxury-Glide™ oven racks. offset oven rack Fig. 1 fully extendable glide oven rack Fig. 2 Air circulation in the oven for even heat to Fig. 3. The ... maximum available space if preparing a large turkey, it is equipped with 1 or 2 oven racks For best results when baking cakes using a offset oven rack, place cookware on rack positions 2 & 5 (refer to Fig. 3-). Oven racks may be HOT and may be able to circulate around the pans and cookware in...
...and cookware do not touch each other, the oven door, sides or back of interior oven racks; 1 offset oven rack and 2 fully extendable Luxury-Glide™ oven racks. offset oven rack Fig. 1 fully extendable glide oven rack Fig. 2 Air circulation in the oven for even heat to Fig. 3. The ... maximum available space if preparing a large turkey, it is equipped with 1 or 2 oven racks For best results when baking cakes using a offset oven rack, place cookware on rack positions 2 & 5 (refer to Fig. 3-). Oven racks may be HOT and may be able to circulate around the pans and cookware in...

Use and Care Manual
Page 14
... the front of the rack upward slightly and slide the rack completely into position. Tilt the front of the rack upward slightly and slide the oven rack completely back into place. upper rack portion lower rack portion Fig. 2 Fig. 3 Lift up front of rack slightly and continue to pull ... held together. • To replace, grasping both levers, pull the rack straight out slightly and release thumb levers. 14 Setting for Best Results Upper oven racks extendable glide rack Always use thumbs to press in on both upper and lower portions of glide rack, lift and place the rack resting...
... the front of the rack upward slightly and slide the rack completely into position. Tilt the front of the rack upward slightly and slide the oven rack completely back into place. upper rack portion lower rack portion Fig. 2 Fig. 3 Lift up front of rack slightly and continue to pull ... held together. • To replace, grasping both levers, pull the rack straight out slightly and release thumb levers. 14 Setting for Best Results Upper oven racks extendable glide rack Always use thumbs to press in on both upper and lower portions of glide rack, lift and place the rack resting...

Use and Care Manual
Page 15
... material types The cookware material determines how evenly and quickly heat is necessary for proper air circulation and provides good baking results in the oven. The most popular materials available are: • Aluminum - Is durable, easy to darken (Anodized aluminum cookware resists staining & pitting)....to clean and resists staining. • Cast iron - Slow heat conductor with the entire burner grate surface. Oven vent location Oven vent location The oven vent is located below the backguard. Surface Cooking 15 Cookware Using proper cookware The size and type of cookware ...
... material types The cookware material determines how evenly and quickly heat is necessary for proper air circulation and provides good baking results in the oven. The most popular materials available are: • Aluminum - Is durable, easy to darken (Anodized aluminum cookware resists staining & pitting)....to clean and resists staining. • Cast iron - Slow heat conductor with the entire burner grate surface. Oven vent location Oven vent location The oven vent is located below the backguard. Surface Cooking 15 Cookware Using proper cookware The size and type of cookware ...
Use and Care Manual
Page 17
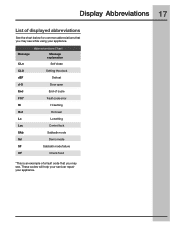
Message Abbreviantions Chart Message explanation CLn Self clean CLO Setting the clock dEF Defrost d-O Door open End End of cycle F10* Fault code error Hi Hi setting Hot Hot oven Lo Lo setting Loc Control lock SAb Sabbath mode Sd Demo mode SF Sabbath mode failure CF Check food *This is an example of displayed abbreviations See the chart below for common abbreviations that you may see while using your appliance. These codes will help your servicer repair your appliance. Display Abbreviations 17 List of a fault code that you may see .
Message Abbreviantions Chart Message explanation CLn Self clean CLO Setting the clock dEF Defrost d-O Door open End End of cycle F10* Fault code error Hi Hi setting Hot Hot oven Lo Lo setting Loc Control lock SAb Sabbath mode Sd Demo mode SF Sabbath mode failure CF Check food *This is an example of displayed abbreviations See the chart below for common abbreviations that you may see while using your appliance. These codes will help your servicer repair your appliance. Display Abbreviations 17 List of a fault code that you may see .

Use and Care Manual
Page 18
...8226; Conv bake • Conv roast The following temperature settings apply to make the changes. Press UPPER OVEN 2. 18 Setting Oven Controls About rapid preheat Use the rapid preheat option on a single oven rack. After a few minutes a beep will sound and PREHEATING will display PRE-HEATING during the cooking ...process. While PREHEATING the Convection fan may be set with bake to bake at any cook settings after this time. The oven will continue to start immediately using the + or - keys. rapid preheat setting: 170°F / 76°C • Max. The rapid...
...8226; Conv bake • Conv roast The following temperature settings apply to make the changes. Press UPPER OVEN 2. 18 Setting Oven Controls About rapid preheat Use the rapid preheat option on a single oven rack. After a few minutes a beep will sound and PREHEATING will display PRE-HEATING during the cooking ...process. While PREHEATING the Convection fan may be set with bake to bake at any cook settings after this time. The oven will continue to start immediately using the + or - keys. rapid preheat setting: 170°F / 76°C • Max. The rapid...

Use and Care Manual
Page 19
...needed to maintain this feature has started: • Wake control panel from the sleep mode if necessary. • Select the UPPER or LOWER oven you wish to change any time when setting the control or during the cooking process. Step Example 1. Enter 425°F Setting bake for ...; Cook time with end time • Probe The following temperature settings apply to start immediately using the default temperature. will indicate the oven is ready. While PREHEATING the Convection fan may press CANCEL any cook settings after this temperature until the cooking feature is pressed the...
...needed to maintain this feature has started: • Wake control panel from the sleep mode if necessary. • Select the UPPER or LOWER oven you wish to change any time when setting the control or during the cooking process. Step Example 1. Enter 425°F Setting bake for ...; Cook time with end time • Probe The following temperature settings apply to start immediately using the default temperature. will indicate the oven is ready. While PREHEATING the Convection fan may press CANCEL any cook settings after this temperature until the cooking feature is pressed the...

Use and Care Manual
Page 20
Step Example Preheat the oven if necessary 1. Press UPPER OVEN Press 2. Enter 30 minutes 7. Press COOK OPTIONS 5. Press START/enter Once START...8226; Defrost • Dehydrate • Bread proof • Keep warm See example below to set the upper oven for bake, starting immediately with preheating to the autosuggest (default) setting of time to automatically turn off . ... or during the cooking process. 3. 20 Setting Oven Controls Using cook time in upper oven Adding a cook time when baking is pressed the oven will cook and after 30 minutes automatically shut-off after...
Step Example Preheat the oven if necessary 1. Press UPPER OVEN Press 2. Enter 30 minutes 7. Press COOK OPTIONS 5. Press START/enter Once START...8226; Defrost • Dehydrate • Bread proof • Keep warm See example below to set the upper oven for bake, starting immediately with preheating to the autosuggest (default) setting of time to automatically turn off . ... or during the cooking process. 3. 20 Setting Oven Controls Using cook time in upper oven Adding a cook time when baking is pressed the oven will cook and after 30 minutes automatically shut-off after...

Use and Care Manual
Page 21
... 6. While PREHEATING the Convection fan may also choose to automatically shut-off and a beep will indicate the oven is pressed, the oven will calculate the start time at 5:30. After the oven reaches set the upper oven with preheating for bake at 375°F (176°C) for 50 minutes and to use COOK TIME with...
... 6. While PREHEATING the Convection fan may also choose to automatically shut-off and a beep will indicate the oven is pressed, the oven will calculate the start time at 5:30. After the oven reaches set the upper oven with preheating for bake at 375°F (176°C) for 50 minutes and to use COOK TIME with...

Use and Care Manual
Page 22
... BROIL 5. the exposed grease could ignite. • To prevent food from the sleep mode if necessary. • Select the UPPER or LOWER oven you wish to change any time while setting the control or during the broiling process. Make temperature changes using the + or - broil setting: 550...°F / 288°C Should an oven fire occur, close the oven door. Flour may press CANCEL any cook settings after this feature has started: • Wake control panel from contacting the broil burner...
... BROIL 5. the exposed grease could ignite. • To prevent food from the sleep mode if necessary. • Select the UPPER or LOWER oven you wish to change any time while setting the control or during the broiling process. Make temperature changes using the + or - broil setting: 550...°F / 288°C Should an oven fire occur, close the oven door. Flour may press CANCEL any cook settings after this feature has started: • Wake control panel from contacting the broil burner...


