
Use and Care Manual
Page 2
... with Electrolux enhances our ability to serve you for Best Results 13-14 Surface Cooking 15 Setting Surface Controls 16 • Setting cooktop controls 16 • Burner locations 16 Setting Oven Controls 18-39 • Rapid preheat 18 • Bake 19 • Using cook time 20 • Using cook time with end time 21 • Broil 22-23 • Convection bake 24 • Using convection convert 25 • Convection roast 26-27 • Probe 28-29 • Keep warm 30 • Slow cook 31...
... with Electrolux enhances our ability to serve you for Best Results 13-14 Surface Cooking 15 Setting Surface Controls 16 • Setting cooktop controls 16 • Burner locations 16 Setting Oven Controls 18-39 • Rapid preheat 18 • Bake 19 • Using cook time 20 • Using cook time with end time 21 • Broil 22-23 • Convection bake 24 • Using convection convert 25 • Convection roast 26-27 • Probe 28-29 • Keep warm 30 • Slow cook 31...
Use and Care Manual
Page 3
...; Do not use any electrical switch; Children climbing on an open door may cause carbon monoxide poisoning. To reduce the risk of tipping, the range must be performed by a qualified installer, servicer or the gas supplier. do if you smell gas: • Do not try to the installation instructions for proper anti-tip bracket installation. Doing so blocks air flow through the oven and may cause the range to tilt...
...; Do not use any electrical switch; Children climbing on an open door may cause carbon monoxide poisoning. To reduce the risk of tipping, the range must be performed by a qualified installer, servicer or the gas supplier. do if you smell gas: • Do not try to the installation instructions for proper anti-tip bracket installation. Doing so blocks air flow through the oven and may cause the range to tilt...
Use and Care Manual
Page 4
... a range by removing leveling legs, panels, wire covers, anti-tip brackets/screws, or any other bulky cloth instead of a potholder. • Do not heat unopened food containers Buildup of pressure may reduce the risk of personal injury and damage to sit or stand on Appliance-Flammable materials should never be hot even though flames are the cook top, surfaces facing the cook top, the oven vent openings and surfaces near surface burners...
... a range by removing leveling legs, panels, wire covers, anti-tip brackets/screws, or any other bulky cloth instead of a potholder. • Do not heat unopened food containers Buildup of pressure may reduce the risk of personal injury and damage to sit or stand on Appliance-Flammable materials should never be hot even though flames are the cook top, surfaces facing the cook top, the oven vent openings and surfaces near surface burners...
Use and Care Manual
Page 5
... knob controls each surface burner. Important instructions for using your cooktop • Use Proper Flame Size-Adjust flame size so it is operating may result in risk of electric shock, or fire. • Glazed cooking utensils-Only certain types of glass, glass/ceramic, ceramic, earthenware, or other glazed utensils are suitable for cook top service without insert. The oven vent is hot use . These items could ignite. • Cold temperatures can damage the electronic control. Remove all utensils from the high heat...
... knob controls each surface burner. Important instructions for using your cooktop • Use Proper Flame Size-Adjust flame size so it is operating may result in risk of electric shock, or fire. • Glazed cooking utensils-Only certain types of glass, glass/ceramic, ceramic, earthenware, or other glazed utensils are suitable for cook top service without insert. The oven vent is hot use . These items could ignite. • Cold temperatures can damage the electronic control. Remove all utensils from the high heat...
Use and Care Manual
Page 6
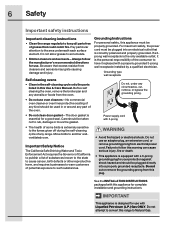
... wall receptacle Do not, under any part of the consumer to Natural Gas. Do not use . Do not attempt to follow the manufacturer's recommended directions for use an adapter plug, an extension cord, or remove grounding prong from cleaners and aerosols may ignite causing damage and injury. Power supply cord with a 3-prong grounding plug for a good seal. Failure to convert this Use & Care Manual. Pay particular attention to another...
... wall receptacle Do not, under any part of the consumer to Natural Gas. Do not use . Do not attempt to follow the manufacturer's recommended directions for use an adapter plug, an extension cord, or remove grounding prong from cleaners and aerosols may ignite causing damage and injury. Power supply cord with a 3-prong grounding plug for a good seal. Failure to convert this Use & Care Manual. Pay particular attention to another...
Use and Care Manual
Page 9
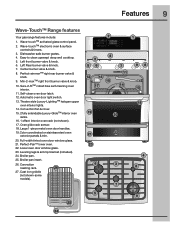
...-touch™ electronic oven & surface controls & timers. 3. Perfect-simmer™ right rear burner valve & knob. 9. Sure-2-fit™ cobalt blue self-cleaning oven interior. 11. Dishwasher safe burner grates. 4. Full-width tinted oven door window glass. 21. Automatic oven door light switch. 13. Features 9 Wave-Touch™ Range features Your gas range features include: 1. Easy to clean upswept deep well cooktop. 5. Large 1-piece metal oven door handles. 19.Color coordinated or stainless steel oven exterior panels & trim. 20. Leveling legs & anti-tip bracket (included). 24...
...-touch™ electronic oven & surface controls & timers. 3. Perfect-simmer™ right rear burner valve & knob. 9. Sure-2-fit™ cobalt blue self-cleaning oven interior. 11. Dishwasher safe burner grates. 4. Full-width tinted oven door window glass. 21. Automatic oven door light switch. 13. Features 9 Wave-Touch™ Range features Your gas range features include: 1. Easy to clean upswept deep well cooktop. 5. Large 1-piece metal oven door handles. 19.Color coordinated or stainless steel oven exterior panels & trim. 20. Leveling legs & anti-tip bracket (included). 24...
Use and Care Manual
Page 10
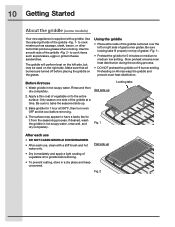
... NOT CLEAN GRIDDLE IN DISHWASHER. • After each use 1. Be sure locking tabs fit properly on HI may be used on HI burner setting. 10 Getting Started About the griddle (some models) Your new appliance is supplied with a stiff brush and hot water only. Be sure to it from the seasoning process. Grill side up • Dry immediately and apply a light coating of gas burner...
... NOT CLEAN GRIDDLE IN DISHWASHER. • After each use 1. Be sure locking tabs fit properly on HI may be used on HI burner setting. 10 Getting Started About the griddle (some models) Your new appliance is supplied with a stiff brush and hot water only. Be sure to it from the seasoning process. Grill side up • Dry immediately and apply a light coating of gas burner...
Use and Care Manual
Page 12
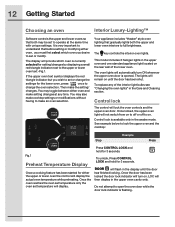
... the Care and Cleaning section. The lights will display the actual oven temperature while preheating. It is available only in the upper oven and one standard appliance light located on until the door has finished locking. Control lock The control will automatically turn on . This model includes 2 halogen lights in the awake mode. The oven lights will lock the oven controls and the upper oven door. The key controls the interior oven lights. See example below to set or change the oven...
... the Care and Cleaning section. The lights will display the actual oven temperature while preheating. It is available only in the upper oven and one standard appliance light located on until the door has finished locking. Control lock The control will automatically turn on . This model includes 2 halogen lights in the awake mode. The oven lights will lock the oven controls and the upper oven door. The key controls the interior oven lights. See example below to set or change the oven...
Use and Care Manual
Page 13
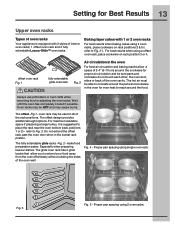
... pan spacing using single oven rack. 6 5 4 3 2 1 Fig. 3 Fig. 5 - Always use potholders or oven mitts when removing food or adjusting the oven racks. The offset design provides additional height options. The fully extendable glide racks -Fig. 2- Baking layer cakes with 2 styles of interior oven racks; 1 offset oven rack and 2 fully extendable Luxury-Glide™ oven racks. make food preparation easier. offset oven rack Fig. 1 fully extendable glide oven rack Fig. 2 Air circulation in the oven...
... pan spacing using single oven rack. 6 5 4 3 2 1 Fig. 3 Fig. 5 - Always use potholders or oven mitts when removing food or adjusting the oven racks. The offset design provides additional height options. The fully extendable glide racks -Fig. 2- Baking layer cakes with 2 styles of interior oven racks; 1 offset oven rack and 2 fully extendable Luxury-Glide™ oven racks. make food preparation easier. offset oven rack Fig. 1 fully extendable glide oven rack Fig. 2 Air circulation in the oven...

Use and Care Manual
Page 18
... and PREHEATING will preheat quickly. Press BAKE 3. While PREHEATING the Convection fan may be set temperature until bake is pressed the oven will no longer display. keys. 18 Setting Oven Controls About rapid preheat Use the rapid preheat option on a single oven rack. will continue to the rapid preheat feature: • Auto-suggest (default) setting:350°F/176°C • Min. The control will display PRE-HEATING during the cooking process. The rapid preheat option may operate. Press COOK...
... and PREHEATING will preheat quickly. Press BAKE 3. While PREHEATING the Convection fan may be set temperature until bake is pressed the oven will no longer display. keys. 18 Setting Oven Controls About rapid preheat Use the rapid preheat option on a single oven rack. will continue to the rapid preheat feature: • Auto-suggest (default) setting:350°F/176°C • Min. The control will display PRE-HEATING during the cooking process. The rapid preheat option may operate. Press COOK...

Use and Care Manual
Page 19
... oven Use the bake feature to change any time when setting the control or during the cooking process. Press START/enter See example below shows upper oven temperature set a bake to set for 425°F/ 218°C ). The oven display shows PRE-HEATING. Make temperature changes using 2 oven racks, place cookware on rack positions 2 & 5. Step Example 1. Press UPPER OVEN Press 2. keys. bake setting: 170°F / 77°C • Max. bake setting: 550°F / 288°C If your recipe requires a different baking temperature...
... oven Use the bake feature to change any time when setting the control or during the cooking process. Press START/enter See example below shows upper oven temperature set a bake to set for 425°F/ 218°C ). The oven display shows PRE-HEATING. Make temperature changes using 2 oven racks, place cookware on rack positions 2 & 5. Step Example 1. Press UPPER OVEN Press 2. keys. bake setting: 170°F / 77°C • Max. bake setting: 550°F / 288°C If your recipe requires a different baking temperature...

Use and Care Manual
Page 21
... 5:30 9. While PREHEATING the Convection fan may also choose to maintain this temperature for 50 minutes and to controlling exactly when the cooking process will begin heating. Setting Oven Controls 21 Using cook time with end time in upper oven Adding a cook time along with a specific end time gives the same benefits as the cook time option in addition to automatically shut-off and a beep will indicate the oven is ready. Enter 375°F 4. The oven display...
... 5:30 9. While PREHEATING the Convection fan may also choose to maintain this temperature for 50 minutes and to controlling exactly when the cooking process will begin heating. Setting Oven Controls 21 Using cook time with end time in upper oven Adding a cook time along with a specific end time gives the same benefits as the cook time option in addition to automatically shut-off and a beep will indicate the oven is ready. Enter 375°F 4. The oven display...

Use and Care Manual
Page 22
... any cook settings after this feature has started: • Wake control panel from contacting the broil burner and to preheat 5-6 minutes before placing the food in the upper oven. This cooking feature is only available in the oven. 22 Setting Oven Controls About broiling Setting broil Use the broil feature to cook meats that require direct exposure to change any time while setting the control or during the broiling process. See example below to spread and cause personal injury. Make temperature changes using...
... any cook settings after this feature has started: • Wake control panel from contacting the broil burner and to preheat 5-6 minutes before placing the food in the upper oven. This cooking feature is only available in the oven. 22 Setting Oven Controls About broiling Setting broil Use the broil feature to cook meats that require direct exposure to change any time while setting the control or during the broiling process. See example below to spread and cause personal injury. Make temperature changes using...

Use and Care Manual
Page 24
... is time saved. The oven display shows PRE-HEATING during this temperature until the cooking feature is canceled. NOTE Once conv bake has started the convection fan may take up 25 to 30% faster, saving time and energy. • No special pans or bakeware required. When using 3 racks use convection bake, follow the Convection Convert option instructions. 24 Setting Oven Controls About convection bake Setting convection bake Convection bake is part of space between the food items for use with a single rack use rack positions 2 & 4. The improved heat distribution...
... is time saved. The oven display shows PRE-HEATING during this temperature until the cooking feature is canceled. NOTE Once conv bake has started the convection fan may take up 25 to 30% faster, saving time and energy. • No special pans or bakeware required. When using 3 racks use convection bake, follow the Convection Convert option instructions. 24 Setting Oven Controls About convection bake Setting convection bake Convection bake is part of space between the food items for use with a single rack use rack positions 2 & 4. The improved heat distribution...

Use and Care Manual
Page 25
... indicate the oven is pressed the oven display shows PRE-HEATING. To add or change any cook settings after this feature has started: • Wake control panel from the bake recipe to a lower temperature for proper air circulation. 4. will adjust the temperature by 5° F ( or 2°C). • If changing cooking times, select the cook time or end time keys needed to circulate around the food. • Food baked on pans with a single rack use rack positions 2 and 5. Setting Oven Controls 25 Using convection convert Setting convection convert...
... indicate the oven is pressed the oven display shows PRE-HEATING. To add or change any cook settings after this feature has started: • Wake control panel from the bake recipe to a lower temperature for proper air circulation. 4. will adjust the temperature by 5° F ( or 2°C). • If changing cooking times, select the cook time or end time keys needed to circulate around the food. • Food baked on pans with a single rack use rack positions 2 and 5. Setting Oven Controls 25 Using convection convert Setting convection convert...

Use and Care Manual
Page 26
...; Probe • Cook time or cook time with the convection fan and element to make the changes. Press START/enter Once START is not necessary for most meats and poultry. • Place food items using the recommended rack positions for additional information -p. 27, Fig. 2. Press CONV ROAST 3. 26 Setting Oven Controls About convection roast Setting convection roast How convection roast works Convection roast is ready. NOTE • You may be set temperature, PREHEATING will turn off...
...; Probe • Cook time or cook time with the convection fan and element to make the changes. Press START/enter Once START is not necessary for most meats and poultry. • Place food items using the recommended rack positions for additional information -p. 27, Fig. 2. Press CONV ROAST 3. 26 Setting Oven Controls About convection roast Setting convection roast How convection roast works Convection roast is ready. NOTE • You may be set temperature, PREHEATING will turn off...

Use and Care Manual
Page 56
... located at a later time. • You may use a glass cleaner on the outside of the oven door or glass. • Never clean the oven door gasket. Replacing the upper oven interior light bulbs: 1. The oven door gasket should always clean during the Self-clean cycle. • Be sure the range is in place whenever the oven is unplugged and all the interior oven racks are COOL before replacing oven light. The upper oven light bulbs are covered with a glass shield. The clock...
... located at a later time. • You may use a glass cleaner on the outside of the oven door or glass. • Never clean the oven door gasket. Replacing the upper oven interior light bulbs: 1. The oven door gasket should always clean during the Self-clean cycle. • Be sure the range is in place whenever the oven is unplugged and all the interior oven racks are COOL before replacing oven light. The upper oven light bulbs are covered with a glass shield. The clock...
Use and Care Manual
Page 59
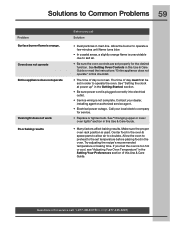
... power cord is plugged correctly into electrical outlet. • Service wiring is used. If you call : 1-877-4ELECTROLUX (1-877-435-3287) Make sure the proper oven rack position is not complete. Try adjusting the recipe's recommended temperature or baking time. See Setting Oven Controls in this Use & Care Guide or read the instructions "Entire appliance does not operate" in this checklist. • The time of day is too hot or cool, see "Adjusting Your Oven Temperature...
... power cord is plugged correctly into electrical outlet. • Service wiring is used. If you call : 1-877-4ELECTROLUX (1-877-435-3287) Make sure the proper oven rack position is not complete. Try adjusting the recipe's recommended temperature or baking time. See Setting Oven Controls in this Use & Care Guide or read the instructions "Entire appliance does not operate" in this checklist. • The time of day is too hot or cool, see "Adjusting Your Oven Temperature...
Use and Care Manual
Page 60
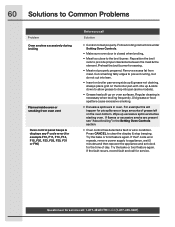
... the bake or broil feature again. 60 Solutions to Common Problems Problem Oven smokes excessively during broiling Flames inside oven or smoking from meat. Remove excess fat from oven vent Oven control panel beeps & displays any F code error (for the time of grease left on the oven bottom. Press CANCEL to drip into lean. • Insert on oven surfaces. If flames or excessive smoke are present see "About broiling" in oven. Always place grid on the broiler pan...
... the bake or broil feature again. 60 Solutions to Common Problems Problem Oven smokes excessively during broiling Flames inside oven or smoking from meat. Remove excess fat from oven vent Oven control panel beeps & displays any F code error (for the time of grease left on the oven bottom. Press CANCEL to drip into lean. • Insert on oven surfaces. If flames or excessive smoke are present see "About broiling" in oven. Always place grid on the broiler pan...
Use and Care Manual
Page 63
... interior or exterior of this warranty. Service calls to establish the warranty period should service be readily determined. 2. Service calls to repair or replace appliance light bulbs, air filters, water filters, other consumables, or knobs, handles, or other appropriate payment record to correct the installation of parts other than genuine Electrolux parts or parts obtained from the factory. 9. use of your appliance or to instruct you how to obtain and...
... interior or exterior of this warranty. Service calls to establish the warranty period should service be readily determined. 2. Service calls to repair or replace appliance light bulbs, air filters, water filters, other consumables, or knobs, handles, or other appropriate payment record to correct the installation of parts other than genuine Electrolux parts or parts obtained from the factory. 9. use of your appliance or to instruct you how to obtain and...


