
Complete Owner's Guide (English)
Page 7
... Single Radiant Element 4. Left Rear Single Radiant Element 2. Center Front Element Control Pads (Fig. 2 only) 12. Cooktop Features 7 COOKTOP FEATURES READ THESE INSTRUCTIONS CAREFULLY BEFORE USING THE COOKTOP ! Minute Timer Key Pads 1 3 2 4 POWER lock warm 10 ON OFF med hot surface size 6 ON ...OFF med hot surface size ON OFF med hot surface 7 11 8 Fig. 2 - 36" Model ON OFF med hot surface size 9 timer 12 Left Front Triple Radiant Element 3. Main Cooktop Controls 11. Left Rear Element Control Pads 8. Right Rear Element Control Pads 9. Center Front...
... Single Radiant Element 4. Left Rear Single Radiant Element 2. Center Front Element Control Pads (Fig. 2 only) 12. Cooktop Features 7 COOKTOP FEATURES READ THESE INSTRUCTIONS CAREFULLY BEFORE USING THE COOKTOP ! Minute Timer Key Pads 1 3 2 4 POWER lock warm 10 ON OFF med hot surface size 6 ON ...OFF med hot surface size ON OFF med hot surface 7 11 8 Fig. 2 - 36" Model ON OFF med hot surface size 9 timer 12 Left Front Triple Radiant Element 3. Main Cooktop Controls 11. Left Rear Element Control Pads 8. Right Rear Element Control Pads 9. Center Front...
Complete Owner's Guide (English)
Page 8
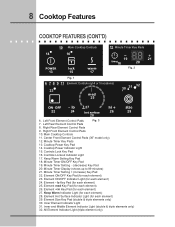
...element) 27. Element + hi Key Pad (for each element) 25. Element Size Key Pad (double & triple elements only) 30. 8 Cooktop Features COOKTOP FEATURES (CONT'D) 10 Main Cooktop Controls 12 Minute Timer Key Pads 14 16 POWER 13 lock 15 warm 17 19 timer18 21 20 Fig. 2 Fig. 1 6 7 ... Indicator Light (for each element) 29. Inner and Middle Element Indicator Light (double & triple elements only) 32. Center Front Element Control Pads (36" model only) 12. Controls Lockout Indicator Light 17. Minute Timer Setting - (decrease) Key Pad 20. Left Front Element Control Pads Fig. 3...
...element) 27. Element + hi Key Pad (for each element) 25. Element Size Key Pad (double & triple elements only) 30. 8 Cooktop Features COOKTOP FEATURES (CONT'D) 10 Main Cooktop Controls 12 Minute Timer Key Pads 14 16 POWER 13 lock 15 warm 17 19 timer18 21 20 Fig. 2 Fig. 1 6 7 ... Indicator Light (for each element) 29. Inner and Middle Element Indicator Light (double & triple elements only) 32. Center Front Element Control Pads (36" model only) 12. Controls Lockout Indicator Light 17. Minute Timer Setting - (decrease) Key Pad 20. Left Front Element Control Pads Fig. 3...
Complete Owner's Guide (English)
Page 9
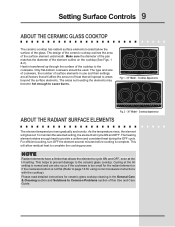
... OFF, even at the HI setting is normal and can also occur if the cookware is too small for using correct cookware instructions with the cooktop). Cooktop Appearance POWER lock warm ON OFF med hot surface size ON OFF med hot surface ON OFF med hot surface size ON OFF med hot... surface ON OFF med hot surface size timer Fig. 2 - 36" Model - To maintain the selected setting, the element will glow red. NOTE Radiant elements have a limiter that will affect the amount of the...
... OFF, even at the HI setting is normal and can also occur if the cookware is too small for using correct cookware instructions with the cooktop). Cooktop Appearance POWER lock warm ON OFF med hot surface size ON OFF med hot surface ON OFF med hot surface size ON OFF med hot... surface ON OFF med hot surface size timer Fig. 2 - 36" Model - To maintain the selected setting, the element will glow red. NOTE Radiant elements have a limiter that will affect the amount of the...
Complete Owner's Guide (English)
Page 10
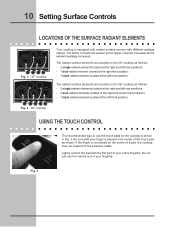
Lightly contact the pad with different wattage ratings. The radiant surface elements are located on the 36" cooktop as follows: - 2 single radiant elements located at the right and left rear positions; - 1 dual radiant element located at the right front position; - 1 triple radiant ...size ON OFF med hot surface ON OFF med hot surface size ON OFF med hot surface ON OFF med hot surface size timer Fig. 2 - 36" cooktop Your cooktop is equipped with radiant surface burners with the flat part of your entire fingertip. The radiant surface elements are located on the 30...
Lightly contact the pad with different wattage ratings. The radiant surface elements are located on the 36" cooktop as follows: - 2 single radiant elements located at the right and left rear positions; - 1 dual radiant element located at the right front position; - 1 triple radiant ...size ON OFF med hot surface ON OFF med hot surface size ON OFF med hot surface ON OFF med hot surface size timer Fig. 2 - 36" cooktop Your cooktop is equipped with radiant surface burners with the flat part of your entire fingertip. The radiant surface elements are located on the 30...

Complete Owner's Guide (English)
Page 14
... heating area extending beyond the bottom edge of the dual radiant element will clear. 4. The Hot Surface Indicator Light will turn ON if the cooktop is POWER touched within 10 seconds the request to HI. Note: If no other surface element is the lowest power level available. When cooking... element position until a beep sound. 14 Setting Surface Controls OPERATING THE DUAL SURFACE RADIANT ELEMENT Both the 30" and 36" cooktops are used touch the key pad to Power ON the cooktop will heat (Fig. 3). POWER lock warm ON OFF med hot surface size ON OFF med hot surface ON OFF...
... heating area extending beyond the bottom edge of the dual radiant element will clear. 4. The Hot Surface Indicator Light will turn ON if the cooktop is POWER touched within 10 seconds the request to HI. Note: If no other surface element is the lowest power level available. When cooking... element position until a beep sound. 14 Setting Surface Controls OPERATING THE DUAL SURFACE RADIANT ELEMENT Both the 30" and 36" cooktops are used touch the key pad to Power ON the cooktop will heat (Fig. 3). POWER lock warm ON OFF med hot surface size ON OFF med hot surface ON OFF...

Complete Owner's Guide (English)
Page 15
... will remain ON until the heating surface area has cooled sufficiently. A touch key pad on a higher setting and then turn ON if the cooktop is heard. Touch med pad once for MEDIUM, touch pad once for Surface Elements table, on indicate that both INNER and MIDDLE coils will ... "Triple" surface radiant elements located as shown in Figs. 1 & 2. Setting Surface Controls 15 OPERATING THE TRIPLE SURFACE RADIANT ELEMENT Both the 30" and 36" cooktops are used to indicate which coil of heat at any time while the element is touched within 10 seconds the request to power the element...
... will remain ON until the heating surface area has cooled sufficiently. A touch key pad on a higher setting and then turn ON if the cooktop is heard. Touch med pad once for MEDIUM, touch pad once for Surface Elements table, on indicate that both INNER and MIDDLE coils will ... "Triple" surface radiant elements located as shown in Figs. 1 & 2. Setting Surface Controls 15 OPERATING THE TRIPLE SURFACE RADIANT ELEMENT Both the 30" and 36" cooktops are used to indicate which coil of heat at any time while the element is touched within 10 seconds the request to power the element...

Installation Instructions (All Languages)
Page 1
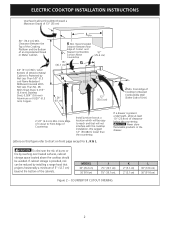
... 29¾ (75.6) 35¾ (90.8) 30 (76.2) 36 (91.4) 20 3/8 (51.8) 20 3/8 (51.8) 20 5/8 (52.4) 20 5/8 (52.4) f. Printed in the vicinity of this or any other appliance. United States Cooktop Dimensions 30" Min. * (76.2 cm) A F Cooktop Cutout Dimensions H B E I IMPORTANT INSTALLATION INFORMATION • All electric cooktops run off a single phase, three-wire or four-wire...
... 29¾ (75.6) 35¾ (90.8) 30 (76.2) 36 (91.4) 20 3/8 (51.8) 20 3/8 (51.8) 20 5/8 (52.4) 20 5/8 (52.4) f. Printed in the vicinity of this or any other appliance. United States Cooktop Dimensions 30" Min. * (76.2 cm) A F Cooktop Cutout Dimensions H B E I IMPORTANT INSTALLATION INFORMATION • All electric cooktops run off a single phase, three-wire or four-wire...
Installation Instructions (All Languages)
Page 2
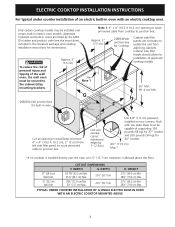
... of 5" (12.7 cm) beyond the bottom of the cabinets. Model 30'' (76.2 cm) 36'' (91.4 cm) J 7½'' (19.1 cm) 7½'' (19.1 cm). AL Min. From Edge of Cooktop to chart on front page except for J , K & L. CAUTION To eliminate the risk of clearance... OPENING K 2'' (5.1 cm) 2'' (5.1 cm) L 30'' (72.6 cm) 36'' (91.4 cm) 2 K Min. If a drawer is present underneath, allow at a location which will not interfere with the cooktop installation. ELECTRIC COOKTOP INSTALLATION INSTRUCTIONS Overhead Cabinet Should Not Exceed a Maximum Depth of an Unprotected Wood or Metal...
... of 5" (12.7 cm) beyond the bottom of the cabinets. Model 30'' (76.2 cm) 36'' (91.4 cm) J 7½'' (19.1 cm) 7½'' (19.1 cm). AL Min. From Edge of Cooktop to chart on front page except for J , K & L. CAUTION To eliminate the risk of clearance... OPENING K 2'' (5.1 cm) 2'' (5.1 cm) L 30'' (72.6 cm) 36'' (91.4 cm) 2 K Min. If a drawer is present underneath, allow at a location which will not interfere with the cooktop installation. ELECTRIC COOKTOP INSTALLATION INSTRUCTIONS Overhead Cabinet Should Not Exceed a Maximum Depth of an Unprotected Wood or Metal...
Installation Instructions (All Languages)
Page 3
...-IN OVEN WITH AN ELECTRIC COOKTOP MOUNTED ABOVE 3 Only certain cooktop models may be capable of supporting 150 pounds (68 kg) for 27" models and 200 pounds (90 kg) for built-in electric oven models. See Note 1 36" Min. (91.4 cm) Min. 208/240 Volt junction box for 30" models. 4½" (11.5 cm) Max.* ...*If no cooktop is installed directly over certain built-in oven. HEIGHT 27¼'' (69.2 cm) ...
...-IN OVEN WITH AN ELECTRIC COOKTOP MOUNTED ABOVE 3 Only certain cooktop models may be capable of supporting 150 pounds (68 kg) for 27" models and 200 pounds (90 kg) for built-in electric oven models. See Note 1 36" Min. (91.4 cm) Min. 208/240 Volt junction box for 30" models. 4½" (11.5 cm) Max.* ...*If no cooktop is installed directly over certain built-in oven. HEIGHT 27¼'' (69.2 cm) ...

Dimensions
Page 1
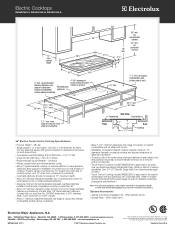
... for additional installation options. Specifications subject to change. **Approved to be used over any Electrolux 36" Downdraft Vent. Easy-to-Clean Cooktop Surface Smooth glass cooktop makes cleanup a breeze. 36" ELECTRIC TOUCH-CONTROL COOKTOPS Features Glide-2-Set® Electronic Touch Controls Yes Ceramic Smoothtop Glass Surface Yes 6" to 9" to 12" Triple Expandable Element - 1000W / 2000W / 2700W 1 6" to 9" Dual...
... for additional installation options. Specifications subject to change. **Approved to be used over any Electrolux 36" Downdraft Vent. Easy-to-Clean Cooktop Surface Smooth glass cooktop makes cleanup a breeze. 36" ELECTRIC TOUCH-CONTROL COOKTOPS Features Glide-2-Set® Electronic Touch Controls Yes Ceramic Smoothtop Glass Surface Yes 6" to 9" to 12" Triple Expandable Element - 1000W / 2000W / 2700W 1 6" to 9" Dual...
Dimensions
Page 2
... 2" space beneath cooktop or optional platform to Electric Cooktop Installation Over 30" / 27" Electric Single Wall Oven Specifications page on wall at Electrolux Home Products, Inc. recommended route armoured cable distance between rear edge of cutout and nearest combustible surface above countertop. • Allow 7-1/2" minimum clearance from edge of countertop 35 3/4" min. 36" max. mean we...
... 2" space beneath cooktop or optional platform to Electric Cooktop Installation Over 30" / 27" Electric Single Wall Oven Specifications page on wall at Electrolux Home Products, Inc. recommended route armoured cable distance between rear edge of cutout and nearest combustible surface above countertop. • Allow 7-1/2" minimum clearance from edge of countertop 35 3/4" min. 36" max. mean we...
Dimensions
Page 4
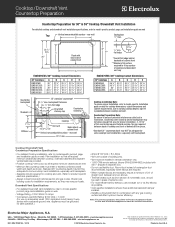
...cooktop dimensions, cutout dimensions and cabinet requirements. Note: For planning purposes only. Cooktop/Downdraft Vent Countertop Preparation Countertop Preparation for cooktop and vent. (Refer to product-specific electrical specifications.) • Always consult local and national electric... such as they may not allow enough flat area for proper installation, 2-13/16" of cooktop and downdraft vent cap E36DD75ESS / 36" Cooktop Cutout Dimensions 36" Cooktops EW36IC60I EW36CC55G EW36EC55G EW36GC55G A 36 1/4" 36 1/4" 36" 34 1/4" B 33 3/4" 33 3/4" 33 3/4" 33 3/4" C 20 1/2" 20 1/2" ...
...cooktop dimensions, cutout dimensions and cabinet requirements. Note: For planning purposes only. Cooktop/Downdraft Vent Countertop Preparation Countertop Preparation for cooktop and vent. (Refer to product-specific electrical specifications.) • Always consult local and national electric... such as they may not allow enough flat area for proper installation, 2-13/16" of cooktop and downdraft vent cap E36DD75ESS / 36" Cooktop Cutout Dimensions 36" Cooktops EW36IC60I EW36CC55G EW36EC55G EW36GC55G A 36 1/4" 36 1/4" 36" 34 1/4" B 33 3/4" 33 3/4" 33 3/4" 33 3/4" C 20 1/2" 20 1/2" ...

