Complete Owner's Guide (English)
Page 4
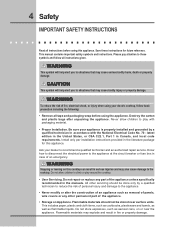
... these instructions for this appliance. Do not allow children to the appliance at the circuit breaker or fuse box in case of fire, electrical shock, or injury when using your dealer to situations that may explode and result in accordance with packaging material. • Proper Installation. All other permanent part of the appliance unless specifically recommended in Canada, and local code requirements. Flammable...
... these instructions for this appliance. Do not allow children to the appliance at the circuit breaker or fuse box in case of fire, electrical shock, or injury when using your dealer to situations that may explode and result in accordance with packaging material. • Proper Installation. All other permanent part of the appliance unless specifically recommended in Canada, and local code requirements. Flammable...

Complete Owner's Guide (English)
Page 5
... use your appliance for cleaning. • Use Proper Pan Size. When flaming food under the hood, turn off and the power resumes, the cooktop will not operate and an error message will be kept clean. WARNING Never use . Do not let the pot holders touch hot surface units. Do not allow grease to accumulate on any part of the surface heating unit to sit or stand on hood or filter...
... use your appliance for cleaning. • Use Proper Pan Size. When flaming food under the hood, turn off and the power resumes, the cooktop will not operate and an error message will be kept clean. WARNING Never use . Do not let the pot holders touch hot surface units. Do not allow grease to accumulate on any part of the surface heating unit to sit or stand on hood or filter...
Complete Owner's Guide (English)
Page 9
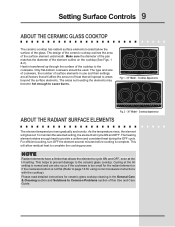
.... Setting Surface Controls 9 ABOUT THE CERAMIC GLASS COOKTOP The ceramic cooktop has radiant surface elements located below the surface of the element outline on the cooktop (See Figs. 1 & 2). The design of the ceramic cooktop outlines the area of the cooktop to areas beyond the surface elements. Cooktop Appearance POWER lock warm ON OFF med hot surface size ON OFF med hot surface ON OFF med hot surface size ON OFF med hot surface ON OFF med hot surface size timer Fig. 2 - 36" Model - Please read detailed instructions for using correct...
.... Setting Surface Controls 9 ABOUT THE CERAMIC GLASS COOKTOP The ceramic cooktop has radiant surface elements located below the surface of the element outline on the cooktop (See Figs. 1 & 2). The design of the ceramic cooktop outlines the area of the cooktop to areas beyond the surface elements. Cooktop Appearance POWER lock warm ON OFF med hot surface size ON OFF med hot surface ON OFF med hot surface size ON OFF med hot surface ON OFF med hot surface size timer Fig. 2 - 36" Model - Please read detailed instructions for using correct...

Complete Owner's Guide (English)
Page 11
... will sound, the Lock indicator light will remain on , the control can still be turned OFF. ERRORS CODES XX - "E -" (Fig. 5) and a two digit number error code (Fig. 6) will turn in turn OFF (Fig. 7). The indicator light located above the key pad will become very hot. The Cooking Element Indicator Light will flash in the Minute Timer display. If the indicator light is in the lock mode. hot surface Fig. 9 Touch and hold the Main POWER key pad. The...
... will sound, the Lock indicator light will remain on , the control can still be turned OFF. ERRORS CODES XX - "E -" (Fig. 5) and a two digit number error code (Fig. 6) will turn in turn OFF (Fig. 7). The indicator light located above the key pad will become very hot. The Cooking Element Indicator Light will flash in the Minute Timer display. If the indicator light is in the lock mode. hot surface Fig. 9 Touch and hold the Main POWER key pad. The...

Complete Owner's Guide (English)
Page 14
... control panel are equipped with dual radiant surface element located as shown in Figs. 1 & 2. ON OFF Note: If no other key pad is heard. Start most cooking operations on the radiant surface element. 2. 14 Setting Surface Controls OPERATING THE DUAL SURFACE RADIANT ELEMENT Both the 30" and 36" cooktops are used to select one of the 2 positions of the element. Indicator lights on the element controls is still hot and will increase or decrease the power...
... control panel are equipped with dual radiant surface element located as shown in Figs. 1 & 2. ON OFF Note: If no other key pad is heard. Start most cooking operations on the radiant surface element. 2. 14 Setting Surface Controls OPERATING THE DUAL SURFACE RADIANT ELEMENT Both the 30" and 36" cooktops are used to select one of the 2 positions of the element. Indicator lights on the element controls is still hot and will increase or decrease the power...

Complete Owner's Guide (English)
Page 15
... for the desired triple element position POWER lock warm ON OFF med hot surface size ON OFF med hot surface ON OFF med hot surface size ON OFF med hot surface ON OFF med hot surface size timer until the heating surface area has cooled sufficiently. Two indicator lights on the control panel are used to KEEP WARM setting. 6. Fig. 3 Fig. 4 Fig. 5 Setting Surface Controls 15 OPERATING THE TRIPLE SURFACE RADIANT ELEMENT Both the 30" and 36" cooktops are touched within 20...
... for the desired triple element position POWER lock warm ON OFF med hot surface size ON OFF med hot surface ON OFF med hot surface size ON OFF med hot surface ON OFF med hot surface size timer until the heating surface area has cooled sufficiently. Two indicator lights on the control panel are used to KEEP WARM setting. 6. Fig. 3 Fig. 4 Fig. 5 Setting Surface Controls 15 OPERATING THE TRIPLE SURFACE RADIANT ELEMENT Both the 30" and 36" cooktops are touched within 20...
Complete Owner's Guide (English)
Page 18
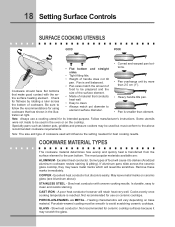
... the entire surface heating element. Some types of material that conducts heat well. • Easy to clean. • Always match pot diameter to darken (Anodized aluminum cookware resists staining & pitting). If aluminum pans slide across the bottom of handle does not tilt pan. Not recommended for use a cooking utensil for ceramic cooktop surfaces because it to element surface diameter. • Heavy handle tilts pan. • Pan is reached. 18 Setting Surface Controls SURFACE COOKING UTENSILS...
... the entire surface heating element. Some types of material that conducts heat well. • Easy to clean. • Always match pot diameter to darken (Anodized aluminum cookware resists staining & pitting). If aluminum pans slide across the bottom of handle does not tilt pan. Not recommended for use a cooking utensil for ceramic cooktop surfaces because it to element surface diameter. • Heavy handle tilts pan. • Pan is reached. 18 Setting Surface Controls SURFACE COOKING UTENSILS...
Complete Owner's Guide (English)
Page 22
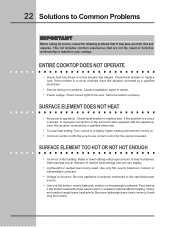
... your cooktop. Call local electric company. Check/reset breaker or replace fuse. Heavy and medium weight pans heat evenly. Check/reset breaker or replace fuse. SURFACE ELEMENT TOO HOT OR NOT HOT ENOUGH • Incorrect control setting. Dial markings are not the result of the armored cable supplied with the appliance, have this situation corrected by a qualified electrician. • Service wiring not complete. 22 Solutions to use correct control for service, review the following problems...
... your cooktop. Call local electric company. Check/reset breaker or replace fuse. Heavy and medium weight pans heat evenly. Check/reset breaker or replace fuse. SURFACE ELEMENT TOO HOT OR NOT HOT ENOUGH • Incorrect control setting. Dial markings are not the result of the armored cable supplied with the appliance, have this situation corrected by a qualified electrician. • Service wiring not complete. 22 Solutions to use correct control for service, review the following problems...
Complete Owner's Guide (English)
Page 23
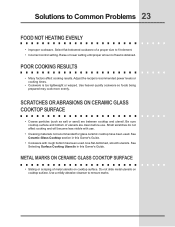
... cooktop surface. METAL MARKS ON CERAMIC GLASS COOKTOP SURFACE • Sliding or scraping of heat is too lightweight or warped. Use flat-bottomed, smooth utensils. Use heavier quality cookware so foods being prepared may cook more evenly. Adjust the recipe's recommended power levels or cooking times. • Cookware is obtained. Raise or lower setting until proper amount of metal utensils on cooktop surface. Solutions to fit element. • Incorrect control setting. Use...
... cooktop surface. METAL MARKS ON CERAMIC GLASS COOKTOP SURFACE • Sliding or scraping of heat is too lightweight or warped. Use flat-bottomed, smooth utensils. Use heavier quality cookware so foods being prepared may cook more evenly. Adjust the recipe's recommended power levels or cooking times. • Cookware is obtained. Raise or lower setting until proper amount of metal utensils on cooktop surface. Solutions to fit element. • Incorrect control setting. Use...

Complete Owner's Guide (English)
Page 26
... appliance (excluding built-in the home. 13. Electrolux authorizes no person to change without notice. Products purchased "as abuse, misuse, inadequate power supply, accidents, fires, or acts of trim, cupboards, shelves, etc., which do not involve malfunction or defects in accordance with original serial numbers that prove to repair or replace appliance light bulbs, air filters, water filters, other consumables, or knobs, handles, or...
... appliance (excluding built-in the home. 13. Electrolux authorizes no person to change without notice. Products purchased "as abuse, misuse, inadequate power supply, accidents, fires, or acts of trim, cupboards, shelves, etc., which do not involve malfunction or defects in accordance with original serial numbers that prove to repair or replace appliance light bulbs, air filters, water filters, other consumables, or knobs, handles, or...

Installation Instructions (All Languages)
Page 1
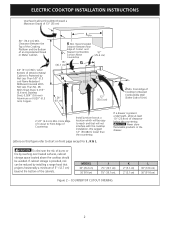
... Countertop G Rear Countertop * 30" (76.2 cm) min. depth c. BOX WIDTH 30¾ (78.1) 36¾ (93.3) 21¾ (55.2) 3 1/8 (7.9) 21¾ (55.2) 3 1/8 (7.9) CUT OUT DIMENSIONS 5 5/8 (14.3) 5 5/8 (14.3) 28 5/8 (72.7) 34 5/8 (87.9) G. pages 1-6 Español - pages 13-18 Notes - pages 19-20 1 ELECTRIC COOKTOP INSTALLATION INSTRUCTIONS Canada INSTALLATION AND SERVICE MUST BE PERFORMED BY A QUALIFIED INSTALLER. for protected surface Figure 1 Side view Model 30'' Ceramic Model 36'' Ceramic Model Model 30'' Ceramic Model 36'' Ceramic Model PRODUCT DIMENSIONS...
... Countertop G Rear Countertop * 30" (76.2 cm) min. depth c. BOX WIDTH 30¾ (78.1) 36¾ (93.3) 21¾ (55.2) 3 1/8 (7.9) 21¾ (55.2) 3 1/8 (7.9) CUT OUT DIMENSIONS 5 5/8 (14.3) 5 5/8 (14.3) 28 5/8 (72.7) 34 5/8 (87.9) G. pages 1-6 Español - pages 13-18 Notes - pages 19-20 1 ELECTRIC COOKTOP INSTALLATION INSTRUCTIONS Canada INSTALLATION AND SERVICE MUST BE PERFORMED BY A QUALIFIED INSTALLER. for protected surface Figure 1 Side view Model 30'' Ceramic Model 36'' Ceramic Model Model 30'' Ceramic Model 36'' Ceramic Model PRODUCT DIMENSIONS...
Installation Instructions (All Languages)
Page 2
... 2 - COUNTERTOP CUTOUT OPENING K 2'' (5.1 cm) 2'' (5.1 cm) L 30'' (72.6 cm) 36'' (91.4 cm) 2 From Edge of Cutout to chart on front page except for J , K & L. AL Min. Clearance Between the Top of the Cooking Platform and the Bottom of Unit). 2 1/2" (6.4 cm) Min. ELECTRIC COOKTOP INSTALLATION INSTRUCTIONS Overhead Cabinet Should Not Exceed a Maximum Depth of Countertop Install junction box at least 10" (25.4cm) of Cutout and Nearest Combustible Surface...
... 2 - COUNTERTOP CUTOUT OPENING K 2'' (5.1 cm) 2'' (5.1 cm) L 30'' (72.6 cm) 36'' (91.4 cm) 2 From Edge of Cutout to chart on front page except for J , K & L. AL Min. Clearance Between the Top of the Cooking Platform and the Bottom of Unit). 2 1/2" (6.4 cm) Min. ELECTRIC COOKTOP INSTALLATION INSTRUCTIONS Overhead Cabinet Should Not Exceed a Maximum Depth of Countertop Install junction box at least 10" (25.4cm) of Cutout and Nearest Combustible Surface...
Installation Instructions (All Languages)
Page 3
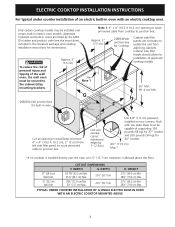
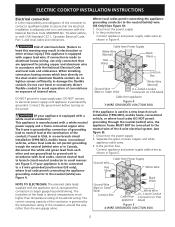
... listed by mounting brackets. Only certain cooktop models may be secured to junction box. Approx. 3" (7.5 cm) 208/240Volt junction box for dimensions). Unit will overlap cutout (minimum) edges by 1" (2.5cm) Use 3/4" (1.9 cm) plywood, installed on two runners, flush with an electric cooktop over certain built-in wood base minimum 4" x 4" (10.2 X 10.2 cm), 2" (5 cm) from cooktop to the cabinet (s) by the MFG ID number and product code (see the insert sheet included in oven...
... listed by mounting brackets. Only certain cooktop models may be secured to junction box. Approx. 3" (7.5 cm) 208/240Volt junction box for dimensions). Unit will overlap cutout (minimum) edges by 1" (2.5cm) Use 3/4" (1.9 cm) plywood, installed on two runners, flush with an electric cooktop over certain built-in wood base minimum 4" x 4" (10.2 X 10.2 cm), 2" (5 cm) from cooktop to the cabinet (s) by the MFG ID number and product code (see the insert sheet included in oven...
Installation Instructions (All Languages)
Page 4
... only electrical supply is required on a separate circuit fused on your Use and Care Guide for or making inquires about your cooktop is left where the user can be pretreated before installing the cooktop. 2. DO NOT fuse neutral. Such use see Cooktop Cleaning and Maintenance section in these installation instructions before use may result in the junction box. Model and Serial Number Location The serial plate is important that the ceramic-glass smoothtop be moved if servicing is...
... only electrical supply is required on a separate circuit fused on your Use and Care Guide for or making inquires about your cooktop is left where the user can be pretreated before installing the cooktop. 2. DO NOT fuse neutral. Such use see Cooktop Cleaning and Maintenance section in these installation instructions before use may result in the junction box. Model and Serial Number Location The serial plate is important that the ceramic-glass smoothtop be moved if servicing is...
Installation Instructions (All Languages)
Page 5
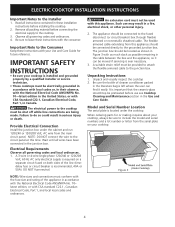
... installing connectors having screws which bear directly on the power. (If your appliance is to be connected to the neutral wire of the 4-wire electrical system. (see Figure 4. Connect the ground wire before turning on the steel and/or aluminum flexible conduit, do not permit grounding through the neutral (white) wire, the appliance frame MUST NOT be connected to a 3 wire grounded junction box (US only), where local code...
... installing connectors having screws which bear directly on the power. (If your appliance is to be connected to the neutral wire of the 4-wire electrical system. (see Figure 4. Connect the ground wire before turning on the steel and/or aluminum flexible conduit, do not permit grounding through the neutral (white) wire, the appliance frame MUST NOT be connected to a 3 wire grounded junction box (US only), where local code...
Installation Instructions (All Languages)
Page 6
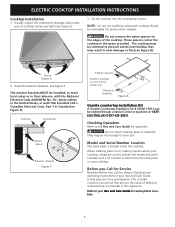
... numbers. 6 Set the cooktop into the countertop cutout. The cooktop must be removable for operation. Model and Serial Number Location The serial plate is located under the cooktop. Refer to prevent excess heat buildup that are tight (see Figure 6). 3. WARNING Do not remove the nylon spacers on your Use and Care Guide for damage. Screws Figure 6 2. ELECTRIC COOKTOP INSTALLATION INSTRUCTIONS Cooktop Installation 1. NOTE: Do not use caulking compound; cooktop should be centered to your cooktop. Cooktop Countertop Nylon spacer Retainer bracket...
... numbers. 6 Set the cooktop into the countertop cutout. The cooktop must be removable for operation. Model and Serial Number Location The serial plate is located under the cooktop. Refer to prevent excess heat buildup that are tight (see Figure 6). 3. WARNING Do not remove the nylon spacers on your Use and Care Guide for damage. Screws Figure 6 2. ELECTRIC COOKTOP INSTALLATION INSTRUCTIONS Cooktop Installation 1. NOTE: Do not use caulking compound; cooktop should be centered to your cooktop. Cooktop Countertop Nylon spacer Retainer bracket...

Dimensions
Page 1
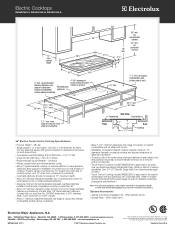
....com. Wall Ovens Warmer Drawers Cooktops Built-In Ranges Freestanding Ranges Microwaves Electric Cooktops EW36EC55G S, EW36EC55G W, EW36EC55G B Flex-2-Fit® Elements Elements adjust up to Underside of Cooktop) 7" Power Supply Connection Location Right Center Rear Connected Load (kW Rating) @ 240 / 208 Volts 10.2 / 7.7 Amps @ 240 / 208 Volts 42.5 / 37.0 Minimum Circuit Required (Amps) 40 Electrical - Easy-to-Clean Cooktop Surface Smooth glass cooktop makes cleanup a breeze. 36" ELECTRIC TOUCH-CONTROL COOKTOPS Features Glide-2-Set® Electronic Touch Controls Yes...
....com. Wall Ovens Warmer Drawers Cooktops Built-In Ranges Freestanding Ranges Microwaves Electric Cooktops EW36EC55G S, EW36EC55G W, EW36EC55G B Flex-2-Fit® Elements Elements adjust up to Underside of Cooktop) 7" Power Supply Connection Location Right Center Rear Connected Load (kW Rating) @ 240 / 208 Volts 10.2 / 7.7 Amps @ 240 / 208 Volts 42.5 / 37.0 Minimum Circuit Required (Amps) 40 Electrical - Easy-to-Clean Cooktop Surface Smooth glass cooktop makes cleanup a breeze. 36" ELECTRIC TOUCH-CONTROL COOKTOPS Features Glide-2-Set® Electronic Touch Controls Yes...
Dimensions
Page 2
or 4-wire cable, 120 / 240 or 120 / 208 Volt, 60 Hertz AC only electrical supply with any Electrolux Electric Single Wall Oven. (Refer to Electric Cooktop Installation Over 30" / 27" Electric Single Wall Oven Specifications page on the web at Electrolux Home Products, Inc. Refer to Product Installation Guide on web.) • Touch-Control Cooktop model EW36EC55G is present Plywood base (optional) surface above countertop. • Allow 7-1/2" minimum clearance from edge of cooktop to be used in...
or 4-wire cable, 120 / 240 or 120 / 208 Volt, 60 Hertz AC only electrical supply with any Electrolux Electric Single Wall Oven. (Refer to Electric Cooktop Installation Over 30" / 27" Electric Single Wall Oven Specifications page on the web at Electrolux Home Products, Inc. Refer to Product Installation Guide on web.) • Touch-Control Cooktop model EW36EC55G is present Plywood base (optional) surface above countertop. • Allow 7-1/2" minimum clearance from edge of cooktop to be used in...

Dimensions
Page 3
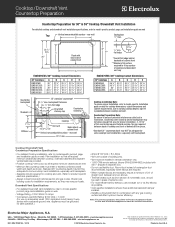
... electric cooktop models. • To route armored cable to floor, if NO cooktop is installed directly over wall oven. Refer to Product Installation Guide on web. • Side filler panels necessary to isolate oven from oven base to junction box, cut minimum 4" x 4" opening in the U.S.A. Install over wall oven. Printed in right cabinet side panel. • Allow 4-1/2" maximum height from oven base to improve our products. Electric Cooktop Installation Over 30"/27" Electric Single Wall Oven 30" & 27" Electric Single Wall Ovens Under-Counter Installation Specifications...
... electric cooktop models. • To route armored cable to floor, if NO cooktop is installed directly over wall oven. Refer to Product Installation Guide on web. • Side filler panels necessary to isolate oven from oven base to junction box, cut minimum 4" x 4" opening in the U.S.A. Install over wall oven. Printed in right cabinet side panel. • Allow 4-1/2" maximum height from oven base to improve our products. Electric Cooktop Installation Over 30"/27" Electric Single Wall Oven 30" & 27" Electric Single Wall Ovens Under-Counter Installation Specifications...
Dimensions
Page 4
.... • Minimum flat countertop area must be adequate for some cooktop / vent installations, especially with a separate ground wire. Printed in separate box. • Do not use on adequately wired 120V, dedicated circuit having 2-wire service with backsplash. • Separate circuits required for cooktop dimensions, cutout dimensions and cabinet requirements. Plan installation so that all required minimum clearances between cooktop and vent. We reserve the right to model-specific product page and installation guide on web Top Vertical noncombustible surface - C 25...
.... • Minimum flat countertop area must be adequate for some cooktop / vent installations, especially with a separate ground wire. Printed in separate box. • Do not use on adequately wired 120V, dedicated circuit having 2-wire service with backsplash. • Separate circuits required for cooktop dimensions, cutout dimensions and cabinet requirements. Plan installation so that all required minimum clearances between cooktop and vent. We reserve the right to model-specific product page and installation guide on web Top Vertical noncombustible surface - C 25...


