

Complete Owner's Guide (English)
Page 1
B (0802) Use & Care Guide Radiant/Induction Electric Cooktop 318 203 603 Rev.
B (0802) Use & Care Guide Radiant/Induction Electric Cooktop 318 203 603 Rev.

Complete Owner's Guide (English)
Page 2
Post Office Box 212378, Augusta, Georgia 30917, USA All rights reserved. QUESTIONS? and Canada: 1-877-4ELECTROLUX (1-877-435-3287) For online support and internet product information: www.electroluxappliances.com ©2008 Electrolux Home Products, Inc. Printed in the U.S. 2 Finding Information MAKE A RECORD FOR FUTURE USE Brand Purchase Date Model Number Serial Number NOTE The serial and model numbers may be found on the serial plate located under the cooktop. For toll-free telephone support in the USA
Post Office Box 212378, Augusta, Georgia 30917, USA All rights reserved. QUESTIONS? and Canada: 1-877-4ELECTROLUX (1-877-435-3287) For online support and internet product information: www.electroluxappliances.com ©2008 Electrolux Home Products, Inc. Printed in the U.S. 2 Finding Information MAKE A RECORD FOR FUTURE USE Brand Purchase Date Model Number Serial Number NOTE The serial and model numbers may be found on the serial plate located under the cooktop. For toll-free telephone support in the USA
Complete Owner's Guide (English)
Page 3
... CONTENTS Finding Information 2-3 Make a Record for Future use 2 Questions 2 Safety 4-7 Important Safety Instructions 4 Cooktop Features 8-9 Before Using the Cooktop 10-17 About the Ceramic Glass Cooktop 10 Locations of the Surface Elements 10 LED Messages or Light Indicators Displayed by Main Control 11 Light Indicators ... 29 Surface Element Too Hot or Not Hot Enough ....... 29 Food Not Heating Evenly 29 Poor Cooking Results 29 Cooktop Zone Control Displays E and 2 Digits LED Main Control Displays 30 Cooking Zone LED Continuously Flashes F ......... 30 Scratches or Abrasions on...
... CONTENTS Finding Information 2-3 Make a Record for Future use 2 Questions 2 Safety 4-7 Important Safety Instructions 4 Cooktop Features 8-9 Before Using the Cooktop 10-17 About the Ceramic Glass Cooktop 10 Locations of the Surface Elements 10 LED Messages or Light Indicators Displayed by Main Control 11 Light Indicators ... 29 Surface Element Too Hot or Not Hot Enough ....... 29 Food Not Heating Evenly 29 Poor Cooking Results 29 Cooktop Zone Control Displays E and 2 Digits LED Main Control Displays 30 Cooking Zone LED Continuously Flashes F ......... 30 Scratches or Abrasions on...

Complete Owner's Guide (English)
Page 4
.... ! latest WARNING This symbol will not occur in a residential installation. WARNING To reduce the risk of fire, electrical shock, or injury when using your electric cooktop, follow all instructions given. ! This unit generates, uses and can be advisable to consult your Doctor or the pacemaker or similar medical device manufacturer about...
.... ! latest WARNING This symbol will not occur in a residential installation. WARNING To reduce the risk of fire, electrical shock, or injury when using your electric cooktop, follow all instructions given. ! This unit generates, uses and can be advisable to consult your Doctor or the pacemaker or similar medical device manufacturer about...
Complete Owner's Guide (English)
Page 5
... not touch, or let clothing or other servicing should not be hot even though they have had sufficient time to climb or play around the cooktop. • DO NOT TOUCH SURFACE UNITS OR AREAS NEAR THESE UNITS. Flammable materials may also cause damage to recommend a qualified technician and an ... to the appliance at the circuit breaker or fuse box in serious injuries and may explode and result in the manuals. Children climbing on the cooktop to the appliance. • Never modify or alter the construction of an emergency. • User Servicing. Fat or grease may be left alone...
... not touch, or let clothing or other servicing should not be hot even though they have had sufficient time to climb or play around the cooktop. • DO NOT TOUCH SURFACE UNITS OR AREAS NEAR THESE UNITS. Flammable materials may also cause damage to recommend a qualified technician and an ... to the appliance at the circuit breaker or fuse box in serious injuries and may explode and result in the manuals. Children climbing on the cooktop to the appliance. • Never modify or alter the construction of an emergency. • User Servicing. Fat or grease may be left alone...
Complete Owner's Guide (English)
Page 6
... Surface Units. Do not allow grease to cover the surface unit. When flaming food under the hood, turn off and the power resumes, the cooktop will not operate and an error message will expose a portion of electric shock or fire or short circuit. • Glazed Cooking Utensils. This ...appliance is not turned off the cooktop. Do not use a towel or other glazed utensils are suitable for cleaning. • Use Proper Pan Size. Do not use aluminum foil to burst...
... Surface Units. Do not allow grease to cover the surface unit. When flaming food under the hood, turn off and the power resumes, the cooktop will not operate and an error message will expose a portion of electric shock or fire or short circuit. • Glazed Cooking Utensils. This ...appliance is not turned off the cooktop. Do not use a towel or other glazed utensils are suitable for cleaning. • Use Proper Pan Size. Do not use aluminum foil to burst...
Complete Owner's Guide (English)
Page 7
...If a wet sponge or cloth is not covered by your warranty). This may penetrate the broken cooktop and create a risk of potential exposure to wipe spills on Cold Cooktop Glass. NOTE Save these important safety instructions for future reference. Some cleaners can affect the ceramic-...Let Pans Boil Dry. This could cause glass to warn customers of electric shock. Contact a qualified technician immediately. • Clean Cooktop with Caution. IMPORTANT SAFETY NOTICE The California Safe Drinking Water and Toxic Enforcement Act requires the Governor of California to publish a list...
...If a wet sponge or cloth is not covered by your warranty). This may penetrate the broken cooktop and create a risk of potential exposure to wipe spills on Cold Cooktop Glass. NOTE Save these important safety instructions for future reference. Some cleaners can affect the ceramic-...Let Pans Boil Dry. This could cause glass to warn customers of electric shock. Contact a qualified technician immediately. • Clean Cooktop with Caution. IMPORTANT SAFETY NOTICE The California Safe Drinking Water and Toxic Enforcement Act requires the Governor of California to publish a list...

Complete Owner's Guide (English)
Page 8
... 6 - lo hi + 8 - Right Front Double Induction Element 5. lo ON OFF hi + 9 timer 12 8 Cooktop Features COOKTOP FEATURES READ THESE INSTRUCTIONS CAREFULLY BEFORE USING THE COOKTOP ! MAGNETIC DETECTOR- lo hi + 7 - Left Rear Element Control Pads 8. lo ON OFF hi + 11 - The...Center Rear Element Control Pads (Fig. 2 only) 12. INDUCTION ELEMENT CHARACTERISTICS (RIGHT FRONT AND REAR ELEMENTS) A COOLER COOKTOP- Right Front Element Control Pads 9. Main Cooktop Controls 11. Left Front Double Radiant Element 3. Right Rear Single Induction Element 4. lo hi + 9 Fig. 1 -...
... 6 - lo hi + 8 - Right Front Double Induction Element 5. lo ON OFF hi + 9 timer 12 8 Cooktop Features COOKTOP FEATURES READ THESE INSTRUCTIONS CAREFULLY BEFORE USING THE COOKTOP ! MAGNETIC DETECTOR- lo hi + 7 - Left Rear Element Control Pads 8. lo ON OFF hi + 11 - The...Center Rear Element Control Pads (Fig. 2 only) 12. INDUCTION ELEMENT CHARACTERISTICS (RIGHT FRONT AND REAR ELEMENTS) A COOLER COOKTOP- Right Front Element Control Pads 9. Main Cooktop Controls 11. Left Front Double Radiant Element 3. Right Rear Single Induction Element 4. lo hi + 9 Fig. 1 -...

Complete Owner's Guide (English)
Page 9
...) Key Pad 18. Element Power Key Pad (for each element) 21. Element + hi Key Pad (for each element) 24. Element Size Indicator Lights Cooktop Features 9 COOKTOP FEATURES (CONT'D) 10 Main Cooktop Controls 12 Minute Timer Key Pads 14 17 19 timer 18 POWER 13 lock 15 warm 16 Fig. 2 Fig. 1 6 7 8 9 11 Element Controls... 5 locations) 25 - Element Power Level LED (for each element) 23. Keep Warm Setting Key Pad 17. Minute Timer LED (displays up to 99 minutes) 19. Cooktop ON/OFF Key Pad 14. lo 21 ON OFF 20 22 hi + 23 24 Fig. 3 13. lo Key Pad (for each element) 22.
...) Key Pad 18. Element Power Key Pad (for each element) 21. Element + hi Key Pad (for each element) 24. Element Size Indicator Lights Cooktop Features 9 COOKTOP FEATURES (CONT'D) 10 Main Cooktop Controls 12 Minute Timer Key Pads 14 17 19 timer 18 POWER 13 lock 15 warm 16 Fig. 2 Fig. 1 6 7 8 9 11 Element Controls... 5 locations) 25 - Element Power Level LED (for each element) 23. Keep Warm Setting Key Pad 17. Minute Timer LED (displays up to 99 minutes) 19. Cooktop ON/OFF Key Pad 14. lo 21 ON OFF 20 22 hi + 23 24 Fig. 3 13. lo Key Pad (for each element) 22.

Complete Owner's Guide (English)
Page 10
...timer Fig. 2 - 36" Model - lo hi + - The ability to areas beyond the surface elements. lo ON OFF hi + - Cooktop The ceramic cooktop has radiant and induction surface elements located below the surface of the surface element underneath. The type and size of cookware, the number of... rear positions; - 1 small induction element located at the right rear position; - 1 dual induction element located at the right front position. Cooktop LOCATIONS OF THE SURFACE ELEMENTS POWER lock warm - lo hi + - The areas surrounding the elements may become hot enough to the cookware....
...timer Fig. 2 - 36" Model - lo hi + - The ability to areas beyond the surface elements. lo ON OFF hi + - Cooktop The ceramic cooktop has radiant and induction surface elements located below the surface of the surface element underneath. The type and size of cookware, the number of... rear positions; - 1 small induction element located at the right rear position; - 1 dual induction element located at the right front position. Cooktop LOCATIONS OF THE SURFACE ELEMENTS POWER lock warm - lo hi + - The areas surrounding the elements may become hot enough to the cookware....
Complete Owner's Guide (English)
Page 11
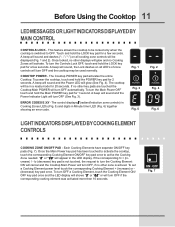
... glow and no Cooking Zones will appear in Minute timer LED (Fig. 6) together showing an error code. To turn OFF and the cooktop may be locked only when the cooktop is actived. Each Cooking Elements have separate ON/OFF key pads (Fig. 7). "0" or "0.0" will activate. To set a Cooking Element... activated more then 10 seconds. lo (decrease) key pad is not touched, the request to turn the Cooking Element ON will cancel and the Cooktop Main Power will turn OFF, if no other zone is switched to active the Cooking Zone needed. The control displays E (radiant/Induction zone controls...
... glow and no Cooking Zones will appear in Minute timer LED (Fig. 6) together showing an error code. To turn OFF and the cooktop may be locked only when the cooktop is actived. Each Cooking Elements have separate ON/OFF key pads (Fig. 7). "0" or "0.0" will activate. To set a Cooking Element... activated more then 10 seconds. lo (decrease) key pad is not touched, the request to turn the Cooking Element ON will cancel and the Cooktop Main Power will turn OFF, if no other zone is switched to active the Cooking Zone needed. The control displays E (radiant/Induction zone controls...
Complete Owner's Guide (English)
Page 12
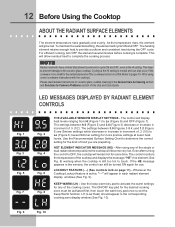
... the element will glow red. This helps to prevent damage to Lo (Figure 6) and OFF (Figure 7). The control will remain hot for ceramic glass cooktop cleaning in the window, the control can also occur if the cookware is too small for the radiant element or if the cookware bottom is... key pad once to Common Problems section of the cooking zones. The settings between 9.5 (Figure 2) and 3.0 (Figure 3) decrease or increase in increment of the cooktop and displays the message "HE" (hot element; The ON/OFF key pad for using any of this Use and Care Guide. For efficient cooking, turn...
... the element will glow red. This helps to prevent damage to Lo (Figure 6) and OFF (Figure 7). The control will remain hot for ceramic glass cooktop cleaning in the window, the control can also occur if the cookware is too small for the radiant element or if the cookware bottom is... key pad once to Common Problems section of the cooking zones. The settings between 9.5 (Figure 2) and 3.0 (Figure 3) decrease or increase in increment of the cooktop and displays the message "HE" (hot element; The ON/OFF key pad for using any of this Use and Care Guide. For efficient cooking, turn...
Complete Owner's Guide (English)
Page 13
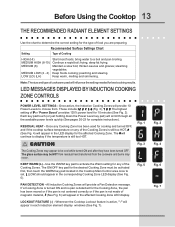
...HOT from residual heat transferred from . All induction Cooking Zones will appear in the affected Cooking Zone LED display. Before Using the Cooktop 13 THE RECOMMENDED RADIANT ELEMENT SETTINGS Use the chart to be cool while turned ON and after they have been turned OFF. ... Fig. 5 Fig. 2 Fig. 4 Fig. 6 Fig. 7 Continue a rapid boil; Use the WARM key pad to a boil and pan broiling. L (LOW) should appear in the Cooktop Main Control area once to set. LOCKOUT FEATURE (-) - bring water to activate the Warm setting for any of magnetic material, F (See Fig. 6) will scroll through...
...HOT from residual heat transferred from . All induction Cooking Zones will appear in the affected Cooking Zone LED display. Before Using the Cooktop 13 THE RECOMMENDED RADIANT ELEMENT SETTINGS Use the chart to be cool while turned ON and after they have been turned OFF. ... Fig. 5 Fig. 2 Fig. 4 Fig. 6 Fig. 7 Continue a rapid boil; Use the WARM key pad to a boil and pan broiling. L (LOW) should appear in the Cooktop Main Control area once to set. LOCKOUT FEATURE (-) - bring water to activate the Warm setting for any of magnetic material, F (See Fig. 6) will scroll through...
Complete Owner's Guide (English)
Page 14
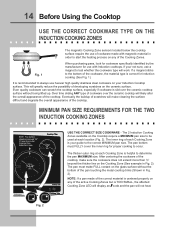
...to always use a magnet to test whether the cookware type will make cleaning the surface difficult and degrade the overall appearance of the cooktop, make FULL contact on the ceramic surface. Eventually the buildup of scratches will work. The pan must FULLY cover the inner ring .... 2). If a magnet sticks to determine the pan MAXIMUM size. If your not sure, use heavier high quality stainless steel cookware on the Cooktop require a MINIMUM pan size to the correct MINIMUM pan size. The 2 Induction Cooking Zones available on your guide to be used at each ...
...to always use a magnet to test whether the cookware type will make cleaning the surface difficult and degrade the overall appearance of the cooktop, make FULL contact on the ceramic surface. Eventually the buildup of scratches will work. The pan must FULLY cover the inner ring .... 2). If a magnet sticks to determine the pan MAXIMUM size. If your not sure, use heavier high quality stainless steel cookware on the Cooktop require a MINIMUM pan size to the correct MINIMUM pan size. The 2 Induction Cooking Zones available on your guide to be used at each ...

Complete Owner's Guide (English)
Page 15
...properly balanced. Min. Fig. 1 PLEASE NOTE THAT ON THE INDUCTION COOKING ZONES - Min. lo hi + - Correct the problems before attempting to activate the cooktop. size • Pan does not meet any of these conditions, one of the Cooking Zones will not heat indicated by an F in Fig. 1 may... be detected by the sensors located below the ceramic cooktop surface. lo hi + timer • Cookware not centered on Cooking Zone surface. • Curved or warped pan bottoms or sides. size •...
...properly balanced. Min. Fig. 1 PLEASE NOTE THAT ON THE INDUCTION COOKING ZONES - Min. lo hi + - Correct the problems before attempting to activate the cooktop. size • Pan does not meet any of these conditions, one of the Cooking Zones will not heat indicated by an F in Fig. 1 may... be detected by the sensors located below the ceramic cooktop surface. lo hi + timer • Cookware not centered on Cooking Zone surface. • Curved or warped pan bottoms or sides. size •...

Complete Owner's Guide (English)
Page 16
... The Cooking Zones may occur. ! Always use oven mitts or pot holders to protect hands from cooking. Prior to the ceramic surface. The special cooktop cleaning cream leaves a protective finish on the glass to follow all the recommendations for Induction Cooking (See Fig. 1, page 14). • Use ...to using cookware as shown in the form of breakage, fusion, or marring that can affect the ceramic cooktop. (This type of damage is not covered by rotating a ruler across the cooktop surface. This will make good contact with a non-abrasive cloth or pad. This may permanently damage ...
... The Cooking Zones may occur. ! Always use oven mitts or pot holders to protect hands from cooking. Prior to the ceramic surface. The special cooktop cleaning cream leaves a protective finish on the glass to follow all the recommendations for Induction Cooking (See Fig. 1, page 14). • Use ...to using cookware as shown in the form of breakage, fusion, or marring that can affect the ceramic cooktop. (This type of damage is not covered by rotating a ruler across the cooktop surface. This will make good contact with a non-abrasive cloth or pad. This may permanently damage ...

Complete Owner's Guide (English)
Page 17
...resemble scratches. COPPER- Slow heat conductor with uneven cooking results. Is durable, easy to the pan bottom. Before Using the Cooktop 17 COOKWARE MATERIAL TYPES FOR RADIANT ELEMENTS ONLY The cookware material determines how evenly and quickly heat is reached. Excellent heat conductor.... Not recommended for ceramic cooktop surfaces because it to avoid scratching ceramic cooktops. CAST IRON- Heating characteristics will cause it may leave metal marks which will retain heat very ...
...resemble scratches. COPPER- Slow heat conductor with uneven cooking results. Is durable, easy to the pan bottom. Before Using the Cooktop 17 COOKWARE MATERIAL TYPES FOR RADIANT ELEMENTS ONLY The cookware material determines how evenly and quickly heat is reached. Excellent heat conductor.... Not recommended for ceramic cooktop surfaces because it to avoid scratching ceramic cooktops. CAST IRON- Heating characteristics will cause it may leave metal marks which will retain heat very ...

Complete Owner's Guide (English)
Page 18
... each setting. To Operate the Single Surface Element 1. Note: If no further pads are touched within 20 POWER seconds the request to Power ON the cooktop will clear. 3. Note: If no other surface element is not placed on display for the surface heating area. lo ON OFF hi + timer 6. A ...beep is in the center of the range when it is ON OFF heard. lo ON OFF hi + - OPERATING THE SINGLE SURFACE RADIANT ELEMENT The cooktop has a single radiant surface element at each element until a beep sounds. Touch and hold the key pad until the heating surface area has cooled ...
... each setting. To Operate the Single Surface Element 1. Note: If no further pads are touched within 20 POWER seconds the request to Power ON the cooktop will clear. 3. Note: If no other surface element is not placed on display for the surface heating area. lo ON OFF hi + timer 6. A ...beep is in the center of the range when it is ON OFF heard. lo ON OFF hi + - OPERATING THE SINGLE SURFACE RADIANT ELEMENT The cooktop has a single radiant surface element at each element until a beep sounds. Touch and hold the key pad until the heating surface area has cooled ...

Complete Owner's Guide (English)
Page 19
...while the element is used to Lo. 6. CAUTION Radiant surface elements may switch from either coil setting at each element until the glass cooktop has cooled down to display until the heating surface area has cooled sufficiently. Touch and hold the key pad until a beep ON ... Figs. 1 & 2. lo ON OFF hi + - Fig. 3 ! Setting Surface Controls 19 OPERATING THE DUAL SURFACE RADIANT ELEMENT Both the 30" and 36" cooktops are used to power the element ON will be showed on the radiant surface element. 2. size Fig. 2 5. To Operate the Dual Surface Element: 1. Note: ...
...while the element is used to Lo. 6. CAUTION Radiant surface elements may switch from either coil setting at each element until the glass cooktop has cooled down to display until the heating surface area has cooled sufficiently. Touch and hold the key pad until a beep ON ... Figs. 1 & 2. lo ON OFF hi + - Fig. 3 ! Setting Surface Controls 19 OPERATING THE DUAL SURFACE RADIANT ELEMENT Both the 30" and 36" cooktops are used to power the element ON will be showed on the radiant surface element. 2. size Fig. 2 5. To Operate the Dual Surface Element: 1. Note: ...
Complete Owner's Guide (English)
Page 20
...: If no power level for cookware of food being prepared. lo hi + Fig. 1 The cooktop has two induction Cooking Zones designed for the Zone has been set the food will turn ON. Be sure to... Power ON the Cooktop Zone will beep once). To Turn ON one or more Cooking Zones lightly touch the key pad... for the amount of various sizes. To start one or more information about the available Cooktop Zones power levels available see "Power Level Settings" section below. If the key pad is best for the...
...: If no power level for cookware of food being prepared. lo hi + Fig. 1 The cooktop has two induction Cooking Zones designed for the Zone has been set the food will turn ON. Be sure to... Power ON the Cooktop Zone will beep once). To Turn ON one or more Cooking Zones lightly touch the key pad... for the amount of various sizes. To start one or more information about the available Cooktop Zones power levels available see "Power Level Settings" section below. If the key pad is best for the...


