Use and Care Manual
Page 4
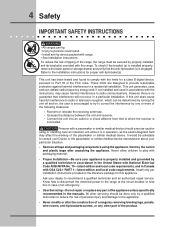
...plastic bags after unpacking the appliance. These limits are designed to provide reasonable protection against harmful interference in a particular installation. However there is properly installed and grounded by removing leveling legs, panels, wire covers, anti-tip brackets/screws, or any part of the ...appliance unless specifically recommended in the manuals. Never allow children to play with packaging material. • Proper Installation-Be sure your dealer to recommend a qualified technician and an authorized repair service. Ask your appliance is no guarantee...
...plastic bags after unpacking the appliance. These limits are designed to provide reasonable protection against harmful interference in a particular installation. However there is properly installed and grounded by removing leveling legs, panels, wire covers, anti-tip brackets/screws, or any part of the ...appliance unless specifically recommended in the manuals. Never allow children to play with packaging material. • Proper Installation-Be sure your dealer to recommend a qualified technician and an authorized repair service. Ask your appliance is no guarantee...

Use and Care Manual
Page 10
... The oven is released through the vents. When the oven is on each door. Oven Vent Warm Air Rack positions 7 6 5 4 3 2 1 (NON-SLIDING RACK ONLY) To install oven rack support, insert the supports by pushing them from the brackets. To remove the oven rack support for proper air circulation in the oven... disengage them downward into the two brackets on , warm air is vented above each side of cooking. 10 Feature Overview OVEN RACK SUPPORTS & OVEN VENTS Installing Oven Rack Supports ALWAYS INSTALL OVEN RACK SUPPORT BEFORE TURNING ON THE OVEN (WHEN THE OVEN IS COOL).
... The oven is released through the vents. When the oven is on each door. Oven Vent Warm Air Rack positions 7 6 5 4 3 2 1 (NON-SLIDING RACK ONLY) To install oven rack support, insert the supports by pushing them from the brackets. To remove the oven rack support for proper air circulation in the oven... disengage them downward into the two brackets on , warm air is vented above each side of cooking. 10 Feature Overview OVEN RACK SUPPORTS & OVEN VENTS Installing Oven Rack Supports ALWAYS INSTALL OVEN RACK SUPPORT BEFORE TURNING ON THE OVEN (WHEN THE OVEN IS COOL).
Use and Care Manual
Page 48
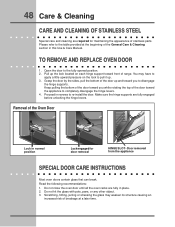
Pull up the lock located on the lock to re-install the door. Open the door to disengage the hinge supports. Grasp the door by the sides, pull the bottom of the door up . 3. Proceed in ...
Pull up the lock located on the lock to re-install the door. Open the door to disengage the hinge supports. Grasp the door by the sides, pull the bottom of the door up . 3. Proceed in ...
Use and Care Manual
Page 52
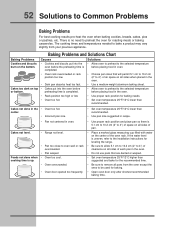
... or low • Use proper rack position for baking. • Open oven door only after shortest recommended baking time. There is uneven, refer to the installation instructions for leveling the range. • Be sure to allow 5.1 cm to 10.2 cm (2" to oven wall or rack overcrowded. • Pan warped Foods not...
... or low • Use proper rack position for baking. • Open oven door only after shortest recommended baking time. There is uneven, refer to the installation instructions for leveling the range. • Be sure to allow 5.1 cm to 10.2 cm (2" to oven wall or rack overcrowded. • Pan warped Foods not...
Use and Care Manual
Page 53
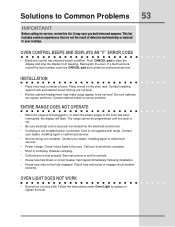
...sure electrical cord is securely connected into the electrical junction box. • Cord/plug is not supplied with range. Contact your dealer, installing agent or authorized servicer. • Power outage. Call your cooktop. Check fuse and screw or engage circuit breaker securely. OVEN LIGHT ...; Electronic control has detected a fault condition. Contact cabinet maker to clear the display and stop the display from beeping. Cord is not installed and/or connected. Replace cord/plug. • Controls are square and level. Be sure cabinets are not set the controls. •...
...sure electrical cord is securely connected into the electrical junction box. • Cord/plug is not supplied with range. Contact your dealer, installing agent or authorized servicer. • Power outage. Call your cooktop. Check fuse and screw or engage circuit breaker securely. OVEN LIGHT ...; Electronic control has detected a fault condition. Contact cabinet maker to clear the display and stop the display from beeping. Cord is not installed and/or connected. Replace cord/plug. • Controls are square and level. Be sure cabinets are not set the controls. •...

Use and Care Manual
Page 57
...or workmanship, or for service calls to be repaired in the USA, Puerto Rico and Canada. If service is performed, it is installed, used, and maintained in accordance with the provided instructions. Surcharges including, but not limited to obtain and keep all receipts. SOME ...original owner to be defective in materials or workmanship when such appliance is installed, used in a commercial setting. 7. Food loss due to establish the warranty period should service be obtained by contacting Electrolux at the addresses or phone numbers below. Service calls to repair or replace...
...or workmanship, or for service calls to be repaired in the USA, Puerto Rico and Canada. If service is performed, it is installed, used, and maintained in accordance with the provided instructions. Surcharges including, but not limited to obtain and keep all receipts. SOME ...original owner to be defective in materials or workmanship when such appliance is installed, used in a commercial setting. 7. Food loss due to establish the warranty period should service be obtained by contacting Electrolux at the addresses or phone numbers below. Service calls to repair or replace...
Dimensions
Page 1
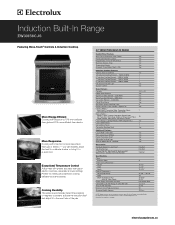
...cooktops, especially at electroluxappliances.ca. you can instantly adjust the heat to a delicate simmer or bring it to Product Installation Guide for detailed installation instructions on the web at lower settings. More Responsive Cooking with induction is 70% more efficient than gas and 20%... more responsive than gas or electric - Height (Adjustable) Width Depth (to change. Induction Built-In Range EW30IS6CJS Featuring Wave-Touch® ...
...cooktops, especially at electroluxappliances.ca. you can instantly adjust the heat to a delicate simmer or bring it to Product Installation Guide for detailed installation instructions on the web at lower settings. More Responsive Cooking with induction is 70% more efficient than gas and 20%... more responsive than gas or electric - Height (Adjustable) Width Depth (to change. Induction Built-In Range EW30IS6CJS Featuring Wave-Touch® ...
Dimensions
Page 2
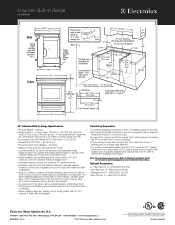
..., ON L5V 3E4 • 1-800-265-8352 • electroluxappliances.ca EW30IS6CJ 05/11 © 2011 Electrolux Major Appliances, NA High standards of 29", replace actual side trim panels with smaller side trim panels, available with optional Side Trim Kit (refer to detailed kit installation instructions). Countertop Preparation For detailed preparation instructions, refer to...
..., ON L5V 3E4 • 1-800-265-8352 • electroluxappliances.ca EW30IS6CJ 05/11 © 2011 Electrolux Major Appliances, NA High standards of 29", replace actual side trim panels with smaller side trim panels, available with optional Side Trim Kit (refer to detailed kit installation instructions). Countertop Preparation For detailed preparation instructions, refer to...

