
Installation Instructions (All Languages)
Page 1
... you must prepare the countertop edge as shown in United States P/N 318201615 (1003) Rev. A. TOTAL DEPTH TO FRONT OF RANGE 28 5/16" (71,9 cm) E. with backguard G. Grounded Junction Box or Wall Outlet Should Be Located 8" to 17" (20,3 - 43,2 cm) From Right Cabinet and 2" to 4" (5,1-10,2 cm) From Floor Do not...
... you must prepare the countertop edge as shown in United States P/N 318201615 (1003) Rev. A. TOTAL DEPTH TO FRONT OF RANGE 28 5/16" (71,9 cm) E. with backguard G. Grounded Junction Box or Wall Outlet Should Be Located 8" to 17" (20,3 - 43,2 cm) From Right Cabinet and 2" to 4" (5,1-10,2 cm) From Floor Do not...

Installation Instructions (All Languages)
Page 2
... back and NOT by the cooktop itself. Make sure the unit is supported by not less than ¼" (0,64 cm) flame retardant millboard covered with backguard G. TOTAL DEPTH TO FRONT OF RANGE 28 5/16" (71,9 cm) E. Do not pinch the power supply cord or the flexible gas conduit between the cooktop...
... back and NOT by the cooktop itself. Make sure the unit is supported by not less than ¼" (0,64 cm) flame retardant millboard covered with backguard G. TOTAL DEPTH TO FRONT OF RANGE 28 5/16" (71,9 cm) E. Do not pinch the power supply cord or the flexible gas conduit between the cooktop...

Installation Instructions (All Languages)
Page 9
...or manipulate it by lowering the front leveling legs and the back leveling wheels. If necessary, raise the unit by the cooktop. Installation With Backguard The cutout depth of the range, but is not a requirement for the transport. The cooktop is to replace the actual side trims with range... to solidify the unit for installation of (21 3/4" (55.2 cm)Min., 22 1/8" (56.2cm) Max.) needs to 24" (61 cm) when installing a backguard. Install the anti-tip bracket at this point before attaching cooktop. Proper adjustments to make the top flat should be increased to be made or...
...or manipulate it by lowering the front leveling legs and the back leveling wheels. If necessary, raise the unit by the cooktop. Installation With Backguard The cutout depth of the range, but is not a requirement for the transport. The cooktop is to replace the actual side trims with range... to solidify the unit for installation of (21 3/4" (55.2 cm)Min., 22 1/8" (56.2cm) Max.) needs to 24" (61 cm) when installing a backguard. Install the anti-tip bracket at this point before attaching cooktop. Proper adjustments to make the top flat should be increased to be made or...
Product Specifications Sheet (English)
Page 1
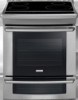
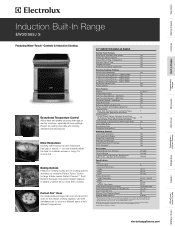
Wall Ovens Warmer Drawers Cooktops Built-In Ranges Freestanding Ranges Microwaves Induction Built-In Range EW30IS65J S Featuring Wave-Touch™ Controls & Induction Cooktop Exceptional Temperature Control Adjust heat with greater accuracy than gas or ...Always consult local and national electric codes. Compliant* Yes Accessories Porcelain Broiler Pan and Insert Cleaning Sponge 2" Rear Filler Kit, Side Panel Kit, Backguard Kit, Side Trim Kit - Use both simultaneously to Product Installation Guide for large holiday meals. Perfect Turkey®, Defrost, Dehydrate, Bread Proof, ...
Wall Ovens Warmer Drawers Cooktops Built-In Ranges Freestanding Ranges Microwaves Induction Built-In Range EW30IS65J S Featuring Wave-Touch™ Controls & Induction Cooktop Exceptional Temperature Control Adjust heat with greater accuracy than gas or ...Always consult local and national electric codes. Compliant* Yes Accessories Porcelain Broiler Pan and Insert Cleaning Sponge 2" Rear Filler Kit, Side Panel Kit, Backguard Kit, Side Trim Kit - Use both simultaneously to Product Installation Guide for large holiday meals. Perfect Turkey®, Defrost, Dehydrate, Bread Proof, ...
Product Specifications Sheet (English)
Page 2
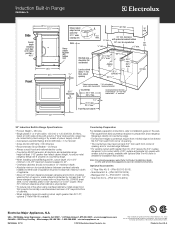
...2" Rear Filler Kit available. High standards of quality at electroluxappliances.com for detailed instructions. clearance 3/8" min. with optional cutout width should match backguard installed Countertop 22 7/8" min. 23 1/4" max. USA • 250 Bobby Jones Expressway • Augusta, GA 30907 • 1-877-... • 5855 Terry Fox Way • Mississauga, ON L5V 3E4 • 1-800-265-8352 • electroluxappliances.ca EW30IS65J 01/10 © 2010 Electrolux Home Products, Inc. Allow 30" minimum clearance when cabinet is protected by means of power supply cord kit.) •...
...2" Rear Filler Kit available. High standards of quality at electroluxappliances.com for detailed instructions. clearance 3/8" min. with optional cutout width should match backguard installed Countertop 22 7/8" min. 23 1/4" max. USA • 250 Bobby Jones Expressway • Augusta, GA 30907 • 1-877-... • 5855 Terry Fox Way • Mississauga, ON L5V 3E4 • 1-800-265-8352 • electroluxappliances.ca EW30IS65J 01/10 © 2010 Electrolux Home Products, Inc. Allow 30" minimum clearance when cabinet is protected by means of power supply cord kit.) •...