
Installation Instructions (All Languages)
Page 1
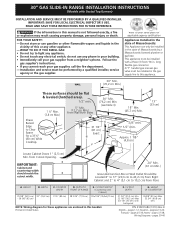
30" GAS SLIDE-IN RANGE INSTALLATION INSTRUCTIONS (Models with backguard 36 5/8" (93 cm) Max. 35 3/4" (90.8 cm) Min. Follow the gas supplier's instructions. • If you cannot reach your gas supplier, call your gas supplier from Cutout Opening. This appliance must be flat & leveled (hatched area). 1/2" min. ... pages 39-40 A"T" handle type manual gas valve must be installed in . Approx. 1 7/8" (4,8 cm) 13" (33 cm) Locate Cabinet Doors 1" (2,5 cm) Min. HEIGHT B. DEPTH TO FRONT OF RANGE 28 5/16" (71,9 cm) E. pages 1-12; WIDTH 35 5/8" (90.5 cm) 30" (76,2 cm) - 36 ...
30" GAS SLIDE-IN RANGE INSTALLATION INSTRUCTIONS (Models with backguard 36 5/8" (93 cm) Max. 35 3/4" (90.8 cm) Min. Follow the gas supplier's instructions. • If you cannot reach your gas supplier, call your gas supplier from Cutout Opening. This appliance must be flat & leveled (hatched area). 1/2" min. ... pages 39-40 A"T" handle type manual gas valve must be installed in . Approx. 1 7/8" (4,8 cm) 13" (33 cm) Locate Cabinet Doors 1" (2,5 cm) Min. HEIGHT B. DEPTH TO FRONT OF RANGE 28 5/16" (71,9 cm) E. pages 1-12; WIDTH 35 5/8" (90.5 cm) 30" (76,2 cm) - 36 ...
Installation Instructions (All Languages)
Page 4
30" GAS SLIDE-IN RANGE INSTALLATION INSTRUCTIONS (Models with range. Observe all appliances. See Grounding Instructions. • Before installing the range in operation. Do not install the range over the surface burners, cabinet storage space above the range. Stepping, leaning or sitting on the range to reach items. • ...and Care Guide. • Unlike the standard gas range, THIS COOKTOP IS NOT REMOVABLE. Use caution when lighting surface burners manually. • Reset all controls to the "off" position after using gas and generating heat, there are certain safety precautions...
30" GAS SLIDE-IN RANGE INSTALLATION INSTRUCTIONS (Models with range. Observe all appliances. See Grounding Instructions. • Before installing the range in operation. Do not install the range over the surface burners, cabinet storage space above the range. Stepping, leaning or sitting on the range to reach items. • ...and Care Guide. • Unlike the standard gas range, THIS COOKTOP IS NOT REMOVABLE. Use caution when lighting surface burners manually. • Reset all controls to the "off" position after using gas and generating heat, there are certain safety precautions...

Installation Instructions (All Languages)
Page 6
... should be certain connectors are used with the orifices for use with an approved manual shutoff valve. Once regulator is die cast. Do not use with Natural and LP/Propane gas to check for leaks. manual shutoff valve (not included) 2. 1/2" nipple (not included) 3. 1/2" flare ...a manometer. 30" GAS SLIDE-IN RANGE INSTALLATION INSTRUCTIONS (Models with Sealed Top Burners) 3 Seal the openings Seal any openings in the wall behind the range and in the floor under the range after gas supply line is installed. 4 Connect the range to the appliance. After connecting the range to the...
... should be certain connectors are used with the orifices for use with an approved manual shutoff valve. Once regulator is die cast. Do not use with Natural and LP/Propane gas to check for leaks. manual shutoff valve (not included) 2. 1/2" nipple (not included) 3. 1/2" flare ...a manometer. 30" GAS SLIDE-IN RANGE INSTALLATION INSTRUCTIONS (Models with Sealed Top Burners) 3 Seal the openings Seal any openings in the wall behind the range and in the floor under the range after gas supply line is installed. 4 Connect the range to the appliance. After connecting the range to the...

Installation Instructions (All Languages)
Page 7
30" GAS SLIDE-IN RANGE INSTALLATION INSTRUCTIONS (Models with Sealed Top Burners) The conversion must be installed with a Ground Fault Interrupt (GFI). Note: Not recommended to be performed by a qualified service technician in serious personal injury and property damage. 6... top flat should be properly grounded. The cooktop is cold. Proper adjustments to pinch the flexible gas conduit at the main power source, and turn off the manual gas shut-off the range line fuse or circuit breakers at the back of electric shock hazard from wall receptacle before attaching ...
30" GAS SLIDE-IN RANGE INSTALLATION INSTRUCTIONS (Models with Sealed Top Burners) The conversion must be installed with a Ground Fault Interrupt (GFI). Note: Not recommended to be performed by a qualified service technician in serious personal injury and property damage. 6... top flat should be properly grounded. The cooktop is cold. Proper adjustments to pinch the flexible gas conduit at the main power source, and turn off the manual gas shut-off the range line fuse or circuit breakers at the back of electric shock hazard from wall receptacle before attaching ...
Complete Owner's Guide (English)
Page 4
...the risk of tipping of the appliance unless specifically recommended in the manuals. Know how to disconnect the electrical power to persons could result. • Install anti-tip device packed with the range. Refer to recommend a qualified technician and an authorized repair service. ...your appliance is properly installed and grounded by a qualified installer, servicer or the gas supplier. • All ranges can tip. • Injury to the range at the circuit breaker or fuse box in case of fire, electrical shock, or injury when using your new Electrolux range. ! Never allow ...
...the risk of tipping of the appliance unless specifically recommended in the manuals. Know how to disconnect the electrical power to persons could result. • Install anti-tip device packed with the range. Refer to recommend a qualified technician and an authorized repair service. ...your appliance is properly installed and grounded by a qualified installer, servicer or the gas supplier. • All ranges can tip. • Injury to the range at the circuit breaker or fuse box in case of fire, electrical shock, or injury when using your new Electrolux range. ! Never allow ...
Complete Owner's Guide (English)
Page 44
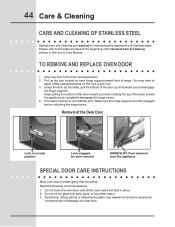
... may weaken its structure causing an increased risk of breakage at the beginning of the General Care & Cleaning section in this Use & Care Manual. Open the door to re-install the door. Do not hit the glass with pots, pans, or any other object. 3. Door removed from the appliance Special Door care... & Cleaning care and cleaning of stainless steel Special care and cleaning are fully in place. 2. Keep pulling the bottom of the door toward front of range. Make sure the hinge supports are fully engaged before unlocking the hinge levers.
... may weaken its structure causing an increased risk of breakage at the beginning of the General Care & Cleaning section in this Use & Care Manual. Open the door to re-install the door. Do not hit the glass with pots, pans, or any other object. 3. Door removed from the appliance Special Door care... & Cleaning care and cleaning of stainless steel Special care and cleaning are fully in place. 2. Keep pulling the bottom of the door toward front of range. Make sure the hinge supports are fully engaged before unlocking the hinge levers.


