Use and Care Manual
Page 2
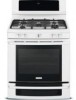
...reserved. and Canada: 1-877-4ELECTROLUX (1-877-435-3287) For online support and Internet production information visit http://www.electroluxusa.com ©2007 Electrolux Home Products, Inc. Questions? For toll-free telephone support in the USA This Use & Care Guide is part of our commitment to ...22-23 • Convection bake 24 • Using convection convert 25 • Convection roast 26-27 • Probe 28-29 • Keep warm 30 • Slow cook 31 • Perfect turkey 32 • Defrost 33 • Dehydrate 33 • Bread proof 34 • Saving & recalling...
...reserved. and Canada: 1-877-4ELECTROLUX (1-877-435-3287) For online support and Internet production information visit http://www.electroluxusa.com ©2007 Electrolux Home Products, Inc. Questions? For toll-free telephone support in the USA This Use & Care Guide is part of our commitment to ...22-23 • Convection bake 24 • Using convection convert 25 • Convection roast 26-27 • Probe 28-29 • Keep warm 30 • Slow cook 31 • Perfect turkey 32 • Defrost 33 • Dehydrate 33 • Bread proof 34 • Saving & recalling...

Use and Care Manual
Page 7
... cooking • Bake -pg 19 • Broil -pg 22-23 • Convection bake -pg 24 • Convection roast -pg 26-27 • Keep warm -pg 30• Slow cook -pg 31 4. Cooking time • Cook time -pg 20 • End time -pg 21 9. Features 7 Oven features & options 1 3 24 12 5 6 7 8...pg 12 3. Favorite settings -pg 35 6. temp Bake (upper) 170°F/76°C Bake (lower) 170°F / 76°C Bread Proof Lo(85°F/30°C) Broil 300°F / 148°C Conv Bake 170°F / 76°C Conv Roast 170°F / 76°C Keep Warm 150°F/66°C...
... cooking • Bake -pg 19 • Broil -pg 22-23 • Convection bake -pg 24 • Convection roast -pg 26-27 • Keep warm -pg 30• Slow cook -pg 31 4. Cooking time • Cook time -pg 20 • End time -pg 21 9. Features 7 Oven features & options 1 3 24 12 5 6 7 8...pg 12 3. Favorite settings -pg 35 6. temp Bake (upper) 170°F/76°C Bake (lower) 170°F / 76°C Bread Proof Lo(85°F/30°C) Broil 300°F / 148°C Conv Bake 170°F / 76°C Conv Roast 170°F / 76°C Keep Warm 150°F/66°C...

Use and Care Manual
Page 20
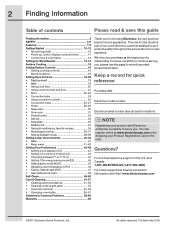
...the best possible results. Cook time may press CANCEL any time when setting the control or during the cooking process. 3. Press COOK OPTIONS 5. Enter 30 minutes 7. Press COOK TIME 6. Press START 4. 20 Setting Oven Controls Using cook time in upper oven Adding a cook time when baking is ...pressed the oven will cook and after 30 minutes. Press BAKE NOTE • You may be set with the following features: • Bake • Conv bake • Conv roast •...
...the best possible results. Cook time may press CANCEL any time when setting the control or during the cooking process. 3. Press COOK OPTIONS 5. Enter 30 minutes 7. Press COOK TIME 6. Press START 4. 20 Setting Oven Controls Using cook time in upper oven Adding a cook time when baking is ...pressed the oven will cook and after 30 minutes. Press BAKE NOTE • You may be set with the following features: • Bake • Conv bake • Conv roast •...
Use and Care Manual
Page 21
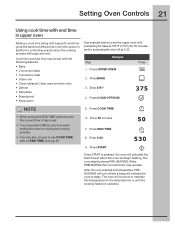
Step Example 1. Enter 375°F 4. Enter 50 minutes 7. Enter 5:30 9. The oven will indicate the oven is ready. Press COOK TIME • When setting the END TIME option be set with the following features: • ... will continue to maintain this temperature for the selected time or until the cooking feature is pressed, the oven will calculate the start time at 5:30. Press UPPER OVEN Press 2. Press BAKE 3. Press END TIME 8. The oven display shows PRE-HEATING.
Step Example 1. Enter 375°F 4. Enter 50 minutes 7. Enter 5:30 9. The oven will indicate the oven is ready. Press COOK TIME • When setting the END TIME option be set with the following features: • ... will continue to maintain this temperature for the selected time or until the cooking feature is pressed, the oven will calculate the start time at 5:30. Press UPPER OVEN Press 2. Press BAKE 3. Press END TIME 8. The oven display shows PRE-HEATING.
Use and Care Manual
Page 24
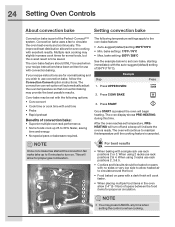
...-HEATING during this temperature until the cooking feature is time saved. If your recipe instructions have been written for normal baking and you wish to 30% faster, saving time and energy. • No special pans or bakeware required. The convection convert option will continue to the conv bake feature: • Auto... to 6 minutes to set conv bake, starting immediately with end time • Probe • Rapid preheat Benefits of space between the food items for proper gas combustion.
...-HEATING during this temperature until the cooking feature is time saved. If your recipe instructions have been written for normal baking and you wish to 30% faster, saving time and energy. • No special pans or bakeware required. The convection convert option will continue to the conv bake feature: • Auto... to 6 minutes to set conv bake, starting immediately with end time • Probe • Rapid preheat Benefits of space between the food items for proper gas combustion.

Use and Care Manual
Page 25
... when setting the control or during the cooking process. Step EExxaammpplele Press • Superior multiple oven rack performance. • Some foods cook up 25 to 30% faster, saving time and energy. • No special pans or bakeware required. 1. will also beep at regular intervals until baking has finished. Setting Oven Controls...
... when setting the control or during the cooking process. Step EExxaammpplele Press • Superior multiple oven rack performance. • Some foods cook up 25 to 30% faster, saving time and energy. • No special pans or bakeware required. 1. will also beep at regular intervals until baking has finished. Setting Oven Controls...

Use and Care Manual
Page 26
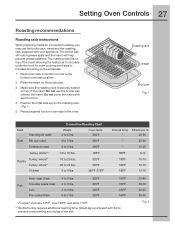
...°C • Minimum: 170°F / 76°C • Maximum: 550°F / 288°C Benefits of + or - For best results • Preheating is no need to 30% faster, saving time and energy. • No special pans or bakeware required. See example below to set convection roast to rapidly roast meats and poultry...
...°C • Minimum: 170°F / 76°C • Maximum: 550°F / 288°C Benefits of + or - For best results • Preheating is no need to 30% faster, saving time and energy. • No special pans or bakeware required. See example below to set convection roast to rapidly roast meats and poultry...
Use and Care Manual
Page 27
...;F 16 to 20 lbs. 20 to 24 lbs. 3 to 4 lbs. 325°F 325°F 350°F -375°F Internal temp Minute per lb. * 25-30 * 25-30 * 15-25 180°F 8-10 180°F 180°F 180°F 10-15 12-16 12-16 Ham roast, fresh 4 to the bottom oven rack... position. 2. Place oven rack on bottom or next to 6 lbs. Make sure the roasting rack is securely seated on top of the skin. 30-40 20-30 20-25 30-40 Fig. 2 Pork Shoulder blade roast 4 to 7 lbs. 325°F 325°F 325°F 325°F 160°F 160°F 160°F 160...
...;F 16 to 20 lbs. 20 to 24 lbs. 3 to 4 lbs. 325°F 325°F 350°F -375°F Internal temp Minute per lb. * 25-30 * 25-30 * 15-25 180°F 8-10 180°F 180°F 180°F 10-15 12-16 12-16 Ham roast, fresh 4 to the bottom oven rack... position. 2. Place oven rack on bottom or next to 6 lbs. Make sure the roasting rack is securely seated on top of the skin. 30-40 20-30 20-25 30-40 Fig. 2 Pork Shoulder blade roast 4 to 7 lbs. 325°F 325°F 325°F 325°F 160°F 160°F 160°F 160...

Use and Care Manual
Page 30
... (default) setting: 170°F/76°C • Min. Press START • FOOD POISONING HAZARD. NOTE Example You may press CANCEL any cook settings after cooking. 30 Setting Oven Controls About keep warm Use the keep warm feature to start immediately with the auto-suggest (default) setting. To add or change . will...
... (default) setting: 170°F/76°C • Min. Press START • FOOD POISONING HAZARD. NOTE Example You may press CANCEL any cook settings after cooking. 30 Setting Oven Controls About keep warm Use the keep warm feature to start immediately with the auto-suggest (default) setting. To add or change . will...
Use and Care Manual
Page 32
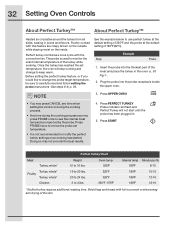
... turkey at the default setting of 325°F and the probe at the default setting of the meat and place the turkey in the oven -p. 30 Fig 1-. 2. Once the turkey has reached the set temperature. • It is used to see the internal meat temperature reported by the probe. Before setting...
... turkey at the default setting of 325°F and the probe at the default setting of the meat and place the turkey in the oven -p. 30 Fig 1-. 2. Once the turkey has reached the set temperature. • It is used to see the internal meat temperature reported by the probe. Before setting...

Use and Care Manual
Page 34
34 Setting Oven Controls About bread proof Setting bread proof The bread proof feature maintains a warm environment useful for 85°F / 30°C). Bread proof may be set bread proof for rising yeast-leavened products. Press UPPER OVEN 3. keys. bread proof setting: 100°F / 38°C For ... 5° F ( or 2°C). • If changing cooking times, select the cook time or end time keys needed to check progress. bread proof setting: 85°F/30°C • Max. Press START • Lightly cover the dough • Place a bowl of + or -
34 Setting Oven Controls About bread proof Setting bread proof The bread proof feature maintains a warm environment useful for 85°F / 30°C). Bread proof may be set bread proof for rising yeast-leavened products. Press UPPER OVEN 3. keys. bread proof setting: 100°F / 38°C For ... 5° F ( or 2°C). • If changing cooking times, select the cook time or end time keys needed to check progress. bread proof setting: 85°F/30°C • Max. Press START • Lightly cover the dough • Place a bowl of + or -
Use and Care Manual
Page 43
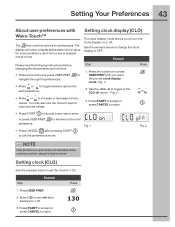
...or press CANCEL to reject. • Press START to turn the clock display on or off option -Fig. 2-. Enter 1:30 or use the numeric keys to 1:30. Step 1. Press See the example below to set clock display mode -Fig. 1-. 2. Example Please read the following instructions before... changing the user preferences functions: • Press and continue to press USER PREF to navigate through the preferences. • Press or to 1:30. 3. Fig. 2 NOTE User preference options are not available while cooking or when using the kitchen timer. Step Example 1. Press and continue ...
...or press CANCEL to reject. • Press START to turn the clock display on or off option -Fig. 2-. Enter 1:30 or use the numeric keys to 1:30. Step 1. Press See the example below to set clock display mode -Fig. 1-. 2. Example Please read the following instructions before... changing the user preferences functions: • Press and continue to press USER PREF to navigate through the preferences. • Press or to 1:30. 3. Fig. 2 NOTE User preference options are not available while cooking or when using the kitchen timer. Step Example 1. Press and continue ...

Use and Care Manual
Page 50
Remember to add 30-40 additional minutes for the oven to cool enough and the oven door to 12 hours later). Press START The example below shows setting the ... CLEAN 3. The example below shows setting the upper oven for lite (2 hrs), med (3 hrs) or heavy soils (4 hrs). Step Example Press You may take about 30-40 minutes to end at 8:00 o'clock. Select MED or select lite or heavy 4. Remove racks and Press UPPER OVEN After pressing start if the...
Remember to add 30-40 additional minutes for the oven to cool enough and the oven door to 12 hours later). Press START The example below shows setting the ... CLEAN 3. The example below shows setting the upper oven for lite (2 hrs), med (3 hrs) or heavy soils (4 hrs). Step Example Press You may take about 30-40 minutes to end at 8:00 o'clock. Select MED or select lite or heavy 4. Remove racks and Press UPPER OVEN After pressing start if the...
Use and Care Manual
Page 51
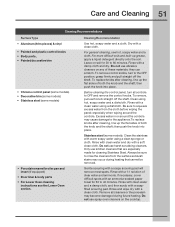
... to rinse the cleaners from the cloth before wiping the panel; then push the knob into place. Do not use abrasive cleaners on soil for 30 to 60 minutes. especially when wiping around the controls may become damaged during heating that are especially made for cleaning Stainless Steel. Stainless steel (some... Use hot, soapy water and a cloth. then push the knob into place. Rinse with clean water and dry with an ammonia-soaked paper towel for 30 to 40 minutes.
... to rinse the cleaners from the cloth before wiping the panel; then push the knob into place. Do not use abrasive cleaners on soil for 30 to 60 minutes. especially when wiping around the controls may become damaged during heating that are especially made for cleaning Stainless Steel. Stainless steel (some... Use hot, soapy water and a cloth. then push the knob into place. Rinse with clean water and dry with an ammonia-soaked paper towel for 30 to 40 minutes.

