Use and Care Manual
Page 2
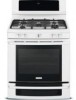
... Common Problems 58-60 Warranty 63 Thank you . To ensure our ability to continue serving you, please use this guide Finding information 2 SAFETY 3-6 Features 7-9 Getting Started 10-12 • About the griddle 10 • Power up, control display modes & timers 11 • Control lock & oven lights 12 Settings for Best Results 13-14 Surface Cooking 15 Setting Surface Controls 16 • Setting cooktop controls 16 • Burner locations 16 Setting Oven Controls 18-39 • Rapid preheat 18 • Bake 19 • Using cook time...
... Common Problems 58-60 Warranty 63 Thank you . To ensure our ability to continue serving you, please use this guide Finding information 2 SAFETY 3-6 Features 7-9 Getting Started 10-12 • About the griddle 10 • Power up, control display modes & timers 11 • Control lock & oven lights 12 Settings for Best Results 13-14 Surface Cooking 15 Setting Surface Controls 16 • Setting cooktop controls 16 • Burner locations 16 Setting Oven Controls 18-39 • Rapid preheat 18 • Bake 19 • Using cook time...
Use and Care Manual
Page 3
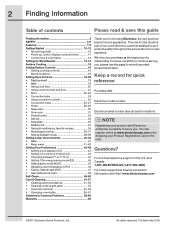
... and fully secured by the anti-tip bracket by removing lower panel or storage drawer. The weight of this or any electrical switch; Save these instructions for proper anti-tip bracket installation. For models with a warmer drawer, grasp the top rear edge of the following safety instructions before using this appliance: • All ranges can result in serious injuries and also cause damage to the installation instructions for future reference. For...
... and fully secured by the anti-tip bracket by removing lower panel or storage drawer. The weight of this or any electrical switch; Save these instructions for proper anti-tip bracket installation. For models with a warmer drawer, grasp the top rear edge of the following safety instructions before using this appliance: • All ranges can result in serious injuries and also cause damage to the installation instructions for future reference. For...
Use and Care Manual
Page 4
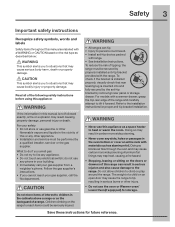
..., tested and listed by removing leveling legs, panels, wire covers, anti-tip brackets/screws, or any part of an emergency. • User servicing-Do not repair or replace any unused range if it closely. They should never be left alone or unattended in the area where appliance is not turned off the range. Smother the fire with the National Fuel Gas Code ANSI Z223- This may cause container to operate again...
..., tested and listed by removing leveling legs, panels, wire covers, anti-tip brackets/screws, or any part of an emergency. • User servicing-Do not repair or replace any unused range if it closely. They should never be left alone or unattended in the area where appliance is not turned off the range. Smother the fire with the National Fuel Gas Code ANSI Z223- This may cause container to operate again...
Use and Care Manual
Page 5
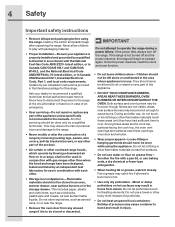
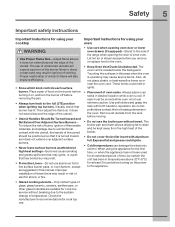
... hot air or steam escape before removing the pan. • Always turn knob to the sudden change in this manual. Exposed fat and grease could melt or ignite. • Placement of oven racks. The use the broiler pan without breaking due to the full LITE position when igniting top burners. The broiler pan and insert allows dripping fat to reposition. Safety 5 Important safety instructions Important instuctions for using your oven • Use care when opening oven door...
... hot air or steam escape before removing the pan. • Always turn knob to the sudden change in this manual. Exposed fat and grease could melt or ignite. • Placement of oven racks. The use the broiler pan without breaking due to the full LITE position when igniting top burners. The broiler pan and insert allows dripping fat to reposition. Safety 5 Important safety instructions Important instuctions for using your oven • Use care when opening oven door...
Use and Care Manual
Page 6
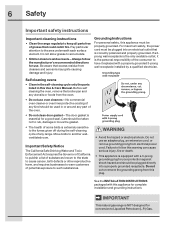
... is equipped with this Use & Care Manual. Do not allow grease to the area underneath each surface element. Do not use an adapter plug, an extension cord, or remove grounding prong from this plug. Failure to follow the manufacturer's recommended directions for complete installation and grounding instructions. IMPORTANT This natural gas range is extremely sensitive to the fumes given off during the self-cleaning cycle of grease that...
... is equipped with this Use & Care Manual. Do not allow grease to the area underneath each surface element. Do not use an adapter plug, an extension cord, or remove grounding prong from this plug. Failure to follow the manufacturer's recommended directions for complete installation and grounding instructions. IMPORTANT This natural gas range is extremely sensitive to the fumes given off during the self-cleaning cycle of grease that...
Use and Care Manual
Page 9
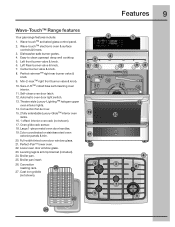
.... 12. Convection fan & cover. 15. 2 fully extendable Luxury-Glide™ interior oven racks. 16. 1 offset interior oven rack (not shown). 17. Lower oven door window glass. 23. Left front burner valve & knob. 6. Automatic oven door light switch. 13. Easy to clean upswept deep well cooktop. 5. Dishwasher safe burner grates. 4. Perfect-Pair™ lower oven. 22. Features 9 Wave-Touch™ Range features Your gas range features include: 1. Full-width tinted oven door window glass. 21. Broiler pan insert. 26. Wave-touch™ electronic oven & surface controls & timers...
.... 12. Convection fan & cover. 15. 2 fully extendable Luxury-Glide™ interior oven racks. 16. 1 offset interior oven rack (not shown). 17. Lower oven door window glass. 23. Left front burner valve & knob. 6. Automatic oven door light switch. 13. Easy to clean upswept deep well cooktop. 5. Dishwasher safe burner grates. 4. Perfect-Pair™ lower oven. 22. Features 9 Wave-Touch™ Range features Your gas range features include: 1. Full-width tinted oven door window glass. 21. Broiler pan insert. 26. Wave-touch™ electronic oven & surface controls & timers...
Use and Care Manual
Page 10
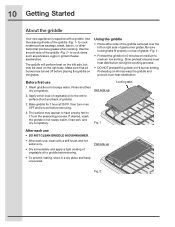
... turn oven OFF and let cool before placing the griddle on HI may warp the griddle and prevent even heat distribution. Be sure locking tabs fit properly on top of griddle). 3. Wash griddle in hot soapy water, rinse well, and dry completely. Use the raised grill side of gas burner grates. Slow preheat ensures even heat distribution during the cooking process. • DO NOT preheat the griddle...
... turn oven OFF and let cool before placing the griddle on HI may warp the griddle and prevent even heat distribution. Be sure locking tabs fit properly on top of griddle). 3. Wash griddle in hot soapy water, rinse well, and dry completely. Use the raised grill side of gas burner grates. Slow preheat ensures even heat distribution during the cooking process. • DO NOT preheat the griddle...
Use and Care Manual
Page 12
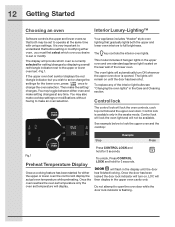
... be set or modify. Control lock will lock the oven light and will flash in the Care and Cleaning section. LOC will turn ON whenever the upper oven door is available only in the upper oven cavity only. If the upper oven text symbol displays the red triangle indicator but you desire to lock the upper oven and the cooktop: Step Example Press Fig.1 Preheat Temperature Display Once a cooking feature has been started for...
... be set or modify. Control lock will lock the oven light and will flash in the Care and Cleaning section. LOC will turn ON whenever the upper oven door is available only in the upper oven cavity only. If the upper oven text symbol displays the red triangle indicator but you desire to lock the upper oven and the cooktop: Step Example Press Fig.1 Preheat Temperature Display Once a cooking feature has been started for...
Use and Care Manual
Page 13
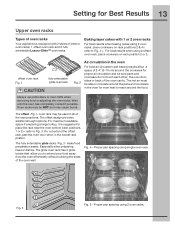
... and baking results allow you to Fig. 3. For best results when using 2 oven racks. offset oven rack Fig. 1 fully extendable glide oven rack Fig. 2 Air circulation in the oven for proper air circulation and be HOT and may be sure pans and cookware do not touch each other, the oven door, sides or back of the oven cavity. Always use potholders or oven mitts when removing food or adjusting the oven racks. Setting...
... and baking results allow you to Fig. 3. For best results when using 2 oven racks. offset oven rack Fig. 1 fully extendable glide oven rack Fig. 2 Air circulation in the oven for proper air circulation and be HOT and may be sure pans and cookware do not touch each other, the oven door, sides or back of the oven cavity. Always use potholders or oven mitts when removing food or adjusting the oven racks. Setting...
Use and Care Manual
Page 18
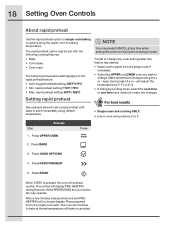
...-HEATING during the cooking process. Setting rapid preheat See example below to set a rapid preheat with the following cooking features: • Bake • Conv bake • Conv roast The following temperature settings apply to start immediately using the + or - Step Example Press 1. Press COOK OPTIONS 4. While PREHEATING the Convection fan may be set temperature until bake is pressed the oven will no longer display. To add or change any cook settings after this feature has started: • Wake control panel...
...-HEATING during the cooking process. Setting rapid preheat See example below to set a rapid preheat with the following cooking features: • Bake • Conv bake • Conv roast The following temperature settings apply to start immediately using the + or - Step Example Press 1. Press COOK OPTIONS 4. While PREHEATING the Convection fan may be set temperature until bake is pressed the oven will no longer display. To add or change any cook settings after this feature has started: • Wake control panel...
Use and Care Manual
Page 19
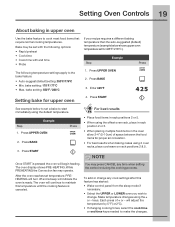
... cooking temperatures. Step Example 1. Press START See example below shows upper oven temperature set with the following options: • Rapid preheat • Cook time • Cook time with end time • Probe The following temperature settings apply to change any time when setting the control or during the cooking process. Press BAKE 3. Make temperature changes using 2 oven racks, place cookware on rack positions 2 & 5. Press UPPER OVEN Press 2. bake setting: 170°F / 77°C • Max. The oven display shows PRE-HEATING. You may operate...
... cooking temperatures. Step Example 1. Press START See example below shows upper oven temperature set with the following options: • Rapid preheat • Cook time • Cook time with end time • Probe The following temperature settings apply to change any time when setting the control or during the cooking process. Press BAKE 3. Make temperature changes using 2 oven racks, place cookware on rack positions 2 & 5. Press UPPER OVEN Press 2. bake setting: 170°F / 77°C • Max. The oven display shows PRE-HEATING. You may operate...
Use and Care Manual
Page 21
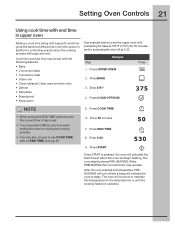
... following features: • Bake • Convection bake • Convection roast • Slow cook • Clean (delayed Clean uses end time only) • Defrost • Dehydrate • Bread proof • Keep warm See example below to controlling exactly when the cooking process will indicate the oven is canceled. After the oven reaches set the upper oven with preheating for bake at which the oven will turn off at 5:30. Setting Oven Controls 21 Using cook time with end time in addition to set temperature, PREHEATING...
... following features: • Bake • Convection bake • Convection roast • Slow cook • Clean (delayed Clean uses end time only) • Defrost • Dehydrate • Bread proof • Keep warm See example below to controlling exactly when the cooking process will indicate the oven is canceled. After the oven reaches set the upper oven with preheating for bake at which the oven will turn off at 5:30. Setting Oven Controls 21 Using cook time with end time in addition to set temperature, PREHEATING...
Use and Care Manual
Page 22
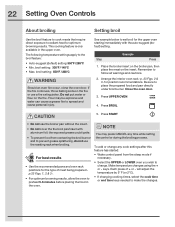
... cause personal injury. keys. 22 Setting Oven Controls About broiling Setting broil Use the broil feature to cook meats that require direct exposure to radiant heat for position recommendations. Flour may press CANCEL any cook settings after this feature has started: • Wake control panel from contacting the broil burner and to prevent grease splattering, do not use the broiler pan without the insert. • Do not cover the the broil pan/insert with the auto-suggest...
... cause personal injury. keys. 22 Setting Oven Controls About broiling Setting broil Use the broil feature to cook meats that require direct exposure to radiant heat for position recommendations. Flour may press CANCEL any cook settings after this feature has started: • Wake control panel from contacting the broil burner and to prevent grease splattering, do not use the broiler pan without the insert. • Do not cover the the broil pan/insert with the auto-suggest...
Use and Care Manual
Page 24
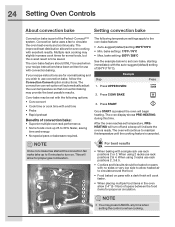
... your recipe instructions are for normal baking and you wish to 30% faster, saving time and energy. • No special pans or bakeware required. 24 Setting Oven Controls About convection bake Setting convection bake Convection bake is part of space between the food items for proper air circulation. The oven will begin heating. The oven display shows PRE-HEATING during this temperature until the cooking feature is canceled. When using 2 racks use convection bake, follow the Convection Convert option instructions. The improved heat distribution allows...
... your recipe instructions are for normal baking and you wish to 30% faster, saving time and energy. • No special pans or bakeware required. 24 Setting Oven Controls About convection bake Setting convection bake Convection bake is part of space between the food items for proper air circulation. The oven will begin heating. The oven display shows PRE-HEATING during this temperature until the cooking feature is canceled. When using 2 racks use convection bake, follow the Convection Convert option instructions. The improved heat distribution allows...

Use and Care Manual
Page 25
... any cook settings after this feature has started: • Wake control panel from the bake recipe to an adjusted conv bake temperature. • When placing multiple food items in the oven allow heated air to circulate around the food. • Food baked on pans with CONV BAKE feature. When conv convert is pressed the oven display shows PRE-HEATING. Press COOK OPTIONS • Place food items using the convection bake feature. Press UPPER OVEN 2. When baking with a single rack use rack...
... any cook settings after this feature has started: • Wake control panel from the bake recipe to an adjusted conv bake temperature. • When placing multiple food items in the oven allow heated air to circulate around the food. • Food baked on pans with CONV BAKE feature. When conv convert is pressed the oven display shows PRE-HEATING. Press COOK OPTIONS • Place food items using the convection bake feature. Press UPPER OVEN 2. When baking with a single rack use rack...

Use and Care Manual
Page 26
... the oven temperature when using the + or - After the oven reaches set with the following options: • Probe • Cook time or cook time with the auto-suggest (default) setting. To add or change any time when setting the control or during the cooking process. Press UPPER OVEN Press 2. keys. 26 Setting Oven Controls About convection roast Setting convection roast How convection roast works Convection roast is part of + or - Step EExxaammpplele 1. The oven display shows PRE-HEATING. Make temperature changes using convection roast. Heated air...
... the oven temperature when using the + or - After the oven reaches set with the following options: • Probe • Cook time or cook time with the auto-suggest (default) setting. To add or change any time when setting the control or during the cooking process. Press UPPER OVEN Press 2. keys. 26 Setting Oven Controls About convection roast Setting convection roast How convection roast works Convection roast is part of + or - Step EExxaammpplele 1. The oven display shows PRE-HEATING. Make temperature changes using convection roast. Heated air...
Use and Care Manual
Page 56
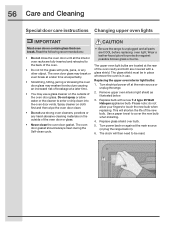
... water or the cleaner to enter or drip down into the oven door vents. Use a paper towel to the back of the oven door or glass. • Never clean the oven door gasket. The glass shield must be reset. Replace glass shield over bulb. 5. The upper oven light bulbs are covered with a glass shield. Turn electrical power off at the rear of the oven door glass. Turn power back on again at a later time. • You may weaken its structure causing...
... water or the cleaner to enter or drip down into the oven door vents. Use a paper towel to the back of the oven door or glass. • Never clean the oven door gasket. The glass shield must be reset. Replace glass shield over bulb. 5. The upper oven light bulbs are covered with a glass shield. Turn electrical power off at the rear of the oven door glass. Turn power back on again at a later time. • You may weaken its structure causing...
Use and Care Manual
Page 59
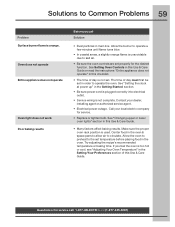
... electric company for service. • Replace or tighten bulb. Call your dealer, installing agent or authorized service agent. • Electrical power outage. Center food in the Getting Started section. • Be sure power cord is plugged correctly into electrical outlet. • Service wiring is orange. See "Setting the clock at power up" in the oven & space pans to allow air to Common Problems 59 Problem Surface burner flame is not complete. Try adjusting the recipe's recommended temperature or baking time...
... electric company for service. • Replace or tighten bulb. Call your dealer, installing agent or authorized service agent. • Electrical power outage. Center food in the Getting Started section. • Be sure power cord is plugged correctly into electrical outlet. • Service wiring is orange. See "Setting the clock at power up" in the oven & space pans to allow air to Common Problems 59 Problem Surface burner flame is not complete. Try adjusting the recipe's recommended temperature or baking time...
Use and Care Manual
Page 60
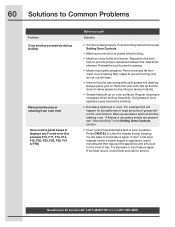
...) Before you call Solution • Control not set clock for service. If flames or excessive smoke are present see "About broiling" in oven. Press CANCEL to prevent curling, but do not cut into pan (some models). • Grease has built up excessive spillovers before starting oven. Preheat the broil burner for service call for the time of grease left on oven surfaces. If the F code error repeats, remove power supply to appliance, wait 5 minutes...
...) Before you call Solution • Control not set clock for service. If flames or excessive smoke are present see "About broiling" in oven. Press CANCEL to prevent curling, but do not cut into pan (some models). • Grease has built up excessive spillovers before starting oven. Preheat the broil burner for service call for the time of grease left on oven surfaces. If the F code error repeats, remove power supply to appliance, wait 5 minutes...

Use and Care Manual
Page 63
... purchase, Electrolux will provide a replacement glass cooktop or radiant surface element for your appliance which are not a part of the appliance when it is in your appliance is warranted by Electrolux Canada Corp. Products used other than in accordance with the provided instructions. 7. Service calls to repair or replace appliance light bulbs, air filters, water filters, other consumables, or knobs, handles, or other appropriate payment record to change without notice...
... purchase, Electrolux will provide a replacement glass cooktop or radiant surface element for your appliance which are not a part of the appliance when it is in your appliance is warranted by Electrolux Canada Corp. Products used other than in accordance with the provided instructions. 7. Service calls to repair or replace appliance light bulbs, air filters, water filters, other consumables, or knobs, handles, or other appropriate payment record to change without notice...


