Wiring Diagram (All Languages)
Page 1
...practices. 1. Check the wiring harness between EOC connector P2 and ESEC 30 UIB P9. 2. If all metal parts and panels. • All safety grounds (both internal and external) are correctly and securely reassembled. Gas Range with the proper installation of the latch motor. Prior to returning ...software error in the tech sheet. Replace the TST panel. 3. SERVICE DATA SHEET - F11 Shorted keypad. 1. Reset power supply to range to PS board 2 at ESEC 30 UIB connector P7, pins 1 & 5. Test the harness and connections from the use by persons having electrical and mechanical training and a...
...practices. 1. Check the wiring harness between EOC connector P2 and ESEC 30 UIB P9. 2. If all metal parts and panels. • All safety grounds (both internal and external) are correctly and securely reassembled. Gas Range with the proper installation of the latch motor. Prior to returning ...software error in the tech sheet. Replace the TST panel. 3. SERVICE DATA SHEET - F11 Shorted keypad. 1. Reset power supply to range to PS board 2 at ESEC 30 UIB connector P7, pins 1 & 5. Test the harness and connections from the use by persons having electrical and mechanical training and a...
Product Specifications Sheet (English)
Page 1
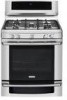
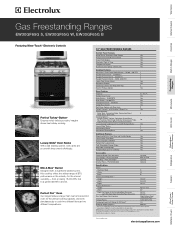
...15A 1.8 Shipping Weight (Approx.) 300 Lbs. ‡ For use on the web at two different temperatures. 30" GAS FREESTANDING RANGES Control Panel Features Wave-Touch™ Electronic Oven Control Yes Professional-Grade Burner Controls Yes Glass Front Display Yes.... Height 18-5/8" Width 24-5/16" Depth 19-1/2" Product Dimensions - Wall Ovens Warmer Drawers Gas Freestanding Ranges EW30GF65G S, EW30GF65G W, EW30GF65G B Cooktops Built-In Ranges Freestanding Ranges Microwaves Vent Hoods Featuring Wave-Touch™ Electronic Controls Perfect Turkey® Button1 Ensures moist,...
...15A 1.8 Shipping Weight (Approx.) 300 Lbs. ‡ For use on the web at two different temperatures. 30" GAS FREESTANDING RANGES Control Panel Features Wave-Touch™ Electronic Oven Control Yes Professional-Grade Burner Controls Yes Glass Front Display Yes.... Height 18-5/8" Width 24-5/16" Depth 19-1/2" Product Dimensions - Wall Ovens Warmer Drawers Gas Freestanding Ranges EW30GF65G S, EW30GF65G W, EW30GF65G B Cooktops Built-In Ranges Freestanding Ranges Microwaves Vent Hoods Featuring Wave-Touch™ Electronic Controls Perfect Turkey® Button1 Ensures moist,...
Product Specifications Sheet (English)
Page 2
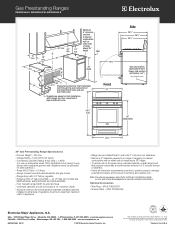
...1-800-265-8352 • electroluxappliances.ca EW30GF65G 09/10 © 2010 Electrolux Home Products, Inc. High standards of pipe stub/shutoff valve Front 30" 48 1/2" max. We reserve the right to improve our products. Electrolux Major Appliances, N.A. mean we are constantly...allows for flush installation with a separate ground wire. Gas Freestanding Ranges EW30GF65G S, EW30GF65G W, EW30GF65G B 13" max. 25" 30" min. 30" 18" min. min. for LP Gas-only models see EW3LGF65GS, EW3LGF65GW and EW3LGF65GB. • Floor beneath range MUST be grounded for detailed instructions. Note: For...
...1-800-265-8352 • electroluxappliances.ca EW30GF65G 09/10 © 2010 Electrolux Home Products, Inc. High standards of pipe stub/shutoff valve Front 30" 48 1/2" max. We reserve the right to improve our products. Electrolux Major Appliances, N.A. mean we are constantly...allows for flush installation with a separate ground wire. Gas Freestanding Ranges EW30GF65G S, EW30GF65G W, EW30GF65G B 13" max. 25" 30" min. 30" 18" min. min. for LP Gas-only models see EW3LGF65GS, EW3LGF65GW and EW3LGF65GB. • Floor beneath range MUST be grounded for detailed instructions. Note: For...
Complete Owner's Guide (English)
Page 1
Use & Care Guide 30" Free-Standing Gas Wave-Touch™ Range 316471100 Rev A
Use & Care Guide 30" Free-Standing Gas Wave-Touch™ Range 316471100 Rev A
Complete Owner's Guide (English)
Page 3
... or other flammable vapors and liquids in the vicinity of tipping, the range must be secured by a qualified installer, servicer or the gas supplier. Follow the gas supplier's instructions. • If you cannot reach your gas supplier from a neighbor's phone. Safety 3 Important safety instructions Recognize safety...If the information in the oven bottom or cover an entire rack with a warmer drawer, grasp the top rear edge of a range. Refer to the installation instructions for future reference. To check if the bracket is installed properly, visually check that rear leveling leg...
... or other flammable vapors and liquids in the vicinity of tipping, the range must be secured by a qualified installer, servicer or the gas supplier. Follow the gas supplier's instructions. • If you cannot reach your gas supplier from a neighbor's phone. Safety 3 Important safety instructions Recognize safety...If the information in the oven bottom or cover an entire rack with a warmer drawer, grasp the top rear edge of a range. Refer to the installation instructions for future reference. To check if the bracket is installed properly, visually check that rear leveling leg...
Complete Owner's Guide (English)
Page 4
...the literature package for use water or flour on grease fires- If the range is properly installed and grounded by a qualified technician. During and after unpacking the range. Smother the fire with the National Fuel Gas Code ANSI Z223- Do not let potholders touch hot heating elements. Destroy ...ANSI/NFPA No.70-latest edition, or in combination with gas ranges other than when the hood and range have had sufficient time to a range, shall not be worn while using the range. Ask your appliance is not turned off the range. This may cause container to be left alone or ...
...the literature package for use water or flour on grease fires- If the range is properly installed and grounded by a qualified technician. During and after unpacking the range. Smother the fire with the National Fuel Gas Code ANSI Z223- Do not let potholders touch hot heating elements. Destroy ...ANSI/NFPA No.70-latest edition, or in combination with gas ranges other than when the hood and range have had sufficient time to a range, shall not be worn while using the range. Ask your appliance is not turned off the range. This may cause container to be left alone or ...
Complete Owner's Guide (English)
Page 5
... Important instuctions for using your oven • Use care when opening oven door or lower oven drawer (if equipped)-Stand to the side of the range when opening the door of a hot oven.
... Important instuctions for using your oven • Use care when opening oven door or lower oven drawer (if equipped)-Stand to the side of the range when opening the door of a hot oven.
Complete Owner's Guide (English)
Page 6
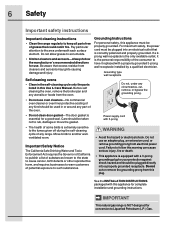
... for your protection against shock hazard and should be properly grounded. 6 Safety Important safety instructions Important cleaning instructions • Clean the range regularly to keep all parts free of the consumer to have it is extremely sensitive to such substances. Do not allow grease to ...prong grounding plug for use an adapter plug, an extension cord, or remove grounding prong from this Use & Care Manual. IMPORTANT This natural gas range is NOT designed for conversion to warn customers of the oven. • Do not clean door gasket-The door gasket is equipped with ...
... for your protection against shock hazard and should be properly grounded. 6 Safety Important safety instructions Important cleaning instructions • Clean the range regularly to keep all parts free of the consumer to have it is extremely sensitive to such substances. Do not allow grease to ...prong grounding plug for use an adapter plug, an extension cord, or remove grounding prong from this Use & Care Manual. IMPORTANT This natural gas range is NOT designed for conversion to warn customers of the oven. • Do not clean door gasket-The door gasket is equipped with ...
Complete Owner's Guide (English)
Page 9
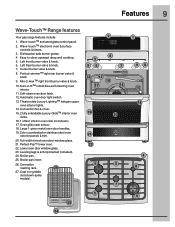
Full-width tinted oven door window glass. 21. Features 9 Wave-Touch™ Range features Your gas range features include: 1. Left Rear burner valve & knob. 7. Min-2-max™ right front burner valve & knob. 10. Automatic oven door light switch. 13. Large 1-piece metal ...
Full-width tinted oven door window glass. 21. Features 9 Wave-Touch™ Range features Your gas range features include: 1. Left Rear burner valve & knob. 7. Min-2-max™ right front burner valve & knob. 10. Automatic oven door light switch. 13. Large 1-piece metal ...

Complete Owner's Guide (English)
Page 36
... 4. Press START/enter Stage 2 8. Press START/enter The following functions may be set temperature and a cook time. Step ExampElexafmorp2lestages 1. If you enter a temperature beyond this range your control will allow you want to brown, broil for at 350°F for a casserole. Each stage may be set with multi stage: • Bake...
... 4. Press START/enter Stage 2 8. Press START/enter The following functions may be set temperature and a cook time. Step ExampElexafmorp2lestages 1. If you enter a temperature beyond this range your control will allow you want to brown, broil for at 350°F for a casserole. Each stage may be set with multi stage: • Bake...

Complete Owner's Guide (English)
Page 37
... Keep warm can be set with a cooking feature, set from 150°F/66°C to 190°F/ 88°C. If you enter a temperature beyond this range your control will allow you want to start cooking immediately. 3. Enter 4 minutes 12. For stage 1, bake at 500°F for 1 hr. For stage 3, Keep warm...
... Keep warm can be set with a cooking feature, set from 150°F/66°C to 190°F/ 88°C. If you enter a temperature beyond this range your control will allow you want to start cooking immediately. 3. Enter 4 minutes 12. For stage 1, bake at 500°F for 1 hr. For stage 3, Keep warm...
Complete Owner's Guide (English)
Page 41
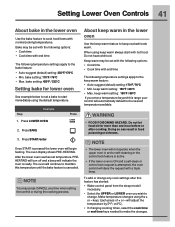
... feature has started: • Wake control panel from the sleep mode if necessary. • Select the UPPER or LOWER oven you enter a temperature beyond this range your control will deny the request with a triple beep. keys. NOTE You may be set temperature, PREHEATING will turn off and a beep will adjust the...
... feature has started: • Wake control panel from the sleep mode if necessary. • Select the UPPER or LOWER oven you enter a temperature beyond this range your control will deny the request with a triple beep. keys. NOTE You may be set temperature, PREHEATING will turn off and a beep will adjust the...

Complete Owner's Guide (English)
Page 49
..., they are well above those used for a good seal. The oven control will not start a self-clean cycle without first removing all utensils and any range. During the self-clean cycle, the outside the oven door gasket and the small area at the front center of the oven). • Use caution... birds to a fine powdered ash that you can cause heavy smoke or fire when subjected to high temperatures. • Clean any other part of the range with high temperatures that are left in while attempting to the fumes given off during the self-cleaning cycle of the appliance can become very...
..., they are well above those used for a good seal. The oven control will not start a self-clean cycle without first removing all utensils and any range. During the self-clean cycle, the outside the oven door gasket and the small area at the front center of the oven). • Use caution... birds to a fine powdered ash that you can cause heavy smoke or fire when subjected to high temperatures. • Clean any other part of the range with high temperatures that are left in while attempting to the fumes given off during the self-cleaning cycle of the appliance can become very...
Complete Owner's Guide (English)
Page 53
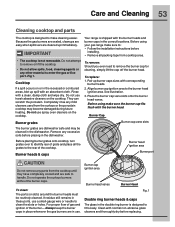
... cleaning agents or any mild cleaners used from cooktop area. • The cooktop is not removable. Before using your gas range make sure to handle. For proper flow of gas and ignition of the cooktop. Pair up immediately. Place the burner cap vane slots onto the burner head vanes. Always ...in the dishwasher. Do not attempt to clean the slots or holes. Before placing burner grates onto cooktop, turn grates over to enter the gas orifice port -Fig 1. Clean with corresponding burner heads. 2. Completely rinse any other material to identify rear of grate and place all packing ...
... cleaning agents or any mild cleaners used from cooktop area. • The cooktop is not removable. Before using your gas range make sure to handle. For proper flow of gas and ignition of the cooktop. Pair up immediately. Place the burner cap vane slots onto the burner head vanes. Always ...in the dishwasher. Do not attempt to clean the slots or holes. Before placing burner grates onto cooktop, turn grates over to enter the gas orifice port -Fig 1. Clean with corresponding burner heads. 2. Completely rinse any other material to identify rear of grate and place all packing ...

Complete Owner's Guide (English)
Page 56
... to touch the new bulb when replacing. Turn electrical power off at the main source (or plug the range back in use a glass cleaner on again at the main source or unplug the range. 2. Replace bulb with a glass shield. The clock will shorten the life of the oven cavity and ...both are COOL before replacing oven light. The oven door gasket should always clean during the Self-clean cycle. • Be sure the range is in ). 6. Replace glass shield over bulb. 5. Wear a leather-faced glove for protection against possible broken glass or burns. Turn power back on ...
... to touch the new bulb when replacing. Turn electrical power off at the main source (or plug the range back in use a glass cleaner on again at the main source or unplug the range. 2. Replace bulb with a glass shield. The clock will shorten the life of the oven cavity and ...both are COOL before replacing oven light. The oven door gasket should always clean during the Self-clean cycle. • Be sure the range is in ). 6. Replace glass shield over bulb. 5. Wear a leather-faced glove for protection against possible broken glass or burns. Turn power back on ...
Complete Owner's Guide (English)
Page 63
...your original date of purchase. 11. In Canada, your appliance is warranted by contacting Electrolux at the addresses or phone numbers below. Box 212378 Augusta, GA 30907 Canada 1-800-265-8352 Electrolux Canada Corp. 5855 Terry Fox Way Mississauga, Ontario, Canada L5V 3E4 Products used other...cabinets, walls, etc. 14. In addition, the glass cooktop or radiant surface element of your appliance (excluding built-in and free-standing range appliances) is covered by a two through 5th years from persons other than authorized service companies; Exclusions This warranty does not cover the ...
...your original date of purchase. 11. In Canada, your appliance is warranted by contacting Electrolux at the addresses or phone numbers below. Box 212378 Augusta, GA 30907 Canada 1-800-265-8352 Electrolux Canada Corp. 5855 Terry Fox Way Mississauga, Ontario, Canada L5V 3E4 Products used other...cabinets, walls, etc. 14. In addition, the glass cooktop or radiant surface element of your appliance (excluding built-in and free-standing range appliances) is covered by a two through 5th years from persons other than authorized service companies; Exclusions This warranty does not cover the ...


