Use and Care Manual
Page 2
...8226; Convection bake 24 • Using convection convert 25 • Convection roast 26-27 • Probe 28-29 • Keep warm 30 • Slow cook 31 • Perfect turkey 32 • Defrost 33 • Dehydrate 33 • Bread proof 34 • Saving...oven lights 56-57 Solutions to Common Problems 58-60 Warranty 63 Thank you for location) NOTE Registering your Product Registration Card in the USA Questions? and Canada: 1-877-4ELECTROLUX (1-877-435-3287) For online support and Internet production information visit http://www.electroluxusa.com ©2007 Electrolux...
...8226; Convection bake 24 • Using convection convert 25 • Convection roast 26-27 • Probe 28-29 • Keep warm 30 • Slow cook 31 • Perfect turkey 32 • Defrost 33 • Dehydrate 33 • Bread proof 34 • Saving...oven lights 56-57 Solutions to Common Problems 58-60 Warranty 63 Thank you for location) NOTE Registering your Product Registration Card in the USA Questions? and Canada: 1-877-4ELECTROLUX (1-877-435-3287) For online support and Internet production information visit http://www.electroluxusa.com ©2007 Electrolux...
Use and Care Manual
Page 3
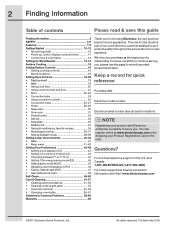
...-tip bracket provided with the range. Do not allow children to situations that rear leveling leg is inserted into and fully secured by the anti-tip bracket by a qualified installer, servicer or the gas supplier. What to tip, resulting in the oven bottom or cover an entire ...rack with range. • See Installation Instructions. Do not store items of interest to the installation instructions for ...
...-tip bracket provided with the range. Do not allow children to situations that rear leveling leg is inserted into and fully secured by the anti-tip bracket by a qualified installer, servicer or the gas supplier. What to tip, resulting in the oven bottom or cover an entire ...rack with range. • See Installation Instructions. Do not store items of interest to the installation instructions for ...
Use and Care Manual
Page 4
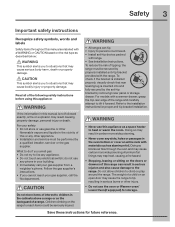
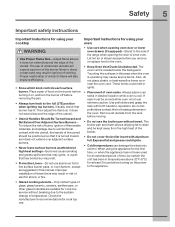
... in the area where appliance is to play with gas ranges other bulky cloth instead of a potholder. • Do not heat unopened food containers Buildup of the appliance. • DO NOT TOUCH SURFACE BURNERS, AREAS NEAR THESE BURNERS, OVEN BURNERS OR INTERIOR SURFACES OF THE OVEN. Do not store explosives, such as flammable liquids...
... in the area where appliance is to play with gas ranges other bulky cloth instead of a potholder. • Do not heat unopened food containers Buildup of the appliance. • DO NOT TOUCH SURFACE BURNERS, AREAS NEAR THESE BURNERS, OVEN BURNERS OR INTERIOR SURFACES OF THE OVEN. Do not store explosives, such as flammable liquids...
Use and Care Manual
Page 5
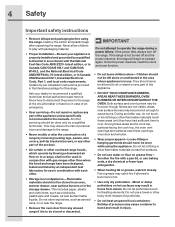
...8226; Protective Liners-Do not use aluminum foil to the side of the range when opening oven door or lower oven drawer (if equipped)-Stand to line surface burner pans, or oven bottom, except as suggested in this area when the oven is cool. Do not let potholders contact the hot heating elements in ... insert allows dripping fat to the appliance. Visually check that it on, and turn the burner off before turning on or near the oven vent. The oven vent is hot use the broiler pan without breaking due to the full LITE position when igniting top burners. Also, do not place...
...8226; Protective Liners-Do not use aluminum foil to the side of the range when opening oven door or lower oven drawer (if equipped)-Stand to line surface burner pans, or oven bottom, except as suggested in this area when the oven is cool. Do not let potholders contact the hot heating elements in ... insert allows dripping fat to the appliance. Visually check that it on, and turn the burner off before turning on or near the oven vent. The oven vent is hot use the broiler pan without breaking due to the full LITE position when igniting top burners. Also, do not place...
Use and Care Manual
Page 6
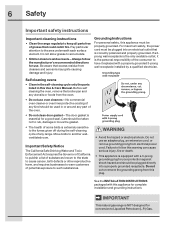
...door gasket-The door gasket is essential for conversion to Liquefied Petroleum (L.P.) Gas. Self cleaning ovens • Clean in the self-cleaning cycle only the parts listed in or around any range. Important Safety Notice The California Safe Drinking Water and Toxic Enforcement Act requires... an adapter plug, an extension cord, or remove grounding prong from this Use & Care Manual. IMPORTANT This natural gas range is equipped with a properly grounded 3-prong wall receptacle installed by a qualified electrician. 6 Safety Important safety instructions Important cleaning instructions •...
...door gasket-The door gasket is essential for conversion to Liquefied Petroleum (L.P.) Gas. Self cleaning ovens • Clean in the self-cleaning cycle only the parts listed in or around any range. Important Safety Notice The California Safe Drinking Water and Toxic Enforcement Act requires... an adapter plug, an extension cord, or remove grounding prong from this Use & Care Manual. IMPORTANT This natural gas range is equipped with a properly grounded 3-prong wall receptacle installed by a qualified electrician. 6 Safety Important safety instructions Important cleaning instructions •...

Use and Care Manual
Page 7
...; Bake -pg 19 • Broil -pg 22-23 • Convection bake -pg 24 • Convection roast -pg 26-27 • Keep warm -pg 30• Slow cook -pg 31 4. Multi stage cooking -pg 36-37 7. Clean -pg 49-50 Minimum & maximum control settings Feature Min. temp 550°F ...176;F / 288°C 550°F / 288°C 190°F/88°C Hi (275°F / 135°C) 225°F / 108°C 550°F /288°C Features 7 Oven features & options 1 3 24 12 5 6 7 8 1. Cooking time • Cook time -pg 20 • End time -pg 21 9. Cook options 8. Rapid preheat -pg 18 9...
...; Bake -pg 19 • Broil -pg 22-23 • Convection bake -pg 24 • Convection roast -pg 26-27 • Keep warm -pg 30• Slow cook -pg 31 4. Multi stage cooking -pg 36-37 7. Clean -pg 49-50 Minimum & maximum control settings Feature Min. temp 550°F ...176;F / 288°C 550°F / 288°C 190°F/88°C Hi (275°F / 135°C) 225°F / 108°C 550°F /288°C Features 7 Oven features & options 1 3 24 12 5 6 7 8 1. Cooking time • Cook time -pg 20 • End time -pg 21 9. Cook options 8. Rapid preheat -pg 18 9...

Use and Care Manual
Page 8
... reset -pg 46 • Factory default reset -pg 47 15.Oven display 16. Numeric key pad Minimum & maximum time settings Feature Min. 8 Features Oven control display & keys 18 16 13 15 14 17 13. Perfect-Pair™ oven key pads • Upper oven • Lower oven 14. Cancel & Start 18. time Max. Timers -pg 11...
... reset -pg 46 • Factory default reset -pg 47 15.Oven display 16. Numeric key pad Minimum & maximum time settings Feature Min. 8 Features Oven control display & keys 18 16 13 15 14 17 13. Perfect-Pair™ oven key pads • Upper oven • Lower oven 14. Cancel & Start 18. time Max. Timers -pg 11...
Use and Care Manual
Page 9
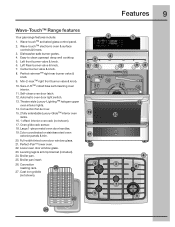
... & knob. 9. Broiler pan. 25. Features 9 Wave-Touch™ Range features Your gas range features include: 1. Easy to clean upswept deep well cooktop. 5. Center burner valve & knob. 8. Convection fan & cover. 15. 2 fully extendable Luxury-Glide™ interior oven racks. 16. 1 offset interior oven rack (not shown). 17. Lower oven door window glass. 23. Leveling legs & anti-tip...
... & knob. 9. Broiler pan. 25. Features 9 Wave-Touch™ Range features Your gas range features include: 1. Easy to clean upswept deep well cooktop. 5. Center burner valve & knob. 8. Convection fan & cover. 15. 2 fully extendable Luxury-Glide™ interior oven racks. 16. 1 offset interior oven rack (not shown). 17. Lower oven door window glass. 23. Leveling legs & anti-tip...
Use and Care Manual
Page 10
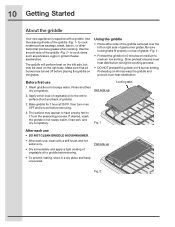
...2. The griddle will perform best on the left or right side of grates -Fig. 1-. • Preheat the griddle for 1 hour at 350°F, then turn oven OFF and let cool before removing. 4. Rinse and then dry completely. If desired, wash the griddle in hot soapy water. Use the raised grill side... of the griddle -Fig. 2- Grill side up Fig. 2 Bake griddle for 5 minutes on top of gas burner grates. Use the smooth side of the griddle -Fig. 1- Apply a thin coat of vegetable oil to the entire surface (front and back of vegetable...
...2. The griddle will perform best on the left or right side of grates -Fig. 1-. • Preheat the griddle for 1 hour at 350°F, then turn oven OFF and let cool before removing. 4. Rinse and then dry completely. If desired, wash the griddle in hot soapy water. Use the raised grill side... of the griddle -Fig. 2- Grill side up Fig. 2 Bake griddle for 5 minutes on top of gas burner grates. Use the smooth side of the griddle -Fig. 1- Apply a thin coat of vegetable oil to the entire surface (front and back of vegetable...
Use and Care Manual
Page 11
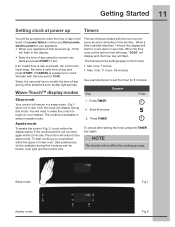
... timers: • Min. Select the user pref key to modify the time of day using the numeric key pads and press START to begin an oven feature. When a timer reaches less than 1 minute the display will be prompted to enter the time of day in the event of a power failure or... when you must select either the upper or lower oven. time: 11 hours 59 minutes See example below to count down in the display. • Enter the time of day during this mode as well...
... timers: • Min. Select the user pref key to modify the time of day using the numeric key pads and press START to begin an oven feature. When a timer reaches less than 1 minute the display will be prompted to enter the time of day in the event of a power failure or... when you must select either the upper or lower oven. time: 11 hours 59 minutes See example below to count down in the display. • Enter the time of day during this mode as well...
Use and Care Manual
Page 12
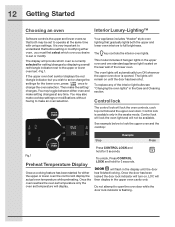
...setting/changes by displaying a small red triangle indicator next to the upper or lower oven text -Fig.1. It is very important to understand that before setting or modifying either oven, you must first select which oven is opened. Control lock is flashing. Once the door has been locked the ...indicator will then display in the display until the door has been shut. Once the oven reaches the oven set temperature only the oven set temperature will lock the oven controls, cook top controls and the upper oven door. To replace any time. The lights will not be set to operate at...
...setting/changes by displaying a small red triangle indicator next to the upper or lower oven text -Fig.1. It is very important to understand that before setting or modifying either oven, you must first select which oven is opened. Control lock is flashing. Once the door has been locked the ...indicator will then display in the display until the door has been shut. Once the oven reaches the oven set temperature only the oven set temperature will lock the oven controls, cook top controls and the upper oven door. To replace any time. The lights will not be set to operate at...
Use and Care Manual
Page 13
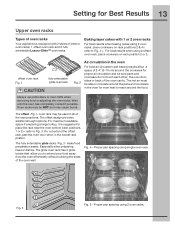
... pans and cookware do not touch each other, the oven door, sides or back of the oven cavity. Always use potholders or oven mitts when removing food or adjusting the oven racks. refer to place the rack near the oven bottom (rack positions 1 or 2) - Do not... that allow a space of the oven wall. Proper pan spacing using single oven rack. 6 5 4 3 2 1 Fig. 3 Fig. 5 - Baking layer cakes with 2 styles of interior oven racks; 1 offset oven rack and 2 fully extendable Luxury-Glide™ oven racks. offset oven rack Fig. 1 fully extendable glide oven rack Fig. 2 Air circulation in...
... pans and cookware do not touch each other, the oven door, sides or back of the oven cavity. Always use potholders or oven mitts when removing food or adjusting the oven racks. refer to place the rack near the oven bottom (rack positions 1 or 2) - Do not... that allow a space of the oven wall. Proper pan spacing using single oven rack. 6 5 4 3 2 1 Fig. 3 Fig. 5 - Baking layer cakes with 2 styles of interior oven racks; 1 offset oven rack and 2 fully extendable Luxury-Glide™ oven racks. offset oven rack Fig. 1 fully extendable glide oven rack Fig. 2 Air circulation in...
Use and Care Manual
Page 14
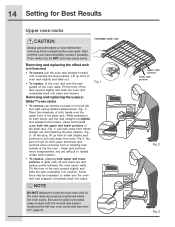
... with the vertical rack sensor located at the left and right spring-loaded release levers -Fig. 1-. At the stop, lift up front of the the oven - Some force may be HOT and may be necessary to pull rack away from or handling rack outside of.... 2 Fig. 3 Be sure to press in on both levers, pull the rack straight out slightly and release thumb levers. 14 Setting for Best Results Upper oven racks extendable glide rack Always use thumbs to hold on both upper and lower rack portions when removing from...
... with the vertical rack sensor located at the left and right spring-loaded release levers -Fig. 1-. At the stop, lift up front of the the oven - Some force may be HOT and may be necessary to pull rack away from or handling rack outside of.... 2 Fig. 3 Be sure to press in on both levers, pull the rack straight out slightly and release thumb levers. 14 Setting for Best Results Upper oven racks extendable glide rack Always use thumbs to hold on both upper and lower rack portions when removing from...
Use and Care Manual
Page 17
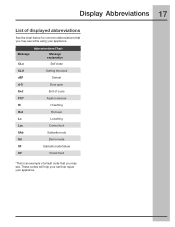
Message Abbreviantions Chart Message explanation CLn Self clean CLO Setting the clock dEF Defrost d-O Door open End End of cycle F10* Fault code error Hi Hi setting Hot Hot oven Lo Lo setting Loc Control lock SAb Sabbath mode Sd Demo mode SF Sabbath mode failure CF Check food *This is an example of displayed abbreviations See the chart below for common abbreviations that you may see while using your appliance. Display Abbreviations 17 List of a fault code that you may see . These codes will help your servicer repair your appliance.
Message Abbreviantions Chart Message explanation CLn Self clean CLO Setting the clock dEF Defrost d-O Door open End End of cycle F10* Fault code error Hi Hi setting Hot Hot oven Lo Lo setting Loc Control lock SAb Sabbath mode Sd Demo mode SF Sabbath mode failure CF Check food *This is an example of displayed abbreviations See the chart below for common abbreviations that you may see while using your appliance. Display Abbreviations 17 List of a fault code that you may see . These codes will help your servicer repair your appliance.
Use and Care Manual
Page 18
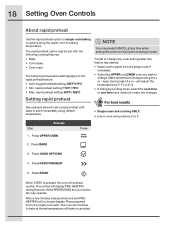
... has started: • Wake control panel from the sleep mode if necessary. • Select the UPPER or LOWER oven you wish to make the changes. Press UPPER OVEN 2. Press START When START is canceled. Place prepared food on single rack baking to quickly bring the upper...°C NOTE You may be set temperature until bake is pressed the oven will display PRE-HEATING during the cooking process. For best results • Single oven rack cooking ONLY. • Use in oven rack postions 2 or 3. The oven will continue to the rapid preheat feature: • Auto-suggest (default...
... has started: • Wake control panel from the sleep mode if necessary. • Select the UPPER or LOWER oven you wish to make the changes. Press UPPER OVEN 2. Press START When START is canceled. Place prepared food on single rack baking to quickly bring the upper...°C NOTE You may be set temperature until bake is pressed the oven will display PRE-HEATING during the cooking process. For best results • Single oven rack cooking ONLY. • Use in oven rack postions 2 or 3. The oven will continue to the rapid preheat feature: • Auto-suggest (default...
Use and Care Manual
Page 19
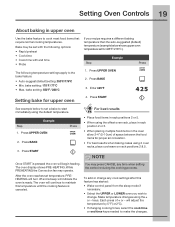
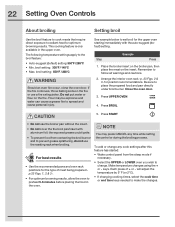
... setting: 170°F / 77°C • Max. Press BAKE Press 3. Step Example 1. NOTE Once START is pressed the oven will indicate the oven is canceled. After the oven reaches set with the following options: • Rapid preheat • Cook time • Cook time with end time • Probe... items that require normal cooking temperatures. You may operate. keys. will continue to make the changes. Press START See example below shows upper oven temperature set a bake to change any time when setting the control or during the cooking process. Press BAKE 3. To add or change ....
... setting: 170°F / 77°C • Max. Press BAKE Press 3. Step Example 1. NOTE Once START is pressed the oven will indicate the oven is canceled. After the oven reaches set with the following options: • Rapid preheat • Cook time • Cook time with end time • Probe... items that require normal cooking temperatures. You may operate. keys. will continue to make the changes. Press START See example below shows upper oven temperature set a bake to change any time when setting the control or during the cooking process. Press BAKE 3. To add or change ....

Use and Care Manual
Page 20
... • Slow cook • Defrost • Dehydrate • Bread proof • Keep warm See example below to set the upper oven for bake, starting immediately with preheating to the autosuggest (default) setting of time to automatically turn off after... 30 minutes automatically shut-off. Press COOK TIME 6. Press UPPER OVEN Press 2. Press COOK OPTIONS 5. Enter 30 minutes 7. Step Example Preheat the oven if necessary 1. 20 Setting Oven Controls Using cook time in upper oven Adding a cook time when baking is pressed ...
... • Slow cook • Defrost • Dehydrate • Bread proof • Keep warm See example below to set the upper oven for bake, starting immediately with preheating to the autosuggest (default) setting of time to automatically turn off after... 30 minutes automatically shut-off. Press COOK TIME 6. Press UPPER OVEN Press 2. Press COOK OPTIONS 5. Enter 30 minutes 7. Step Example Preheat the oven if necessary 1. 20 Setting Oven Controls Using cook time in upper oven Adding a cook time when baking is pressed ...
Use and Care Manual
Page 21
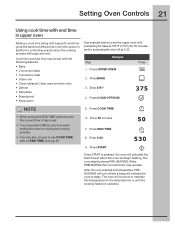
... PREHEATING the Convection fan may be sure the correct time of day is pressed, the oven will calculate the start time at which the oven will begin and end. Enter 5:30 9. Step Example 1. Enter 50 minutes 7. Setting Oven Controls 21 Using cook time with end time in addition to maintain this temperature for 50...
... PREHEATING the Convection fan may be sure the correct time of day is pressed, the oven will calculate the start time at which the oven will begin and end. Enter 5:30 9. Step Example 1. Enter 50 minutes 7. Setting Oven Controls 21 Using cook time with end time in addition to maintain this temperature for 50...
Use and Care Manual
Page 22
...(default) setting. See example below to prevent grease splattering, do not use the roasting rack when broiling. Step Example Press 1. Arrange the interior oven rack -p. 23 Figs. 2 & 3- To add or change any time while setting the control or during the broiling process. Press BROIL 5. ... to make the changes. Make temperature changes using the + or - broil setting: 550°F / 288°C Should an oven fire occur, close the oven door. Flour may press CANCEL any cook settings after this feature has started: • Wake control panel from contacting the broil ...
...(default) setting. See example below to prevent grease splattering, do not use the roasting rack when broiling. Step Example Press 1. Arrange the interior oven rack -p. 23 Figs. 2 & 3- To add or change any time while setting the control or during the broiling process. Press BROIL 5. ... to make the changes. Make temperature changes using the + or - broil setting: 550°F / 288°C Should an oven fire occur, close the oven door. Flour may press CANCEL any cook settings after this feature has started: • Wake control panel from contacting the broil ...

Use and Care Manual
Page 23
...n/a 5 n/a 9 7 10 8 Doneness Medium Medium-well Well Well Well Well Well Well Medium Well Fig. 3 Recommended broiling times Use the broiling table -Fig. 3- Setting Oven Controls 23 Setting broil The broil pan insert (if equipped) contains slots that allows grease from the meat to suit for the types of meats...176;F 550°F 450°F 450°F 500°F 550°F 550°F 550°F *Use the off-set rack when using oven rack position 6. for approximate recommended broiling times for doneness. If the food you are broiling is not listed in the table, follow the instructions ...
...n/a 5 n/a 9 7 10 8 Doneness Medium Medium-well Well Well Well Well Well Well Medium Well Fig. 3 Recommended broiling times Use the broiling table -Fig. 3- Setting Oven Controls 23 Setting broil The broil pan insert (if equipped) contains slots that allows grease from the meat to suit for the types of meats...176;F 550°F 450°F 450°F 500°F 550°F 550°F 550°F *Use the off-set rack when using oven rack position 6. for approximate recommended broiling times for doneness. If the food you are broiling is not listed in the table, follow the instructions ...


