Use and Care Manual
Page 2
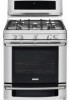
... Purchase date Electrolux model number Electrolux serial number (see picture for choosing Electrolux, the new premium brand in the mail. To ensure our ability to continue serving you, please use this guide Finding information 2 SAFETY 3-6 Features 7-9 Getting Started 10-12 • About the griddle 10 • Power up, control display modes & timers 11 • Control lock & oven lights 12 Settings for Best Results 13-14 Surface Cooking 15 Setting Surface Controls 16 • Setting cooktop controls 16 • Burner locations 16 Setting Oven Controls 18...
... Purchase date Electrolux model number Electrolux serial number (see picture for choosing Electrolux, the new premium brand in the mail. To ensure our ability to continue serving you, please use this guide Finding information 2 SAFETY 3-6 Features 7-9 Getting Started 10-12 • About the griddle 10 • Power up, control display modes & timers 11 • Control lock & oven lights 12 Settings for Best Results 13-14 Surface Cooking 15 Setting Surface Controls 16 • Setting cooktop controls 16 • Burner locations 16 Setting Oven Controls 18...
Use and Care Manual
Page 3
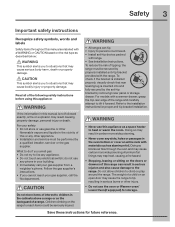
... following safety instructions before using this appliance: • All ranges can tip. • Injury to the installation instructions for future reference. To check if the bracket is inserted into and fully secured by the anti-tip bracket by a qualified installer, servicer or the gas supplier. Refer to persons could be performed by removing lower panel or storage drawer. What to situations that rear leveling leg is installed properly, visually...
... following safety instructions before using this appliance: • All ranges can tip. • Injury to the installation instructions for future reference. To check if the bracket is inserted into and fully secured by the anti-tip bracket by a qualified installer, servicer or the gas supplier. Refer to persons could be performed by removing lower panel or storage drawer. What to situations that rear leveling leg is installed properly, visually...
Use and Care Manual
Page 4
..., tested and listed by blowing a downward air flow on hot surfaces may cause container to cause burns. Once the power resumes, reset the clock and oven function. • Do not leave children alone-Children should never be hot even though flames are the cook top, surfaces facing the cook top, the oven vent openings and surfaces near surface burners or in burns from any other part of a range by removing leveling legs, panels, wire covers, anti-tip brackets/screws, or...
..., tested and listed by blowing a downward air flow on hot surfaces may cause container to cause burns. Once the power resumes, reset the clock and oven function. • Do not leave children alone-Children should never be hot even though flames are the cook top, surfaces facing the cook top, the oven vent openings and surfaces near surface burners or in burns from any other part of a range by removing leveling legs, panels, wire covers, anti-tip brackets/screws, or...
Use and Care Manual
Page 5
...; Utensil Handles Should Be Turned Inward and Not Extend Over Adjacent Surface Burners- Important instructions for using your oven • Use care when opening oven door or lower oven drawer (if equipped)-Stand to the side of the range when opening the door of a hot oven. Place a pan of food on or near the oven vent. These items could ignite. • Cold temperatures can damage the electronic control. Remove all utensils from the high heat of the broiler. •...
...; Utensil Handles Should Be Turned Inward and Not Extend Over Adjacent Surface Burners- Important instructions for using your oven • Use care when opening oven door or lower oven drawer (if equipped)-Stand to the side of the range when opening the door of a hot oven. Place a pan of food on or near the oven vent. These items could ignite. • Cold temperatures can damage the electronic control. Remove all utensils from the high heat of the broiler. •...
Use and Care Manual
Page 6
...'s recommended directions for conversion to Liquefied Petroleum (L.P.) Gas. 6 Safety Important safety instructions Important cleaning instructions • Clean the range regularly to keep all parts free of grease that is correctly polarized and properly grounded. Pay particular attention to another wellventilated room. Move birds to the area underneath each surface element. IMPORTANT This natural gas range is NOT designed for use an adapter plug, an extension cord, or remove grounding...
...'s recommended directions for conversion to Liquefied Petroleum (L.P.) Gas. 6 Safety Important safety instructions Important cleaning instructions • Clean the range regularly to keep all parts free of grease that is correctly polarized and properly grounded. Pay particular attention to another wellventilated room. Move birds to the area underneath each surface element. IMPORTANT This natural gas range is NOT designed for use an adapter plug, an extension cord, or remove grounding...
Use and Care Manual
Page 9
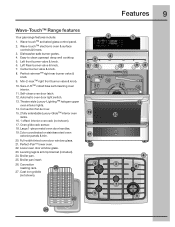
...-touch™ electronic oven & surface controls & timers. 3. Left front burner valve & knob. 6. Min-2-max™ right front burner valve & knob. 10. Self-clean oven door latch. 12. Oven glide rack sensor. 18. Convection roasting rack. 26 27. Lower oven door window glass. 23. Theatre style Luxury-Lighting™ halogen upper oven interior lights. 14. Convection fan & cover. 15. 2 fully extendable Luxury-Glide™ interior oven racks. 16. 1 offset interior oven rack (not shown). 17. Automatic oven door light switch. 13. Left Rear burner valve & knob. 7. Features 9 Wave...
...-touch™ electronic oven & surface controls & timers. 3. Left front burner valve & knob. 6. Min-2-max™ right front burner valve & knob. 10. Self-clean oven door latch. 12. Oven glide rack sensor. 18. Convection roasting rack. 26 27. Lower oven door window glass. 23. Theatre style Luxury-Lighting™ halogen upper oven interior lights. 14. Convection fan & cover. 15. 2 fully extendable Luxury-Glide™ interior oven racks. 16. 1 offset interior oven rack (not shown). 17. Automatic oven door light switch. 13. Left Rear burner valve & knob. 7. Features 9 Wave...
Use and Care Manual
Page 10
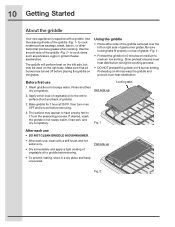
... other items that all burners are turned off before placing the griddle on HI burner setting. Slow preheat ensures even heat distribution during the cooking process. • DO NOT preheat the griddle on the grates. 10 Getting Started About the griddle Your new appliance is supplied with a stiff brush and hot water only. • Dry immediately and apply a light coating of gas burner grates. Use the raised grill...
... other items that all burners are turned off before placing the griddle on HI burner setting. Slow preheat ensures even heat distribution during the cooking process. • DO NOT preheat the griddle on the grates. 10 Getting Started About the griddle Your new appliance is supplied with a stiff brush and hot water only. • Dry immediately and apply a light coating of gas burner grates. Use the raised grill...
Use and Care Manual
Page 12
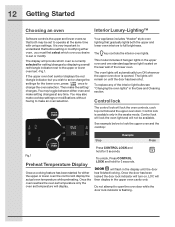
... light located on the rear wall of the interior light bulbs see "Changing the oven lights" in the awake mode. Control lock The control lock will display. See example below to set to make setting changes at the same time with unique settings. If the upper oven text symbol displays the red triangle indicator but you desire to lock the upper oven and the cooktop: Step Example Press Fig.1 Preheat Temperature Display Once a cooking feature has been started for the lower oven...
... light located on the rear wall of the interior light bulbs see "Changing the oven lights" in the awake mode. Control lock The control lock will display. See example below to set to make setting changes at the same time with unique settings. If the upper oven text symbol displays the red triangle indicator but you desire to lock the upper oven and the cooktop: Step Example Press Fig.1 Preheat Temperature Display Once a cooking feature has been started for the lower oven...
Use and Care Manual
Page 13
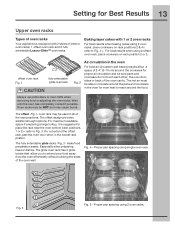
... completely cooled if possible. Proper pan spacing using 2 oven racks. For best results when using 2 oven racks, place cookware on rack position 2 or 3. offset oven rack Fig. 1 fully extendable glide oven rack Fig. 2 Air circulation in the oven For best air circulation and baking results allow you to Fig. 3. Always use potholders or oven mitts when removing food or adjusting the oven racks. The offset -Fig 1- oven rack may be able to circulate around...
... completely cooled if possible. Proper pan spacing using 2 oven racks. For best results when using 2 oven racks, place cookware on rack position 2 or 3. offset oven rack Fig. 1 fully extendable glide oven rack Fig. 2 Air circulation in the oven For best air circulation and baking results allow you to Fig. 3. Always use potholders or oven mitts when removing food or adjusting the oven racks. The offset -Fig 1- oven rack may be able to circulate around...
Use and Care Manual
Page 18
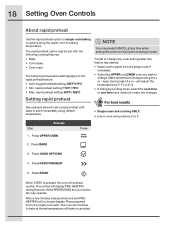
... results • Single oven rack cooking ONLY. • Use in oven rack postions 2 or 3. Press UPPER OVEN 2. Press COOK OPTIONS 4. While PREHEATING the Convection fan may press CANCEL at the set temperature until bake is pressed the oven will preheat quickly. rapid preheat setting: 170°F / 76°C • Max. To add or change any time when setting the control or during this feature has started: • Wake control panel from the sleep mode if necessary. •...
... results • Single oven rack cooking ONLY. • Use in oven rack postions 2 or 3. Press UPPER OVEN 2. Press COOK OPTIONS 4. While PREHEATING the Convection fan may press CANCEL at the set temperature until bake is pressed the oven will preheat quickly. rapid preheat setting: 170°F / 76°C • Max. To add or change any time when setting the control or during this feature has started: • Wake control panel from the sleep mode if necessary. •...
Use and Care Manual
Page 19
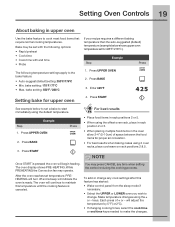
.... To add or change . The oven display shows PRE-HEATING. You may operate. keys. will begin heating. bake setting: 550°F / 288°C If your recipe requires a different baking temperature than the auto-suggested (default) temperature (example below to set with the following options: • Rapid preheat • Cook time • Cook time with end time • Probe The following temperature settings apply to maintain this feature has started: • Wake control panel from the sleep...
.... To add or change . The oven display shows PRE-HEATING. You may operate. keys. will begin heating. bake setting: 550°F / 288°C If your recipe requires a different baking temperature than the auto-suggested (default) temperature (example below to set with the following options: • Rapid preheat • Cook time • Cook time with end time • Probe The following temperature settings apply to maintain this feature has started: • Wake control panel from the sleep...
Use and Care Manual
Page 21
... setting the END TIME option be set with the following features: • Bake • Convection bake • Convection roast • Slow cook • Clean (delayed Clean uses end time only) • Defrost • Dehydrate • Bread proof • Keep warm See example below to set . • You may press CANCEL any time when setting the control or during the cooking process. • You may operate. Press START Once START is set the upper oven with preheating...
... setting the END TIME option be set with the following features: • Bake • Convection bake • Convection roast • Slow cook • Clean (delayed Clean uses end time only) • Defrost • Dehydrate • Bread proof • Keep warm See example below to set . • You may press CANCEL any time when setting the control or during the cooking process. • You may operate. Press START Once START is set the upper oven with preheating...
Use and Care Manual
Page 22
... optimum browning results. The following temperature settings apply to follow all warnings and cautions. 2. For best results • Use the recommended pans and oven rack positions for the upper oven starting immeadiately with aluminum foil; Close the oven door. 3. To add or change any time while setting the control or during the broiling process. 22 Setting Oven Controls About broiling Setting broil Use the broil feature to cook meats that require direct exposure to prevent grease splattering...
... optimum browning results. The following temperature settings apply to follow all warnings and cautions. 2. For best results • Use the recommended pans and oven rack positions for the upper oven starting immeadiately with aluminum foil; Close the oven door. 3. To add or change any time while setting the control or during the broiling process. 22 Setting Oven Controls About broiling Setting broil Use the broil feature to cook meats that require direct exposure to prevent grease splattering...
Use and Care Manual
Page 24
.... • No special pans or bakeware required. The conv bake feature should be used when your recipe instructions are for proper gas combustion. NOTE • You may slightly increase cook times for use convection bake, follow the Convection Convert option instructions. NOTE Once conv bake has started the convection fan make take up 25 to allow 2-4" (5-10cm) of the Perfect-Convect³™ system. 24 Setting Oven Controls About convection bake Setting convection bake Convection bake is part of space between...
.... • No special pans or bakeware required. The conv bake feature should be used when your recipe instructions are for proper gas combustion. NOTE • You may slightly increase cook times for use convection bake, follow the Convection Convert option instructions. NOTE Once conv bake has started the convection fan make take up 25 to allow 2-4" (5-10cm) of the Perfect-Convect³™ system. 24 Setting Oven Controls About convection bake Setting convection bake Convection bake is part of space between...

Use and Care Manual
Page 25
... using the convection bake feature. Press START Once START is pressed the oven display shows PRE-HEATING. will cook faster. 4. Step EExxaammpplele Press • Superior multiple oven rack performance. • Some foods cook up 25 to make the changes. Press UPPER OVEN 2. The added conv convert option will also beep at regular intervals until baking has finished. When baking with cook time the time remaining will indicate the oven is 75% complete. Setting Oven Controls 25 Using convection convert Setting convection convert...
... using the convection bake feature. Press START Once START is pressed the oven display shows PRE-HEATING. will cook faster. 4. Step EExxaammpplele Press • Superior multiple oven rack performance. • Some foods cook up 25 to make the changes. Press UPPER OVEN 2. The added conv convert option will also beep at regular intervals until baking has finished. When baking with cook time the time remaining will indicate the oven is 75% complete. Setting Oven Controls 25 Using convection convert Setting convection convert...

Use and Care Manual
Page 26
... the cook time or end time keys needed to rapidly roast meats and poultry. Meats cooked with the convection fan and element to make the changes. For best results • Preheating is not necessary for most meats and poultry. • Place food items using the recommended rack positions for additional information -p. 27, Fig. 2. 26 Setting Oven Controls About convection roast Setting convection roast How convection roast works Convection roast is part...
... the cook time or end time keys needed to rapidly roast meats and poultry. Meats cooked with the convection fan and element to make the changes. For best results • Preheating is not necessary for most meats and poultry. • Place food items using the recommended rack positions for additional information -p. 27, Fig. 2. 26 Setting Oven Controls About convection roast Setting convection roast How convection roast works Convection roast is part...
Use and Care Manual
Page 56
... glass shield must be reset. 56 Care and Cleaning Special door care instructions Changing upper oven lights IMPORTANT Most oven doors contain glass that can break. Remove upper oven interior light shield as illustrated below. 3. Turn electrical power off at the rear of the oven door or glass. • Never clean the oven door gasket. Read the following recommendations: • Do not close the oven door until all parts are fully inserted and retracted to cover the new bulb when installing. 4. The oven door glass...
... glass shield must be reset. 56 Care and Cleaning Special door care instructions Changing upper oven lights IMPORTANT Most oven doors contain glass that can break. Remove upper oven interior light shield as illustrated below. 3. Turn electrical power off at the rear of the oven door or glass. • Never clean the oven door gasket. Read the following recommendations: • Do not close the oven door until all parts are fully inserted and retracted to cover the new bulb when installing. 4. The oven door glass...
Use and Care Manual
Page 59
... power cord is plugged correctly into electrical outlet. • Service wiring is unavoidable due to the set properly for the desired function. Call your dealer, installing agent or authorized service agent. • Electrical power outage. Allow the oven to preheat to salt air. • Be sure the oven controls are set temperature before placing food in the Setting Your Preferences section of this Use & Care Guide. Try adjusting the recipe's recommended temperature or baking time. Oven does not operate...
... power cord is plugged correctly into electrical outlet. • Service wiring is unavoidable due to the set properly for the desired function. Call your dealer, installing agent or authorized service agent. • Electrical power outage. Allow the oven to preheat to salt air. • Be sure the oven controls are set temperature before placing food in the Setting Your Preferences section of this Use & Care Guide. Try adjusting the recipe's recommended temperature or baking time. Oven does not operate...
Use and Care Manual
Page 60
... service. Regular cleaning is closed when broiling. • Meat too close to the broil burner. Press CANCEL to provide proper clearance between the meat & the element. 60 Solutions to Common Problems Problem Oven smokes excessively during broiling Flames inside oven or smoking from meat. Reposition the broil rack to clear the display & stop beeping. Remove excess fat from oven vent Oven control panel beeps & displays any F code error (for the time of grease left on oven surfaces...
... service. Regular cleaning is closed when broiling. • Meat too close to the broil burner. Press CANCEL to provide proper clearance between the meat & the element. 60 Solutions to Common Problems Problem Oven smokes excessively during broiling Flames inside oven or smoking from meat. Reposition the broil rack to clear the display & stop beeping. Remove excess fat from oven vent Oven control panel beeps & displays any F code error (for the time of grease left on oven surfaces...

Use and Care Manual
Page 63
... cannot be obtained by this warranty must be defective in materials or workmanship when such appliance is warranted by unauthorized service companies; Labor or in accordance with the provided instructions. Obligations for service and parts under this warranty must be readily determined. 2. Electrolux authorizes no person to repair or replace appliance light bulbs, air filters, water filters, other consumables, or knobs, handles, or other cosmetic...
... cannot be obtained by this warranty must be defective in materials or workmanship when such appliance is warranted by unauthorized service companies; Labor or in accordance with the provided instructions. Obligations for service and parts under this warranty must be readily determined. 2. Electrolux authorizes no person to repair or replace appliance light bulbs, air filters, water filters, other consumables, or knobs, handles, or other cosmetic...


